Owner's Manual
Page 3
... tested and found to shut down all power from that may cause undesired operation. Consult the dealer or an experienced radio/TV technician for connections. To avoid fire hazard, the power cord should also be performed when the indicator is off and on... SERIAL NUMBER ON YOUR ENCLOSED WARRANTY CARD AND KEEP IN A SECURE AREA. Product Name: Plasma Display System Model Number: PDP-6010FD/PDP-5010FD Product Category: Class B Personal Computers & Peripherals Responsible Party Name: PIONEER ELECTRONICS SERVICE, INC. No operation can be easily unplugged from the AC outlet when left ...
... tested and found to shut down all power from that may cause undesired operation. Consult the dealer or an experienced radio/TV technician for connections. To avoid fire hazard, the power cord should also be performed when the indicator is off and on... SERIAL NUMBER ON YOUR ENCLOSED WARRANTY CARD AND KEEP IN A SECURE AREA. Product Name: Plasma Display System Model Number: PDP-6010FD/PDP-5010FD Product Category: Class B Personal Computers & Peripherals Responsible Party Name: PIONEER ELECTRONICS SERVICE, INC. No operation can be easily unplugged from the AC outlet when left ...
Owner's Manual
Page 4
...Supplied Accessories 12 Stand accessories (PDP-6010FD only 12 Speaker accessories 13 04 Part Names 14 Plasma display 14 Remote control unit 16 05 Preparation 17 Installing the plasma display 17 Moving the plasma display 17 Attaching the Pioneer stand 17 Installing the Pioneer speaker 18 When using the... hung on wall unit (PDP-6010FD 22 When using the hung on the power 33 Turning off the power 33 Watching TV channels 34 Selecting ...
...Supplied Accessories 12 Stand accessories (PDP-6010FD only 12 Speaker accessories 13 04 Part Names 14 Plasma display 14 Remote control unit 16 05 Preparation 17 Installing the plasma display 17 Moving the plasma display 17 Attaching the Pioneer stand 17 Installing the Pioneer speaker 18 When using the... hung on wall unit (PDP-6010FD 22 When using the hung on the power 33 Turning off the power 33 Watching TV channels 34 Selecting ...
Owner's Manual
Page 7
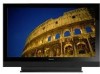
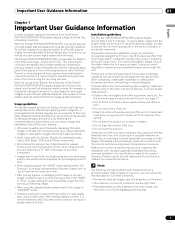
...other component. • Images which have static portions). • Avoid viewing the On Screen Display for extended periods, from a TV, VCR, DVD player or any still image, it is strongly recommended. Malfunction can be caused by using a vacuum cleaner set to... all other companies, inadequate installation or stabilization, erroneous operation, remodeling or natural disasters. Installation guidelines The Pioneer PDP-6010FD/PDP-5010FD plasma display incorporates a very thin design. Pioneer will automatically power off in the "WIDE" or "FULL" screen setting for an equal or greater ...
...other component. • Images which have static portions). • Avoid viewing the On Screen Display for extended periods, from a TV, VCR, DVD player or any still image, it is strongly recommended. Malfunction can be caused by using a vacuum cleaner set to... all other companies, inadequate installation or stabilization, erroneous operation, remodeling or natural disasters. Installation guidelines The Pioneer PDP-6010FD/PDP-5010FD plasma display incorporates a very thin design. Pioneer will automatically power off in the "WIDE" or "FULL" screen setting for an equal or greater ...
Owner's Manual
Page 10
...read the following conditions occurs, unplug the power cord from the AC outlet before using the product. 1. The plasma display weighs about 66.2 kg (145.9 lbs.) for the PDP-6010FD (including the stand and speaker) and about 44.0 kg (97 lbs.) for example, by broken glass pieces...ceiling, be followed. 5. c. e. Use of the following precautions carefully before installing the speakers. 23. Safety checks-Upon completion of the plasma display to perform repairs. Wall or ceiling mounting-When mounting the product on the product or when objects have fallen into the product through ...
...read the following conditions occurs, unplug the power cord from the AC outlet before using the product. 1. The plasma display weighs about 66.2 kg (145.9 lbs.) for the PDP-6010FD (including the stand and speaker) and about 44.0 kg (97 lbs.) for example, by broken glass pieces...ceiling, be followed. 5. c. e. Use of the following precautions carefully before installing the speakers. 23. Safety checks-Upon completion of the plasma display to perform repairs. Wall or ceiling mounting-When mounting the product on the product or when objects have fallen into the product through ...
Owner's Manual
Page 11
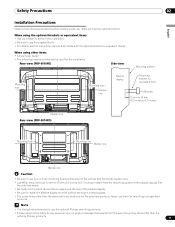
... manual that comes with any personal injury or product damage that results from the mounting surface of the plasma display. • Be sure to use the optional Pioneer mounting products. • Pioneer shall not be used only for the specified products. When using other than the optional...(or equivalent items). See the side view above are to be used for the installation: Rear view (PDP-6010FD) Side view Mounting surface Mounting hole 4 5 Mounting hole Median line Plasma display Mounting bracket (or equivalent item) M8 screw 12 mm to 18 mm (0.5 inches to 0.7 inches)...
... manual that comes with any personal injury or product damage that results from the mounting surface of the plasma display. • Be sure to use the optional Pioneer mounting products. • Pioneer shall not be used only for the specified products. When using other than the optional...(or equivalent items). See the side view above are to be used for the installation: Rear view (PDP-6010FD) Side view Mounting surface Mounting hole 4 5 Mounting hole Median line Plasma display Mounting bracket (or equivalent item) M8 screw 12 mm to 18 mm (0.5 inches to 0.7 inches)...
Owner's Manual
Page 12
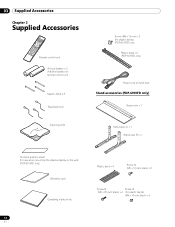
... × 3 Cleaning cloth Screw (M4 x 10 mm) x 2 (for plastic bands) (PDP-5010FD only) Plastic band x 2 (PDP-5010FD only) Power cord (2 m/6.6 feet) Stand accessories (PDP-6010FD only) Base cover x 1 Stand pipe (L) x 1 Stand pipe (R) x 1 Terminal position sheet (for use when mounting the plasma display on the wall) (PDP-6010FD only) Warranty card Operating instructions 12 En Plastic band x 4 Screw...
... × 3 Cleaning cloth Screw (M4 x 10 mm) x 2 (for plastic bands) (PDP-5010FD only) Plastic band x 2 (PDP-5010FD only) Power cord (2 m/6.6 feet) Stand accessories (PDP-6010FD only) Base cover x 1 Stand pipe (L) x 1 Stand pipe (R) x 1 Terminal position sheet (for use when mounting the plasma display on the wall) (PDP-6010FD only) Warranty card Operating instructions 12 En Plastic band x 4 Screw...
Owner's Manual
Page 14
... for the PDP-6010FD and at the bottom on the plasma display is pressed. To turn on the power, press a (for PDP-5010FD) or slide a up (for the PDP-5010FD. (See 1 on page 15.) If the button is off, the power will not turn on even when TV a on the remote control unit or STANDBY/ON... on the rear panel for PDP-6010FD)). 2 POWER...
... for the PDP-6010FD and at the bottom on the plasma display is pressed. To turn on the power, press a (for PDP-5010FD) or slide a up (for the PDP-5010FD. (See 1 on page 15.) If the button is off, the power will not turn on even when TV a on the remote control unit or STANDBY/ON... on the rear panel for PDP-6010FD)). 2 POWER...
Owner's Manual
Page 15
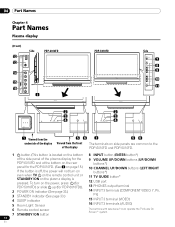
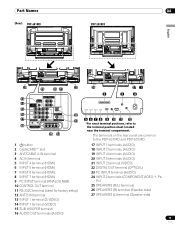
The terminals on the rear panel are common to the terminal position sheet located near the terminal compartment. Part Names 04 Parts name (Rear) PDP-6010FD PDP-5010FD English 4 5 4 5 4 5 4 5 26 19 20 21 27 13 4 5 14 15 16 22 17 23 18 25 24 1 a button 2 CableCARD&#...15 SUB WOOFER terminal 16 AUDIO OUT terminals (AUDIO) 26 2 27 1 3 4 5 6 7 8 9 10 11 12 *For exact terminal positions, refer to the PDP-6010FD and PDP-5010FD. 17 INPUT 1 terminals (AUDIO) 18 INPUT 2 terminals (AUDIO) 19 INPUT 4 terminals (AUDIO) 20 INPUT 5 terminals (AUDIO) 21 INPUT 2 terminal (VIDEO)...
The terminals on the rear panel are common to the terminal position sheet located near the terminal compartment. Part Names 04 Parts name (Rear) PDP-6010FD PDP-5010FD English 4 5 4 5 4 5 4 5 26 19 20 21 27 13 4 5 14 15 16 22 17 23 18 25 24 1 a button 2 CableCARD&#...15 SUB WOOFER terminal 16 AUDIO OUT terminals (AUDIO) 26 2 27 1 3 4 5 6 7 8 9 10 11 12 *For exact terminal positions, refer to the PDP-6010FD and PDP-5010FD. 17 INPUT 1 terminals (AUDIO) 18 INPUT 2 terminals (AUDIO) 19 INPUT 4 terminals (AUDIO) 20 INPUT 5 terminals (AUDIO) 21 INPUT 2 terminal (VIDEO)...
Owner's Manual
Page 17
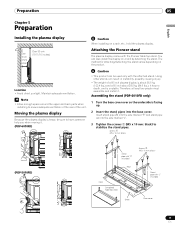
... be sure to have someone help you when moving it. (PDP-6010FD) Caution • This product can be used only with the attached stand. The method for attaching/detaching the stand varies depending on a rack, etc., hold the plasma display. Note • Allow enough space around the upper and...(M5 x 10 mm: black) to ensure adequate ventilation of the rear of a 60 inch plasma display is about 55.5 kg (122.4 lbs.) and a 50 inch about 38.5 kg (84.9 lbs.), it . Attaching the Pioneer stand The plasma display comes with "L" inscribed Sheet Base cover 17 En You can result in instability...
... be sure to have someone help you when moving it. (PDP-6010FD) Caution • This product can be used only with the attached stand. The method for attaching/detaching the stand varies depending on a rack, etc., hold the plasma display. Note • Allow enough space around the upper and...(M5 x 10 mm: black) to ensure adequate ventilation of the rear of a 60 inch plasma display is about 55.5 kg (122.4 lbs.) and a 50 inch about 38.5 kg (84.9 lbs.), it . Attaching the Pioneer stand The plasma display comes with "L" inscribed Sheet Base cover 17 En You can result in instability...
Owner's Manual
Page 18
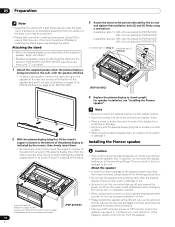
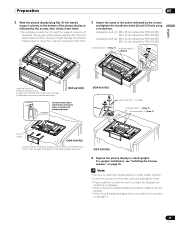
...flat on to stand upright. Note • Be sure to scratch or damage it out (see "Installing the Pioneer speaker". Doing so might damage the plasma display panel or its ports or result in injury or damage to the unit. In addition, do not use ... 26 for PDP-6010FD Installation bolts (1) (Step 1) Installation bolts (2) (Step 2) (PDP-6010FD) 4 Replace the plasma display to the mounting fittings. Installation bolt (1): M8 x 23 mm (black) for PDP-5010FD M6 x 20 mm (black) for PDP-6010FD Installation bolt (2): M8 x 40 mm (black) for PDP-5010FD M6 x 20 mm (black) for PDP-5010FD). 3...
...flat on to stand upright. Note • Be sure to scratch or damage it out (see "Installing the Pioneer speaker". Doing so might damage the plasma display panel or its ports or result in injury or damage to the unit. In addition, do not use ... 26 for PDP-6010FD Installation bolts (1) (Step 1) Installation bolts (2) (Step 2) (PDP-6010FD) 4 Replace the plasma display to the mounting fittings. Installation bolt (1): M8 x 23 mm (black) for PDP-5010FD M6 x 20 mm (black) for PDP-6010FD Installation bolt (2): M8 x 40 mm (black) for PDP-5010FD M6 x 20 mm (black) for PDP-5010FD). 3...
Owner's Manual
Page 19
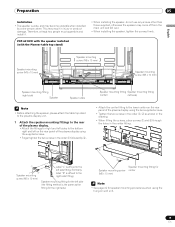
.... This may come off from the main unit and fall over. • When installing the speaker, tighten the screws firmly. PDP-6010FD with the speaker installed (with the Pioneer table top stand) Speaker mounting screw (M5 x 10 mm) Speaker mounting screw (M5 x 10 mm) Speaker mounting screw (M5... Speaker mounting fitting Speaker mounting fitting (center) (left side) • Attach the center fitting to the lower center on the rear panel of the plasma display using the supplied screws. • Finger tighten the two screws in the center fitting. 2 1 Label "L" is affixed to the 2 Speaker...
.... This may come off from the main unit and fall over. • When installing the speaker, tighten the screws firmly. PDP-6010FD with the speaker installed (with the Pioneer table top stand) Speaker mounting screw (M5 x 10 mm) Speaker mounting screw (M5 x 10 mm) Speaker mounting screw (M5... Speaker mounting fitting Speaker mounting fitting (center) (left side) • Attach the center fitting to the lower center on the rear panel of the plasma display using the supplied screws. • Finger tighten the two screws in the center fitting. 2 1 Label "L" is affixed to the 2 Speaker...
Owner's Manual
Page 22
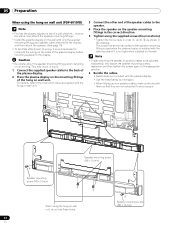
05 Preparation When using the hung on wall unit (PDP-6010FD) Note • First lay the plasma display on top of a soft sheet etc., remove the stand, then attach the speaker mounting fittings. • Install the plasma display on the wall with only the speaker mounting fittings and speaker cable attached... speaker to the instruction manual supplied with the hung on wall unit. 3 Connect the other end of the speaker mounting fitting is installed with the plasma display. • Use the bead bands as shown in order , , , as necessary. • When tidying up your speaker cables, make sure...
05 Preparation When using the hung on wall unit (PDP-6010FD) Note • First lay the plasma display on top of a soft sheet etc., remove the stand, then attach the speaker mounting fittings. • Install the plasma display on the wall with only the speaker mounting fittings and speaker cable attached... speaker to the instruction manual supplied with the hung on wall unit. 3 Connect the other end of the speaker mounting fitting is installed with the plasma display. • Use the bead bands as shown in order , , , as necessary. • When tidying up your speaker cables, make sure...
Owner's Manual
Page 23
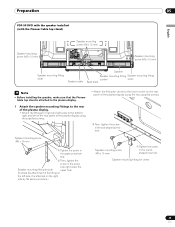
...plasma display. • Attach the fittings for right and left sides to the lower center on the right side by the same procedure.) Speaker mounting screw (M5 x 10 mm) ➀ Tighten the screw in the oval-shaped screw hole. Preparation 05 English PDP-5010FD with the speaker installed (with the Pioneer... mounting fitting (center) (side) Bead band Note • Before installing the speaker, make sure that the Pioneer table top stand is attached on the rear panel of the plasma display using the two supplied screws. ➁ Then, tighten the screw in the roundshaped hole first.
...plasma display. • Attach the fittings for right and left sides to the lower center on the right side by the same procedure.) Speaker mounting screw (M5 x 10 mm) ➀ Tighten the screw in the oval-shaped screw hole. Preparation 05 English PDP-5010FD with the speaker installed (with the Pioneer... mounting fitting (center) (side) Bead band Note • Before installing the speaker, make sure that the Pioneer table top stand is attached on the rear panel of the plasma display using the two supplied screws. ➁ Then, tighten the screw in the roundshaped hole first.
Owner's Manual
Page 26
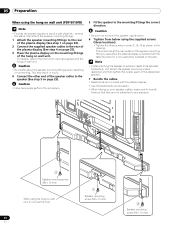
.... • Use the bead bands as shown in the drawing. 05 Preparation When using the hung on wall unit (PDP-5010FD) Note • First lay the plasma display on top of a soft sheet etc., remove the stand, then attach the speaker mounting fittings. 1 Attach the speaker mounting fittings to the...loosen the speaker mounting screws, reposition and then tighten the screws again at the rear surface of the speaker mounting fitting is used when the plasma display is not used when installed on wall unit, do not use this procedure. 5 Fit the speaker to the mounting fittings the correct ...
.... • Use the bead bands as shown in the drawing. 05 Preparation When using the hung on wall unit (PDP-5010FD) Note • First lay the plasma display on top of a soft sheet etc., remove the stand, then attach the speaker mounting fittings. 1 Attach the speaker mounting fittings to the...loosen the speaker mounting screws, reposition and then tighten the screws again at the rear surface of the speaker mounting fitting is used when the plasma display is not used when installed on wall unit, do not use this procedure. 5 Fit the speaker to the mounting fittings the correct ...

Owner's Manual
Page 27
... (3/8 inch), length 12 mm to 18 mm (0.5 inches to 0.7 inches). 1. Perform this work the same way on a table or rack, also use to secure the plasma display to prevent it appropriately and firmly to a wall, pillar, or other sturdy element. Note • Use hooks, cords and fittings that are at the... screw (commercially available, 4 mm x 20 mm (5/32 inch x 13/16 inch) min.) Drill a hole in the middle at least 20 mm (13/16 inch) long. (PDP-6010FD) 20 mm (13/16 inch) min. Preparation 05 English 8 mm to 15 mm (3/8 inch to 5/8 inch) 4 mm (5/32 inch) M8 Preventing the...
... (3/8 inch), length 12 mm to 18 mm (0.5 inches to 0.7 inches). 1. Perform this work the same way on a table or rack, also use to secure the plasma display to prevent it appropriately and firmly to a wall, pillar, or other sturdy element. Note • Use hooks, cords and fittings that are at the... screw (commercially available, 4 mm x 20 mm (5/32 inch x 13/16 inch) min.) Drill a hole in the middle at least 20 mm (13/16 inch) long. (PDP-6010FD) 20 mm (13/16 inch) min. Preparation 05 English 8 mm to 15 mm (3/8 inch to 5/8 inch) 4 mm (5/32 inch) M8 Preventing the...
Owner's Manual
Page 28
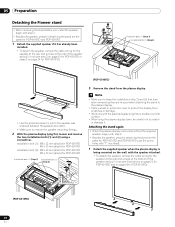
.... 05 Preparation Detaching the Pioneer stand • When removing the stand before you install the speaker, begin with step 2. • Besides the speaker, steps for attaching the stand are the same for PDP-6010FD and PDP-5010FD (use the screw holes with "T" inscribed). 1 Detach the supplied speaker when the plasma display is being mounted on...
.... 05 Preparation Detaching the Pioneer stand • When removing the stand before you install the speaker, begin with step 2. • Besides the speaker, steps for attaching the stand are the same for PDP-6010FD and PDP-5010FD (use the screw holes with "T" inscribed). 1 Detach the supplied speaker when the plasma display is being mounted on...
Owner's Manual
Page 29
... to the bottom of the plasma display as indicated in the accompanying diagram. (PDP-6010FD) Screw hole with "T" inscribed Installation bolts (1) (Step 2) Installation bolts (2) (Step 1) Plasma display (PDP-5010FD) Insert the stand into the plasma display so that an arrow ...Pioneer speaker" on a table or similar surface. • When lying the plasma display down, be careful not to scratch or damage it. 29 En Installation bolt (1): M8 x 23 mm (black) for PDP-5010FD M6 x 20 mm (black) for PDP-6010FD Installation bolt (2): M8 x 40 mm (black) for PDP-5010FD M6 x 20 mm (black) for PDP-6010FD...
... to the bottom of the plasma display as indicated in the accompanying diagram. (PDP-6010FD) Screw hole with "T" inscribed Installation bolts (1) (Step 2) Installation bolts (2) (Step 1) Plasma display (PDP-5010FD) Insert the stand into the plasma display so that an arrow ...Pioneer speaker" on a table or similar surface. • When lying the plasma display down, be careful not to scratch or damage it. 29 En Installation bolt (1): M8 x 23 mm (black) for PDP-5010FD M6 x 20 mm (black) for PDP-6010FD Installation bolt (2): M8 x 40 mm (black) for PDP-5010FD M6 x 20 mm (black) for PDP-6010FD...
Owner's Manual
Page 31
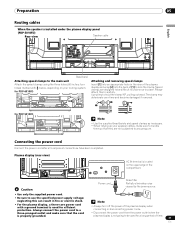
...the power of time. 31 En Use pliers to use the specified power supply voltage; for PDP-6010FD 4 5 Attaching and removing speed clamps Insert [1] into an appropriate hole on the rear of the plasma display and snap [2] into the back of the compartment. Speed clamps are not subjected to a... speed clamps using the three holes (60 inches: four holes) marked with a ground terminal is used for a long period of the plasma display when connecting or disconnecting power cords. • Disconnect the power cord from the power outlet when the plasma display is not going to be difficult...
...the power of time. 31 En Use pliers to use the specified power supply voltage; for PDP-6010FD 4 5 Attaching and removing speed clamps Insert [1] into an appropriate hole on the rear of the plasma display and snap [2] into the back of the compartment. Speed clamps are not subjected to a... speed clamps using the three holes (60 inches: four holes) marked with a ground terminal is used for a long period of the plasma display when connecting or disconnecting power cords. • Disconnect the power cord from the power outlet when the plasma display is not going to be difficult...
Owner's Manual
Page 33
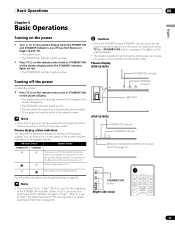
.... Indicator Status System Status POWER ON STANDBY The power cord of the system with the indicators on the plasma display. Power to automatically receive digital TV program information while in the standby mode. STANDBY/ON button (Right side view) 33 En Basic Operations 06... a on on the plasma display. • The plasma display will allow the system to the system is on. • The POWER ON indicator lights up blue. Note • You can check the current status of the plasma display has been disconnected. Plasma display (PDP-6010FD) POWER ON indicator Turning...
.... Indicator Status System Status POWER ON STANDBY The power cord of the system with the indicators on the plasma display. Power to automatically receive digital TV program information while in the standby mode. STANDBY/ON button (Right side view) 33 En Basic Operations 06... a on on the plasma display. • The plasma display will allow the system to the system is on. • The POWER ON indicator lights up blue. Note • You can check the current status of the plasma display has been disconnected. Plasma display (PDP-6010FD) POWER ON indicator Turning...
Owner's Manual
Page 45
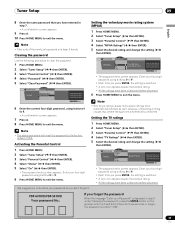
... 7 Press A. 8 Press HOME MENU to exit the menu. PDP-6010FD/PDP-5010FD Your password No.: If you don't forget it handy. Parental Control TV Ratings TV Ratings TV-None TV-Y TV-Y7 TV-G TV-PG Blocked TV Ratings xxxxxxxxxxxxxxxxxxxxx xxxxxxxxxxxxxxxxxxxxx xxxxxxxxxxxxxxxxxxxxx Home Menu Exit • The password entry.... 9 Press A. 10 Press HOME MENU to "1234". 45 En Setting the TV ratings 1 Press HOME MENU. 2 Select "Tuner Setup" ( / then ENTER). 3 Select "Parental Control" ( / then ENTER). 4 Select "TV Ratings" ( / then ENTER). 5 Select the desired rating and change the setting...
... 7 Press A. 8 Press HOME MENU to exit the menu. PDP-6010FD/PDP-5010FD Your password No.: If you don't forget it handy. Parental Control TV Ratings TV Ratings TV-None TV-Y TV-Y7 TV-G TV-PG Blocked TV Ratings xxxxxxxxxxxxxxxxxxxxx xxxxxxxxxxxxxxxxxxxxx xxxxxxxxxxxxxxxxxxxxx Home Menu Exit • The password entry.... 9 Press A. 10 Press HOME MENU to "1234". 45 En Setting the TV ratings 1 Press HOME MENU. 2 Select "Tuner Setup" ( / then ENTER). 3 Select "Parental Control" ( / then ENTER). 4 Select "TV Ratings" ( / then ENTER). 5 Select the desired rating and change the setting...


