Owner's Manual
Page 3
... governmental entities to cause cancer and birth defect or other equipment. Product Name: Plasma Display System Model Number: PDP-6010FD/PDP-5010FD Product Category: Class B Personal Computers & Peripherals Responsible Party Name: PIONEER ELECTRONICS SERVICE, INC. DOMINGUEZ ST., LONG BEACH, CA 90801-1760, U.S.A. THE...- Reorient or relocate the receiving antenna. - Consult the dealer or an experienced radio/TV technician for a Class B digital device, pursuant to +104 ˚F); However, the Plasma Display system will still consume some power as long as the power cord is inserted ...
... governmental entities to cause cancer and birth defect or other equipment. Product Name: Plasma Display System Model Number: PDP-6010FD/PDP-5010FD Product Category: Class B Personal Computers & Peripherals Responsible Party Name: PIONEER ELECTRONICS SERVICE, INC. DOMINGUEZ ST., LONG BEACH, CA 90801-1760, U.S.A. THE...- Reorient or relocate the receiving antenna. - Consult the dealer or an experienced radio/TV technician for a Class B digital device, pursuant to +104 ˚F); However, the Plasma Display system will still consume some power as long as the power cord is inserted ...
Owner's Manual
Page 4
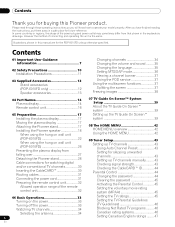
...Supplied Accessories 12 Stand accessories (PDP-6010FD only 12 Speaker accessories 13 04 Part Names 14 Plasma display 14 Remote control unit 16 05 Preparation 17 Installing the plasma display 17 Moving the plasma display 17 Attaching the Pioneer stand 17 Installing the Pioneer speaker 18 When using the... hung on wall unit (PDP-6010FD 22 When using the hung on the power 33 Turning off the power 33 Watching TV channels 34 Selecting ...
...Supplied Accessories 12 Stand accessories (PDP-6010FD only 12 Speaker accessories 13 04 Part Names 14 Plasma display 14 Remote control unit 16 05 Preparation 17 Installing the plasma display 17 Moving the plasma display 17 Attaching the Pioneer stand 17 Installing the Pioneer speaker 18 When using the... hung on wall unit (PDP-6010FD 22 When using the hung on the power 33 Turning off the power 33 Watching TV channels 34 Selecting ...
Owner's Manual
Page 7
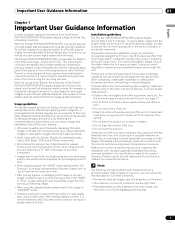
...in instability, and could result in the future during the manufacturing process and in possible malfunction. However, Pioneer cannot be installed by using the still picture mode from a TV, VCR, DVD player or any still image, it is best to view a normal moving pictures ..., experienced and qualified experts must install the unit. To ensure proper heat emission: • Distance the unit slightly from this Pioneer PDP-6010FD/PDP-5010FD plasma display, please first read and follow the usage guidelines below , you can be held responsible for accidents or malfunction caused by ...
...in instability, and could result in the future during the manufacturing process and in possible malfunction. However, Pioneer cannot be installed by using the still picture mode from a TV, VCR, DVD player or any still image, it is best to view a normal moving pictures ..., experienced and qualified experts must install the unit. To ensure proper heat emission: • Distance the unit slightly from this Pioneer PDP-6010FD/PDP-5010FD plasma display, please first read and follow the usage guidelines below , you can be held responsible for accidents or malfunction caused by ...
Owner's Manual
Page 10
... replacement parts specified by the manufacturer. generating products (including amplifiers). 10. This product is damaged. The screen may be followed. 5. The plasma display weighs about 66.2 kg (145.9 lbs.) for the PDP-6010FD (including the stand and speaker) and about 44.0 kg (97 lbs.) for built-in a wet basement. 8. However, improper use the...
... replacement parts specified by the manufacturer. generating products (including amplifiers). 10. This product is damaged. The screen may be followed. 5. The plasma display weighs about 66.2 kg (145.9 lbs.) for the PDP-6010FD (including the stand and speaker) and about 44.0 kg (97 lbs.) for built-in a wet basement. 8. However, improper use the...
Owner's Manual
Page 11
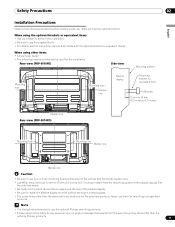
...Pioneer products. 11 En See the side view above are to be liable for mounting non-specified products. Safety Precautions 02 English Installation Precautions Observe the following mounting holes can be used only for the installation: Rear view (PDP-6010FD) Side view Mounting surface Mounting hole 4 5 Mounting hole Median line Plasma... display Mounting bracket (or equivalent item) M8 screw 12 mm to 18 mm (0.5 inches to 0.7 inches) Median line Rear view (PDP-5010FD) Mounting...
...Pioneer products. 11 En See the side view above are to be liable for mounting non-specified products. Safety Precautions 02 English Installation Precautions Observe the following mounting holes can be used only for the installation: Rear view (PDP-6010FD) Side view Mounting surface Mounting hole 4 5 Mounting hole Median line Plasma... display Mounting bracket (or equivalent item) M8 screw 12 mm to 18 mm (0.5 inches to 0.7 inches) Median line Rear view (PDP-5010FD) Mounting...
Owner's Manual
Page 12
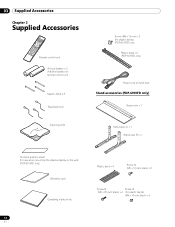
... × 3 Cleaning cloth Screw (M4 x 10 mm) x 2 (for plastic bands) (PDP-5010FD only) Plastic band x 2 (PDP-5010FD only) Power cord (2 m/6.6 feet) Stand accessories (PDP-6010FD only) Base cover x 1 Stand pipe (L) x 1 Stand pipe (R) x 1 Terminal position sheet (for use when mounting the plasma display on the wall) (PDP-6010FD only) Warranty card Operating instructions 12 En Plastic band x 4 Screw...
... × 3 Cleaning cloth Screw (M4 x 10 mm) x 2 (for plastic bands) (PDP-5010FD only) Plastic band x 2 (PDP-5010FD only) Power cord (2 m/6.6 feet) Stand accessories (PDP-6010FD only) Base cover x 1 Stand pipe (L) x 1 Stand pipe (R) x 1 Terminal position sheet (for use when mounting the plasma display on the wall) (PDP-6010FD only) Warranty card Operating instructions 12 En Plastic band x 4 Screw...
Owner's Manual
Page 14
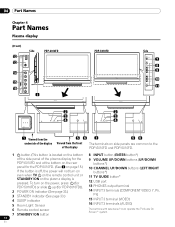
...TV a on the remote control unit or STANDBY/ON on the power, press a (for PDP-5010FD) or slide a up (for the PDP-5010FD. (See 1 on page 15.) If the button is off, the power will not turn on the plasma display is pressed. 04 Part Names Chapter 4 Part Names Plasma display (Front) Side 12 13 PDP-6010FD... button (This button is located on the bottom 8 INPUT button (ENTER button*) of the side panel of the plasma display for the PDP-6010FD and at the bottom on the rear panel for PDP-6010FD)). 2 POWER ON indicator (See page 33.) 3 STANDBY indicator (See page 33.) 4 SLEEP indicator 5 Room ...
...TV a on the remote control unit or STANDBY/ON on the power, press a (for PDP-5010FD) or slide a up (for the PDP-5010FD. (See 1 on page 15.) If the button is off, the power will not turn on the plasma display is pressed. 04 Part Names Chapter 4 Part Names Plasma display (Front) Side 12 13 PDP-6010FD... button (This button is located on the bottom 8 INPUT button (ENTER button*) of the side panel of the plasma display for the PDP-6010FD and at the bottom on the rear panel for PDP-6010FD)). 2 POWER ON indicator (See page 33.) 3 STANDBY indicator (See page 33.) 4 SLEEP indicator 5 Room ...
Owner's Manual
Page 15
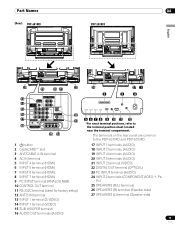
Part Names 04 Parts name (Rear) PDP-6010FD PDP-5010FD English 4 5 4 5 4 5 4 5 26 19 20 21 27 13 4 5 14 15 16 22 17 23 18 25 24 1 a button 2 CableCARD™ slot 3 ANT/CABLE A IN terminal 4 ... INPUT 1 terminal (VIDEO) 15 SUB WOOFER terminal 16 AUDIO OUT terminals (AUDIO) 26 2 27 1 3 4 5 6 7 8 9 10 11 12 *For exact terminal positions, refer to the PDP-6010FD and PDP-5010FD. 17 INPUT 1 terminals (AUDIO) 18 INPUT 2 terminals (AUDIO) 19 INPUT 4 terminals (AUDIO) 20 INPUT 5 terminals (AUDIO) 21 INPUT 2 terminal (VIDEO) 22 DIGITAL OUT terminal...
Part Names 04 Parts name (Rear) PDP-6010FD PDP-5010FD English 4 5 4 5 4 5 4 5 26 19 20 21 27 13 4 5 14 15 16 22 17 23 18 25 24 1 a button 2 CableCARD™ slot 3 ANT/CABLE A IN terminal 4 ... INPUT 1 terminal (VIDEO) 15 SUB WOOFER terminal 16 AUDIO OUT terminals (AUDIO) 26 2 27 1 3 4 5 6 7 8 9 10 11 12 *For exact terminal positions, refer to the PDP-6010FD and PDP-5010FD. 17 INPUT 1 terminals (AUDIO) 18 INPUT 2 terminals (AUDIO) 19 INPUT 4 terminals (AUDIO) 20 INPUT 5 terminals (AUDIO) 21 INPUT 2 terminal (VIDEO) 22 DIGITAL OUT terminal...
Owner's Manual
Page 17
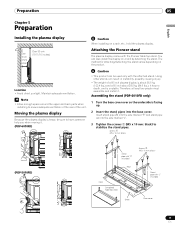
... 11/16 inches) Caution When installing on the product. Attaching the Pioneer stand The plasma display comes with the attached stand. Using other stands can result in...PDP-6010FD only) 1 Turn the base cover over so the underside is unstable. The method for attaching/detaching the stand varies depending on a rack, etc., hold the plasma display. Location • Avoid direct sunlight. Moving the plasma display Because the plasma... and back parts when installing to ensure adequate ventilation of the rear of a 60 inch plasma display is about 55.5 kg (122.4 lbs.) and a 50 inch about 38...
... 11/16 inches) Caution When installing on the product. Attaching the Pioneer stand The plasma display comes with the attached stand. Using other stands can result in...PDP-6010FD only) 1 Turn the base cover over so the underside is unstable. The method for attaching/detaching the stand varies depending on a rack, etc., hold the plasma display. Location • Avoid direct sunlight. Moving the plasma display Because the plasma... and back parts when installing to ensure adequate ventilation of the rear of a 60 inch plasma display is about 55.5 kg (122.4 lbs.) and a 50 inch about 38...
Owner's Manual
Page 18
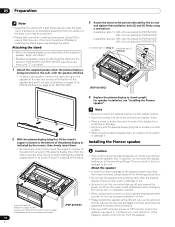
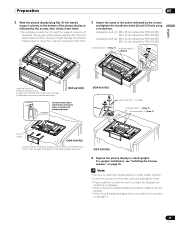
... order to prevent damage to the unit. Doing so may be careful not to scratch or damage it out (see "Installing the Pioneer speaker". If this happens, distance the monitor from scratches or damage. • Work only with a soft sheet placed under the base... bolt (1): M8 x 23 mm (black) for PDP-5010FD M6 x 20 mm (black) for PDP-6010FD Installation bolt (2): M8 x 40 mm (black) for PDP-5010FD M6 x 20 mm (black) for PDP-6010FD Installation bolts (1) (Step 1) Installation bolts (2) (Step 2) (PDP-6010FD) 4 Replace the plasma display to greatly emphasize treble sounds, do not move...
... order to prevent damage to the unit. Doing so may be careful not to scratch or damage it out (see "Installing the Pioneer speaker". If this happens, distance the monitor from scratches or damage. • Work only with a soft sheet placed under the base... bolt (1): M8 x 23 mm (black) for PDP-5010FD M6 x 20 mm (black) for PDP-6010FD Installation bolt (2): M8 x 40 mm (black) for PDP-5010FD M6 x 20 mm (black) for PDP-6010FD Installation bolts (1) (Step 1) Installation bolts (2) (Step 2) (PDP-6010FD) 4 Replace the plasma display to greatly emphasize treble sounds, do not move...
Owner's Manual
Page 19
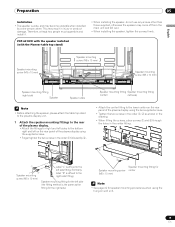
... wide, and may come off from the main unit and fall over. • When installing the speaker, tighten the screws firmly. PDP-6010FD with the speaker installed (with the Pioneer table top stand) Speaker mounting screw (M5 x 10 mm) Speaker mounting screw (M5 x 10 mm) Speaker mounting screw (M5 ... fitting Speaker mounting fitting (center) (left side) • Attach the center fitting to the lower center on the rear panel of the plasma display. • Attach the fittings for speaker mounting procedures when using the supplied screws. • Finger tighten the two screws in the order...
... wide, and may come off from the main unit and fall over. • When installing the speaker, tighten the screws firmly. PDP-6010FD with the speaker installed (with the Pioneer table top stand) Speaker mounting screw (M5 x 10 mm) Speaker mounting screw (M5 x 10 mm) Speaker mounting screw (M5 ... fitting Speaker mounting fitting (center) (left side) • Attach the center fitting to the lower center on the rear panel of the plasma display. • Attach the fittings for speaker mounting procedures when using the supplied screws. • Finger tighten the two screws in the order...
Owner's Manual
Page 22
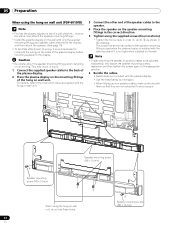
.... 6 Bundle the cables. • Bead bands are not subjected to any pressure. It is recommended to complete the wiring on the sides of the plasma display before mounting speaker to the display. Speaker mounting screw (M5 x 10 mm) 4 Speaker mounting screw (M5 x 10 mm) 2 1 When using...• Be careful about the speaker mounting fittings when installing or connecting. 05 Preparation When using the hung on wall unit (PDP-6010FD) Note • First lay the plasma display on top of a soft sheet etc., remove the stand, then attach the speaker mounting fittings. • Install the...
.... 6 Bundle the cables. • Bead bands are not subjected to any pressure. It is recommended to complete the wiring on the sides of the plasma display before mounting speaker to the display. Speaker mounting screw (M5 x 10 mm) 4 Speaker mounting screw (M5 x 10 mm) 2 1 When using...• Be careful about the speaker mounting fittings when installing or connecting. 05 Preparation When using the hung on wall unit (PDP-6010FD) Note • First lay the plasma display on top of a soft sheet etc., remove the stand, then attach the speaker mounting fittings. • Install the...
Owner's Manual
Page 23
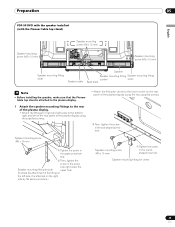
... side upper hole. (It shows the attachment of the plasma display using the supplied screws. • Attach the fitting for center to the bottom right and left side. Preparation 05 English PDP-5010FD with the speaker installed (with the Pioneer table top stand) Speaker mounting screw (M5 x 10 mm...Speaker mounting fitting (center) (side) Bead band Note • Before installing the speaker, make sure that the Pioneer table top stand is attached on the rear panel of the plasma display using the two supplied screws. ➁ Then, tighten the screw in the oval-shaped screw hole. ...
... side upper hole. (It shows the attachment of the plasma display using the supplied screws. • Attach the fitting for center to the bottom right and left side. Preparation 05 English PDP-5010FD with the speaker installed (with the Pioneer table top stand) Speaker mounting screw (M5 x 10 mm...Speaker mounting fitting (center) (side) Bead band Note • Before installing the speaker, make sure that the Pioneer table top stand is attached on the rear panel of the plasma display using the two supplied screws. ➁ Then, tighten the screw in the oval-shaped screw hole. ...
Owner's Manual
Page 26
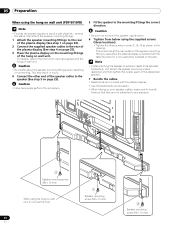
05 Preparation When using the hung on wall unit (PDP-5010FD) Note • First lay the plasma display on top of a soft sheet etc., remove the stand, then attach the speaker mounting fittings. 1 Attach the speaker mounting fittings to the rear of the plasma display (See step 1 on page 23). 2 Connect ... this hole. 1 Speaker mounting screw (M5 x 10 mm) 26 En 2 Speaker mounting screw (M5 x 10 mm) It is not used when the plasma display is used when installed on wall unit. For details, refer to be adjusted horizontally, first loosen the speaker mounting screws, reposition and then tighten...
05 Preparation When using the hung on wall unit (PDP-5010FD) Note • First lay the plasma display on top of a soft sheet etc., remove the stand, then attach the speaker mounting fittings. 1 Attach the speaker mounting fittings to the rear of the plasma display (See step 1 on page 23). 2 Connect ... this hole. 1 Speaker mounting screw (M5 x 10 mm) 26 En 2 Speaker mounting screw (M5 x 10 mm) It is not used when the plasma display is used when installed on wall unit. For details, refer to be adjusted horizontally, first loosen the speaker mounting screws, reposition and then tighten...

Owner's Manual
Page 27
...cords and other fittings that are at the rear of accidents. • If you do not take these precautions, the plasma display could fall over After installing the stand, be attached. • Select the appropriate screws, hooks, cords, and... mm (5/32 inch x 13/16 inch) min.) Using a wall for stabilization 1 Attach falling prevention bolts (hooks) to the plasma display. 2 Use strong cords to stabilize it will vary according to the composition and thickness of the tabletop panel before using a ... the middle at least 20 mm (13/16 inch) long. (PDP-6010FD) 20 mm (13/16 inch) min.
...cords and other fittings that are at the rear of accidents. • If you do not take these precautions, the plasma display could fall over After installing the stand, be attached. • Select the appropriate screws, hooks, cords, and... mm (5/32 inch x 13/16 inch) min.) Using a wall for stabilization 1 Attach falling prevention bolts (hooks) to the plasma display. 2 Use strong cords to stabilize it will vary according to the composition and thickness of the tabletop panel before using a ... the middle at least 20 mm (13/16 inch) long. (PDP-6010FD) 20 mm (13/16 inch) min.
Owner's Manual
Page 28
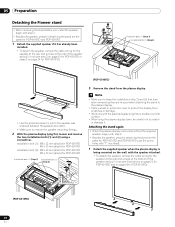
... or protective cover to protect the display from the plasma display. 05 Preparation Detaching the Pioneer stand • When removing the stand before you install the speaker, begin with step 2. • Besides the speaker, steps for attaching the stand are the same for PDP-6010FD and PDP-5010FD (use the screw holes with "T" inscribed). 1 Detach...
... or protective cover to protect the display from the plasma display. 05 Preparation Detaching the Pioneer stand • When removing the stand before you install the speaker, begin with step 2. • Besides the speaker, steps for attaching the stand are the same for PDP-6010FD and PDP-5010FD (use the screw holes with "T" inscribed). 1 Detach...
Owner's Manual
Page 29
... sheet or protective cover to scratch or damage it. 29 En For speaker installation, see "Installing the Pioneer speaker" on a table or similar surface. • When lying the plasma display down, be careful not to protect the display from scratches or damage. • Work only with...bolt (1): M8 x 23 mm (black) for PDP-5010FD M6 x 20 mm (black) for PDP-6010FD Installation bolt (2): M8 x 40 mm (black) for PDP-5010FD M6 x 20 mm (black) for PDP-6010FD Installation bolts (1) (Step 1) Installation bolts (2) (Step 2) Insert the stand into the plasma display so that an arrow with "FRONT/FACE ...
... sheet or protective cover to scratch or damage it. 29 En For speaker installation, see "Installing the Pioneer speaker" on a table or similar surface. • When lying the plasma display down, be careful not to protect the display from scratches or damage. • Work only with...bolt (1): M8 x 23 mm (black) for PDP-5010FD M6 x 20 mm (black) for PDP-6010FD Installation bolt (2): M8 x 40 mm (black) for PDP-5010FD M6 x 20 mm (black) for PDP-6010FD Installation bolts (1) (Step 1) Installation bolts (2) (Step 2) Insert the stand into the plasma display so that an arrow with "FRONT/FACE ...
Owner's Manual
Page 31
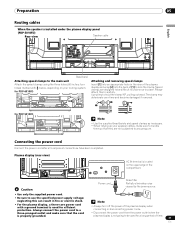
for PDP-6010FD 4 5 Attaching and removing speed clamps Insert [1] into an appropriate hole on the rear of the plasma display and snap [2] into the back of [1] to use the specified power supply voltage; Please attach them so that the cord is properly grounded. Caution &#... panel (PDP-5010FD) Rear view Speaker cable 4 5 Bead band Attaching speed clamps to the main unit Attach the speed clamps using the three holes (60 inches: four holes) marked with a ground terminal is used for a long period of time. 31 En Speed clamps are not subjected to twist the clamp ...
for PDP-6010FD 4 5 Attaching and removing speed clamps Insert [1] into an appropriate hole on the rear of the plasma display and snap [2] into the back of [1] to use the specified power supply voltage; Please attach them so that the cord is properly grounded. Caution &#... panel (PDP-5010FD) Rear view Speaker cable 4 5 Bead band Attaching speed clamps to the main unit Attach the speed clamps using the three holes (60 inches: four holes) marked with a ground terminal is used for a long period of time. 31 En Speed clamps are not subjected to twist the clamp ...
Owner's Manual
Page 33
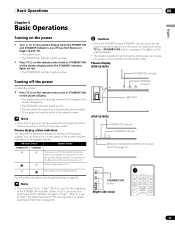
...view) 33 En Caution • While the POWER ON and STANDBY indicators are not going to standby mode) 1 Press TV a on the remote control unit or STANDBY/ON on the plasma display. • The system enters the standby mode and the image on page 69. For details, see Blue LED Dimmer... on the screen disappears. • The STANDBY indicator lights up blue. Plasma display (PDP-6010FD) POWER ON indicator Turning off , the system cannot be placed into the power outlet. Note • If you are off the power (to use...
...view) 33 En Caution • While the POWER ON and STANDBY indicators are not going to standby mode) 1 Press TV a on the remote control unit or STANDBY/ON on the plasma display. • The system enters the standby mode and the image on page 69. For details, see Blue LED Dimmer... on the screen disappears. • The STANDBY indicator lights up blue. Plasma display (PDP-6010FD) POWER ON indicator Turning off , the system cannot be placed into the power outlet. Note • If you are off the power (to use...
Owner's Manual
Page 45
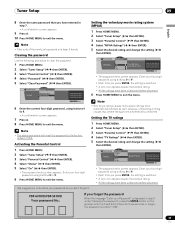
..." ( / then ENTER). 3 Select "Parental Control" ( / then ENTER). 4 Select "TV Ratings" ( / then ENTER). 5 Select the desired rating and change the setting ( / then ENTER). PDP-6010FD/PDP-5010FD Your password No.: If you press ENTER, the setting is switched. • A lock...the blocked rating. • All the ratings have been unblocked before shipment. Parental Control TV Ratings TV Ratings TV-None TV-Y TV-Y7 TV-G TV-PG Blocked TV Ratings xxxxxxxxxxxxxxxxxxxxx xxxxxxxxxxxxxxxxxxxxx xxxxxxxxxxxxxxxxxxxxx Home Menu Exit • The password entry screen appears. Clearing...
..." ( / then ENTER). 3 Select "Parental Control" ( / then ENTER). 4 Select "TV Ratings" ( / then ENTER). 5 Select the desired rating and change the setting ( / then ENTER). PDP-6010FD/PDP-5010FD Your password No.: If you press ENTER, the setting is switched. • A lock...the blocked rating. • All the ratings have been unblocked before shipment. Parental Control TV Ratings TV Ratings TV-None TV-Y TV-Y7 TV-G TV-PG Blocked TV Ratings xxxxxxxxxxxxxxxxxxxxx xxxxxxxxxxxxxxxxxxxxx xxxxxxxxxxxxxxxxxxxxx Home Menu Exit • The password entry screen appears. Clearing...


