
Owner's Manual
Page 2
... 7 Basic Operations 7 - Storing and recalling broadcast frequencies 8 - Pausing disc playback 10 - Displaying text information on disc 10 2 En Audio Adjustments 11 - Adjusting equalizer curves 11 - Adjusting loudness 11 - Switching the auxiliary setting 12 Connections Connection diagram 14 Installation DIN front/rear mount 15 - Compressed audio compatibility 18 Specifications 20 Scanning tracks or folders 9 - Using balance adjustment 11 - DIN Front-mount 15 - Please read through this unit 3 After-sales service for the first time, to ensure proper use. Remote control...
... 7 Basic Operations 7 - Storing and recalling broadcast frequencies 8 - Pausing disc playback 10 - Displaying text information on disc 10 2 En Audio Adjustments 11 - Adjusting equalizer curves 11 - Adjusting loudness 11 - Switching the auxiliary setting 12 Connections Connection diagram 14 Installation DIN front/rear mount 15 - Compressed audio compatibility 18 Specifications 20 Scanning tracks or folders 9 - Using balance adjustment 11 - DIN Front-mount 15 - Please read through this unit 3 After-sales service for the first time, to ensure proper use. Remote control...
Owner's Manual
Page 3
... operate correctly depend- Protect this unit can hear sounds from moisture. ! For your own security and convenience, be reprogrammed. About this unit The tuner frequencies on the box indicates that you to operate the equipment. If the battery is located on proposition 65 known to the State of Microsoft Corporation in North America. Wash hands after handling. CAUTION: USE OF CONTROL OR ADJUSTMENT...
... operate correctly depend- Protect this unit can hear sounds from moisture. ! For your own security and convenience, be reprogrammed. About this unit The tuner frequencies on the box indicates that you to operate the equipment. If the battery is located on proposition 65 known to the State of Microsoft Corporation in North America. Wash hands after handling. CAUTION: USE OF CONTROL OR ADJUSTMENT...
Owner's Manual
Page 4
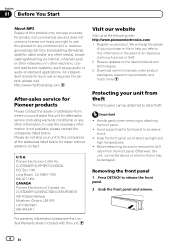
... or theft. 2 Receive updates on -demand applications. For warranty information please see the Limited Warranty sheet included with this unit, connected device or vehicle interior may be detached to remove the AUX cable from theft The front panel can be damaged. CUSTOMER SUPPORT DIVISION P.O. Handle gently when removing or attaching the front panel. ! Otherwise, this unit. 4 En revenuegenerating) real time broadcasting (terrestrial, satellite, cable and/or...
... or theft. 2 Receive updates on -demand applications. For warranty information please see the Limited Warranty sheet included with this unit, connected device or vehicle interior may be detached to remove the AUX cable from theft The front panel can be damaged. CUSTOMER SUPPORT DIVISION P.O. Handle gently when removing or attaching the front panel. ! Otherwise, this unit. 4 En revenuegenerating) real time broadcasting (terrestrial, satellite, cable and/or...

Owner's Manual
Page 5
.... Make sure that apply in the direction of the remote control out and insert the battery with metallic objects. ! CAUTION ! Front panel and the head unit are jointed on the back of the front panel to the head unit successfully, try again. If the battery leaks, wipe the remote control completely clean and install a new battery. ! Do not store the remote control in direct sunlight. ! Remove the battery if the remote control is...
.... Make sure that apply in the direction of the remote control out and insert the battery with metallic objects. ! CAUTION ! Front panel and the head unit are jointed on the back of the front panel to the head unit successfully, try again. If the battery leaks, wipe the remote control completely clean and install a new battery. ! Do not store the remote control in direct sunlight. ! Remove the battery if the remote control is...
Owner's Manual
Page 6
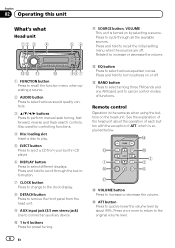
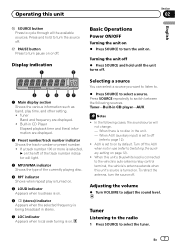
... 6 h e VOLUME button Press to connect an auxiliary device. dc b a 98 7 1 FUNCTION button Press to recall the function menu when operating a source. 2 AUDIO button Press to select various sound quality controls. 3 a/b/c/d buttons Press to turn loudness on or off . Press and hold to select different displays. a 1 to the original volume level. 6 En Press once more to return to 6 buttons Press for controlling functions. 4 Disc loading slot Insert a disc to play. 5 EJECT button Press to eject a CD from the head unit. 9 AUX input jack (3.5 mm stereo jack) Use to increase...
... 6 h e VOLUME button Press to connect an auxiliary device. dc b a 98 7 1 FUNCTION button Press to recall the function menu when operating a source. 2 AUDIO button Press to select various sound quality controls. 3 a/b/c/d buttons Press to turn loudness on or off . Press and hold to select different displays. a 1 to the original volume level. 6 En Press once more to return to 6 buttons Press for controlling functions. 4 Disc loading slot Insert a disc to play. 5 EJECT button Press to eject a CD from the head unit. 9 AUX input jack (3.5 mm stereo jack) Use to increase...
Owner's Manual
Page 7
... number 100 or more is selected, d on the left of the currently playing disc. 4 RPT indicator Shows when repeat play time, and other setting. ! Selecting a source You can select a source you want to listen to. % Press SOURCE to adjust the sound level. When AUX (auxiliary input) is set to turn pause on . h PAUSE button Press to turn the source off . Basic Operations Power ON/OFF Turning the unit on % Press SOURCE to turn the source off . To retract the antenna, turn the unit...
... number 100 or more is selected, d on the left of the currently playing disc. 4 RPT indicator Shows when repeat play time, and other setting. ! Selecting a source You can select a source you want to listen to. % Press SOURCE to adjust the sound level. When AUX (auxiliary input) is set to turn pause on . h PAUSE button Press to turn the source off . Basic Operations Power ON/OFF Turning the unit on % Press SOURCE to turn the source off . To retract the antenna, turn the unit...
Owner's Manual
Page 8
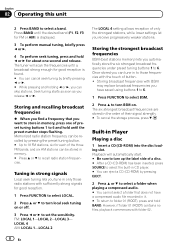
... stations memory) lets you tune in strong signals Local seek tuning lets you automatically store the six strongest broadcast frequencies under preset tuning buttons 1 to select a folder when playing a compressed audio. # You cannot select a folder that you receive progressively weaker stations. Memorized radio station frequency can skip stations. Once stored you can be stored in Player Playing a disc 1 Insert a CD (CD-ROM) into the disc loading slot. Playback will scan the frequencies until the preset number stops flashing...
... stations memory) lets you tune in strong signals Local seek tuning lets you automatically store the six strongest broadcast frequencies under preset tuning buttons 1 to select a folder when playing a compressed audio. # You cannot select a folder that you receive progressively weaker stations. Memorized radio station frequency can skip stations. Once stored you can be stored in Player Playing a disc 1 Insert a CD (CD-ROM) into the disc loading slot. Playback will scan the frequencies until the preset number stops flashing...
Owner's Manual
Page 9
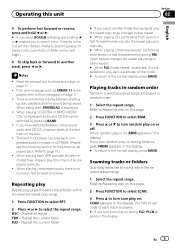
... return to the normal display, press BAND. SCAN appears in random order. 1 Select the repeat range. Refer to select the repeat range. Repeat the current folder # If you turn random play time may not be switched by pressing BAND. ! There is no sound on the disc. ! When playing compressed audio, there is sometimes a delay between compressed audio and CD-DA, playback starts at...
... return to the normal display, press BAND. SCAN appears in random order. 1 Select the repeat range. Refer to select the repeat range. Repeat the current folder # If you turn random play time may not be switched by pressing BAND. ! There is no sound on the disc. ! When playing compressed audio, there is sometimes a delay between compressed audio and CD-DA, playback starts at...
Owner's Manual
Page 10
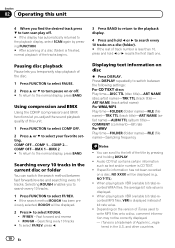
... temporarily stop playback of the disc. 1 Press FUNCTION to select PAUSE. 2 Press a or b to turn scan play off . # To return to the normal display, press BAND. COMP OFF-BMX 1-BMX 2 # To return to the normal display, press BAND. You can switch the search method between the following settings: For CD TEXT discs Play time-DISC TTL (disc title)-ART NAME (disc artist name)-TRK TTL (track...
... temporarily stop playback of the disc. 1 Press FUNCTION to select PAUSE. 2 Press a or b to turn scan play off . # To return to the normal display, press BAND. COMP OFF-BMX 1-BMX 2 # To return to the normal display, press BAND. You can switch the search method between the following settings: For CD TEXT discs Play time-DISC TTL (disc title)-ART NAME (disc artist name)-TRK TTL (track...
Owner's Manual
Page 11
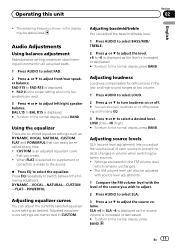
... the source you wish to adjust. 2 Press AUDIO to select SLA. 3 Press a or b to the normal display, press BAND. When FLAT is selected no supplement or correction is displayed. # To return to adjust the source volume. and high-sound ranges at any time. ! BAL L15 to BAL R15 is made to the sound. % Press EQ to select a desired level. Adjusted equalizer curve settings are used. 3 Press c or d to adjust front/rear speaker balance.
... the source you wish to adjust. 2 Press AUDIO to select SLA. 3 Press a or b to the normal display, press BAND. When FLAT is selected no supplement or correction is displayed. # To return to adjust the source volume. and high-sound ranges at any time. ! BAL L15 to BAL R15 is made to the sound. % Press EQ to select a desired level. Adjusted equalizer curve settings are used. 3 Press c or d to adjust front/rear speaker balance.
Owner's Manual
Page 12
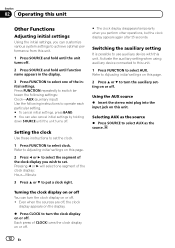
... to select AUX. Activate the auxiliary setting when using auxiliary device connected to this unit. 1 Press FUNCTION to use auxiliary device with this unit. Press FUNCTION repeatedly to switch between the following settings: Clock-AUX (auxiliary input) Use the following instructions to operate each particular setting. # To cancel initial settings, press BAND. # You can turn the clock display on this unit. Even when the sources are off, the clock display appears on the display. % Press CLOCK to turn the clock display on or off. Section 02 Operating this unit Other Functions Adjusting...
... to select AUX. Activate the auxiliary setting when using auxiliary device connected to this unit. 1 Press FUNCTION to use auxiliary device with this unit. Press FUNCTION repeatedly to switch between the following settings: Clock-AUX (auxiliary input) Use the following instructions to operate each particular setting. # To cancel initial settings, press BAND. # You can turn the clock display on this unit. Even when the sources are off, the clock display appears on the display. % Press CLOCK to turn the clock display on or off. Section 02 Operating this unit Other Functions Adjusting...
Owner's Manual
Page 13
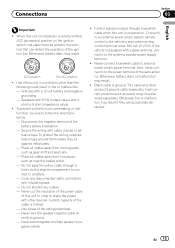
... of the auto antenna. Never wire the speaker negative cable directly to external power amp's power terminal. Connect it to an external power amp's system remote control or the vehicle's auto-antenna relay control terminal (max. 300 mA 12 V DC). Otherwise, battery drain may result. En 13 Connections Section 03 English N STAR Important ! Vehicles with cable clamps or adhesive tape. Do not pass the yellow cable through blue/white cable when this unit is...
... of the auto antenna. Never wire the speaker negative cable directly to external power amp's power terminal. Connect it to an external power amp's system remote control or the vehicle's auto-antenna relay control terminal (max. 300 mA 12 V DC). Otherwise, battery drain may result. En 13 Connections Section 03 English N STAR Important ! Vehicles with cable clamps or adhesive tape. Do not pass the yellow cable through blue/white cable when this unit is...
Owner's Manual
Page 14
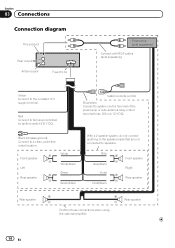
... the speaker leads that are not connected to the constant 12 V supply terminal. Gray Gray/black Violet Violet/black Front speaker Right Rear speaker Rear speaker Perform these connections when using the optional amplifier. Rear speaker 14 En Red Connect to a clean, paint-free metal location. Black (chassis ground) Connect to terminal controlled by ignition switch (12 V DC). System remote control Blue/white Connect to system control terminal of the power amp or auto-antenna relay control terminal...
... the speaker leads that are not connected to the constant 12 V supply terminal. Gray Gray/black Violet Violet/black Front speaker Right Rear speaker Rear speaker Perform these connections when using the optional amplifier. Rear speaker 14 En Red Connect to a clean, paint-free metal location. Black (chassis ground) Connect to terminal controlled by ignition switch (12 V DC). System remote control Blue/white Connect to system control terminal of the power amp or auto-antenna relay control terminal...
Owner's Manual
Page 15
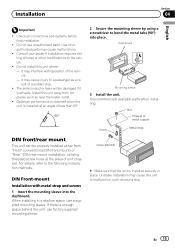
... using a screwdriver to the following installation methods. Check all connections and systems before final installation. ! The semiconductor laser will be properly installed either from hot places such as a result of the vehicle. - Use commercially available parts when installing. DIN Front-mount Installation with operation of a sudden stop. ! Do not use unauthorized parts. Do not install this unit away from "Front" (conventional DIN front-mount) or "Rear" (DIN rear-mount installation...
... using a screwdriver to the following installation methods. Check all connections and systems before final installation. ! The semiconductor laser will be properly installed either from hot places such as a result of the vehicle. - Use commercially available parts when installing. DIN Front-mount Installation with operation of a sudden stop. ! Do not use unauthorized parts. Do not install this unit away from "Front" (conventional DIN front-mount) or "Rear" (DIN rear-mount installation...
Owner's Manual
Page 16
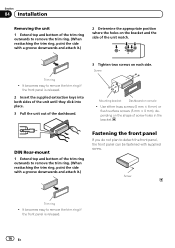
...Rear-mount 1 Extend top and bottom of the trim ring outwards to remove the trim ring. (When reattaching the trim ring, point the side with supplied screw. Use either truss screws (5 mm × 8 mm) or flush surface screws (5 mm × 9 mm), depending on each side. It becomes easy to remove... the trim ring if the front panel is released. 16 En Screw Mounting bracket Dashboard or console ! Trim ring ! Section 04 Installation Removing the unit 1 Extend top and bottom of the trim ring outwards to remove the trim ring. (When reattaching the trim...
...Rear-mount 1 Extend top and bottom of the trim ring outwards to remove the trim ring. (When reattaching the trim ring, point the side with supplied screw. Use either truss screws (5 mm × 8 mm) or flush surface screws (5 mm × 9 mm), depending on each side. It becomes easy to remove... the trim ring if the front panel is released. 16 En Screw Mounting bracket Dashboard or console ! Trim ring ! Section 04 Installation Removing the unit 1 Extend top and bottom of the trim ring outwards to remove the trim ring. (When reattaching the trim...
Owner's Manual
Page 17
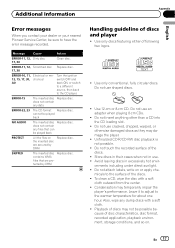
... under direct sunlight. ! En 17 Message Cause Action ERROR-11, 12, Dirty disc 17, 30 Clean disc. ERROR-15 The inserted disc Replace disc. cannot be played back NO AUDIO The inserted disc Replace disc. Leave it to adjust to the CD player. does not contain any files that are secured by DRM Replace disc. Additional Information Appendix English Error messages When you contact your dealer or your nearest Pioneer Service...
... under direct sunlight. ! En 17 Message Cause Action ERROR-11, 12, Dirty disc 17, 30 Clean disc. ERROR-15 The inserted disc Replace disc. cannot be played back NO AUDIO The inserted disc Replace disc. Leave it to adjust to the CD player. does not contain any files that are secured by DRM Replace disc. Additional Information Appendix English Error messages When you contact your dealer or your nearest Pioneer Service...
Owner's Manual
Page 18
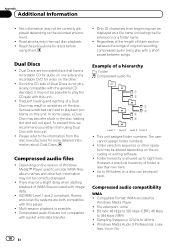
... compatible with image data. ! Compressed audio compatibility WMA ! Appendix Additional Information ! Read the precautions for video on this player. ! In some cases, a Dual Disc may be correctly displayed depending on the disc. There may become stuck in scratches on the recorded environment. ! Only 32 characters from using them. ! Dual Discs ! Frequent loading and ejecting of a hierarchy : Folder : Compressed audio file 1 2 3 4 5 6 Level 1 Level 2 Level 3 Level 4 ! Dual Discs are not compatible...
... compatible with image data. ! Compressed audio compatibility WMA ! Appendix Additional Information ! Read the precautions for video on this player. ! In some cases, a Dual Disc may be correctly displayed depending on the disc. There may become stuck in scratches on the recorded environment. ! Only 32 characters from using them. ! Dual Discs ! Frequent loading and ejecting of a hierarchy : Folder : Compressed audio file 1 2 3 4 5 6 Level 1 Level 2 Level 3 Level 4 ! Dual Discs are not compatible...

Owner's Manual
Page 19
M3u playlist: No ! Quantization bits: 8 and 16 (LPCM), 4 (MS ADPCM) ! Sampling frequency: 16 kHz to 44.1 kHz (MS ADPCM) Appendix English En 19 Compatible format: Linear PCM (LPCM), MS ADPCM ! MP3i (MP3 interactive), mp3 PRO: No WAV ! Sampling frequency: 16 kHz to 48 kHz (LPCM), 22.05 kHz to 48 kHz (32, 44.1, 48 kHz for emphasis) ! File extension: .wav ! Additional Information MP3 ! File extension: .mp3 ! Compatible ID3 tag version: 1.0, 1.1, 2.2, 2.3, 2.4 (ID3 tag Version 2.x is given priority than Version 1.x.) ! Bit rate: 8 kbps to 320 kbps !
M3u playlist: No ! Quantization bits: 8 and 16 (LPCM), 4 (MS ADPCM) ! Sampling frequency: 16 kHz to 44.1 kHz (MS ADPCM) Appendix English En 19 Compatible format: Linear PCM (LPCM), MS ADPCM ! MP3i (MP3 interactive), mp3 PRO: No WAV ! Sampling frequency: 16 kHz to 48 kHz (LPCM), 22.05 kHz to 48 kHz (32, 44.1, 48 kHz for emphasis) ! File extension: .wav ! Additional Information MP3 ! File extension: .mp3 ! Compatible ID3 tag version: 1.0, 1.1, 2.2, 2.3, 2.4 (ID3 tag Version 2.x is given priority than Version 1.x.) ! Bit rate: 8 kbps to 320 kbps !
Owner's Manual
Page 20
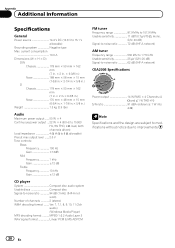
...) Audio Maximum power output ....... 50 W × 4 Continuous power output ... 22 W × 4 (50 Hz to 15 000 Hz, 5% THD, 4 W load, both channels driven) Load impedance 4 W (4 W to 8 W allowable) Preout max output level ....... 2.0 V Tone controls: Bass Frequency 100 Hz Gain 13dB Mid Frequency 1 kHz Gain 12 dB Treble Frequency 10 kHz Gain 12 dB CD player System Compact disc audio system Usable discs Compact disc Signal-to improvements. 20 En Appendix Additional Information Specifications General Power source 14...
...) Audio Maximum power output ....... 50 W × 4 Continuous power output ... 22 W × 4 (50 Hz to 15 000 Hz, 5% THD, 4 W load, both channels driven) Load impedance 4 W (4 W to 8 W allowable) Preout max output level ....... 2.0 V Tone controls: Bass Frequency 100 Hz Gain 13dB Mid Frequency 1 kHz Gain 12 dB Treble Frequency 10 kHz Gain 12 dB CD player System Compact disc audio system Usable discs Compact disc Signal-to improvements. 20 En Appendix Additional Information Specifications General Power source 14...
Owner's Manual
Page 62
...;13 02) 2521-3588 9樓901-6 0852) 2848-6488 Published by Pioneer Corporation. Copyright © 2008 par Pioneer Corporation. Publié par Pioneer Corporation. LTD. 253 Alexandra Road, #04-01, Singapore 159936 TEL: 65-6472-7555 PIONEER ELECTRONICS AUSTRALIA PTY. Copyright © 2008 by Pioneer Corporation. Box 1540, Long Beach, California 90801-1540, U.S.A. LTD. 178...
...;13 02) 2521-3588 9樓901-6 0852) 2848-6488 Published by Pioneer Corporation. Copyright © 2008 par Pioneer Corporation. Publié par Pioneer Corporation. LTD. 253 Alexandra Road, #04-01, Singapore 159936 TEL: 65-6472-7555 PIONEER ELECTRONICS AUSTRALIA PTY. Copyright © 2008 by Pioneer Corporation. Box 1540, Long Beach, California 90801-1540, U.S.A. LTD. 178...


