
Leaflet
Page 3
Micro Hi-Fi System Specifications MCM275/37 Sound • Output Power: 10W Total Power • Output power ...control: 24-key with Digital Right Management not supported. Trademarks are subject to change without notice. www.philips.com * Music with battery Tuner/Reception/Transmission • Tuner Bands: FM Stereo, AM • ... H x D): 310 x 314 x 238 mm • Weight incl. Specifications are the property of Koninklijke Philips Electronics N.V. Packaging: 5.5 kg • Issue date 2009-08-09 Version: 4.0.7 12 NC: 9073 100 13027 UPC: 6 09585 11072 4 © 2009 Koninklijke...
Micro Hi-Fi System Specifications MCM275/37 Sound • Output Power: 10W Total Power • Output power ...control: 24-key with Digital Right Management not supported. Trademarks are subject to change without notice. www.philips.com * Music with battery Tuner/Reception/Transmission • Tuner Bands: FM Stereo, AM • ... H x D): 310 x 314 x 238 mm • Weight incl. Specifications are the property of Koninklijke Philips Electronics N.V. Packaging: 5.5 kg • Issue date 2009-08-09 Version: 4.0.7 12 NC: 9073 100 13027 UPC: 6 09585 11072 4 © 2009 Koninklijke...

User manual
Page 8
English Contents General Information Supplied accessories 9 Environmental information 9 Safety information 9 Controls Controls on the set 10 Remote control 11-12 Installation Placing MCM275 12 Mounting stand onto the set Mounting MCM275 onto walls Rear connections 13-14 Speaker connections Antenna connections Connecting an additional appliance 14-15 Connecting a USB device Connecting a non-USB ... ......... 25 Timer Setting the timer 26 Activating and deactivating TIMER 26 SLEEP 26 Specifications 27 Maintenance 27 Troubleshooting 28-29 How to mount your MCM275 onto walls 30 8
English Contents General Information Supplied accessories 9 Environmental information 9 Safety information 9 Controls Controls on the set 10 Remote control 11-12 Installation Placing MCM275 12 Mounting stand onto the set Mounting MCM275 onto walls Rear connections 13-14 Speaker connections Antenna connections Connecting an additional appliance 14-15 Connecting a USB device Connecting a non-USB ... ......... 25 Timer Setting the timer 26 Activating and deactivating TIMER 26 SLEEP 26 Specifications 27 Maintenance 27 Troubleshooting 28-29 How to mount your MCM275 onto walls 30 8
User manual
Page 12
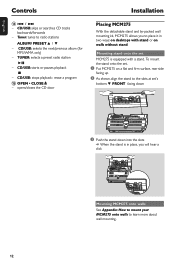
... playback; opens/closes the CD door Placing MCM275 With the detachable stand and by-packed wall mounting kit, MCM275 allows you will hear a click Mounting MCM275 onto walls See Appendix: How to mount your MCM275 onto walls to place it in two ways...: on desktops with a stand. To mount the stand onto the set, 1 Put MCM275 on walls without stand. English Controls Installation $4 / ¢ - Tuner: tunes to radio stations ALBUM/ PRESET 3 /...facing up 2 As shown, align the stand to the slots at set MCM275 is in place, you to learn more about wall mounting...
... playback; opens/closes the CD door Placing MCM275 With the detachable stand and by-packed wall mounting kit, MCM275 allows you will hear a click Mounting MCM275 onto walls See Appendix: How to mount your MCM275 onto walls to place it in two ways...: on desktops with a stand. To mount the stand onto the set, 1 Put MCM275 on walls without stand. English Controls Installation $4 / ¢ - Tuner: tunes to radio stations ALBUM/ PRESET 3 /...facing up 2 As shown, align the stand to the slots at set MCM275 is in place, you to learn more about wall mounting...

User manual
Page 16
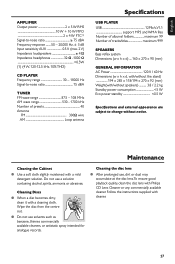
...tray at 4. 3 Remove the old battery and put a new CR2025 battery in place. 4 Put back the battery tray. 2 Setting the clock After connecting MCM275 to the power supply, set ) 4 Press DISPLAY/CLOCK to confirm ➜ The hours digits start flashing 5 Hold down or press VOLUME +/- USB -...tab before using the remote control. - English Preparation Using the remote control IMPORTANT! - Notes for example CD, TUNER). - To select 24-hour clock or 12-hour clock, ● On the remote control, press VOLUME +/- To exit without storing the clock setting press STOP 9 1 5 ➠ LI 3 THIUM...
...tray at 4. 3 Remove the old battery and put a new CR2025 battery in place. 4 Put back the battery tray. 2 Setting the clock After connecting MCM275 to the power supply, set ) 4 Press DISPLAY/CLOCK to confirm ➜ The hours digits start flashing 5 Hold down or press VOLUME +/- USB -...tab before using the remote control. - English Preparation Using the remote control IMPORTANT! - Notes for example CD, TUNER). - To select 24-hour clock or 12-hour clock, ● On the remote control, press VOLUME +/- To exit without storing the clock setting press STOP 9 1 5 ➠ LI 3 THIUM...
User manual
Page 27
...Hz, ± 3 dB Input sensitivity AUX 0.5 V (max. 2 V) Impedance loudspeakers 4 Ω Impedance headphones 32 Ω -1000 0.5W (1) (4 W, 120-12.5 kHz, 10% THD) CD PLAYER Frequency range 30 - 18000 Hz Signal-to-noise ratio 75 dBA TUNER FM wave range 87.5 - 108 MHz AM wave... available cleaners, or antistatic spray intended for analogue records. Maintenance Cleaning the Cabinet ● Use a soft cloth slightly moistened with Philips CD Lens Cleaner or any commercially available cleaner. Follow the instructions supplied with cleaner. 27 Wipe the disc from the centre out....
...Hz, ± 3 dB Input sensitivity AUX 0.5 V (max. 2 V) Impedance loudspeakers 4 Ω Impedance headphones 32 Ω -1000 0.5W (1) (4 W, 120-12.5 kHz, 10% THD) CD PLAYER Frequency range 30 - 18000 Hz Signal-to-noise ratio 75 dBA TUNER FM wave range 87.5 - 108 MHz AM wave... available cleaners, or antistatic spray intended for analogue records. Maintenance Cleaning the Cabinet ● Use a soft cloth slightly moistened with Philips CD Lens Cleaner or any commercially available cleaner. Follow the instructions supplied with cleaner. 27 Wipe the disc from the centre out....

Quick start guide
Page 3
... switch the set to start flashing 3 Hold down or press VOLUME +/- Prepare Setting the clock 1 Press and hold DISPLAY/CLOCK on the remote control ➜ 12 HR or 24 HR appears for example). - To select 24-hour clock or...
... switch the set to start flashing 3 Hold down or press VOLUME +/- Prepare Setting the clock 1 Press and hold DISPLAY/CLOCK on the remote control ➜ 12 HR or 24 HR appears for example). - To select 24-hour clock or...


