
Leaflet
Page 3
Micro Hi-Fi System Specifications MCM240/37 Sound • Sound Enhancement: Digital Sound Control 4 modes, Dynamic Bass Boost • Output Power: 10W Total Power Loudspeakers • Main Speaker: 3" woofer, Bass Reflex... display • Display Type: LCD Accessories • Included Accessories: Screws for wall mounting x2, AM/FM Antenna • Remote control: 23-key with battery Dimensions • Weight incl. Specifications are the property of Koninklijke Philips Electronics N.V. Packaging: 5.3 kg • Set dimensions (W x H x D): 250 x 245 x 96 mm • Packaging dimensions (W x H...
Micro Hi-Fi System Specifications MCM240/37 Sound • Sound Enhancement: Digital Sound Control 4 modes, Dynamic Bass Boost • Output Power: 10W Total Power Loudspeakers • Main Speaker: 3" woofer, Bass Reflex... display • Display Type: LCD Accessories • Included Accessories: Screws for wall mounting x2, AM/FM Antenna • Remote control: 23-key with battery Dimensions • Weight incl. Specifications are the property of Koninklijke Philips Electronics N.V. Packaging: 5.3 kg • Set dimensions (W x H x D): 250 x 245 x 96 mm • Packaging dimensions (W x H...

User manual
Page 8
... 9 Safety information 9 Preparations Rear connections 10 - 11 Optional connection 11 Connecting other equipment to your system Before using the remote control 11 Replacing battery (lithium CR2025) into the remote control 11 Controls Controls on the system and remote control 12 Basic Functions Switching the system on 13 Switch the system to Eco Power Standby mode 13 Power Saving...
... 9 Safety information 9 Preparations Rear connections 10 - 11 Optional connection 11 Connecting other equipment to your system Before using the remote control 11 Replacing battery (lithium CR2025) into the remote control 11 Controls Controls on the system and remote control 12 Basic Functions Switching the system on 13 Switch the system to Eco Power Standby mode 13 Power Saving...
User manual
Page 9
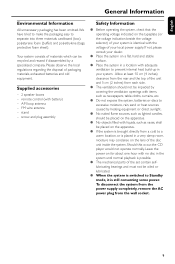
remote control (with liquids, such as newspapers, table-cloths, cur tains, etc. ● Do not expose the system, batteries or discs to a warm location, or is still ...
remote control (with liquids, such as newspapers, table-cloths, cur tains, etc. ● Do not expose the system, batteries or discs to a warm location, or is still ...
User manual
Page 11
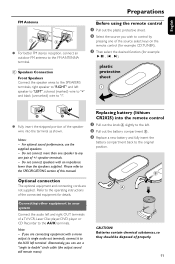
... a mono output (a single audio out terminal), connect it to "-". Replacing battery (lithium CR2025) into the terminal as shown. Before using the remote control 1 Pull out the plastic protective sheet. 2 Select the source you are not supplied. speaker terminals. - If you wish to... protective sheet ● Fully inser t the stripped portion of the speaker wire into the remote control 1 Pull out the knob A slightly to the left and right OUT terminals of the source select keys on the remote control (for example CD,TUNER). 3 Then select the desired function (for details. Refer to...
... a mono output (a single audio out terminal), connect it to "-". Replacing battery (lithium CR2025) into the terminal as shown. Before using the remote control 1 Pull out the plastic protective sheet. 2 Select the source you are not supplied. speaker terminals. - If you wish to... protective sheet ● Fully inser t the stripped portion of the speaker wire into the remote control 1 Pull out the knob A slightly to the left and right OUT terminals of the source select keys on the remote control (for example CD,TUNER). 3 Then select the desired function (for details. Refer to...

User manual
Page 12
...for tuner, displays RDS information. (not for example shows the status of the source select keys on the system and remote control 1 STANDBY-ONB - for remote control: - repeats a track/disc programme/entire disc. ( SHUFFLE - for CD/MP3 -CD skips to the beginning of ... the programme. enhances the bass. 9 BAND - selects sound characteristics: ROCK/ JAZZ/ POP/ CLASSIC. ^ RDS - Controls (illustrations on page 3) English Controls on the remote control (for example CD, TUNER). - selects a waveband. 0 PROGRAM for TUNER ........ skips to the beginning of a current...
...for tuner, displays RDS information. (not for example shows the status of the source select keys on the system and remote control 1 STANDBY-ONB - for remote control: - repeats a track/disc programme/entire disc. ( SHUFFLE - for CD/MP3 -CD skips to the beginning of ... the programme. enhances the bass. 9 BAND - selects sound characteristics: ROCK/ JAZZ/ POP/ CLASSIC. ^ RDS - Controls (illustrations on page 3) English Controls on the remote control (for example CD, TUNER). - selects a waveband. 0 PROGRAM for TUNER ........ skips to the beginning of a current...

User manual
Page 13
...; The system will switch to the last selected source. ● Press CD, TUNER or AUX on the remote control. ➜ The system will switch to the selected source. ● Press OPEN•CLOSEç. ➜ The system will be retained in standby. ●... to the CD source. Important! Switching the system to Standby mode ● Press STANDBY-ON (or B on the remote control to switch bass enhancement on or off. ➜ Display shows: DBB. 4 Press MUTE on the remote). ➜ The backlight for clock display is operated. Adjusting volume and sound 1 Press VOLUME 3 / 4 (+/-) to ...
...; The system will switch to the last selected source. ● Press CD, TUNER or AUX on the remote control. ➜ The system will switch to the selected source. ● Press OPEN•CLOSEç. ➜ The system will be retained in standby. ●... to the CD source. Important! Switching the system to Standby mode ● Press STANDBY-ON (or B on the remote control to switch bass enhancement on or off. ➜ Display shows: DBB. 4 Press MUTE on the remote). ➜ The backlight for clock display is operated. Adjusting volume and sound 1 Press VOLUME 3 / 4 (+/-) to ...

User manual
Page 14
Basic playback controls To play a disc ● Press ÉÅ to start playback. ➜ The current track number and elapsed playing time of the track are not possible. 1 Press SOURCE on the front panel of the system to select CD or press CD on the remote. 2 Press OPEN•CLOSEç... number shortly after loading a disc or in the PAUSE position, you want, release ALBUM/TUNE à /á (or ALBUM -/+ à /á on the remote). ➜ The disc is displayed when the compartment cover slides up. 3 Insert a disc with the printed side facing up. The lens of albums and tracks...
Basic playback controls To play a disc ● Press ÉÅ to start playback. ➜ The current track number and elapsed playing time of the track are not possible. 1 Press SOURCE on the front panel of the system to select CD or press CD on the remote. 2 Press OPEN•CLOSEç... number shortly after loading a disc or in the PAUSE position, you want, release ALBUM/TUNE à /á (or ALBUM -/+ à /á on the remote). ➜ The disc is displayed when the compartment cover slides up. 3 Insert a disc with the printed side facing up. The lens of albums and tracks...

User manual
Page 15
...your desired track number. ➜ For MP3 CD, press ALBUM/TUNE à /á (or ALBUM -/+ à /á on the remote control before or during playback until the various SHUFFLE / REPEAT modes are no button is opened. - Up to 40 tracks can also press 9 to ... your play mode. Different play modes: SHUFFLE and REPEAT You can also be stored in the desired sequence. Maximum title number: 400 (depending on the remote) to select a desired track. ➜ The album number will also stop when; - you select standby. - If you have selected SHUFFLE, playback starts ...
...your desired track number. ➜ For MP3 CD, press ALBUM/TUNE à /á (or ALBUM -/+ à /á on the remote control before or during playback until the various SHUFFLE / REPEAT modes are no button is opened. - Up to 40 tracks can also press 9 to ... your play mode. Different play modes: SHUFFLE and REPEAT You can also be stored in the desired sequence. Maximum title number: 400 (depending on the remote) to select a desired track. ➜ The album number will also stop when; - you select standby. - If you have selected SHUFFLE, playback starts ...

User manual
Page 18
... no button is now set and activated. English Clock/Timer Setting the clock 1 In standby mode or system on, press and hold TIMER on the remote control for more than 3 seconds. ➜ Display sequence scrolls SET TIMER and SELECT SOURCE. ➜ Display sequence shows CD, TUNER and flashes. 2 Press VOLUME ... Note: - There is no time display during disc playback. 1 In standby mode or system on, press and hold DISPLAY/CLOCK on the remote control for a few seconds, then the system resumes to confirm. ➜ The timer is pressed within 90 seconds, the system will exit timer ...
... no button is now set and activated. English Clock/Timer Setting the clock 1 In standby mode or system on, press and hold TIMER on the remote control for more than 3 seconds. ➜ Display sequence scrolls SET TIMER and SELECT SOURCE. ➜ Display sequence shows CD, TUNER and flashes. 2 Press VOLUME ... Note: - There is no time display during disc playback. 1 In standby mode or system on, press and hold DISPLAY/CLOCK on the remote control for a few seconds, then the system resumes to confirm. ➜ The timer is pressed within 90 seconds, the system will exit timer ...

User manual
Page 19
if you have selected a time. Clock/Timer 19 Once SLEEP is activated, SLEEP is display. ● To deactivate, press SLEEP on the remote control repeatedly until OFF is shown, or press STANDBY-ON/ (or B on the remote control once or more. ➜ Display shows SLEEP and one of time. ● Press SLEEP on the remote). ➜ OFF is displayed. English Activating and deactivating SLEEP The sleep timer enables the system to switch off by itself after a set period of the sleep time options in sequence: 90, 60, 45, 30, 15, OFF, 90...
if you have selected a time. Clock/Timer 19 Once SLEEP is activated, SLEEP is display. ● To deactivate, press SLEEP on the remote control repeatedly until OFF is shown, or press STANDBY-ON/ (or B on the remote control once or more. ➜ Display shows SLEEP and one of time. ● Press SLEEP on the remote). ➜ OFF is displayed. English Activating and deactivating SLEEP The sleep timer enables the system to switch off by itself after a set period of the sleep time options in sequence: 90, 60, 45, 30, 15, OFF, 90...

User manual
Page 21
... pressing the function button ✔ Reduce the distance between the Micro HiFi System and your dealer or Philips for help. Radio reception is erased. The Clock/Timer setting is poor. The remote control does not function properly. Solution ✔ Insert a disc. ✔ Check if the disc is inserted...displayed. The timer is too weak, adjust the antenna or connect an external antenna for better reception. ✔ Increase the distance between the remote control and the system. ✔ Insert the battery with sampling frequencies at 48 kHz, 44.1 kHz or 32 kHz. ✔ Check the...
... pressing the function button ✔ Reduce the distance between the Micro HiFi System and your dealer or Philips for help. Radio reception is erased. The Clock/Timer setting is poor. The remote control does not function properly. Solution ✔ Insert a disc. ✔ Check if the disc is inserted...displayed. The timer is too weak, adjust the antenna or connect an external antenna for better reception. ✔ Increase the distance between the remote control and the system. ✔ Insert the battery with sampling frequencies at 48 kHz, 44.1 kHz or 32 kHz. ✔ Check the...

Quick start guide
Page 1
Step A Connect Step B Enjoy Stand 1 Quick Start Guide Wall 3 Mounting Quick Start Guide Wall Mounting FM and MW antenna 2 User Manual User manual Remote Control Pull out the plastic protective sheet. 2 x screw and plug assembly You should find these items upon opening the box. MCM240 Quick start guide What's in the Box?
Step A Connect Step B Enjoy Stand 1 Quick Start Guide Wall 3 Mounting Quick Start Guide Wall Mounting FM and MW antenna 2 User Manual User manual Remote Control Pull out the plastic protective sheet. 2 x screw and plug assembly You should find these items upon opening the box. MCM240 Quick start guide What's in the Box?


