Leaflet
Page 1
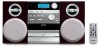
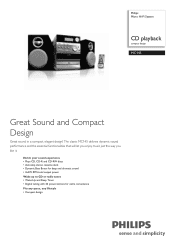
... you like it. Philips Micro Hi-Fi System CD playback compact design MC145 Great Sound and Compact Design Great sound in a compact, elegant design! Enrich your sound experience • Plays CD, CD-R and CD-RW discs • Autostop stereo cassette deck • Dynamic Bass Boost for deep and dramatic sound • 2x2W RMS total output power Wake up to CD or radio tunes • Wake-Up and Sleep Timer • Digital tuning with 20 preset stations for extra convenience...
... you like it. Philips Micro Hi-Fi System CD playback compact design MC145 Great Sound and Compact Design Great sound in a compact, elegant design! Enrich your sound experience • Plays CD, CD-R and CD-RW discs • Autostop stereo cassette deck • Dynamic Bass Boost for deep and dramatic sound • 2x2W RMS total output power Wake up to CD or radio tunes • Wake-Up and Sleep Timer • Digital tuning with 20 preset stations for extra convenience...
Leaflet
Page 2
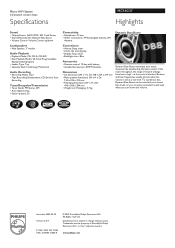
...; Disc Playback Modes: 20-Track Programmable, Repeat/one/all/program • Loader Type: Top • Cassette Deck Technology: Mechanical Audio Recording • Recording Media: Tape • Tape Recording Enhancement: CD Synchro Start Recording Tuner/Reception/Transmission • Tuner Bands: FM Stereo, AM • Auto digital tuning • Station presets: 20 Connectivity • Headphone: 3.5 mm • Other connections: FM fixed pigtail antenna, AM Antenna Dynamic Bass Boost Convenience • Alarms: Sleep timer • Clock: On main display • Display...
...; Disc Playback Modes: 20-Track Programmable, Repeat/one/all/program • Loader Type: Top • Cassette Deck Technology: Mechanical Audio Recording • Recording Media: Tape • Tape Recording Enhancement: CD Synchro Start Recording Tuner/Reception/Transmission • Tuner Bands: FM Stereo, AM • Auto digital tuning • Station presets: 20 Connectivity • Headphone: 3.5 mm • Other connections: FM fixed pigtail antenna, AM Antenna Dynamic Bass Boost Convenience • Alarms: Sleep timer • Clock: On main display • Display...
User manual
Page 4
... to get the very most from your date of plug to wide slot, fully insert. 4 in your model with PHILIPS makes you 'll receive notification - REFER SERVICING TO QUALIFIED SERVICE PERSONNEL. Model No t This "bolt of Product Ownership Registering your product, you eligible for all of the valuable benefits listed below the Serial No. Serial No WARNING: TO PREVENT FIRE OR SHOCK HAZARD...
... to get the very most from your date of plug to wide slot, fully insert. 4 in your model with PHILIPS makes you 'll receive notification - REFER SERVICING TO QUALIFIED SERVICE PERSONNEL. Model No t This "bolt of Product Ownership Registering your product, you eligible for all of the valuable benefits listed below the Serial No. Serial No WARNING: TO PREVENT FIRE OR SHOCK HAZARD...
User manual
Page 6
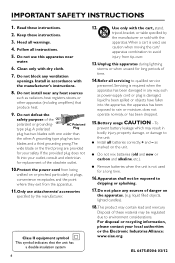
... blade or the third prong are provided for a long time. 16.Apparatus shall not be regulated due to the unit: ● Install all servicing to dripping or splashing. 17.Do not place any ventilation openings. Keep these instructions. 2. Install in any heat sources such as power-supply cord or plug is used for your local authorities or the Electronic Industries Alliance: www...
... blade or the third prong are provided for a long time. 16.Apparatus shall not be regulated due to the unit: ● Install all servicing to dripping or splashing. 17.Do not place any ventilation openings. Keep these instructions. 2. Install in any heat sources such as power-supply cord or plug is used for your local authorities or the Electronic Industries Alliance: www...
User manual
Page 8
... Rear connections 10 Before using the remote control 11 Replacing battery (lithium CR2032) into the remote control 11 Controls Controls on the system and remote control 12 Basic Functions Switching the system on 13 Power-saving automatic standby 13 Adjusting volume and sound 13 CD Operation Playing a disc 14 Selecting a different track 14 Finding a passage within a track 14 Different play modes: Shuffle and Repeat ..... 15 Programming track numbers 15 Erasing the programme 15 Radio Reception Tuning to radio stations 16 Programming radio stations 16 Tuning to preset radio stations...
... Rear connections 10 Before using the remote control 11 Replacing battery (lithium CR2032) into the remote control 11 Controls Controls on the system and remote control 12 Basic Functions Switching the system on 13 Power-saving automatic standby 13 Adjusting volume and sound 13 CD Operation Playing a disc 14 Selecting a different track 14 Finding a passage within a track 14 Different play modes: Shuffle and Repeat ..... 15 Programming track numbers 15 Erasing the programme 15 Radio Reception Tuning to radio stations 16 Programming radio stations 16 Tuning to preset radio stations...
User manual
Page 9
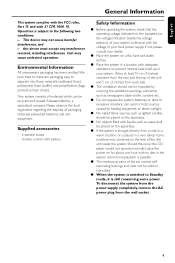
... disc in the system until normal playback is still consuming some power. To disconnect the system from the power supply completely, remove the AC power plug from a cold to a warm location, or is subject to the following two conditions: - this occur, the CD player would not operate normally. Supplied accessories - 2 speaker boxes - remote control with adequate ventilation to Standby mode, it is possible. ● The mechanical parts of your system...
... disc in the system until normal playback is still consuming some power. To disconnect the system from the power supply completely, remove the AC power plug from a cold to a warm location, or is subject to the following two conditions: - this occur, the CD player would not operate normally. Supplied accessories - 2 speaker boxes - remote control with adequate ventilation to Standby mode, it is possible. ● The mechanical parts of your system...
User manual
Page 10
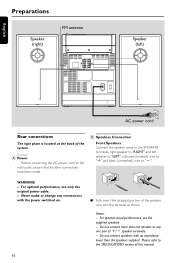
... speaker wires to the SPEAKERS terminals, right speaker to "RIGHT" and left ) FM ANT AC ~ 110V 220V AC power cord Rear connections The type plate is located at the back of this manual. 10 For optimal performance, use the supplied speakers. - speaker terminals. - Never make or change any one speaker to the SPECIFICATIONS section of the system. Do not connect more than the speakers supplied. For optimal sound performance, use only the original power cable...
... speaker wires to the SPEAKERS terminals, right speaker to "RIGHT" and left ) FM ANT AC ~ 110V 220V AC power cord Rear connections The type plate is located at the back of this manual. 10 For optimal performance, use the supplied speakers. - speaker terminals. - Never make or change any one speaker to the SPECIFICATIONS section of the system. Do not connect more than the speakers supplied. For optimal sound performance, use only the original power cable...
User manual
Page 12
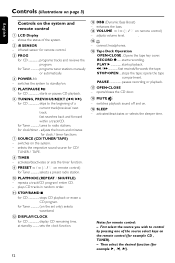
... PLAY/PAUSE 2; Notes for Tuner tunes to standby/on the system. - activates/deactivates or sets the timer function. 9 PRESET G / H (3 / 4 on the system and remote control 1 LCD Display - RECORD 0 ....... STOP/BAND 9 for clock / timer functions 7 SOURCE (CD/ TUNER/ TAPE) - adjusts volume level. . % - adjusts the hours and minutes for CD stops CD playback or erase a CD program. selects the respective sound source for CD/ TUNER / TAPE. 8 TIMER - Controls (illustrations on page 3) English Controls on remote control) for Tuner selects a preset radio station...
... PLAY/PAUSE 2; Notes for Tuner tunes to standby/on the system. - activates/deactivates or sets the timer function. 9 PRESET G / H (3 / 4 on the system and remote control 1 LCD Display - RECORD 0 ....... STOP/BAND 9 for clock / timer functions 7 SOURCE (CD/ TUNER/ TAPE) - adjusts volume level. . % - adjusts the hours and minutes for CD stops CD playback or erase a CD program. selects the respective sound source for CD/ TUNER / TAPE. 8 TIMER - Controls (illustrations on page 3) English Controls on remote control) for Tuner selects a preset radio station...
User manual
Page 13
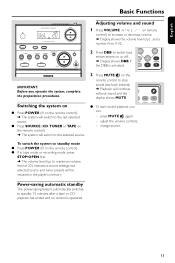
... a tape or CD playback has ended and no control is activated. To switch the system to standby mode ● Press POWER (y on the remote control). ● If in tape mode or recording mode, press STOP•OPEN first. ➜ The volume level (up to maximum volume level of 20), interactive sound settings, last selected source and tuner presets will continue without sound and the display shows MUTE . English Basic Functions Adjusting volume and sound 1 Press VOLUME G / H (3 / 4 on remote control) to...
... a tape or CD playback has ended and no control is activated. To switch the system to standby mode ● Press POWER (y on the remote control). ● If in tape mode or recording mode, press STOP•OPEN first. ➜ The volume level (up to maximum volume level of 20), interactive sound settings, last selected source and tuner presets will continue without sound and the display shows MUTE . English Basic Functions Adjusting volume and sound 1 Press VOLUME G / H (3 / 4 on remote control) to...
User manual
Page 14
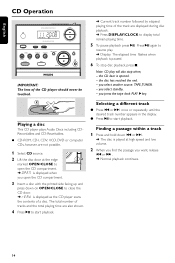
... to open the CD compartment. ➜ OPEN is paused. 6 To stop when; - to display total remain playing time. 5 To pause playback press 2;. English CD Operation IMPORTANT: The lens of the CD player should never be touched. ➜ Current track number followed by elapsed playing time of the track are displayed during disc playback. ➜ Press DISPLAY/CLOCK to start playback. you select standby. - to resume play will also stop disc playback...
... to open the CD compartment. ➜ OPEN is paused. 6 To stop when; - to display total remain playing time. 5 To pause playback press 2;. English CD Operation IMPORTANT: The lens of the CD player should never be touched. ➜ Current track number followed by elapsed playing time of the track are displayed during disc playback. ➜ Press DISPLAY/CLOCK to start playback. you select standby. - to resume play will also stop disc playback...
User manual
Page 15
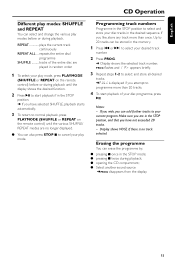
... in random order 1 To select your play mode. to start playback of the entire disc are no track selected. Programming track numbers Programme in the STOP position to cancel your play mode, press PLAYMODE (SHUFFLE or REPEAT on the remote control) until the display shows the desired function. 2 Press 2; Make sure you have selected SHUFFLE, playback starts automatically. 3 To return to normal playback...
... in random order 1 To select your play mode. to start playback of the entire disc are no track selected. Programming track numbers Programme in the STOP position to cancel your play mode, press PLAYMODE (SHUFFLE or REPEAT on the remote control) until the display shows the desired function. 2 Press 2; Make sure you have selected SHUFFLE, playback starts automatically. 3 To return to normal playback...
User manual
Page 16
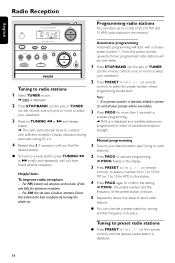
... the set) or TUNER (on the remote control) once or more to select your desired station (see Tuning to radio stations). 2 Press PROG to activate programming. ➜ PROG flashes in the display. 3 Press PRESET G / H (3 / 4 on remote control) to select the preset number where programming should start with sufficient reception. Helpful hints: To improve radio reception: - Direct this antenna for AM) to this preset number upwards, former programmed radio stations will be overridden. 3 Press PROG for optimum reception. - Note: - Manual programming 1 Tune...
... the set) or TUNER (on the remote control) once or more to select your desired station (see Tuning to radio stations). 2 Press PROG to activate programming. ➜ PROG flashes in the display. 3 Press PRESET G / H (3 / 4 on remote control) to select the preset number where programming should start with sufficient reception. Helpful hints: To improve radio reception: - Direct this antenna for AM) to this preset number upwards, former programmed radio stations will be overridden. 3 Press PROG for optimum reception. - Note: - Manual programming 1 Tune...
User manual
Page 17
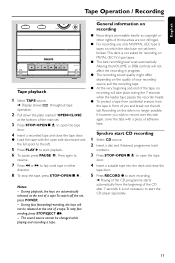
... a piece of adhesive tape. It is set automatically. Altering the VOLUME or DBB controls will not affect the recording in either direction. 8 To stop fast winding, press STOP/EJECT 9/. - The sound source cannot be released at the end of a tape.To stop the tape, press STOP•OPENÇç. English Tape Operation / Recording Tape playback 1 Select TAPE source. ➜ Display: shows throughout tape operation. 2 Pull down the...
... a piece of adhesive tape. It is set automatically. Altering the VOLUME or DBB controls will not affect the recording in either direction. 8 To stop fast winding, press STOP/EJECT 9/. - The sound source cannot be released at the end of a tape.To stop the tape, press STOP•OPENÇç. English Tape Operation / Recording Tape playback 1 Select TAPE source. ➜ Display: shows throughout tape operation. 2 Pull down the...
User manual
Page 19
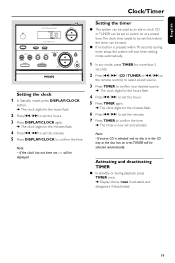
... timer is in the CD tray or the disc has an error,TUNER will be used as an alarm clock. Note: - will exit timer setting mode automatically. 1 In any mode, press TIMER for more than 2 seconds. 2 Press ¡1 / 2™ (CD / TUNER or ¡1 / 2™ on at a preset time.The clock time needs to be set first before the timer can be selected automatically. English Clock/Timer Setting the clock 1 In Standby mode, press DISPLAY/CLOCK button. ➜ The clock digits for the hours flash...
... timer is in the CD tray or the disc has an error,TUNER will be used as an alarm clock. Note: - will exit timer setting mode automatically. 1 In any mode, press TIMER for more than 2 seconds. 2 Press ¡1 / 2™ (CD / TUNER or ¡1 / 2™ on at a preset time.The clock time needs to be set first before the timer can be selected automatically. English Clock/Timer Setting the clock 1 In Standby mode, press DISPLAY/CLOCK button. ➜ The clock digits for the hours flash...
User manual
Page 20
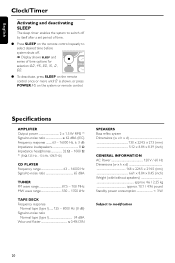
English Clock/Timer Activating and deactivating SLEEP The sleep timer enables the system to switch off by itself after a set period of time options for selection: 60, 45, 30,15, 0, 60. ● To deactivate, press SLEEP on the remote control once or more until '0' is shown, or press POWER / y on the system or remote control. Specifications AMPLIFIER Output power 2 x 1.5 W RMS (1) Signal-to-noise ratio 62 dBA (IEC) Frequency response...
English Clock/Timer Activating and deactivating SLEEP The sleep timer enables the system to switch off by itself after a set period of time options for selection: 60, 45, 30,15, 0, 60. ● To deactivate, press SLEEP on the remote control once or more until '0' is shown, or press POWER / y on the system or remote control. Specifications AMPLIFIER Output power 2 x 1.5 W RMS (1) Signal-to-noise ratio 62 dBA (IEC) Frequency response...
User manual
Page 21
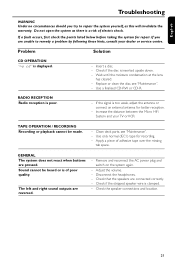
... the Micro HiFi System and your dealer or service centre. Check that the speakers are reversed. - Use a finalised CD-RW or CD-R. - Sound cannot be made. - Check if the stripped speaker wire is inserted upside down. - Do not open the system as this will invalidate the warranty. Problem CD OPERATION "no circumstances should you are unable to repair the system yourself, as there is too weak, adjust the antenna or connect...
... the Micro HiFi System and your dealer or service centre. Check that the speakers are reversed. - Use a finalised CD-RW or CD-R. - Sound cannot be made. - Check if the stripped speaker wire is inserted upside down. - Do not open the system as this will invalidate the warranty. Problem CD OPERATION "no circumstances should you are unable to repair the system yourself, as there is too weak, adjust the antenna or connect...
User manual
Page 22
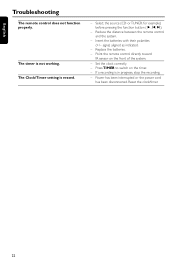
...) aligned as indicated. - Replace the batteries. - Press TIMER to switch on the front of the system. - The Clock/Timer setting is in progress, stop the recording. - Select the source (CD or TUNER, for example) before pressing the function button (É,í,ë). - Reduce the distance between the remote control and the system. - Power has been interrupted or the power cord has been disconnected. English Troubleshooting The remote control does not function...
...) aligned as indicated. - Replace the batteries. - Press TIMER to switch on the front of the system. - The Clock/Timer setting is in progress, stop the recording. - Select the source (CD or TUNER, for example) before pressing the function button (É,í,ë). - Reduce the distance between the remote control and the system. - Power has been interrupted or the power cord has been disconnected. English Troubleshooting The remote control does not function...
User manual
Page 23
... manufactured from new, or serviceable used for Philips that requires modification or adaptation to enable it was designed, manufactured, approved and/or authorized, or repair of the product, adjust- Note: Any product sold and identified as based on the product, and installation or repair of antenna systems outside of the product. • Product repair and/or part replacement because of improper installation, connections to or loss of programs, data or other...
... manufactured from new, or serviceable used for Philips that requires modification or adaptation to enable it was designed, manufactured, approved and/or authorized, or repair of the product, adjust- Note: Any product sold and identified as based on the product, and installation or repair of antenna systems outside of the product. • Product repair and/or part replacement because of improper installation, connections to or loss of programs, data or other...
Quick start guide
Page 2
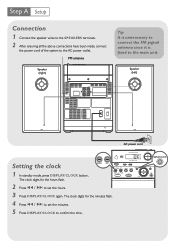
... power cord Setting the clock 1 In standby mode, press DISPLAY/CLOCK button.. The clock digits for the minutes flash. 4 Press ¡1 / 2™ to confirm the time. FM antenna Speaker (right) Tip It is unnecessary to connect the FM pigtail antenna since it is fixed to the AC power outlet. Setup Connection 1 Connect the speaker wires to the SPEAKERS terminals. 2 After ensuring all the above connections have been made, connect the power cord of the system to the main unit. The clock digits...
... power cord Setting the clock 1 In standby mode, press DISPLAY/CLOCK button.. The clock digits for the minutes flash. 4 Press ¡1 / 2™ to confirm the time. FM antenna Speaker (right) Tip It is unnecessary to connect the FM pigtail antenna since it is fixed to the AC power outlet. Setup Connection 1 Connect the speaker wires to the SPEAKERS terminals. 2 After ensuring all the above connections have been made, connect the power cord of the system to the main unit. The clock digits...
Quick start guide
Page 3
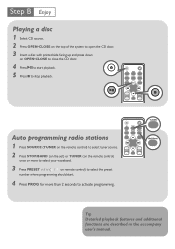
... the accompany user's manual. Step B Enjoy Playing a disc 1 Select CD source. 2 Press OPEN•CLOSE on the top of the system to open the CD door. 3 Insert a disc with printed side facing up and press down on remote control) to select the preset number where programming should start playback. 5 Press 9 to stop playback. Auto programming radio stations 1 Press SOURCE (TUNER on the remote control) to select tuner source. 2 Press STOP/BAND (on the set) or TUNER (on the remote control) once...
... the accompany user's manual. Step B Enjoy Playing a disc 1 Select CD source. 2 Press OPEN•CLOSE on the top of the system to open the CD door. 3 Insert a disc with printed side facing up and press down on remote control) to select the preset number where programming should start playback. 5 Press 9 to stop playback. Auto programming radio stations 1 Press SOURCE (TUNER on the remote control) to select tuner source. 2 Press STOP/BAND (on the set) or TUNER (on the remote control) once...


