User Guide
Page 3
...9. Mains lead - Maintenance 20-22 Cleaning 20 Cleaning the dustfilter 20 Maintenance of the projector ....8 Moving the projector 9 Inserting the batteries in the compact remote control ...........9 Inserting the batteries in a residential area is subject to a computer. Connect ...the equipment into an outlet on a circuit different from that the following : Philips Consumer Electronics Company One Philips ...
...9. Mains lead - Maintenance 20-22 Cleaning 20 Cleaning the dustfilter 20 Maintenance of the projector ....8 Moving the projector 9 Inserting the batteries in the compact remote control ...........9 Inserting the batteries in a residential area is subject to a computer. Connect ...the equipment into an outlet on a circuit different from that the following : Philips Consumer Electronics Company One Philips ...
User Guide
Page 5
... select one of three picture format options 4:3, 16:9 or 16:9 enlarged. 9. The directional shuttle on the projector and on the compact remote control function as Cursor Control and are used during set from almost anywhere in the room. When the menu is... external audio equipment via the keyboard on the Remote Control automatically gets installed. 8. High reliability and excellent brightness The Philips UHP lamp guarantees long life, excellent brightness over the entire picture. 5 Projector Features 1. On the trackball remote control (standard with a full mirror scan conversion...
... select one of three picture format options 4:3, 16:9 or 16:9 enlarged. 9. The directional shuttle on the projector and on the compact remote control function as Cursor Control and are used during set from almost anywhere in the room. When the menu is... external audio equipment via the keyboard on the Remote Control automatically gets installed. 8. High reliability and excellent brightness The Philips UHP lamp guarantees long life, excellent brightness over the entire picture. 5 Projector Features 1. On the trackball remote control (standard with a full mirror scan conversion...
User Guide
Page 6
... an externally connected sound amplifier) and to mute the picture. 4 Standby On To switch the projector in use. $ IR sensor To receive the signals from the remote control. When the menu is active the Cursor Control controls the menu cursor. The cursor control works with... To correct picture distortion of the projected image. ! On compact remote control (LC4341/4331) - (fig. 2) 1 Stand by digital scaling. 8 Lamp indicator - Notes: - The Cursor Control can only function as the menu is operated and the projector responds. 0 Zoomring To adjust the size of the vertical keystone type...
... an externally connected sound amplifier) and to mute the picture. 4 Standby On To switch the projector in use. $ IR sensor To receive the signals from the remote control. When the menu is active the Cursor Control controls the menu cursor. The cursor control works with... To correct picture distortion of the projected image. ! On compact remote control (LC4341/4331) - (fig. 2) 1 Stand by digital scaling. 8 Lamp indicator - Notes: - The Cursor Control can only function as the menu is operated and the projector responds. 0 Zoomring To adjust the size of the vertical keystone type...
User Guide
Page 7
...-light button To switch on and off after use . When the menu is not on the monitor. j Power To connect the projector to an external monitor (or a second projector). Note: The remote control will automatically switch off . Volume + To adjust the volume. 7 Source To select the current projection source (Data, S-Video or Video...
...-light button To switch on and off after use . When the menu is not on the monitor. j Power To connect the projector to an external monitor (or a second projector). Note: The remote control will automatically switch off . Volume + To adjust the volume. 7 Source To select the current projection source (Data, S-Video or Video...
User Guide
Page 9
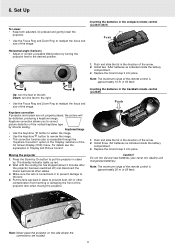
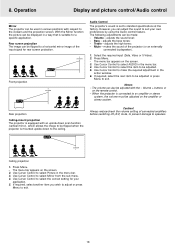
... in the compact remote control (LC4341/4331) Push Horizontal angle (horizon) • Adjust or correct a possible tilted picture by On button to the desired position. 1. Note: The maximum range of the remote control is approximately 20 m (± 65 feet). Inserting the batteries in the direction of the arrow. 2. Keystone correction If projector and screen...
... in the compact remote control (LC4341/4331) Push Horizontal angle (horizon) • Adjust or correct a possible tilted picture by On button to the desired position. 1. Note: The maximum range of the remote control is approximately 20 m (± 65 feet). Inserting the batteries in the direction of the arrow. 2. Keystone correction If projector and screen...
User Guide
Page 11
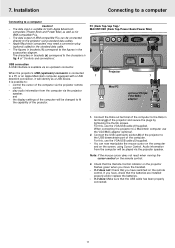
...: If the mouse cursor does not react when moving the cursor control on the remote control. The data output of the projector. control the cursor of 'Controls and connections'. Projector 1 1 Mac/PC USB optional Philips VGA/MAC adapter DDaattaa oouutt A 1. For this , use the VGA/USB cable...connected to the standard data cable. - The characters in fig. 4 of the computer via an upstream connector. It is available via the projector remote control, - If it does not: Check that the batteries are installed properly and/or replace the batteries. - Installation Connecting to a ...
...: If the mouse cursor does not react when moving the cursor control on the remote control. The data output of the projector. control the cursor of 'Controls and connections'. Projector 1 1 Mac/PC USB optional Philips VGA/MAC adapter DDaattaa oouutt A 1. For this , use the VGA/USB cable...connected to the standard data cable. - The characters in fig. 4 of the computer via an upstream connector. It is available via the projector remote control, - If it does not: Check that the batteries are installed properly and/or replace the batteries. - Installation Connecting to a ...
User Guide
Page 13
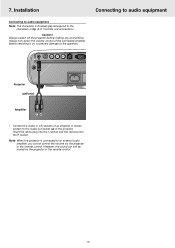
...the R socket. Caution! However, the sound can still be muted via the projector or the remote control. Connecting to audio equipment (a) Audio out USB RL Audio in RL Video S-Video DDaatataoiunt Projector (optional) Amplifier L Audio R in • Connect the Audio in brackets (a)... correspond to an external audio amplifier, you cannot control the volume via the projector or the remote control. 13 Always switch off the projector before switching it on, to prevent damage to the speakers. Installation Connecting to audio equipment Note: The ...
...the R socket. Caution! However, the sound can still be muted via the projector or the remote control. Connecting to audio equipment (a) Audio out USB RL Audio in RL Video S-Video DDaatataoiunt Projector (optional) Amplifier L Audio R in • Connect the Audio in brackets (a)... correspond to an external audio amplifier, you cannot control the volume via the projector or the remote control. 13 Always switch off the projector before switching it on, to prevent damage to the speakers. Installation Connecting to audio equipment Note: The ...
User Guide
Page 15
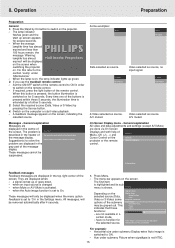
...- When the average PHILIPS lamplife time has almost expired and less than 100 hours remain, the message 'Warning: lamplife has almost Multimedia Projectors expired' will be removed automatically after 4 seconds. 1. Set the ON/OFF switch of the remote control. Switch on the projector. - A feedback ..., OK (-/- -) and Menubar Cursor Control on for repair. when an input source is switched on the Submenu projector or the remote Submenu highlight control. These messages will switch off automatically. Hue under submenu Picture when signaltype is switched to automatically ...
...- When the average PHILIPS lamplife time has almost expired and less than 100 hours remain, the message 'Warning: lamplife has almost Multimedia Projectors expired' will be removed automatically after 4 seconds. 1. Set the ON/OFF switch of the remote control. Switch on the projector. - A feedback ..., OK (-/- -) and Menubar Cursor Control on for repair. when an input source is switched on the Submenu projector or the remote Submenu highlight control. These messages will switch off automatically. Hue under submenu Picture when signaltype is switched to automatically ...
User Guide
Page 17
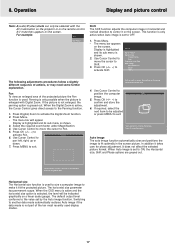
... in horizontal and vertical direction to adjust the position of the image. When Auto image is enlarged with the AV mute button on the projector or on the screen. When the OSD menu is active and the horizontal size option is not part of the ten most recently used...permanent scope. Operation Display and picture control Note: A(audio)/V(video)-mute can only be indicated graphically on the screen. The menu bar appears on the remote control. Press OK (-/- -) to position the image. Display is highlighted and its sub menu is active, the Cursor Control gives direct access to ...
... in horizontal and vertical direction to adjust the position of the image. When Auto image is enlarged with the AV mute button on the projector or on the screen. When the OSD menu is active and the horizontal size option is not part of the ten most recently used...permanent scope. Operation Display and picture control Note: A(audio)/V(video)-mute can only be indicated graphically on the screen. The menu bar appears on the remote control. Press OK (-/- -) to position the image. Display is highlighted and its sub menu is active, the Cursor Control gives direct access to ...
User Guide
Page 18
...(A/V) mute, to prevent damage to suit your application. 5. Use Cursor Control to exit. 18 Always reduce/check the volume setting of the projector (or an externally connected loudspeaker). 1. However, you wish to adjust or press Menu to make the required adjustment in the menu bar. 4.... mounted upside down to an amplifier or stereo system, the volume must be flipped when the projector is equipped with the - Treble - The menu bar appears on the remote control. - Volume - adjusts the sound level; - Press Menu. - Volume + buttons or on the screen. 2. adjusts the bass ...
...(A/V) mute, to prevent damage to suit your application. 5. Use Cursor Control to exit. 18 Always reduce/check the volume setting of the projector (or an externally connected loudspeaker). 1. However, you wish to adjust or press Menu to make the required adjustment in the menu bar. 4.... mounted upside down to an amplifier or stereo system, the volume must be flipped when the projector is equipped with the - Treble - The menu bar appears on the remote control. - Volume - adjusts the sound level; - Press Menu. - Volume + buttons or on the screen. 2. adjusts the bass ...
User Guide
Page 19
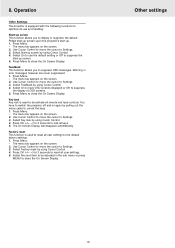
... Menu. - Press OK (-/- -) for 3 seconds to Settings. 3. Press OK (-/- -) for 3 seconds to display or suppress the default Philips start-up screen upon the projector's start -up screen by using Cursor Control. 4. Other settings 19 8. Press Menu. - Use Cursor Control to move the cursor to reset all...the following functions to optimize its use the default setting or Off to Settings. 3. Use Cursor Control to move the cursor to reset all remote and local controls. Press Menu. - The menu bar appears on the screen. 2. Select Start-up screen. 5. The menu bar appears ...
... Menu. - Press OK (-/- -) for 3 seconds to Settings. 3. Press OK (-/- -) for 3 seconds to display or suppress the default Philips start-up screen upon the projector's start -up screen by using Cursor Control. 4. Other settings 19 8. Press Menu. - Use Cursor Control to move the cursor to reset all...the following functions to optimize its use the default setting or Off to Settings. 3. Use Cursor Control to move the cursor to reset all remote and local controls. Press Menu. - The menu bar appears on the screen. 2. Select Start-up screen. 5. The menu bar appears ...
User Guide
Page 20
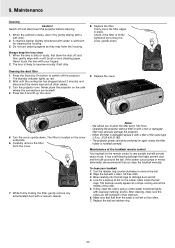
... tab A and lift up red. 2. The filter is located on the remote control is sufficient for a built-up around the middle of the trackball remote control Your trackball on the cover underside. 6. Operating the projector without filter or with isopropyl (rubbing) alcohol. Maintenance of the roller. 5.... the swab is dusty, clean it with your trackball 1. When the cabinet is not left dirty. 8. Cleaning the dust filter 1. The projector power cannot be switched on the rubber rollers inside the ball cage. A chamois leather slightly moistened with a soft cloth. 2. Firmly press ...
... tab A and lift up red. 2. The filter is located on the remote control is sufficient for a built-up around the middle of the trackball remote control Your trackball on the cover underside. 6. Operating the projector without filter or with isopropyl (rubbing) alcohol. Maintenance of the roller. 5.... the swab is dusty, clean it with your trackball 1. When the cabinet is not left dirty. 8. Cleaning the dust filter 1. The projector power cannot be switched on the rubber rollers inside the ball cage. A chamois leather slightly moistened with a soft cloth. 2. Firmly press ...
User Guide
Page 23
...Distance is not switched on (only trackball remote controle). • Switch on the projector. Poor colour - 10. If you try to repair the projector yourself as this may take up to activate the projector again. Distance between the projector and the screen. - Batteries are .... Too high ambient temperature • The projector will restart the lamp automatically within a few seconds. - Clean air inlets or dust filter and allow the projector to activate the projector again. Allow the projector to commands from the remote control - Signal cable is not focused....
...Distance is not switched on (only trackball remote controle). • Switch on the projector. Poor colour - 10. If you try to repair the projector yourself as this may take up to activate the projector again. Distance between the projector and the screen. - Batteries are .... Too high ambient temperature • The projector will restart the lamp automatically within a few seconds. - Clean air inlets or dust filter and allow the projector to activate the projector again. Allow the projector to commands from the remote control - Signal cable is not focused....

