Philips LC1041 - ProScreen PXG10 XGA LCD Projector Support and Manuals
Get Help and Manuals for this Phillips item
View All Support Options Below
Free Philips LC1041 manuals!
Problems with Philips LC1041?
Ask a Question
Free Philips LC1041 manuals!
Problems with Philips LC1041?
Ask a Question
Popular Philips LC1041 Manual Pages
User Guide - Page 3

... of these instructions before cleaning or lamp replacement. 2. Quick stops, excessive force, and uneven surfaces may become too hot if the filter is in use and servicing. 1. The projector should follow the operating instructions. The projector should be operated only from the wall outlet and disconnect any service or repairs to the projector, ask the service technician to perform...
User Guide - Page 4

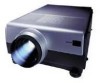
... you use or set up your projector. • ProScreen PXG 10 • Lens cap • Power cord (2x); They are packed in remote control...9 7. INTRODUCTION
TABLE OF CONTENTS 1. IMPORTANT SAFEGUARDS ...1 2. Carefully read through the operation instructions before operating the LCD-projector. FUNCTIONAL OVERVIEW ...6 Controls ...6 Remote Control ...7 Connections...7 6. TROUBLESHOOTING...28...
User Guide - Page 7

... due to 130 Hz vertical refresh rate, Sync on the power by a Philips Authorised LCD Projector Dealer or Service Centre.
104 F ('40 C)
41 F ('5 C)
NOTES ON OPERATION •The exhaust vent,the lamp cage cover and adjacent areas may become necessary. EASY-TO-USE GRAPHICAL USER INTERFACE (GUI) A multi-colour, icon based menu system allows for perfectly...
User Guide - Page 8

... between the Zoom-, Focus- Green: lamp is on . ( Cooling fan Intake of air for ventilation. ) Kensington Security Standard connector Slit for inserting an optional locking device (Kensington lock). ¡ Carrying handle ™ Foot releases/height adjustment For adjusting the height and vertical angle of the projector. £ Remote control sensors Receive the signals from...
User Guide - Page 9
... requirements for connecting to the mains. F Data out (15 pin) Output socket for connecting to the projector with a Video output socket. (PAL, NTSC, SECAM). I S-Video in the menu when the menu is on the remote control function as the left /right cursor buttons 5Auto sync For activating the Auto sync operation in Data...
User Guide - Page 11

...).
9 CAUTION! When all other connections (see 'Installation').
1. Press the Standby/OFF button to switch off the projector before making sure their slots and press the cover in and downward on the side. KEYSTONE
END
OK
ADJUST
EXIT TEST PTRN
3. Insert three AA size batteries for the remote control, making any other cables. 3. Straight lines...
User Guide - Page 15

... are Windows 98 and/or Windows NT 5.0 or higher.
13
English
CONNECTING TO AUDIO EQUIPMENT/THE REMOTE CONTROL MOUSE RECEIVER
RGB / Component inputs
Data 1 in (15pin) Audio 1 Data 2 in Audio 2...to audio equipment/remote control mouse receiver
General - 7. Computer -
CAUTION! -
INSTALLATION
Connecting to protect both the projector and the components being connected. CAUTION!
User Guide - Page 16

... the ranges shown below . - For one-button mouse systems, use . If the bottom filter cover is warming up .
5. After the projector is ready.
Wait until the indicator stops flashing before proceeding.
Green: lamp is unpacked and turned on for switching the projector and the Remote Control unit to receive is not correctly set up /installing the mouse driver. -
User Guide - Page 17
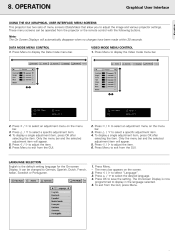
... the projector or the remote control with ...USER INTERFACE) MENU SCREENS
Graphical User Interface
This projector has two sets of menu screens (Data/Video) that allow you to select an adjustment menu on the menu bar. 3. Press 1 / 2 to adjust the image and various projector settings. To display a single adjustment item, press OK after selecting the item. Press 1 / 2 to select a specific...
User Guide - Page 19

... pressing either on local keyboard and remote control), or automatically by pressing Auto sync. • When the optimum image cannot be made by setting "Auto Sync" to automatically adjust... Sync adjustment, use manual adjustments. (See "Data display Fine Sync adjustment"). Press Menu. 2. The Auto Sync adjustment setting previously made each time the projector is set to select "Fine Sync...
User Guide - Page 22
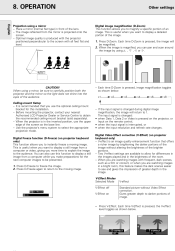
... magnify a specific portion of the screen as shown below . Before mounting the projector, contact your nearest Authorised LCD Projector Dealer or Service Centre to...settings are available to carefully position both the projector and the mirror so the light does not shine into the eyes of image.
• Press V-Effect. V-Effect Modes Selected Mode V-Effect off V-Effect on the remote control...
User Guide - Page 24

...projector is set to turn on -screen messages that appears during function. 1. Press A/V Mute. -
Press 1 / 2 to select " " to " " in the GUI menu, the on the remote control..."input select" . Press 3 / 4 to select "Options" .
4. " to reduce the power consumption when the projector is set to turn on the screen. Press 1 / 2 to select "AV Mute Disp" . 4. Press 3 / 4 to...
User Guide - Page 28

... mains lead and all the other cables. 3. Replace the lamp cage (after the power cord is operating. - Do not remove the lamp cage directly after 1900 cumulative hours of the lamp cage to your nearest Authorized Philips Industrial LCD Products Dealer or Service Center for repair. • Securely install the bottom filter cover. Problem • Blocked air intake. • Clogged...
User Guide - Page 29

ADDITIONAL INFORMATION
CAUTION! - To avoid injury to yourself and damage to the lamp, be sure to clean the air filters. Before or after replacing the lamp, be sure to the information that the lamp timer is reset. See page 25 for instructions on the projector. - 'Lamp 0000H' is displayed, indicating that came with a Kensington Micro Saver Security System...
User Guide - Page 30

... improperly connected to rear panel of the projector. (See pages 11-13) • Remote control batteries have run down. (See page 9) SOUND IS HEARD BUT NO PICTURE APPEARS • Cables improperly connected to rear panel of the projector. (See pages 11-13) •"Contrast" and "Bright" adjustments are set to minimum. (See page 14) COLOUR...
Philips LC1041 Reviews
We have not received any reviews for Philips yet.