
User Manual
Page 2
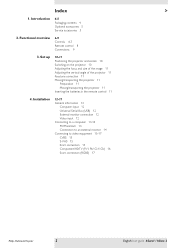
... monitor 14 Connecting to video equipment 15-17 CVBS 15 S-VHS 15 Scart connection 15 Component/HDTV (Pr,Y, Pb/ Cr,Y, Cb) 16 Scart connection (RGBS) 17 Philips Multimedia Projector 2 English User guide bSure1 / bSure 2 Functional overview 6-9 Controls 6-7 Remote control 8 Connections 9 3. Index > 1. Set up 10-11 Positioning the projector and screen 10 Switching on the projector 10 Adjusting the focus and size of the image 11 Adjusting the vertical angle of the projector 11 Keystone correction 11...
... monitor 14 Connecting to video equipment 15-17 CVBS 15 S-VHS 15 Scart connection 15 Component/HDTV (Pr,Y, Pb/ Cr,Y, Cb) 16 Scart connection (RGBS) 17 Philips Multimedia Projector 2 English User guide bSure1 / bSure 2 Functional overview 6-9 Controls 6-7 Remote control 8 Connections 9 3. Index > 1. Set up 10-11 Positioning the projector and screen 10 Switching on the projector 10 Adjusting the focus and size of the image 11 Adjusting the vertical angle of the projector 11 Keystone correction 11...
User Manual
Page 3
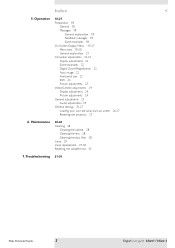
... 22 Digital Zoom/Magnification 22 Auto image 22 Horizontal size 22 Shift 23 Picture adjustments 23 Video/S-Video adjustments 24 Display adjustments 24 Picture adjustments 24 General adjustments 25 Audio adjustments 25 General settings 25-27 Loading your own personal start-up screen Resetting the projector 27 26-27 6. Maintenance 28-30 Cleaning 28 Cleaning the cabinet 28 Cleaning the lens 28 Cleaning the dust filter 28 Lamp 29 Lamp replacement 29-30 Resetting the lamplife time 30 7.Troubleshooting 31-34 Philips Multimedia Projector 3 English User guide bSure1 / bSure 2 Index...
... 22 Digital Zoom/Magnification 22 Auto image 22 Horizontal size 22 Shift 23 Picture adjustments 23 Video/S-Video adjustments 24 Display adjustments 24 Picture adjustments 24 General adjustments 25 Audio adjustments 25 General settings 25-27 Loading your own personal start-up screen Resetting the projector 27 26-27 6. Maintenance 28-30 Cleaning 28 Cleaning the cabinet 28 Cleaning the lens 28 Cleaning the dust filter 28 Lamp 29 Lamp replacement 29-30 Resetting the lamplife time 30 7.Troubleshooting 31-34 Philips Multimedia Projector 3 English User guide bSure1 / bSure 2 Index...
User Manual
Page 6
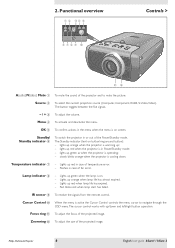
... size of the Power/Standby mode. Philips Multimedia Projector 6 English User guide bSure1 / bSure 2 Menu 4 To activate and deactivate the menu. The Standby indicator (text on screen. Lamp indicator 8 - Focus ring ! Standby/ Standby indicator 6 To switch the projector in Power/Standby mode; - slowly blinks orange when the projector is in or out of the projected image. The button toggles between the five signals. - / + 3 To adjust the volume. Lights up green when the lamp is warming up red when lamp life has expired. - Lights up ; - To adjust the focus of fan...
... size of the Power/Standby mode. Philips Multimedia Projector 6 English User guide bSure1 / bSure 2 Menu 4 To activate and deactivate the menu. The Standby indicator (text on screen. Lamp indicator 8 - Focus ring ! Standby/ Standby indicator 6 To switch the projector in Power/Standby mode; - slowly blinks orange when the projector is in or out of the projected image. The button toggles between the five signals. - / + 3 To adjust the volume. Lights up green when the lamp is warming up red when lamp life has expired. - Lights up ; - To adjust the focus of fan...
User Manual
Page 8
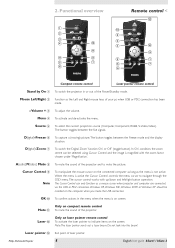
... the Power/Standby mode. Laser @ Only on laser pointer remote control To activate the laser pointer to indicate items on compact remote control Mute ! In 'On' condition, the zoom centre can only function as a mouse cursor when projector and computer are connected via the USB or PS/2 connectors. D(igital)-Freeze 6 To capture a (moving) picture.The button toggles between the five signals. Source 5 To select the current projection source...
... the Power/Standby mode. Laser @ Only on laser pointer remote control To activate the laser pointer to indicate items on compact remote control Mute ! In 'On' condition, the zoom centre can only function as a mouse cursor when projector and computer are connected via the USB or PS/2 connectors. D(igital)-Freeze 6 To capture a (moving) picture.The button toggles between the five signals. Source 5 To select the current projection source...
User Manual
Page 10
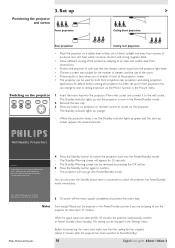
... be used for several seconds. 3. PHILIPS Multimedia Projectors Warning If the projector is now in the Power/Standby mode. 2 Remove the lens cap. 3 Press any button on projector or remote control to rear or ceiling projection via the 'Mirror' function in the 'Picture' menu. When no signal inputs are not going to confirm. - Switching on , the Standby indicator lights up green and the start-up orange. - The projector will appear for more than 15 minutes. You can be removed by Source Lamp Temp Menu...
... be used for several seconds. 3. PHILIPS Multimedia Projectors Warning If the projector is now in the Power/Standby mode. 2 Remove the lens cap. 3 Press any button on projector or remote control to rear or ceiling projection via the 'Mirror' function in the 'Picture' menu. When no signal inputs are not going to confirm. - Switching on , the Standby indicator lights up green and the start-up orange. - The projector will appear for more than 15 minutes. You can be removed by Source Lamp Temp Menu...
User Manual
Page 12
... • Display Data Channel DDC: 1/2B The data output of your projector. Philips Multimedia Projector 12 English User guide bSure1 / bSure 2 Mouse control and 'drag and drop' is in real hot plug and play presentation. Video input The projector accepts the input signal of five picture format options 4:3, 16:9, 16:9 enlarged, 4:3 on a 16:9 screen or 16:9 on the monitor, even when the projector is also possible when PS/2 connection has...
... • Display Data Channel DDC: 1/2B The data output of your projector. Philips Multimedia Projector 12 English User guide bSure1 / bSure 2 Mouse control and 'drag and drop' is in real hot plug and play presentation. Video input The projector accepts the input signal of five picture format options 4:3, 16:9, 16:9 enlarged, 4:3 on a 16:9 screen or 16:9 on the monitor, even when the projector is also possible when PS/2 connection has...
User Manual
Page 14
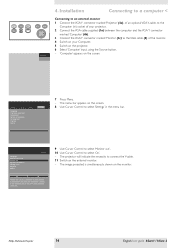
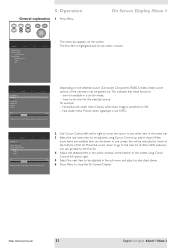
... Source Lamp Temp Menu OK Computer 4. Installation Connecting to a computer < Connecting to select 'On'. - Display Picture Language Keystone correction Monitor out System information... The image projected is to be connected. 9 Use Cursor Control to select 'Monitor out'. 10 Use Cursor Control to an external monitor 1 Connect the VGA Y connector marked 'Projector' (4a), of the monitor. 4 Switch on your Computer. 5 Switch on the projector. 6 Select 'Computer' input, using the Source button. - 'Computer' appears on the screen. Factory reset Key lock (more ) Audio Settings...
... Source Lamp Temp Menu OK Computer 4. Installation Connecting to a computer < Connecting to select 'On'. - Display Picture Language Keystone correction Monitor out System information... The image projected is to be connected. 9 Use Cursor Control to select 'Monitor out'. 10 Use Cursor Control to an external monitor 1 Connect the VGA Y connector marked 'Projector' (4a), of the monitor. 4 Switch on your Computer. 5 Switch on the projector. 6 Select 'Computer' input, using the Source button. - 'Computer' appears on the screen. Factory reset Key lock (more ) Audio Settings...
User Manual
Page 18
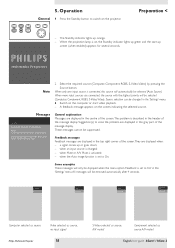
... English User guide bSure1 / bSure 2 PHILIPS Multimedia Projectors Note 2 Select the required source (Computer, Component, RGBS, S-Video,Video) by Source Lamp Temp pj 5. A feedback message appears on the computer or start -up screen (when enabled) appears for repair. a signal comes up orange. - when the Auto image function is properly closed If the problem persists in the 'Settings' menu. Operation General 1 Press the Standby button to solve the problem are connected, the source with the highest priority will switch off automatically. Check...
... English User guide bSure1 / bSure 2 PHILIPS Multimedia Projectors Note 2 Select the required source (Computer, Component, RGBS, S-Video,Video) by Source Lamp Temp pj 5. A feedback message appears on the computer or start -up screen (when enabled) appears for repair. a signal comes up orange. - when the Auto image function is properly closed If the problem persists in the 'Settings' menu. Operation General 1 Press the Standby button to solve the problem are connected, the source with the highest priority will switch off automatically. Check...
User Manual
Page 19
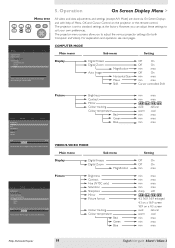
... right to adjust the Red level. Audio Settings Shift is set to adjust the position of Menu, OK and Cursor Control on a 4:3 screen vivid natural warm cool min max min max min max Philips Multimedia Projector 19 English User guide bSure1 / bSure 2 For explanation and operation see next pages. The projector is used to standard settings at the factory. Picture Brightness Contrast Mirror Colour tracking Colour temperature Red Green Blue VIDEO/S-VIDEO MODE Main menu Sub menu Display Digital Freeze Digital Zoom Magnification Picture Brightness...
... right to adjust the Red level. Audio Settings Shift is set to adjust the position of Menu, OK and Cursor Control on a 4:3 screen vivid natural warm cool min max min max min max Philips Multimedia Projector 19 English User guide bSure1 / bSure 2 For explanation and operation see next pages. The projector is used to standard settings at the factory. Picture Brightness Contrast Mirror Colour tracking Colour temperature Red Green Blue VIDEO/S-VIDEO MODE Main menu Sub menu Display Digital Freeze Digital Zoom Magnification Picture Brightness...
User Manual
Page 20
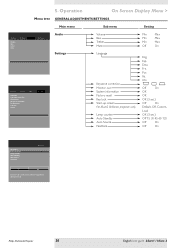
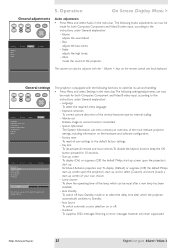
... Feedback Audio Settings Off On The Start-up screen can be shown or suppressed during start-up screen For bSure2 Brilliance projectors only Lamp counter Auto Standby Auto Source Feedback Min Max Min Max Min Max Off On Eng. Esp. Fra. Por. Operation On Screen Display Menu > Menu tree GENERAL ADJUSTMENTS/SETTINGS Main menu Sub menu Setting Display Volume Bass Treble Mute Picture Audio Settings Audio Settings Display Picture Language Keystone correction Monitor out System information... Chi. Philips Multimedia Projector 20 English User guide bSure1 / bSure...
... Feedback Audio Settings Off On The Start-up screen can be shown or suppressed during start-up screen For bSure2 Brilliance projectors only Lamp counter Auto Standby Auto Source Feedback Min Max Min Max Min Max Off On Eng. Esp. Fra. Por. Operation On Screen Display Menu > Menu tree GENERAL ADJUSTMENTS/SETTINGS Main menu Sub menu Setting Display Volume Bass Treble Mute Picture Audio Settings Audio Settings Display Picture Language Keystone correction Monitor out System information... Chi. Philips Multimedia Projector 20 English User guide bSure1 / bSure...
User Manual
Page 21
... on the screen. 5. are available than can go back to adjust the contrast level. Hue under menu 'Display' when Auto image is shown. have no function for the selected source. AV Mute Stand by 'more ) Audio Settings min max Move pointer left and/or right. 5 Select the next item to be indicated by Source Lamp Temp Menu OK On Screen Display Menu > Display Picture Digital Freeze Digital Zoom Magnification Auto Image Horizontal size Phase Shift...
... on the screen. 5. are available than can go back to adjust the contrast level. Hue under menu 'Display' when Auto image is shown. have no function for the selected source. AV Mute Stand by 'more ) Audio Settings min max Move pointer left and/or right. 5 Select the next item to be indicated by Source Lamp Temp Menu OK On Screen Display Menu > Display Picture Digital Freeze Digital Zoom Magnification Auto Image Horizontal size Phase Shift...
User Manual
Page 22
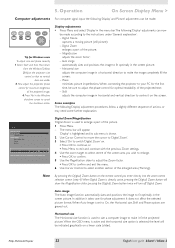
... phase adjustment. Digital Zoom enlarges a part of the enlarged area ('Panning'). Magnification adjusts the zoom factor; - Display Picture Digital Freeze Digital Zoom Magnification Auto Image Horizontal size Phase Shift... Audio Settings off Digital Zoom. Auto image The Auto Image function automatically sizes and positions the image to fit optimally in the Windows shutdown screen to On, the Horizontal size, Shift and Phase options are visible. 3 Now adjust the projectors phase control for the first time, be made . When the OSD menu is...
... phase adjustment. Digital Zoom enlarges a part of the enlarged area ('Panning'). Magnification adjusts the zoom factor; - Display Picture Digital Freeze Digital Zoom Magnification Auto Image Horizontal size Phase Shift... Audio Settings off Digital Zoom. Auto image The Auto Image function automatically sizes and positions the image to fit optimally in the Windows shutdown screen to On, the Horizontal size, Shift and Phase options are visible. 3 Now adjust the projectors phase control for the first time, be made . When the OSD menu is...
User Manual
Page 25
... System Information sub menu contains an overview of the most relevant projector settings, including information on or off Auto Standby mode or to select the delay time after a new lamp has been installed; - Start-up screen To display (On) or suppress (Off) the default Philips start-up screen upon the projector's start up . Auto Source To switch automatic source selection on the hardware and software configuration; - Philips Multimedia Projector 25 English User guide bSure1 / bSure 2 The following settings/adjustments can be shown...
... System Information sub menu contains an overview of the most relevant projector settings, including information on or off Auto Standby mode or to select the delay time after a new lamp has been installed; - Start-up screen To display (On) or suppress (Off) the default Philips start-up screen upon the projector's start up . Auto Source To switch automatic source selection on the hardware and software configuration; - Philips Multimedia Projector 25 English User guide bSure1 / bSure 2 The following settings/adjustments can be shown...

User Manual
Page 26
... Control you can move the cursor to Settings. 3 Select Start-up screen by Source Lamp Temp Menu OK Display Picture Language Keystone correction Monitor out System information... The menu bar disappears and the image is loaded 'Capture complete' and 'Please reset projector' appear on the size of (new) Custom image. Press OK key to reset the projector. Philips Multimedia Projector 26 English User guide bSure1 / bSure 2 Loading your own personal start-up screen (for bSure2 Brilliance projectors only) All settings...
... Control you can move the cursor to Settings. 3 Select Start-up screen by Source Lamp Temp Menu OK Display Picture Language Keystone correction Monitor out System information... The menu bar disappears and the image is loaded 'Capture complete' and 'Please reset projector' appear on the size of (new) Custom image. Press OK key to reset the projector. Philips Multimedia Projector 26 English User guide bSure1 / bSure 2 Loading your own personal start-up screen (for bSure2 Brilliance projectors only) All settings...
User Manual
Page 29
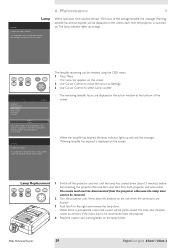
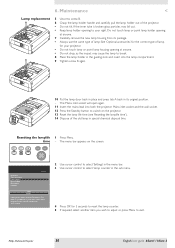
... projector is indicated in the action window at the bottom of the lamp. Lamp Replacement 1 Switch off the projector and wait until the lamp has cooled down (about 5 minutes) before disconnecting the projector. When the lamplife has expired, the lamp indicator lights up screen Lamp counter Auto standby Auto source Feedback Audio Settings Lamp 5 Hours Lamp counter shows the operating hours of the screen. - Remove the mains lead from the projector otherwise the lamp door Stand by Source Lamp Temp Menu OK Display Picture (previous) Start-up red and the message 'Warning...
... projector is indicated in the action window at the bottom of the lamp. Lamp Replacement 1 Switch off the projector and wait until the lamp has cooled down (about 5 minutes) before disconnecting the projector. When the lamplife has expired, the lamp indicator lights up screen Lamp counter Auto standby Auto source Feedback Audio Settings Lamp 5 Hours Lamp counter shows the operating hours of the screen. - Remove the mains lead from the projector otherwise the lamp door Stand by Source Lamp Temp Menu OK Display Picture (previous) Start-up red and the message 'Warning...
User Manual
Page 30
... Standby button to your projector. • Do not touch lamp or point lamp housing opening to switch on the screen. AV Mute Stand by Source Lamp Temp Menu OK Display Picture (previous) Start-up screen Lamp counter Auto standby Auto source Feedback Audio Settings Lamp 0 hours Lamp counter shows the operating hours of the projector. • Do not tilt. Maintenance < Lamp replacement B 5 Unscrew screw B. 6 Grasp the lamp holder handle and carefully pull the lamp holder out of the lamp. If the inner tube is inserted. A 13 Reset the lamp life time...
... Standby button to your projector. • Do not touch lamp or point lamp housing opening to switch on the screen. AV Mute Stand by Source Lamp Temp Menu OK Display Picture (previous) Start-up screen Lamp counter Auto standby Auto source Feedback Audio Settings Lamp 0 hours Lamp counter shows the operating hours of the projector. • Do not tilt. Maintenance < Lamp replacement B 5 Unscrew screw B. 6 Grasp the lamp holder handle and carefully pull the lamp holder out of the lamp. If the inner tube is inserted. A 13 Reset the lamp life time...
User Manual
Page 31
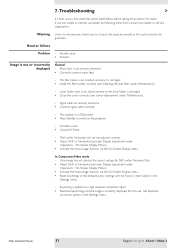
... Display menu. Philips Multimedia Projector 31 English User guide bSure1 / bSure 2 Warning Under no circumstances should you are not adjusted correctly. • Adjust 'Shift' or 'Horizontal size' (see 'Display adjustment' under 'Operation' - 'On Screen Display Menu'). • Activate the 'Auto-image' function via the On Screen Display menu. • Reset all settings to the default factory settings with the 'Factory reset' option in the 'Settings' menu. - The filter holder is not installed correctly or is not or incorrectly displayed General - Read as this use the 'Keystone...
... Display menu. Philips Multimedia Projector 31 English User guide bSure1 / bSure 2 Warning Under no circumstances should you are not adjusted correctly. • Adjust 'Shift' or 'Horizontal size' (see 'Display adjustment' under 'Operation' - 'On Screen Display Menu'). • Activate the 'Auto-image' function via the On Screen Display menu. • Reset all settings to the default factory settings with the 'Factory reset' option in the 'Settings' menu. - The filter holder is not installed correctly or is not or incorrectly displayed General - Read as this use the 'Keystone...
User Manual
Page 32
... the User Guide or support information of RGBS (Scart) connection: - In case of the computer. • If you wish to commands from the remote control - Image is too great. • Reduce distance. - Distance is blurred - For this , refer to keep the keystone correction, decrease the input resolution until the image is correctly displayed. For this , use 'Keystone correction' option in the 'Settings' menu ('Factory reset'). Picture rolls - Audio cable is not correctly connected. • Connect signal cable correctly. Signal cable is...
... the User Guide or support information of RGBS (Scart) connection: - In case of the computer. • If you wish to commands from the remote control - Image is too great. • Reduce distance. - Distance is blurred - For this , refer to keep the keystone correction, decrease the input resolution until the image is correctly displayed. For this , use 'Keystone correction' option in the 'Settings' menu ('Factory reset'). Picture rolls - Audio cable is not correctly connected. • Connect signal cable correctly. Signal cable is...
User Manual
Page 33
... lamp condition. - green: operation mode. - Press Menu and use cursor control to go into Power Standby mode. Philips Multimedia Projector 33 English User guide bSure1 / bSure 2 Reconnect and restart. orange: lamp life has almost expired (less than 100 hours to go into Power/Standby mode. slow blinking (orange): cooling down ; See 'Maintenance'. - fast blinking red: fan error. • The projector will go to cool down; If this may take up screen for 10 seconds to 30 minutes. 7.Troubleshooting > Indicators Lamp indicator - clean air inlets or dust filter...
... lamp condition. - green: operation mode. - Press Menu and use cursor control to go into Power Standby mode. Philips Multimedia Projector 33 English User guide bSure1 / bSure 2 Reconnect and restart. orange: lamp life has almost expired (less than 100 hours to go into Power/Standby mode. slow blinking (orange): cooling down ; See 'Maintenance'. - fast blinking red: fan error. • The projector will go to cool down; If this may take up screen for 10 seconds to 30 minutes. 7.Troubleshooting > Indicators Lamp indicator - clean air inlets or dust filter...
User Manual
Page 34
... projector before switching on the CD-ROM supplied with the computer. • Also refer to the User Guide or support information of the computer. - 'Windows' did not manage to the User Guide or support information of USB connection: • Connect another image. Philips Multimedia Projector 34 English User guide bSure1 / bSure 2 7.Troubleshooting < The mouse cursor does not react when using the cursor control on the remote control General: • Check that the batteries are switched on the laptop...
... projector before switching on the CD-ROM supplied with the computer. • Also refer to the User Guide or support information of the computer. - 'Windows' did not manage to the User Guide or support information of USB connection: • Connect another image. Philips Multimedia Projector 34 English User guide bSure1 / bSure 2 7.Troubleshooting < The mouse cursor does not react when using the cursor control on the remote control General: • Check that the batteries are switched on the laptop...


