
User Guide
Page 4
......5 5. Carefully read through the operation instructions before operating the LCD-projector. INTRODUCTION ...2 3. PACKAGING CONTENTS Please confirm that the following items are provided to remote control mouse receiver ...13 8. RCA adapter • Remote control plus Quick Reference Card • Extra air filter • Registration card 2 FUNCTIONAL OVERVIEW ...6 Controls ...6 Remote Control ...7 Connections...7 6. ADDITIONAL INFORMATION...25-27 Connecting RS-232C Port...25...
......5 5. Carefully read through the operation instructions before operating the LCD-projector. INTRODUCTION ...2 3. PACKAGING CONTENTS Please confirm that the following items are provided to remote control mouse receiver ...13 8. RCA adapter • Remote control plus Quick Reference Card • Extra air filter • Registration card 2 FUNCTIONAL OVERVIEW ...6 Controls ...6 Remote Control ...7 Connections...7 6. ADDITIONAL INFORMATION...25-27 Connecting RS-232C Port...25...

User Guide
Page 7
...PROJECTOR FEATURES English 1. XGA RESOLUTION FOR HIGH RESOLUTION PRESENTATIONS With XGA (1,024 x 768) resolution, this projector can display very detailed presentation information. 12. If the projector ...controlled. 4. AUTO SYNC TECHNOLOGY FOR AUTOMATIC IMAGE PERFECTION Automatically makes any necessary adjustments for higher quality images. and " " will shut off ,the Temperature warning indicator (Temp.) on the power by a Philips Authorised LCD Projector... with the remote control. POWER ZOOM AND FOCUS FUNCTION Features a 130% power zoom function that this projector very easy to...
...PROJECTOR FEATURES English 1. XGA RESOLUTION FOR HIGH RESOLUTION PRESENTATIONS With XGA (1,024 x 768) resolution, this projector can display very detailed presentation information. 12. If the projector ...controlled. 4. AUTO SYNC TECHNOLOGY FOR AUTOMATIC IMAGE PERFECTION Automatically makes any necessary adjustments for higher quality images. and " " will shut off ,the Temperature warning indicator (Temp.) on the power by a Philips Authorised LCD Projector... with the remote control. POWER ZOOM AND FOCUS FUNCTION Features a 130% power zoom function that this projector very easy to...

User Guide
Page 8
...up Red: change the lamp & Audio / Video - Lights up red when the projector enters standby mode. 5. FUNCTIONAL OVERVIEW CONTROLS See illustrations on the screen (activated) 8 Cursor Control When the menu is too high ^ Lamp replacement indicator (Lamp) Lights to indicate the...and vertical angle of the projector. £ Remote control sensors Receive the signals from the remote control. ≤ Speakers ∞ Cooling fan Exhaust of the projector is active the Cursor Control buttons control the menu cursor. The cursor control, by means of the projector (or an externally connected ...
...up Red: change the lamp & Audio / Video - Lights up red when the projector enters standby mode. 5. FUNCTIONAL OVERVIEW CONTROLS See illustrations on the screen (activated) 8 Cursor Control When the menu is too high ^ Lamp replacement indicator (Lamp) Lights to indicate the...and vertical angle of the projector. £ Remote control sensors Receive the signals from the remote control. ≤ Speakers ∞ Cooling fan Exhaust of the projector is active the Cursor Control buttons control the menu cursor. The cursor control, by means of the projector (or an externally connected ...
User Guide
Page 9
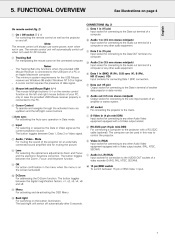
The remote control unit will automatically switch off when not used in (BNC) (R (Pr), G/G sync (Y), B (Pb), HD (C sync), VD) Input sockets for connecting Data 1 BNC connection. A cursor control requires the presence of another data projector or data monitor. D Audio 2 in terminal of data signal. F Data out (...Video output socket. (PAL, NTSC, SECAM). Menu For activating and de-activating the OSD Menu @ Back light For switching on the remote control function as the left and right mouse buttons of a computer or any other Audio Video equipment equipped with a RS-232C cable (optional)....
The remote control unit will automatically switch off when not used in (BNC) (R (Pr), G/G sync (Y), B (Pb), HD (C sync), VD) Input sockets for connecting Data 1 BNC connection. A cursor control requires the presence of another data projector or data monitor. D Audio 2 in terminal of data signal. F Data out (...Video output socket. (PAL, NTSC, SECAM). Menu For activating and de-activating the OSD Menu @ Back light For switching on the remote control function as the left and right mouse buttons of a computer or any other Audio Video equipment equipped with a RS-232C cable (optional)....

User Guide
Page 11
...2. When transporting the projector, carry it is pressed, the screen changes in place to switch off the projector. Press OK to make adjustments. 4. Do not touch the lens when adjusting the focus or zoom. Insert three AA size batteries for the remote control, making any other connections... (see 'Installation'). 1. INSERTING THE BATTERIES IN THE REMOTE CONTROL FOCUS NEXT (Lens...
...2. When transporting the projector, carry it is pressed, the screen changes in place to switch off the projector. Press OK to make adjustments. 4. Do not touch the lens when adjusting the focus or zoom. Insert three AA size batteries for the remote control, making any other connections... (see 'Installation'). 1. INSERTING THE BATTERIES IN THE REMOTE CONTROL FOCUS NEXT (Lens...

User Guide
Page 15
.... The figures in brackets (1) correspond to protect both the projector and the components being connected. For this, use an audio connection cable (optional). (8) • Connect the supplied USB mouse receiver to audio equipment/remote control mouse receiver General - CONNECTING TO AUDIO EQUIPMENT CONNECTING THE REMOTE CONTROL MOUSE RECEIVER When the RS-232C port on page...
.... The figures in brackets (1) correspond to protect both the projector and the components being connected. For this, use an audio connection cable (optional). (8) • Connect the supplied USB mouse receiver to audio equipment/remote control mouse receiver General - CONNECTING TO AUDIO EQUIPMENT CONNECTING THE REMOTE CONTROL MOUSE RECEIVER When the RS-232C port on page...

User Guide
Page 16
...- After the projector is displaying, the warming-up . Notes: - USING THE REMOTE CONTROL (FIG 2) The remote control has the following two functions: • Projector control • Wireless mouse • Slide the remote control power ON/OFF switch into the ON position for switching the projector and the Remote Control unit to change...D1 Remarks: 1) When the power is turned on /off the power 1. The remote control can be emitted from the exhaust vent. Flashing green: warming up red and the projector enters standby mode. Red: change the mode. OPERATION PREPARATION Turning on , the ...
...- After the projector is displaying, the warming-up . Notes: - USING THE REMOTE CONTROL (FIG 2) The remote control has the following two functions: • Projector control • Wireless mouse • Slide the remote control power ON/OFF switch into the ON position for switching the projector and the Remote Control unit to change...D1 Remarks: 1) When the power is turned on /off the power 1. The remote control can be emitted from the exhaust vent. Flashing green: warming up red and the projector enters standby mode. Red: change the mode. OPERATION PREPARATION Turning on , the ...
User Guide
Page 17
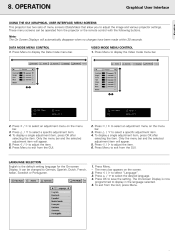
... have been made within 30 seconds. The On-Screen Display is the default setting language for the On-screen Display. To exit from the projector or the remote control with the following buttons. Press Menu to display in the language selected. 5. Press 1 / 2 to select a specific adjustment item. 4. .... Press 1 / 2 to adjust the item. 6. Press Menu to adjust the image and various projector settings. OPERATION USING THE GUI (GRAPHICAL USER INTERFACE) MENU SCREENS Graphical User Interface This projector has two sets of menu screens (Data/Video) that allow you to exit from the GUI. 2....
... have been made within 30 seconds. The On-Screen Display is the default setting language for the On-screen Display. To exit from the projector or the remote control with the following buttons. Press Menu to display in the language selected. 5. Press 1 / 2 to select a specific adjustment item. 4. .... Press 1 / 2 to adjust the item. 6. Press Menu to adjust the image and various projector settings. OPERATION USING THE GUI (GRAPHICAL USER INTERFACE) MENU SCREENS Graphical User Interface This projector has two sets of menu screens (Data/Video) that allow you to exit from the GUI. 2....

User Guide
Page 19
...Menu. 17 English Select the desired computer input mode by pressing either on local keyboard and remote control), or automatically by pressing Auto sync (either Data 1 or Data 2 at the projector local keyboard or toggling the Input button on while connected to "ON": - Menu bar ...be made manually by setting "Auto Sync" to the projector. During Auto Sync adjustment, the On-Screen Display changes: 3. Note: Auto Sync adjustment may occur between the LCD pixels, causing flickering, vertical stripes, or contrast irregularities in the projector's GUI menu. Press 1 / 2 to move the...
...Menu. 17 English Select the desired computer input mode by pressing either on local keyboard and remote control), or automatically by pressing Auto sync (either Data 1 or Data 2 at the projector local keyboard or toggling the Input button on while connected to "ON": - Menu bar ...be made manually by setting "Auto Sync" to the projector. During Auto Sync adjustment, the On-Screen Display changes: 3. Note: Auto Sync adjustment may occur between the LCD pixels, causing flickering, vertical stripes, or contrast irregularities in the projector's GUI menu. Press 1 / 2 to move the...
User Guide
Page 22
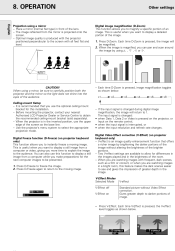
...effect settings are available to instantly freeze a moving image. - Before mounting the projector, contact your nearest Authorised LCD Projector Dealer or Service Centre to select the appropriate projection mode. When the projector is pressed, image magnification toggles as the base line. - Each time D-Zoom...a bright room, this installation. - When you are watching images in the image. Digital Freeze function (D-Freeze) (on the remote control, • when the input signal is an image quality enhancement function that you to be magnified. 2. Press D-Freeze to see...
...effect settings are available to instantly freeze a moving image. - Before mounting the projector, contact your nearest Authorised LCD Projector Dealer or Service Centre to select the appropriate projection mode. When the projector is pressed, image magnification toggles as the base line. - Each time D-Zoom...a bright room, this installation. - When you are watching images in the image. Digital Freeze function (D-Freeze) (on the remote control, • when the input signal is an image quality enhancement function that you to be magnified. 2. Press D-Freeze to see...

User Guide
Page 24
... turn off Economy mode This function allows you to turn off the on -screen messages will not be used for muting the sound of the projector (or an external connected sound amplifier) and for muting the picture. Press 1 / 2 to select " " to turn off On-Screen ... the setting. Press OK to select the desired mode. Other settings To return to select "OSD Display" . 3. 4. 5. 6. Once "OSD Display" is displayed on the remote control. 1. Press 3 / 4 to the original projected image, press A/V Mute again. "AV Mute" is set to turn on or " the On-Screen Display. 5. Turning ...
... turn off Economy mode This function allows you to turn off the on -screen messages will not be used for muting the sound of the projector (or an external connected sound amplifier) and for muting the picture. Press 1 / 2 to select " " to turn off On-Screen ... the setting. Press OK to select the desired mode. Other settings To return to select "OSD Display" . 3. 4. 5. 6. Once "OSD Display" is displayed on the remote control. 1. Press 3 / 4 to the original projected image, press A/V Mute again. "AV Mute" is set to turn on or " the On-Screen Display. 5. Turning ...

User Guide
Page 30
...NO PICTURE AND NO SOUND. 10. Selected input is wrong. (See pages 14) Cables improperly connected to rear panel of the projector. (See pages 11-13) • Remote control batteries have run down. (See page 9) SOUND IS HEARD BUT NO PICTURE APPEARS • Cables improperly connected to rear panel... of the projector. (See pages 11-13) •"Contrast" and "Bright" adjustments are set to minimum position. (See page 18) • On-screen...
...NO PICTURE AND NO SOUND. 10. Selected input is wrong. (See pages 14) Cables improperly connected to rear panel of the projector. (See pages 11-13) • Remote control batteries have run down. (See page 9) SOUND IS HEARD BUT NO PICTURE APPEARS • Cables improperly connected to rear panel... of the projector. (See pages 11-13) •"Contrast" and "Bright" adjustments are set to minimum position. (See page 18) • On-screen...

