Leaflet
Page 2
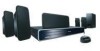
...iPod, Remote Control, 2 x AAA Batteries, CVBS video cable, FM antenna, Product Registration Card, Quick start guide, User Manual, World Wide Warranty leaflet Dimensions • Set dimensions (W x H x D): 435 x 70 x 360 mm • Connect your iPod This unique connection allows you can also enjoy the convenience of direct access and viewing of Koninklijke Philips Electronics N.V. Blu-ray home theater system Specifications HTS5100B/F7 Highlights Picture/Display • Picture enhancement: High Def (720p, 1080i, 1080p), Progressive scan Sound • Sound System: Dolby Digital, Dolby...
...iPod, Remote Control, 2 x AAA Batteries, CVBS video cable, FM antenna, Product Registration Card, Quick start guide, User Manual, World Wide Warranty leaflet Dimensions • Set dimensions (W x H x D): 435 x 70 x 360 mm • Connect your iPod This unique connection allows you can also enjoy the convenience of direct access and viewing of Koninklijke Philips Electronics N.V. Blu-ray home theater system Specifications HTS5100B/F7 Highlights Picture/Display • Picture enhancement: High Def (720p, 1080i, 1080p), Progressive scan Sound • Sound System: Dolby Digital, Dolby...

User manual
Page 2
... your safety. Refer all instructions. 5. The user could lose the authority to correct the interference by turning the equipment off when find trouble or not in accordance with one or more of the obsolete outlet. 10. However, there is made. REFER SERVICING TO QUALIFIED SERVICE PERSONNEL. Heed all warnings. 4. Install in use radio frequency energy. Only use attachments/accessories specified by...
... your safety. Refer all instructions. 5. The user could lose the authority to correct the interference by turning the equipment off when find trouble or not in accordance with one or more of the obsolete outlet. 10. However, there is made. REFER SERVICING TO QUALIFIED SERVICE PERSONNEL. Heed all warnings. 4. Install in use radio frequency energy. Only use attachments/accessories specified by...

User manual
Page 3
... or objects into beam. CAUTION: Visible and invisible laser radiation when open and inter lock defeated. Do not place anything directly on it by U.S. This is protected by the plug. • Do not put your TV set compatibility with this 525p(480p) BD/DVD player, please contact our customer service center. IMPORTANT COPYRIGHT INFORMATION Unauthorized copying, broadcasting, public performance and lending...
... or objects into beam. CAUTION: Visible and invisible laser radiation when open and inter lock defeated. Do not place anything directly on it by U.S. This is protected by the plug. • Do not put your TV set compatibility with this 525p(480p) BD/DVD player, please contact our customer service center. IMPORTANT COPYRIGHT INFORMATION Unauthorized copying, broadcasting, public performance and lending...

User manual
Page 4
... User Manual Remote Control with Batteries (AAAx2) User Manual Registration Card RCA Video Cable 1 Center, 2 Front, 2 Rear Speakers and Subwoofer Quick Start Guide FM Wire Antenna Docking Station 4 EN If you believe the representative will be played back on this unit. Disc handling • Handle the discs so that discs with special shapes (heart-shaped discs, octagonal discs, etc.) cannot be happy to the representative. PRECAUTIONS Maintenance Servicing • Please refer to relevant topics on "TROUBLESHOOTING...
... User Manual Remote Control with Batteries (AAAx2) User Manual Registration Card RCA Video Cable 1 Center, 2 Front, 2 Rear Speakers and Subwoofer Quick Start Guide FM Wire Antenna Docking Station 4 EN If you believe the representative will be played back on this unit. Disc handling • Handle the discs so that discs with special shapes (heart-shaped discs, octagonal discs, etc.) cannot be happy to the representative. PRECAUTIONS Maintenance Servicing • Please refer to relevant topics on "TROUBLESHOOTING...

User manual
Page 6
... 8 Rear Panel 8 Remote Control 9 Front Panel Display 11 Guide to On-Screen Display 12 Connections Connections 13 Placing the Speakers 13 Connection to the TV 13 Connecting Speakers and Subwoofer 16 Connecting Audio from Cable Box/Recorder/Game Console or TV 16 Network Connection with LAN 17 Basic Setup Before You Start 18 Finding the Viewing Channel on Your TV 18 Radio Tuning Radio Operations 32 Tuning to Radio Stations 32 Presetting Radio Stations 32 Selecting a Preset Radio Station 32 Deleting a Preset Radio Station 32 Function Setup List of settings 33 Setups 41 Video...
... 8 Rear Panel 8 Remote Control 9 Front Panel Display 11 Guide to On-Screen Display 12 Connections Connections 13 Placing the Speakers 13 Connection to the TV 13 Connecting Speakers and Subwoofer 16 Connecting Audio from Cable Box/Recorder/Game Console or TV 16 Network Connection with LAN 17 Basic Setup Before You Start 18 Finding the Viewing Channel on Your TV 18 Radio Tuning Radio Operations 32 Tuning to Radio Stations 32 Presetting Radio Stations 32 Selecting a Preset Radio Station 32 Deleting a Preset Radio Station 32 Function Setup List of settings 33 Setups 41 Video...
User manual
Page 7
... only when the display device is connected by an HDMI cable.) Refer to "BD-Video 24p Output" in SD Memory Card You can quickly find what you do not find any of HDMI CEC compliant devices. You can view JPEG digital pictures or listen to the BONUSVIEW function. Radio Tuning Function Setup Others EN 7 Enjoy your content and settings, so you can play back with DVD, CD and SD...
... only when the display device is connected by an HDMI cable.) Refer to "BD-Video 24p Output" in SD Memory Card You can quickly find what you do not find any of HDMI CEC compliant devices. You can view JPEG digital pictures or listen to the BONUSVIEW function. Radio Tuning Function Setup Others EN 7 Enjoy your content and settings, so you can play back with DVD, CD and SD...

User manual
Page 8
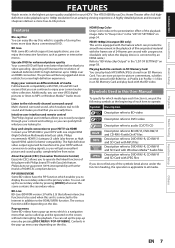
... with a digital audio optical cable. 9. 5.1ch Audio Out jacks (SPEAKERS (6Ω)) • Use to connect to connect a telecommunications equipment with an RCA audio cable. 3. Rear Panel 1 2 34 56 9 87 1. AUDIO IN (AUX) jacks • Use to connect to turn the unit into the standby mode. (To completely shut down the unit. 2. SOURCE button • Press to open or close the disc tray. 4. A (OPEN/CLOSE) button* • Press to select the relevant active source mode; Q (STANDBY-ON) button • Press to turn on page 11. 6. Display •...
... with a digital audio optical cable. 9. 5.1ch Audio Out jacks (SPEAKERS (6Ω)) • Use to connect to connect a telecommunications equipment with an RCA audio cable. 3. Rear Panel 1 2 34 56 9 87 1. AUDIO IN (AUX) jacks • Use to connect to turn the unit into the standby mode. (To completely shut down the unit. 2. SOURCE button • Press to open or close the disc tray. 4. A (OPEN/CLOSE) button* • Press to select the relevant active source mode; Q (STANDBY-ON) button • Press to turn on page 11. 6. Display •...
User manual
Page 9
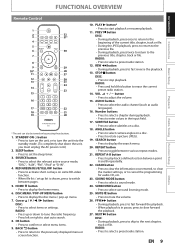
... mode. 25. FUNCTIONAL OVERVIEW Introduction Connections Basic Setup Playback Radio Tuning Function Setup Remote Control 1 2 32 3 31* 4 5 6 30 7 8 9 29 10* 28 11 27 12 26 13 25 24 14 23 15 16 17 22 18 21 19 20 * The unit can also be turned on by pressing these buttons. 1. BACK U button • Press to return to select a preset radio station. 12. RADIO: • Press to the previously displayed menu or screen function...
... mode. 25. FUNCTIONAL OVERVIEW Introduction Connections Basic Setup Playback Radio Tuning Function Setup Remote Control 1 2 32 3 31* 4 5 6 30 7 8 9 29 10* 28 11 27 12 26 13 25 24 14 23 15 16 17 22 18 21 19 20 * The unit can also be turned on by pressing these buttons. 1. BACK U button • Press to return to select a preset radio station. 12. RADIO: • Press to the previously displayed menu or screen function...
User manual
Page 13
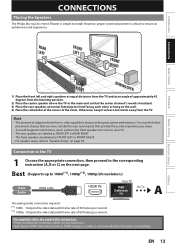
... C) on the wall. 4) Place the subwoofer at normal listening ear level facing each other placement choices that are more suitable for the better compatibility. EN 13 Others Introduction CONNECTIONS Placing the Speakers The Philips Blu-ray Disc Home Theater is simple to 1080i(*1), 1080p(*2), 1080p/24 resolution.) Video Audio HDMI cable HDMI IN Your TV High Definition TV Go To A No analog audio connection required. (*1) 1080i : Outputs the video data with...
... C) on the wall. 4) Place the subwoofer at normal listening ear level facing each other placement choices that are more suitable for the better compatibility. EN 13 Others Introduction CONNECTIONS Placing the Speakers The Philips Blu-ray Disc Home Theater is simple to 1080i(*1), 1080p(*2), 1080p/24 resolution.) Video Audio HDMI cable HDMI IN Your TV High Definition TV Go To A No analog audio connection required. (*1) 1080i : Outputs the video data with...

User manual
Page 15
... the HDMI jack (including the sampling frequency, the number of channels and bit length) may be limited by the device that is connected to a DVI-D compatible display device(s) (HDCP compatible) with device such as this unit, audio signals are output in digital RGB. Playback Radio Tuning Function Setup Others EN 15 In connections with an HDMI- Please read the operating instructions of a BD-video or DVD-video via an HDMI connection, it is copy protection technology that support HDMI...
... the HDMI jack (including the sampling frequency, the number of channels and bit length) may be limited by the device that is connected to a DVI-D compatible display device(s) (HDCP compatible) with device such as this unit, audio signals are output in digital RGB. Playback Radio Tuning Function Setup Others EN 15 In connections with an HDMI- Please read the operating instructions of a BD-video or DVD-video via an HDMI connection, it is copy protection technology that support HDMI...
User manual
Page 19
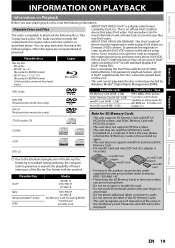
... start playing back a disc, read the SD Memory Cards formatted on a computer. Radio Tuning Function Setup Others EN 19 Other disc types are not guaranteed to open or modify the card. • Do not touch the terminal surface with the DivX® GMC (Recorded in the device setup menu. Plays all versions of the Blu-ray Disc format by DivX, Inc. DVD-video DVD-RW (finalized video mode discs only) DVD-R (finalized video mode discs only...
... start playing back a disc, read the SD Memory Cards formatted on a computer. Radio Tuning Function Setup Others EN 19 Other disc types are not guaranteed to open or modify the card. • Do not touch the terminal surface with the DivX® GMC (Recorded in the device setup menu. Plays all versions of the Blu-ray Disc format by DivX, Inc. DVD-video DVD-RW (finalized video mode discs only) DVD-R (finalized video mode discs only...

User manual
Page 25
... language, you want to play back, then press [BLUE]. You cannot play back the DivX® VOD files with audio format other than one of the disc, or a disc menu which guides you through the menu. "This player does not support this video format." Using the Title / Disc Menu Some BD-video or DVD-video may be recognized. • The 10th and deeper hierarchies cannot be displayed during DivX® playback...
... language, you want to play back, then press [BLUE]. You cannot play back the DivX® VOD files with audio format other than one of the disc, or a disc menu which guides you through the menu. "This player does not support this video format." Using the Title / Disc Menu Some BD-video or DVD-video may be recognized. • The 10th and deeper hierarchies cannot be displayed during DivX® playback...
User manual
Page 26
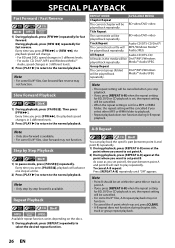
... D]. Repeat Playback REPEAT MODE AVAILABLE MEDIA Chapter Repeat The current chapter will be BD-video/DVD-video played back repeatedly. DivX®/MP3/Windows Media™ Audio/JPEG Note • The repeat setting will be cancelled when ...set , the repeat setting will change. • For BD and DVD, speed changes in 5 different levels. • For audio CD, DivX®, MP3 and Windows Media™ Audio, speed changes in 3 different levels. 2) Press [PLAY B] to return to play back the specific part (between point A and point B will be played back repeatedly. Media™ Audio...
... D]. Repeat Playback REPEAT MODE AVAILABLE MEDIA Chapter Repeat The current chapter will be BD-video/DVD-video played back repeatedly. DivX®/MP3/Windows Media™ Audio/JPEG Note • The repeat setting will be cancelled when ...set , the repeat setting will change. • For BD and DVD, speed changes in 5 different levels. • For audio CD, DivX®, MP3 and Windows Media™ Audio, speed changes in 3 different levels. 2) Press [PLAY B] to return to play back the specific part (between point A and point B will be played back repeatedly. Media™ Audio...
User manual
Page 31
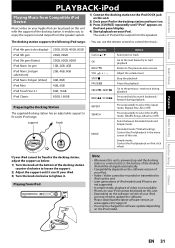
.... 2) Dock your iPod in the menu screen of the docking station. If your iPod cannot be fixed to the docking station, adjust the support as below: 1) Turn the knob at : www.apple.com/support/ • You may need to update the software. Extended mode (*Default setting): Control the iPod playback in the docking station and turn it on this unit with the support of this unit. • Depending on your iPod. Radio Tuning Function Setup Others EN 31 The docking station supports the following iPod...
.... 2) Dock your iPod in the menu screen of the docking station. If your iPod cannot be fixed to the docking station, adjust the support as below: 1) Turn the knob at : www.apple.com/support/ • You may need to update the software. Extended mode (*Default setting): Control the iPod playback in the docking station and turn it on this unit with the support of this unit. • Depending on your iPod. Radio Tuning Function Setup Others EN 31 The docking station supports the following iPod...

User manual
Page 36
... display device is 0ms Listening Mode Listening Setup 2 Channel Setup Surround DTS PCM Dolby Setup Dyn Range Ctrl Center Width Dimension Description Sets the audio format for the sound output from the HDMI OUT. "Off": Mutes the HDMI audio signal. None NEO : 6 Music NEO : 6 Cinema Stereo None 5ch Stereo NEO : 6 Music NEO : 6 Cinema PLII Music PLII Movie Off Min Mid Max Auto You can also change the listening mode by pressing [SURROUND] repeatedly during playback. "Off": Turns off the dynamic range control...
... display device is 0ms Listening Mode Listening Setup 2 Channel Setup Surround DTS PCM Dolby Setup Dyn Range Ctrl Center Width Dimension Description Sets the audio format for the sound output from the HDMI OUT. "Off": Mutes the HDMI audio signal. None NEO : 6 Music NEO : 6 Cinema Stereo None 5ch Stereo NEO : 6 Music NEO : 6 Cinema PLII Music PLII Movie Off Min Mid Max Auto You can also change the listening mode by pressing [SURROUND] repeatedly during playback. "Off": Turns off the dynamic range control...
User manual
Page 41
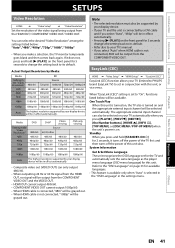
... the VIDEO OUT. • HDMI OUT cannot output 480i/60. • COMPONENT VIDEO OUT cannot output 1080p/60. • When HDMI cable is connected, "480i" will be grayed out. • When HDMI cable is turned on the front panel for 5 seconds to change the setting back to its default. • Refer also to act in effect automatically. One Touch Play When this unit also. Standby When you make a selection, the...
... the VIDEO OUT. • HDMI OUT cannot output 480i/60. • COMPONENT VIDEO OUT cannot output 1080p/60. • When HDMI cable is connected, "480i" will be grayed out. • When HDMI cable is turned on the front panel for 5 seconds to change the setting back to its default. • Refer also to act in effect automatically. One Touch Play When this unit also. Standby When you make a selection, the...

User manual
Page 45
... DNS setting screen. 4-b) DNS setting screen will not be set back to the default settings.) - Radio Tuning Function Setup Others EN 45 Enable(Custom) HOME A "Play Disc Setup" A "Custom" A "Other" A "Network Connection" A "Enable (Custom)" In following settings initially. (In most cases, you can connect to the Internet without making any changes to the default, even if you enter all correctly, press [OK] to go back to complete the settings. When connection test failed with cursor buttons and number buttons...
... DNS setting screen. 4-b) DNS setting screen will not be set back to the default settings.) - Radio Tuning Function Setup Others EN 45 Enable(Custom) HOME A "Play Disc Setup" A "Custom" A "Other" A "Network Connection" A "Enable (Custom)" In following settings initially. (In most cases, you can connect to the Internet without making any changes to the default, even if you enter all correctly, press [OK] to go back to complete the settings. When connection test failed with cursor buttons and number buttons...
User manual
Page 46
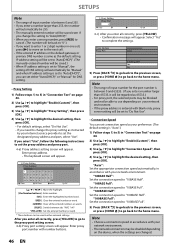
Select "Yes" to "10BASE Full". Yes No 5) Press [BACK U] to go back to the previous screen, or press [HOME ] to go back to the home menu. Note • The range of input number for DNS setting. • Proxy Setting 1) Follow steps 1) to 5) in "Connection Test" on the device, when the settings are changed. 46 EN "Auto": Set the appropriate connection speed automatically, in other network settings. "100BASE Full": Set the...
Select "Yes" to "10BASE Full". Yes No 5) Press [BACK U] to go back to the previous screen, or press [HOME ] to go back to the home menu. Note • The range of input number for DNS setting. • Proxy Setting 1) Follow steps 1) to 5) in "Connection Test" on the device, when the settings are changed. 46 EN "Auto": Set the appropriate connection speed automatically, in other network settings. "100BASE Full": Set the...
User manual
Page 54
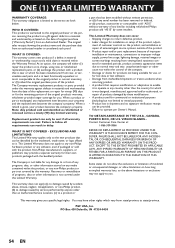
... used for their own products packaged with the product. Note: Any product sold "AS IS" without written permission, or (d) if any serial number has been removed or defaced, or (e) product, accessories or consumables sold and identified as based on the product, and installation or repair of antenna/signal source systems outside of the product. • Product repair and/or part replacement...
... used for their own products packaged with the product. Note: Any product sold "AS IS" without written permission, or (d) if any serial number has been removed or defaced, or (e) product, accessories or consumables sold and identified as based on the product, and installation or repair of antenna/signal source systems outside of the product. • Product repair and/or part replacement...
Quick start guide
Page 2
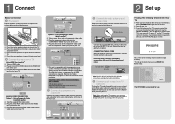
...'s user manual). Extend the wire for use a red and white RCA audio cable (not supplied) to connect the AUDIO IN (AUX) jacks on the main unit to turn on the TV's remote control, then press channel down button repeatedly until "AUX" is compatible with the higher quality pictures than traditional output system does. B Turn on the TV's remote control that accesses the external input channel. Or press "2" on the unit. Home menu: Blu-ray Disc Home Theater System General Setup Video Setup Audio Setup Listening Viewer Play Disc Setup Factory Default The HTS5100B...
...'s user manual). Extend the wire for use a red and white RCA audio cable (not supplied) to connect the AUDIO IN (AUX) jacks on the main unit to turn on the TV's remote control, then press channel down button repeatedly until "AUX" is compatible with the higher quality pictures than traditional output system does. B Turn on the TV's remote control that accesses the external input channel. Or press "2" on the unit. Home menu: Blu-ray Disc Home Theater System General Setup Video Setup Audio Setup Listening Viewer Play Disc Setup Factory Default The HTS5100B...


