
User manual
Page 5
... to provide reasonable protection against harmful interference in accordance with enhanced playback of HDMI licensing LLC. If this copyright protection technology must be determined by turning the equipment off and on a circuit different from Dolby Laboratories. Use of Dolby Laboratories.
... to provide reasonable protection against harmful interference in accordance with enhanced playback of HDMI licensing LLC. If this copyright protection technology must be determined by turning the equipment off and on a circuit different from Dolby Laboratories. Use of Dolby Laboratories.
User manual
Page 7
... a preset radio station...50 Others Sound and Volume Controls 51 Volume control ...51 Selecting surround sound...51 Selecting digital sound effects...51 Other Features...52 Turning on the sleep timer ...52 Installing the latest software ...52 Troubleshooting...53-55 Glossary...56-57 Specifications ...58 1_hts3565-66D_37_eng2_final813.i7 7 7 2008-03-27 3:11...
... a preset radio station...50 Others Sound and Volume Controls 51 Volume control ...51 Selecting surround sound...51 Selecting digital sound effects...51 Other Features...52 Turning on the sleep timer ...52 Installing the latest software ...52 Troubleshooting...53-55 Glossary...56-57 Specifications ...58 1_hts3565-66D_37_eng2_final813.i7 7 7 2008-03-27 3:11...
User manual
Page 9
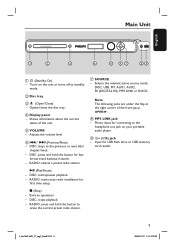
Turns on your portable audio player. Opens/closes the disc tray. Adjusts the volume level. DISC: starts/pauses playback. - Exits an operation. - Note: The following jacks ... title/ chapter/track. - i (USB) jack - RADIO: press and hold this button to standby mode. DISC: skips to the headphone out jack on this unit or turns off to erase the current preset radio station. Phono input for fast forward and backward search. - g SOURCE - Main Unit English 1 2 3 4 5 67 89 a 2 (Standby-On) - b Disc...
Turns on your portable audio player. Opens/closes the disc tray. Adjusts the volume level. DISC: starts/pauses playback. - Exits an operation. - Note: The following jacks ... title/ chapter/track. - i (USB) jack - RADIO: press and hold this button to standby mode. DISC: skips to the headphone out jack on this unit or turns off to erase the current preset radio station. Phono input for fast forward and backward search. - g SOURCE - Main Unit English 1 2 3 4 5 67 89 a 2 (Standby-On) - b Disc...
User manual
Page 10
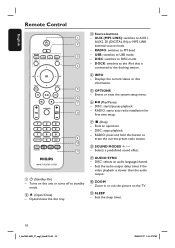
...out the picture on this button to FM band. - Displays the current status or disc information. RADIO: press and hold this unit or turns off to AUX1, AUX2, DI (DIGITAL IN) or MP3 LINK external source mode. - DISC: selects an audio language/channel. - RADIO:... switches to erase the current preset radio station. Turns on the TV. AUX (MP3 LINK): switches to standby mode. d INFO - RADIO: starts auto radio installation for first time setup. English Remote Control 1 2 3 4...
...out the picture on this button to FM band. - Displays the current status or disc information. RADIO: press and hold this unit or turns off to AUX1, AUX2, DI (DIGITAL IN) or MP3 LINK external source mode. - DISC: selects an audio language/channel. - RADIO:... switches to erase the current preset radio station. Turns on the TV. AUX (MP3 LINK): switches to standby mode. d INFO - RADIO: starts auto radio installation for first time setup. English Remote Control 1 2 3 4...

User manual
Page 11
... a DVD subtitle language. DISC: selects various repeat or shuffle modes; English Remote Control (continued) l OK - RADIO: selects a preset radio station. Adjusts the volume level. r SURROUND - turns off repeat or shuffle mode. - s Numeric keypad 0-9 - Enters a number of the disc. - RADIO: press this button to start manual preset programming. - p % (Mute) - DVD: go back...
... a DVD subtitle language. DISC: selects various repeat or shuffle modes; English Remote Control (continued) l OK - RADIO: selects a preset radio station. Adjusts the volume level. r SURROUND - turns off repeat or shuffle mode. - s Numeric keypad 0-9 - Enters a number of the disc. - RADIO: press this button to start manual preset programming. - p % (Mute) - DVD: go back...
User manual
Page 20
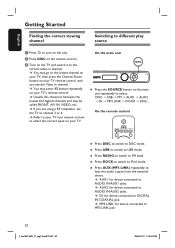
...' for device connected to AUDIO IN-AUX2 jacks. 'DI' for device connected to DIGITAL IN-COAXIAL jack. 'MP3 LINK' for device connected to DISC mode. C Turn on the remote control. You may go to the lowest channel on your TV, then press the Channel Down button on your TV remote control... Press the SOURCE button on the unit. You may be called FRONT, A/V IN, VIDEO, etc.. English Getting Started Finding the correct viewing channel A Press 2 to turn on the main unit repeatedly to select: DISC USB FM AUX1 AUX2 DI MP3 LINK DOCK DISC ... Press DOCK to switch to iPod mode.
...' for device connected to AUDIO IN-AUX2 jacks. 'DI' for device connected to DIGITAL IN-COAXIAL jack. 'MP3 LINK' for device connected to DISC mode. C Turn on the remote control. You may go to the lowest channel on your TV, then press the Channel Down button on your TV remote control... Press the SOURCE button on the unit. You may be called FRONT, A/V IN, VIDEO, etc.. English Getting Started Finding the correct viewing channel A Press 2 to turn on the main unit repeatedly to select: DISC USB FM AUX1 AUX2 DI MP3 LINK DOCK DISC ... Press DOCK to switch to iPod mode.

User manual
Page 23
...and quality. English Getting Started (continued) Setting up Progressive Scan feature (for the auto recovery. - There will be no picture is turned off the progressive scan feature on the remote control. Helpful Hints: - Make sure that are some progressive scan TV that the TV ...HDMI Setup Closed Caption F Read the notification message on your TV. In such a case, turn off (or set to interlaced mode.) Refer to a Progressive Scan TV or component video input'.) A Turn on the remote control. D Press repeatedly to confirm. 1_hts3565-66D_37_eng2_final813.i23 23 23 2008-03...
...and quality. English Getting Started (continued) Setting up Progressive Scan feature (for the auto recovery. - There will be no picture is turned off the progressive scan feature on the remote control. Helpful Hints: - Make sure that are some progressive scan TV that the TV ...HDMI Setup Closed Caption F Read the notification message on your TV. In such a case, turn off (or set to interlaced mode.) Refer to a Progressive Scan TV or component video input'.) A Turn on the remote control. D Press repeatedly to confirm. 1_hts3565-66D_37_eng2_final813.i23 23 23 2008-03...
User manual
Page 25
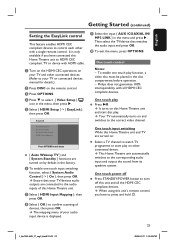
...Input Mapping }, then press OK. J To exit the menu, press OPTIONS. Philips does not guarantee 100% interoperability with all the HDMI CEC compliant devices. One...Control HDMI Input Mapping Press OPTIONS to exit menu { Auto Wakeup TV } and { System Standby } functions are turned on; H Select { OK } to confirm scanning of your audio input device is only available if you have...are connected to the audio inputs of this unit and all HDMI CEC compliant devices. Your TV automatically turns on and switches to the corresponding audio input and output the sound from its speakers system. It is...
...Input Mapping }, then press OK. J To exit the menu, press OPTIONS. Philips does not guarantee 100% interoperability with all the HDMI CEC compliant devices. One...Control HDMI Input Mapping Press OPTIONS to exit menu { Auto Wakeup TV } and { System Standby } functions are turned on; H Select { OK } to confirm scanning of your audio input device is only available if you have...are connected to the audio inputs of this unit and all HDMI CEC compliant devices. Your TV automatically turns on and switches to the corresponding audio input and output the sound from its speakers system. It is...
User manual
Page 26
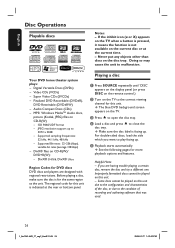
...; Ultra Region Codes for this unit. - Playing a disc A Press SOURCE repeatedly until 'DISC' appears on the display panel (or press DISC on the remote control.) B Turn on this unit due to the configuration and characteristics of the disc, or due to the correct viewing channel for DVD discs DVD discs and...
...; Ultra Region Codes for this unit. - Playing a disc A Press SOURCE repeatedly until 'DISC' appears on the display panel (or press DISC on the remote control.) B Turn on this unit due to the configuration and characteristics of the disc, or due to the correct viewing channel for DVD discs DVD discs and...
User manual
Page 27
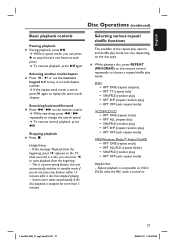
.../ shuffle functions The available of the repeat play options and shuffle play mode. While searching, press m / M repeatedly to replay the same track/ chapter. This is turned on the remote control. DVD RPT ONE (repeat chapter) RPT TT (repeat title) SHUFFLE (random play) RPT SHF (repeat random play) RPT OFF (exit repeat...
.../ shuffle functions The available of the repeat play options and shuffle play mode. While searching, press m / M repeatedly to replay the same track/ chapter. This is turned on the remote control. DVD RPT ONE (repeat chapter) RPT TT (repeat title) SHUFFLE (random play) RPT SHF (repeat random play) RPT OFF (exit repeat...
User manual
Page 30
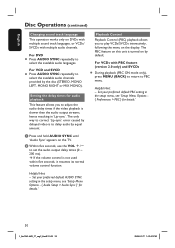
... disc (STEREO, MONO LEFT, MONO RIGHT or MIX MONO). Set your preferred default PBC setting in 'Lip-sync'. The PBC feature on this unit is turned on DVDs with multiple sound track languages, or VCDs/ SVCDs with PBC feature (version 2.0 only) and SVCDs During playback (PBC ON mode only), press MENU...
... disc (STEREO, MONO LEFT, MONO RIGHT or MIX MONO). Set your preferred default PBC setting in 'Lip-sync'. The PBC feature on this unit is turned on DVDs with multiple sound track languages, or VCDs/ SVCDs with PBC feature (version 2.0 only) and SVCDs During playback (PBC ON mode only), press MENU...
User manual
Page 32
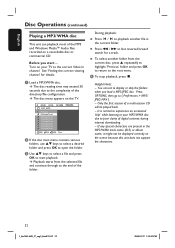
Turn on a recordable disc or commercial CD. During playback; To select another file in the MP3/WMA track name (ID3) or album name, it might not ...
Turn on a recordable disc or commercial CD. During playback; To select another file in the MP3/WMA track name (ID3) or album name, it might not ...
User manual
Page 33
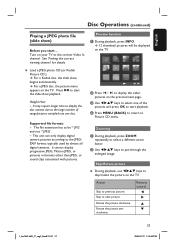
Turn on the TV. See 'Finding the correct viewing channel' for details. Preview function A During playback, press INFO. 12 thumbnail pictures will be '*.JPG' and not '*....
Turn on the TV. See 'Finding the correct viewing channel' for details. Preview function A During playback, press INFO. 12 thumbnail pictures will be '*.JPG' and not '*....
User manual
Page 35
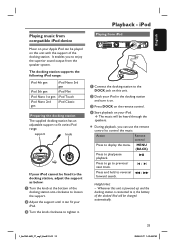
... Press to display the menu. The music will be charged automatically. 1_hts3565-66D_37_eng2_final813.i35 35 35 2008-03-27 3:12:04 PM C Turn the knob clockwise to tighten it on. Whenever this unit is powered up and the docking station is connected to it can fit your iPod...the docking station anti-clockwise to loosen the support. B Dock your iPod. Helpful Hint: - D Start playback on your iPod in the docking station and turn it . During playback, you to enjoy the superior sound output from iPod AUX 2 AUX 1 A Connect the docking station to fit varies iPod range. ...
... Press to display the menu. The music will be charged automatically. 1_hts3565-66D_37_eng2_final813.i35 35 35 2008-03-27 3:12:04 PM C Turn the knob clockwise to tighten it on. Whenever this unit is powered up and the docking station is connected to it can fit your iPod...the docking station anti-clockwise to loosen the support. B Dock your iPod. Helpful Hint: - D Start playback on your iPod in the docking station and turn it . During playback, you to enjoy the superior sound output from iPod AUX 2 AUX 1 A Connect the docking station to fit varies iPod range. ...

User manual
Page 39
...disc requires a six-digit password. You can only be played. OSD Language Select the menu language for details.) { Unlock } - DivX(R) VOD Code Philips provides you with the disc lock function. Display Dim Select the brightness of this unit's display panel. { 100% } - To block the playback of... to standby mode automatically. { Off } - All discs can be locked. { Lock } - This switches off the sleep mode function. Turn off all discs are the factory default settings) Disc Lock Not all LEDs and icons on the front display panel of this unit. Up to...
...disc requires a six-digit password. You can only be played. OSD Language Select the menu language for details.) { Unlock } - DivX(R) VOD Code Philips provides you with the disc lock function. Display Dim Select the brightness of this unit's display panel. { 100% } - To block the playback of... to standby mode automatically. { Off } - All discs can be locked. { Lock } - This switches off the sleep mode function. Turn off all discs are the factory default settings) Disc Lock Not all LEDs and icons on the front display panel of this unit. Up to...

User manual
Page 40
See 'Getting Started - Turn off the HDMI audio output. It may take a while for the center and rear speakers based on the listening position and distance. Speakers Delay Access ...
See 'Getting Started - Turn off the HDMI audio output. It may take a while for the center and rear speakers based on the listening position and distance. Speakers Delay Access ...

User manual
Page 41
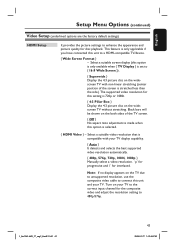
... feature allows you to adjust the audio delay times if the video playback is not available if you press SURROUND on the remote control, it turns off CD-upsampling. { 88.2 kHz (X2) } - This function is slower than the audio output streams. Use keys to set the delay times for better sound...
... feature allows you to adjust the audio delay times if the video playback is not available if you press SURROUND on the remote control, it turns off CD-upsampling. { 88.2 kHz (X2) } - This function is slower than the audio output streams. Use keys to set the delay times for better sound...
User manual
Page 42
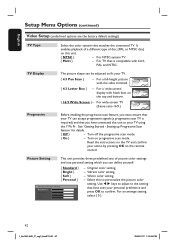
... that is required) and that your TV can accept progressive signals (a progressive scan TV is compatible with both PAL and NTSC. Turn on the remote control. For NTSC-system TV. { Multi } - Turn off the progressive scan mode. { On } - Vibrant color setting. - Use keys to adjust to personalize the picture color setting. See...
... that is required) and that your TV can accept progressive signals (a progressive scan TV is compatible with both PAL and NTSC. Turn on the remote control. For NTSC-system TV. { Multi } - Turn off the progressive scan mode. { On } - Vibrant color setting. - Use keys to adjust to personalize the picture color setting. See...
User manual
Page 43
This feature is selected. { HDMI Video } - Turn on your TV to the correct input channel for interlaced. Note: If no display appears on the TV due to unsupported resolution, use the composite ...
This feature is selected. { HDMI Video } - Turn on your TV to the correct input channel for interlaced. Note: If no display appears on the TV due to unsupported resolution, use the composite ...

User manual
Page 44
... this unit remote control can enjoy the EasyLink controls. See your TV/ devices before you can still turn on your TVs/ devices manual for details. - Philips does not guarantee 100% interoperability with HDMI CEC. - Note: However, press and hold 2 button on this unit and all the HDMI CEC compliant devices. Your ...
... this unit remote control can enjoy the EasyLink controls. See your TV/ devices before you can still turn on your TVs/ devices manual for details. - Philips does not guarantee 100% interoperability with HDMI CEC. - Note: However, press and hold 2 button on this unit and all the HDMI CEC compliant devices. Your ...


