

User manual
Page 7
...sound 33 Selecting digital sound effects 34 Volume Control 34 Dimming system's display screen 34 Using the remote to operate 'Philips' television 34 Specifications 35 Troubleshooting 36-37 Glossary 38-39 Limited Warranty 40 7 turning on/off 19 Adjusting the delay...turning on/off 28 Screen saver - English General Information Supplied accessories 8 Care and safety information 8 Connections Step 1: Placing the speakers and subwoofer .. 9 Step 2: Connecting speakers and subwoofer 10 Step 3: Connecting TV 11 Using Composite Video jack 11 Using Component Video jack (Y Pb Pr) .. 11 ...
...sound 33 Selecting digital sound effects 34 Volume Control 34 Dimming system's display screen 34 Using the remote to operate 'Philips' television 34 Specifications 35 Troubleshooting 36-37 Glossary 38-39 Limited Warranty 40 7 turning on/off 19 Adjusting the delay...turning on/off 28 Screen saver - English General Information Supplied accessories 8 Care and safety information 8 Connections Step 1: Placing the speakers and subwoofer .. 9 Step 2: Connecting speakers and subwoofer 10 Step 3: Connecting TV 11 Using Composite Video jack 11 Using Component Video jack (Y Pb Pr) .. 11 ...
User manual
Page 9
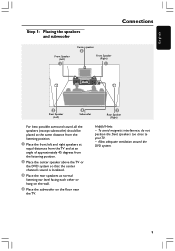
... the speakers and subwoofer Front Speaker (Left) 1 Center speaker 2 Front Speaker (Right) 1 Connections 3 Rear Speaker (Left) 4 Subwoofer 3 Rear Speaker (Right) For best possible surround sound, all the speakers (except subwoofer) should be placed at the same distance from the listening position. 1 Place the front left and right speakers at ... approximately 45 degrees from the listening position. 2 Place the center speaker above the TV or the DVD system so that the center channel's sound is localized. 3 Place the rear speakers at normal listening ear level facing each other or hang on the...
... the speakers and subwoofer Front Speaker (Left) 1 Center speaker 2 Front Speaker (Right) 1 Connections 3 Rear Speaker (Left) 4 Subwoofer 3 Rear Speaker (Right) For best possible surround sound, all the speakers (except subwoofer) should be placed at the same distance from the listening position. 1 Place the front left and right speakers at ... approximately 45 degrees from the listening position. 2 Place the center speaker above the TV or the DVD system so that the center channel's sound is localized. 3 Place the rear speakers at normal listening ear level facing each other or hang on the...
User manual
Page 10
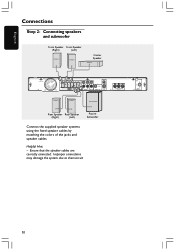
English Connections Step 2: Connecting speakers and subwoofer Front Speaker Front Speaker (Right) (Left) FRONT R FRONT L Center Speaker CENTER REAR R REAR L SUBWOOFER Rear Speaker Rear Speaker (Right) (Left) Passive Subwoofer Connect the supplied speaker systems using the fixed speaker cables by matching the colors of the jacks and speaker cables. Helpful Hint: - Ensure that the speaker cables are correctly connected. Improper connections may damage the system due to short-circuit. 10
English Connections Step 2: Connecting speakers and subwoofer Front Speaker Front Speaker (Right) (Left) FRONT R FRONT L Center Speaker CENTER REAR R REAR L SUBWOOFER Rear Speaker Rear Speaker (Right) (Left) Passive Subwoofer Connect the supplied speaker systems using the fixed speaker cables by matching the colors of the jacks and speaker cables. Helpful Hint: - Ensure that the speaker cables are correctly connected. Improper connections may damage the system due to short-circuit. 10
User manual
Page 15
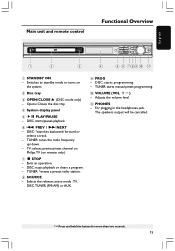
Switches to standby mode or turns on remote only.) 7 Ç STOP - DISC: stops playback or clears a program. - The speakers output will be cancelled. * = Press and hold the button for more than two seconds. 15 TUNER: *erases a preset radio station. 8 SOURCE - Opens/ Closes.... ! For plugging in the headphones jack. Selects the relevant active mode :TV, DISC,TUNER (FM/AM) or AUX. 9 PROG - TV: selects previous/next channel on Philips TV (on the system. 2 Disc tray 3 OPEN /CLOSE 0 (DISC mode only) - DISC: starts/pauses playback. 6 S PREV / T NEXT - English Main unit and remote ...
Switches to standby mode or turns on remote only.) 7 Ç STOP - DISC: stops playback or clears a program. - The speakers output will be cancelled. * = Press and hold the button for more than two seconds. 15 TUNER: *erases a preset radio station. 8 SOURCE - Opens/ Closes.... ! For plugging in the headphones jack. Selects the relevant active mode :TV, DISC,TUNER (FM/AM) or AUX. 9 PROG - TV: selects previous/next channel on Philips TV (on the system. 2 Disc tray 3 OPEN /CLOSE 0 (DISC mode only) - DISC: starts/pauses playback. 6 S PREV / T NEXT - English Main unit and remote ...
User manual
Page 16
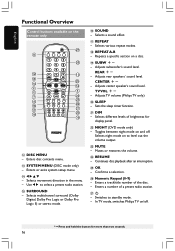
...for more than two seconds. 16 Enters disc contents menu. # SYSTEM MENU (DISC mode only) - Selects a sound effect. & REPEAT - Adjusts center speaker's sound level. Selects night mode on the remote only 27 8 26 12 10 13 25 14 14 6 6 5 7 24 15 23 16 22 17...off . Adjusts TV volume (Philips TV only.) ) SLEEP - Switches to select a preset radio station. % SURROUND - Enters or exits system setup menu. $ 1234 - Selects multichannel surround (Dolby Digital, Dolby Pro Logic or Dolby Pro Logic II) or stereo mode. ^ SOUND - Adjusts rear speakers' sound level. Selects different ...
...for more than two seconds. 16 Enters disc contents menu. # SYSTEM MENU (DISC mode only) - Selects a sound effect. & REPEAT - Adjusts center speaker's sound level. Selects night mode on the remote only 27 8 26 12 10 13 25 14 14 6 6 5 7 24 15 23 16 22 17...off . Adjusts TV volume (Philips TV only.) ) SLEEP - Switches to select a preset radio station. % SURROUND - Enters or exits system setup menu. $ 1234 - Selects multichannel surround (Dolby Digital, Dolby Pro Logic or Dolby Pro Logic II) or stereo mode. ^ SOUND - Adjusts rear speakers' sound level. Selects different ...
User manual
Page 19
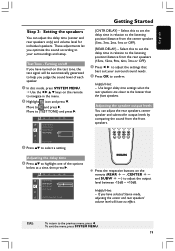
... adjustments let you optimize the sound according to {TEST TONE} and press 2. Move to your surround sound needs. 6 Press OK to highlight one of each speaker. 1 In disc mode, press SYSTEM MENU. ➜ Use the 1 2 3 4 keys on the test tone, the test signal will be automatically generated to help you ... a setting. {CNTR DELAY} - Select this to set the delay time in relation to navigate in relation to the listening position/distance from the rear speakers (15ms, 12ms, 9ms, 6ms, 3ms or OFF). 5 Press 1 2 to adjust the settings that best suit your surroundings and setup. Adjusting the...
... adjustments let you optimize the sound according to {TEST TONE} and press 2. Move to your surround sound needs. 6 Press OK to highlight one of each speaker. 1 In disc mode, press SYSTEM MENU. ➜ Use the 1 2 3 4 keys on the test tone, the test signal will be automatically generated to help you ... a setting. {CNTR DELAY} - Select this to set the delay time in relation to navigate in relation to the listening position/distance from the rear speakers (15ms, 12ms, 9ms, 6ms, 3ms or OFF). 5 Press 1 2 to adjust the settings that best suit your surroundings and setup. Adjusting the...
User manual
Page 33
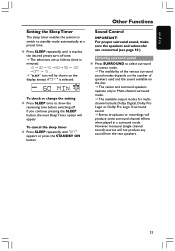
...stereo mode. ➜ The availability of the various surround sound modes depends on the number of speakers used and the sound available on the disc. ➜ The center and surround speakers operate only in Multi-channel surround mode. ➜ The available output modes for multichannel include: ...; 15 ... ➜ "SLEEP" icon will be shown on the display, except if "OFF" is selected. For proper surround sound, make sure the speakers and subwoofer are as follows (time in a surround mode. G Press SLEEP repeatedly until "OFF" appears or press the STANDBY ON button. However, monaural ...
...stereo mode. ➜ The availability of the various surround sound modes depends on the number of speakers used and the sound available on the disc. ➜ The center and surround speakers operate only in Multi-channel surround mode. ➜ The available output modes for multichannel include: ...; 15 ... ➜ "SLEEP" icon will be shown on the display, except if "OFF" is selected. For proper surround sound, make sure the speakers and subwoofer are as follows (time in a surround mode. G Press SLEEP repeatedly until "OFF" appears or press the STANDBY ON button. However, monaural ...
User manual
Page 34
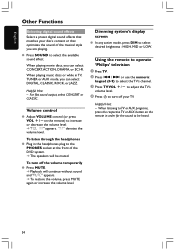
... or AUX button on the remote) to turn off your disc's content or that optimizes the sound of the DVD system. ➜ The speakers will continue without sound and "MUTE" appears. ➜ To restore the volume, press MUTE again or increase the volume level. When playing ...or while in order for the sound to select desired brightness : HIGH, MID or LOW. "XX" denotes the volume level. Using the remote to operate 'Philips' television 1 Press TV. 2 Press S / T or use the numeric keypad (0-9) to select the available sound effect. English Other Functions Selecting digital sound ...
... or AUX button on the remote) to turn off your disc's content or that optimizes the sound of the DVD system. ➜ The speakers will continue without sound and "MUTE" appears. ➜ To restore the volume, press MUTE again or increase the volume level. When playing ...or while in order for the sound to select desired brightness : HIGH, MID or LOW. "XX" denotes the volume level. Using the remote to operate 'Philips' television 1 Press TV. 2 Press S / T or use the numeric keypad (0-9) to select the available sound effect. English Other Functions Selecting digital sound ...
User manual
Page 35
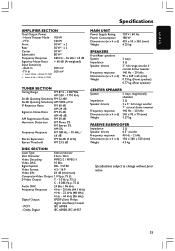
...Response 4 Hz - 20 kHz (44.1 kHz) 4 Hz - 22 kHz (48 kHz) 4 Hz - 44 kHz (96 kHz) Digital Output SPDIF (Sony Philips digital interface) Coaxial - Dolby Digital IEC 60958, IEC 61937 MAIN UNIT Power Supply Rating Power Consumption Dimensions (w x h x d) Weight 120 V / 60 Hz... 180 W 435 x 53 x 365 (mm) 4.25 kg SPEAKERS Front/Rear speakers System Impedance Speaker drivers Frequency response Dimensions (w x h x d) Weight 2 ways 3 Ω 3" full range woofer, 1" conical dome tweeter 140 Hz - 20 kHz 93 ...
...Response 4 Hz - 20 kHz (44.1 kHz) 4 Hz - 22 kHz (48 kHz) 4 Hz - 44 kHz (96 kHz) Digital Output SPDIF (Sony Philips digital interface) Coaxial - Dolby Digital IEC 60958, IEC 61937 MAIN UNIT Power Supply Rating Power Consumption Dimensions (w x h x d) Weight 120 V / 60 Hz... 180 W 435 x 53 x 365 (mm) 4.25 kg SPEAKERS Front/Rear speakers System Impedance Speaker drivers Frequency response Dimensions (w x h x d) Weight 2 ways 3 Ω 3" full range woofer, 1" conical dome tweeter 140 Hz - 20 kHz 93 ...
User manual
Page 36
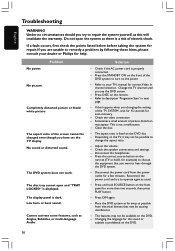
... remote (TV or AUX, for example) to choose the equipment that may not be possible to change the aspect ratio. - Refer to your dealer or Philips for help. If this will invalidate the warranty. Disconnect the power cord from electrical devices that you see the DVD screen. - If you try to... system as far away as Angles, Subtitles, or multi-language Audio. Problem No picture. Check if the AC power cord is properly connected. - Check the speaker connections and settings. -
... remote (TV or AUX, for example) to choose the equipment that may not be possible to change the aspect ratio. - Refer to your dealer or Philips for help. If this will invalidate the warranty. Disconnect the power cord from electrical devices that you see the DVD screen. - If you try to... system as far away as Angles, Subtitles, or multi-language Audio. Problem No picture. Check if the AC power cord is properly connected. - Check the speaker connections and settings. -
User manual
Page 37
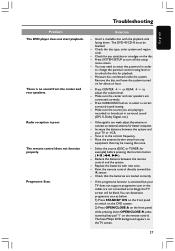
...code. - Press SURROUND button to turn off the setup menu screen. - The blue Philips DVD background appears on the remote control. There is activated but your TV or VCR. - Make sure the center and rear speakers are playing is poor. Place the antenna farther away from the center and rear... speakers. Check that may need to enter the password in to switch on the DVD system. 2) Press ...
...code. - Press SURROUND button to turn off the setup menu screen. - The blue Philips DVD background appears on the remote control. There is activated but your TV or VCR. - Make sure the center and rear speakers are playing is poor. Place the antenna farther away from the center and rear... speakers. Check that may need to enter the password in to switch on the DVD system. 2) Press ...
User manual
Page 39
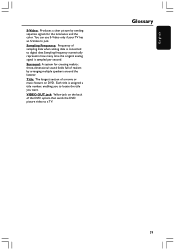
... sampling data when analog data is converted to a TV. Each title is sampled per second. Glossary 39 English S-Video: Produces a clear picture by arranging multiple speakers around the listener. You can use S-Video only if your TV has an S-Video In jack.
... sampling data when analog data is converted to a TV. Each title is sampled per second. Glossary 39 English S-Video: Produces a clear picture by arranging multiple speakers around the listener. You can use S-Video only if your TV has an S-Video In jack.
Quick start guide
Page 1
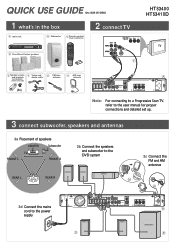
... 38562 1 what's in the box A main unit B Subwoofer CRemote control includes 2x AA batteries 2 connect TV HTS3400 HTS3410D D Front/Rear/Center speakers F ESpeaker screws and brackets (for mounting the speakers on the wall) F Video and Audio cable G FM wire antenna H AM loop antenna (4x) A Note...TV, refer to the user manual for proper connections and detailed set up. 3 connect subwoofer, speakers and antennas 3a Placement of speakers CENTER Subwoofer TV FRONT L FRONT R 3b Connect the speakers and subwoofer to the DVD system REAR L REAR R FRONT R FRONT L CENTER 3c Connect ...
... 38562 1 what's in the box A main unit B Subwoofer CRemote control includes 2x AA batteries 2 connect TV HTS3400 HTS3410D D Front/Rear/Center speakers F ESpeaker screws and brackets (for mounting the speakers on the wall) F Video and Audio cable G FM wire antenna H AM loop antenna (4x) A Note...TV, refer to the user manual for proper connections and detailed set up. 3 connect subwoofer, speakers and antennas 3a Placement of speakers CENTER Subwoofer TV FRONT L FRONT R 3b Connect the speakers and subwoofer to the DVD system REAR L REAR R FRONT R FRONT L CENTER 3c Connect ...

Quick start guide
Page 2
connect VCR 5a Press TUNER. 5b Press and hold PROG on TV. Visit our website www.philips.com/support More settings and features 1 2 GET PICTURE • Check the connection of the DVD system to TV is in place (see 2 Connect TV). •... sound effect. Detailed playback features and additional functions are described in the user manual. 5 6 programme radio stations optional - GET SOUND No sound from rear speakers? It will start to programme all available radio stations. 5c Once complete, use the TV remote control to select a preset radio station. Refer to open...
connect VCR 5a Press TUNER. 5b Press and hold PROG on TV. Visit our website www.philips.com/support More settings and features 1 2 GET PICTURE • Check the connection of the DVD system to TV is in place (see 2 Connect TV). •... sound effect. Detailed playback features and additional functions are described in the user manual. 5 6 programme radio stations optional - GET SOUND No sound from rear speakers? It will start to programme all available radio stations. 5c Once complete, use the TV remote control to select a preset radio station. Refer to open...
Leaflet
Page 2
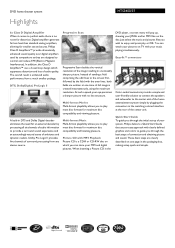
...fit™ connectors Color-coded connectors provide a simple and user-friendly solution to connect the speakers and subwoofer to the center unit of the home entertainment system simply by competitors as they...and obtaining picture and sound. Quick Start Guide To guide you through the initial set enclosures. Philips Class D Amplifiers™ provide dramatically enhanced sound quality over digital amplifiers used by plugging the ...quick and simple. DVD home theater system Highlights HTS3400/37 6x Class D Digital Amplifier When it comes to perfect audio there is no line structure.
...fit™ connectors Color-coded connectors provide a simple and user-friendly solution to connect the speakers and subwoofer to the center unit of the home entertainment system simply by competitors as they...and obtaining picture and sound. Quick Start Guide To guide you through the initial set enclosures. Philips Class D Amplifiers™ provide dramatically enhanced sound quality over digital amplifiers used by plugging the ...quick and simple. DVD home theater system Highlights HTS3400/37 6x Class D Digital Amplifier When it comes to perfect audio there is no line structure.

Leaflet
Page 3
DVD home theater system Specifications HTS3400/37 Picture/Display • Aspect ratio: 4:3, 16:9 • D/A converter: 10 bit / 54 MHz • Picture enhancement: Progressive Scan Convenience • Child Protection: Parental Control ... www.philips.com Specifications are the property of Preset Channels: 40 Connectivity • Front / Side connections: Headphone out • Other connections: AUX in, TV in (audio, cinch), Line out, Digital coaxial out, Composite video (CVBS) out, Component Video out Interlaced, SVideo out, FM Antenna, AM Antenna, Easy-Fit speaker connectors ...
DVD home theater system Specifications HTS3400/37 Picture/Display • Aspect ratio: 4:3, 16:9 • D/A converter: 10 bit / 54 MHz • Picture enhancement: Progressive Scan Convenience • Child Protection: Parental Control ... www.philips.com Specifications are the property of Preset Channels: 40 Connectivity • Front / Side connections: Headphone out • Other connections: AUX in, TV in (audio, cinch), Line out, Digital coaxial out, Composite video (CVBS) out, Component Video out Interlaced, SVideo out, FM Antenna, AM Antenna, Easy-Fit speaker connectors ...


