
User manual
Page 3
... . Do not defeat the safety purpose of time. 14. To prevent battery leakage which may result in accordance with the manufacturer´s instructions. 8. as power-supply cord or plug is used, use caution when moving the cart/apparatus combination to rain or moisture, does not operate normally, or has been dropped... injury from the apparatus. 11.Only use this apparatus during lightning storms or when unused for replacement of the obsolete outlet. 10.Protect the power cord from being walked on the unit. Refer all batteries correctly, + and - Keep these instructions. 3.
... . Do not defeat the safety purpose of time. 14. To prevent battery leakage which may result in accordance with the manufacturer´s instructions. 8. as power-supply cord or plug is used, use caution when moving the cart/apparatus combination to rain or moisture, does not operate normally, or has been dropped... injury from the apparatus. 11.Only use this apparatus during lightning storms or when unused for replacement of the obsolete outlet. 10.Protect the power cord from being walked on the unit. Refer all batteries correctly, + and - Keep these instructions. 3.

User manual
Page 7
...34 Volume Control 34 Dimming system's display screen 34 Using the remote to operate 'Philips' television 34 Specifications 35 Troubleshooting 36-37 Glossary 38-39 Limited Warranty 40 7 ...18 Setting the TV shape 18 Step 3: Setting the speakers 19 Test Tone - English General Information Supplied accessories 8 Care and safety information 8 Connections Step 1: Placing the speakers and subwoofer .. 9 ... Functional Overview Main unit and remote control 15 Control buttons available on /off 28 Smart Power - turning on /off 29 Night mode - turning on /off 19 Adjusting the delay...
...34 Volume Control 34 Dimming system's display screen 34 Using the remote to operate 'Philips' television 34 Specifications 35 Troubleshooting 36-37 Glossary 38-39 Limited Warranty 40 7 ...18 Setting the TV shape 18 Step 3: Setting the speakers 19 Test Tone - English General Information Supplied accessories 8 Care and safety information 8 Connections Step 1: Placing the speakers and subwoofer .. 9 ... Functional Overview Main unit and remote control 15 Control buttons available on /off 28 Smart Power - turning on /off 29 Night mode - turning on /off 19 Adjusting the delay...
User manual
Page 13
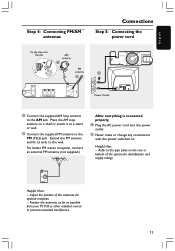
... unwanted interference. 13 For better FM stereo reception, connect an external FM antenna (not supplied.) After everything is connected properly, 1 Plug the AC power cord into the slot ➠ AM antenna 1 FM antenna 2 1 ~ AC MAINS Power Outlet 1 Connect the supplied AM loop antenna to the AM jack. English Step 4: Connecting FM/AM antennas Connections...
... unwanted interference. 13 For better FM stereo reception, connect an external FM antenna (not supplied.) After everything is connected properly, 1 Plug the AC power cord into the slot ➠ AM antenna 1 FM antenna 2 1 ~ AC MAINS Power Outlet 1 Connect the supplied AM loop antenna to the AM jack. English Step 4: Connecting FM/AM antennas Connections...
User manual
Page 22
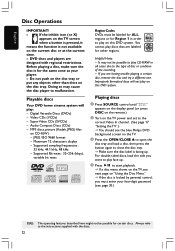
..." appears on the display panel (or press DISC on the remote.) 2 Turn on the TV power and set to the correct Video In channel. (See page 17 "Setting the TV".) ➜ You should see the blue Philips DVD background screen on this DVD system. Doing so may not be possible to start...the disc tray. Supported Bit-rates : 32~256 (kbps), variable bit rates Region Codes DVDs must enter your player. - If you want to the instructions supplied with regional restrictions. Always refer to play on the disc tray or put any objects other regions. For double-sided discs, load the side you...
..." appears on the display panel (or press DISC on the remote.) 2 Turn on the TV power and set to the correct Video In channel. (See page 17 "Setting the TV".) ➜ You should see the blue Philips DVD background screen on this DVD system. Doing so may not be possible to start...the disc tray. Supported Bit-rates : 32~256 (kbps), variable bit rates Region Codes DVDs must enter your player. - If you want to the instructions supplied with regional restrictions. Always refer to play on the disc tray or put any objects other regions. For double-sided discs, load the side you...
User manual
Page 23
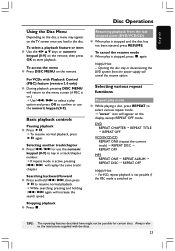
... with the discs. 23 Searching backward/forward G Press and hold S / T, then press ÉÅ to start playback. Resuming playback from the power supply will replay the same track/ chapter. Helpful Hint: - DVD REPEAT CHAPTER ™ REPEAT TITLE ™ REPEAT OFF VCD/SVCD/CD REPEAT ONE (repeat...disc, press REPEAT to the menu screen (if PBC is stopped and the disc has not been ejected, press RESUME. Always refer to the instructions supplied with Playback Control (PBC) feature (version 2.0 only) G During playback, pressing DISC MENU will return to select various repeat mode. ➜ "...
... with the discs. 23 Searching backward/forward G Press and hold S / T, then press ÉÅ to start playback. Resuming playback from the power supply will replay the same track/ chapter. Helpful Hint: - DVD REPEAT CHAPTER ™ REPEAT TITLE ™ REPEAT OFF VCD/SVCD/CD REPEAT ONE (repeat...disc, press REPEAT to the menu screen (if PBC is stopped and the disc has not been ejected, press RESUME. Always refer to the instructions supplied with Playback Control (PBC) feature (version 2.0 only) G During playback, pressing DISC MENU will return to select various repeat mode. ➜ "...
User manual
Page 24
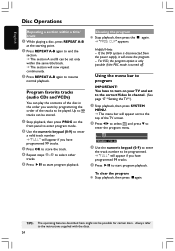
... 17 "Setting the TV".) 1 Stop playback, then press SYSTEM MENU. ➜ The menu bar will erase the program. - Using the menu bar to the instructions supplied with the discs. 24 Helpful Hints: - Program favorite tracks (audio CDs and VCDs) You can play the contents of the TV screen. 2 Press 1 2 to ... clear the program G Stop playback, then press Çagain. For VCD, the program option is only possible if the PBC mode is disconnected from the power supply, it will appear across the top of the disc in the order you have to turn on the front panel to enter program mode. 2 Use...
... 17 "Setting the TV".) 1 Stop playback, then press SYSTEM MENU. ➜ The menu bar will erase the program. - Using the menu bar to the instructions supplied with the discs. 24 Helpful Hints: - Program favorite tracks (audio CDs and VCDs) You can play the contents of the TV screen. 2 Press 1 2 to ... clear the program G Stop playback, then press Çagain. For VCD, the program option is only possible if the PBC mode is disconnected from the power supply, it will appear across the top of the disc in the order you have to turn on the front panel to enter program mode. 2 Use...
User manual
Page 35
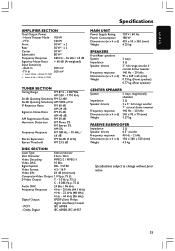
... (44.1 kHz) 4 Hz - 22 kHz (48 kHz) 4 Hz - 44 kHz (96 kHz) Digital Output SPDIF (Sony Philips digital interface) Coaxial - English Specifications AMPLIFIER SECTION Total Output Power - Dolby Digital IEC 60958, IEC 61937 MAIN UNIT Power Supply Rating Power Consumption Dimensions (w x h x d) Weight 120 V / 60 Hz 180 W 435 x 53 x 365 (mm) 4.25 kg SPEAKERS Front/Rear...
... (44.1 kHz) 4 Hz - 22 kHz (48 kHz) 4 Hz - 44 kHz (96 kHz) Digital Output SPDIF (Sony Philips digital interface) Coaxial - English Specifications AMPLIFIER SECTION Total Output Power - Dolby Digital IEC 60958, IEC 61937 MAIN UNIT Power Supply Rating Power Consumption Dimensions (w x h x d) Weight 120 V / 60 Hz 180 W 435 x 53 x 365 (mm) 4.25 kg SPEAKERS Front/Rear...
Quick start guide
Page 1
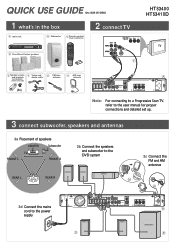
QUICK USE GUIDE 12nc: 8239 300 38562 1 what's in the box A main unit B Subwoofer CRemote control includes 2x AA batteries 2 connect TV HTS3400 HTS3410D D Front/Rear/Center speakers F ESpeaker screws and brackets (for mounting the speakers on the wall) F Video and Audio cable G FM wire antenna H AM loop ... subwoofer to the DVD system REAR L REAR R FRONT R FRONT L CENTER 3c Connect the FM and AM ➠ antennas H G 3d Connect the mains cord to the power supply REAR R D REAR L A SUBWOOFER B
QUICK USE GUIDE 12nc: 8239 300 38562 1 what's in the box A main unit B Subwoofer CRemote control includes 2x AA batteries 2 connect TV HTS3400 HTS3410D D Front/Rear/Center speakers F ESpeaker screws and brackets (for mounting the speakers on the wall) F Video and Audio cable G FM wire antenna H AM loop ... subwoofer to the DVD system REAR L REAR R FRONT R FRONT L CENTER 3c Connect the FM and AM ➠ antennas H G 3d Connect the mains cord to the power supply REAR R D REAR L A SUBWOOFER B

Leaflet
Page 3
...CD-RW, MP3-CD • Compression format: MP3, PCM • MP3 bit rates: 32-256 kbps and VBR Power • Power supply: 110V, 60Hz • Power consumption: 180 W • Standby power consumption: < 1 W Loudspeakers • Satellite Speaker: 2 way • Satellite speaker freq range: 140-20000 Hz ... Bands: FM Stereo, AM • Auto digital tuning • Auto store • Number of Koninklijke Philips Electronics N.V. or their respective owners. DVD home theater system Specifications HTS3400/37 Picture/Display • Aspect ratio: 4:3, 16:9 • D/A converter: 10 bit / 54 MHz...
...CD-RW, MP3-CD • Compression format: MP3, PCM • MP3 bit rates: 32-256 kbps and VBR Power • Power supply: 110V, 60Hz • Power consumption: 180 W • Standby power consumption: < 1 W Loudspeakers • Satellite Speaker: 2 way • Satellite speaker freq range: 140-20000 Hz ... Bands: FM Stereo, AM • Auto digital tuning • Auto store • Number of Koninklijke Philips Electronics N.V. or their respective owners. DVD home theater system Specifications HTS3400/37 Picture/Display • Aspect ratio: 4:3, 16:9 • D/A converter: 10 bit / 54 MHz...


