
User manual
Page 4
... le Ministère des Communications du Canada. IF THERE ARE QUESTIONS REGARDING OUR TV SET COMPATIBILITY WITH THIS MODEL 525p AND 625p DVD PLAYER, PLEASE CONTACT OUR CUSTOMER SERVICE CENTER.' Canada English: This digital apparatus does not exceed the Class B limits for radio noise ...PICTURE PROBLEMS, IT IS RECOMMENDED THAT THE USER SWITCH THE CONNECTION TO THE 'STANDARD DEFINITION' OUTPUT. Operation is located on certain discs, Philips is fully compatible with 21 CFR 1040.10. This device must accept any interference received, including interference that this laser product. Class II...
... le Ministère des Communications du Canada. IF THERE ARE QUESTIONS REGARDING OUR TV SET COMPATIBILITY WITH THIS MODEL 525p AND 625p DVD PLAYER, PLEASE CONTACT OUR CUSTOMER SERVICE CENTER.' Canada English: This digital apparatus does not exceed the Class B limits for radio noise ...PICTURE PROBLEMS, IT IS RECOMMENDED THAT THE USER SWITCH THE CONNECTION TO THE 'STANDARD DEFINITION' OUTPUT. Operation is located on certain discs, Philips is fully compatible with 21 CFR 1040.10. This device must accept any interference received, including interference that this laser product. Class II...

User manual
Page 7
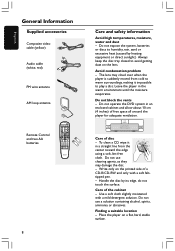
... Selecting surround sound 33 Selecting digital sound effects 34 Volume Control 34 Dimming system's display screen 34 Using the remote to operate 'Philips' television 34 Specifications 35 Troubleshooting 36-37 Glossary 38-39 Limited Warranty 40 7 turning on /off 28 Screen saver - turning ...optional) Connecting a VCR or Cable/Satellite Box .... 14 Viewing and listening to the playback ...... 14 Using the VCR for recording DVD playback 14 Connecting digital audio equipment 14 Digital Recording 14 Functional Overview Main unit and remote control 15 Control buttons available on /off...
... Selecting surround sound 33 Selecting digital sound effects 34 Volume Control 34 Dimming system's display screen 34 Using the remote to operate 'Philips' television 34 Specifications 35 Troubleshooting 36-37 Glossary 38-39 Limited Warranty 40 7 turning on /off 28 Screen saver - turning ...optional) Connecting a VCR or Cable/Satellite Box .... 14 Viewing and listening to the playback ...... 14 Using the VCR for recording DVD playback 14 Connecting digital audio equipment 14 Digital Recording 14 Functional Overview Main unit and remote control 15 Control buttons available on /off...
User manual
Page 8
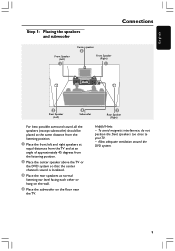
...an enclosed cabinet and allow about 10 cm (4 inches) of free space all around the player for adequate ventilation. 10 cm (4 inches) 10 cm (4 inches) PHILIPS DVD Home Cinema System 10 cm (4 inches) Care of disc - Care of a CD-R/CD-RW and only with a mild detergent solution. Use a soft cloth ...rain, sand or excessive heat (caused by its edge, do not touch the surface. Place the player on the lens. Do not operate the DVD system in the warm environment until the moisture evaporates. Avoid condensation problem - Do not expose the system, batteries or discs to avoid getting dust on...
...an enclosed cabinet and allow about 10 cm (4 inches) of free space all around the player for adequate ventilation. 10 cm (4 inches) 10 cm (4 inches) PHILIPS DVD Home Cinema System 10 cm (4 inches) Care of disc - Care of a CD-R/CD-RW and only with a mild detergent solution. Use a soft cloth ...rain, sand or excessive heat (caused by its edge, do not touch the surface. Place the player on the lens. Do not operate the DVD system in the warm environment until the moisture evaporates. Avoid condensation problem - Do not expose the system, batteries or discs to avoid getting dust on...
User manual
Page 9
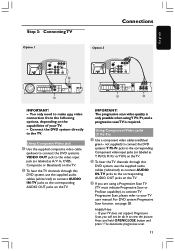
... distances from the TV and at an angle of approximately 45 degrees from the listening position. 2 Place the center speaker above the TV or the DVD system so that the center channel's sound is localized. 3 Place the rear speakers at normal listening ear level facing each other or hang on the... wall. 4 Place the subwoofer on the floor near the TV. Allow adequate ventilation around the DVD system. 9 To avoid magnetic interference, do not position the front speakers too close to your TV. - Helpful Hints: -
... distances from the TV and at an angle of approximately 45 degrees from the listening position. 2 Place the center speaker above the TV or the DVD system so that the center channel's sound is localized. 3 Place the rear speakers at normal listening ear level facing each other or hang on the... wall. 4 Place the subwoofer on the floor near the TV. Allow adequate ventilation around the DVD system. 9 To avoid magnetic interference, do not position the front speakers too close to your TV. - Helpful Hints: -
User manual
Page 11
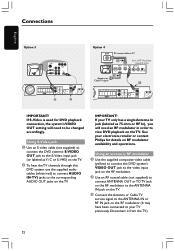
...as A/ V In, CVBS, Composite or Baseband) on the TV. 2 To hear the TV channels through this DVD system, use the supplied audio cables (white/red) to connect AUDIO IN-TV jacks to the corresponding AUDIO OUT ...jacks on the TV. Using Composite Video jack 1 Use the supplied composite video cable (yellow) to connect the DVD system's VIDEO OUT jack to the video input jack (or labeled as Y Pb/Cb Pr/Cr orYUV) on... theTV. 2 To hear the TV channels through this DVD system, use the supplied audio cables (white/ red) to connect AUDIO IN-TV jacks to your TV does ...
...as A/ V In, CVBS, Composite or Baseband) on the TV. 2 To hear the TV channels through this DVD system, use the supplied audio cables (white/red) to connect AUDIO IN-TV jacks to the corresponding AUDIO OUT ...jacks on the TV. Using Composite Video jack 1 Use the supplied composite video cable (yellow) to connect the DVD system's VIDEO OUT jack to the video input jack (or labeled as Y Pb/Cb Pr/Cr orYUV) on... theTV. 2 To hear the TV channels through this DVD system, use the supplied audio cables (white/ red) to connect AUDIO IN-TV jacks to your TV does ...
User manual
Page 12
... availability and operations. Disconnect it from the TV.) 12 Using an accessory RF modulator 1 Use the supplied composite video cable (yellow) to connect the DVD system's VIDEO OUT jack to the video input jack on the RF modulator. 2 Use an RF coaxial cable (not supplied) to connect ANTENNA OUT ... ANTENNA IN or RF IN jack on the TV. IMPORTANT! If S-Video is used for details on the TV. See your electronics retailer or contact Philips for DVD playback connection, the system's VIDEO OUT setting will need to your TV only has a single Antenna In jack (labeled as Y/ C or S-VHS) ...
... availability and operations. Disconnect it from the TV.) 12 Using an accessory RF modulator 1 Use the supplied composite video cable (yellow) to connect the DVD system's VIDEO OUT jack to the video input jack on the RF modulator. 2 Use an RF coaxial cable (not supplied) to connect ANTENNA OUT ... ANTENNA IN or RF IN jack on the TV. IMPORTANT! If S-Video is used for details on the TV. See your electronics retailer or contact Philips for DVD playback connection, the system's VIDEO OUT setting will need to your TV only has a single Antenna In jack (labeled as Y/ C or S-VHS) ...
User manual
Page 14
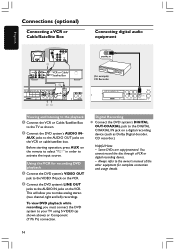
... starting operation, press AUX on a digital recording device (such as Dolby Digital decoder, CD recorder.) Helpful Hints: - Digital Recording G Connect the DVD system's DIGITAL OUT-COAXIAL jack to the DIGITAL COAXIAL IN jack on the remote to select "AUX" in order to make analog stereo (two channel..., right and left) recordings. Some DVDs are copy-protected. To view DVD playback while recording, you to activate the input source. Always refer to the owner's manual of the other equipment for example) CD ...
... starting operation, press AUX on a digital recording device (such as Dolby Digital decoder, CD recorder.) Helpful Hints: - Digital Recording G Connect the DVD system's DIGITAL OUT-COAXIAL jack to the DIGITAL COAXIAL IN jack on the remote to select "AUX" in order to make analog stereo (two channel..., right and left) recordings. Some DVDs are copy-protected. To view DVD playback while recording, you to activate the input source. Always refer to the owner's manual of the other equipment for example) CD ...
User manual
Page 16
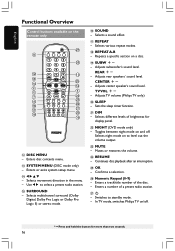
... 10 13 25 14 14 6 6 5 7 24 15 23 16 22 17 21 18 20 19 @ DISC MENU - Adjusts center speaker's sound level. Adjusts TV volume (Philips TV only.) ) SLEEP - Confirms a selection. § Numeric Keypad (0-9) - REAR +- Enters a number of the disc. - Selects movement direction in the menu. - Adjusts subwoofer's sound...( SUBW +- TV VOL +- CENTER +- Enters disc contents menu. # SYSTEM MENU (DISC mode only) - Enters or exits system setup menu. $ 1234 - In TV mode, switches Philips TV on and off . * = Press and hold the button for display panel. ™ NIGHT...
... 10 13 25 14 14 6 6 5 7 24 15 23 16 22 17 21 18 20 19 @ DISC MENU - Adjusts center speaker's sound level. Adjusts TV volume (Philips TV only.) ) SLEEP - Confirms a selection. § Numeric Keypad (0-9) - REAR +- Enters a number of the disc. - Selects movement direction in the menu. - Adjusts subwoofer's sound...( SUBW +- TV VOL +- CENTER +- Enters disc contents menu. # SYSTEM MENU (DISC mode only) - Enters or exits system setup menu. $ 1234 - In TV mode, switches Philips TV on and off . * = Press and hold the button for display panel. ™ NIGHT...
User manual
Page 17
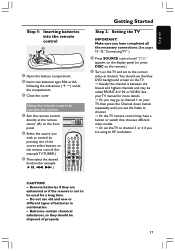
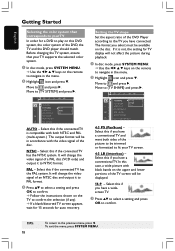
... and highest channels and may have completed all the necessary connections. (See pages 11-12 "Connecting TV".) 1 Press SOURCE control until you see the blue DVD background screen on the front panel. 2 Select the source you have a button or switch that chooses different video modes. ➜ Or, set the TV to...
... and highest channels and may have completed all the necessary connections. (See pages 11-12 "Connecting TV".) 1 Press SOURCE control until you see the blue DVD background screen on the front panel. 2 Select the source you have a button or switch that chooses different video modes. ➜ Or, set the TV to...
User manual
Page 18
Move to and press 2. Setting the TV shape Set the aspect ratio of the DVD Player according to the TV you have a widescreen TV. 3 Press 34 to ...if you have a conventional TV. Before changing the TV system, ensure that corresponds to your TV In order for a DVD to play on this case, a wide picture with the video signal of an NTSC disc and output it to PAL format...Select this if you select must be trimmed or formatted to fit your TV screen. 4:3 LB (letterbox) - In this DVD system, the color system of a PAL disc (VCD only) and output it is compatible with both sides of the TV...
Move to and press 2. Setting the TV shape Set the aspect ratio of the DVD Player according to the TV you have a widescreen TV. 3 Press 34 to ...if you have a conventional TV. Before changing the TV system, ensure that corresponds to your TV In order for a DVD to play on this case, a wide picture with the video signal of an NTSC disc and output it to PAL format...Select this if you select must be trimmed or formatted to fit your TV screen. 4:3 LB (letterbox) - In this DVD system, the color system of a PAL disc (VCD only) and output it is compatible with both sides of the TV...
User manual
Page 20
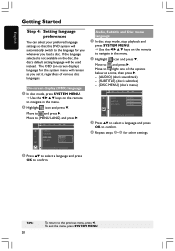
... the 1 2 3 4 keys on the remote to and press 2. English Getting Started Step 4: Setting language preferences You can select your preferred language settings so that this DVD system will be used instead. Move to navigate in the menu. 2 Highlight icon and press 4.
... the 1 2 3 4 keys on the remote to and press 2. English Getting Started Step 4: Setting language preferences You can select your preferred language settings so that this DVD system will be used instead. Move to navigate in the menu. 2 Highlight icon and press 4.
User manual
Page 21
...front panel to your TV user manual. - To activate it is required. Your TV supports progressive scan, but it , please refer to switch on the DVD system. 2 Press and hold OPEN/CLOSE 0 on the front panel, while pressing down the OPEN/CLOSE 0, press the numerical keypad "1" on the remote ...control. ➜ The blue Philips DVD background appears on page 28. To eixt the menu, press SYSTEM MENU. 21 To enjoy the quality offered by progressive scan, a progressive scan TV is...
...front panel to your TV user manual. - To activate it is required. Your TV supports progressive scan, but it , please refer to switch on the DVD system. 2 Press and hold OPEN/CLOSE 0 on the front panel, while pressing down the OPEN/CLOSE 0, press the numerical keypad "1" on the remote ...control. ➜ The blue Philips DVD background appears on page 28. To eixt the menu, press SYSTEM MENU. 21 To enjoy the quality offered by progressive scan, a progressive scan TV is...
User manual
Page 22
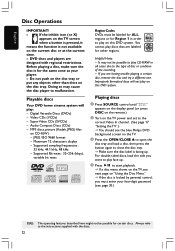
... /ISO 9660 format - Supported sampling frequencies : 32 kHz, 44.1 kHz, 48 kHz - Supported Bit-rates : 32~256 (kbps), variable bit rates Region Codes DVDs must enter your player. - It may cause the disc player to the instructions supplied with regional restrictions. Always refer to malfunction. Before playing a disc, make... on the TV power and set to the correct Video In channel. (See page 17 "Setting the TV".) ➜ You should see the blue Philips DVD background screen on the TV. 3 Press the OPEN/CLOSE 0 to open the disc tray and load a disc, then press the button again to start...
... /ISO 9660 format - Supported sampling frequencies : 32 kHz, 44.1 kHz, 48 kHz - Supported Bit-rates : 32~256 (kbps), variable bit rates Region Codes DVDs must enter your player. - It may cause the disc player to the instructions supplied with regional restrictions. Always refer to malfunction. Before playing a disc, make... on the TV power and set to the correct Video In channel. (See page 17 "Setting the TV".) ➜ You should see the blue Philips DVD background screen on the TV. 3 Press the OPEN/CLOSE 0 to open the disc tray and load a disc, then press the button again to start...
User manual
Page 23
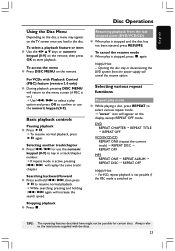
...with the discs. 23 Basic playback controls Pausing playback G Press ÉÅ. ➜ To resume normal playback, press ÉÅ again. DVD REPEAT CHAPTER ™ REPEAT TITLE ™ REPEAT OFF VCD/SVCD/CD REPEAT ONE (repeat the current track) ™ REPEAT DISC ™ ...mode G While playing a disc, press REPEAT to start playback. Stopping playback G Press Ç. Opening the disc tray or disconnecting the DVD system from the last stopped point (DVD/VCD/CD) G When play is stopped, press Ç again. English Disc Operations Using the Disc Menu Depending on the disc, a...
...with the discs. 23 Basic playback controls Pausing playback G Press ÉÅ. ➜ To resume normal playback, press ÉÅ again. DVD REPEAT CHAPTER ™ REPEAT TITLE ™ REPEAT OFF VCD/SVCD/CD REPEAT ONE (repeat the current track) ™ REPEAT DISC ™ ...mode G While playing a disc, press REPEAT to start playback. Stopping playback G Press Ç. Opening the disc tray or disconnecting the DVD system from the last stopped point (DVD/VCD/CD) G When play is stopped, press Ç again. English Disc Operations Using the Disc Menu Depending on the disc, a...
User manual
Page 24
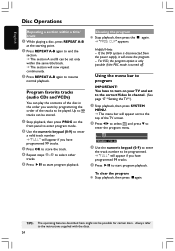
... Ç again. ➜ "PROG CLR" appears. English Disc Operations Repeating a section within the same title/track. ➜ The section will erase the program. - If the DVD system is turned off. For VCD, the program option is only possible if the PBC mode is disconnected from the power supply, it will now...
... Ç again. ➜ "PROG CLR" appears. English Disc Operations Repeating a section within the same title/track. ➜ The section will erase the program. - If the DVD system is turned off. For VCD, the program option is only possible if the PBC mode is disconnected from the power supply, it will now...
User manual
Page 26
... move within the enlarged picture on the disc format. To resume normal playback, press ÉÅ. IMPORTANT! - Slow Forward, SR- Slow Rerverse) FAST REVERSE (FR) DVD / MP3 : FR x2, FR x4, FR x6, FR x8, PLAY. VCD / CD : FF x1, FF x2, FF x3, FF x4, PLAY. backward, FF -...2.0 with multiple angles. VCD : SF x1/1, SF x1/2, SF x1/3, PLAY. (SF - To resume normal playback, select 'ZOOM OFF' from different angles if the DVD is when you enter (SETUP MENU), after which you are multiple choices available, press 4 repeatedly to select. 3 Press SYSTEM MENU again to begin . To resume...
... move within the enlarged picture on the disc format. To resume normal playback, press ÉÅ. IMPORTANT! - Slow Forward, SR- Slow Rerverse) FAST REVERSE (FR) DVD / MP3 : FR x2, FR x4, FR x6, FR x8, PLAY. VCD / CD : FF x1, FF x2, FF x3, FF x4, PLAY. backward, FF -...2.0 with multiple angles. VCD : SF x1/1, SF x1/2, SF x1/3, PLAY. (SF - To resume normal playback, select 'ZOOM OFF' from different angles if the DVD is when you enter (SETUP MENU), after which you are multiple choices available, press 4 repeatedly to select. 3 Press SYSTEM MENU again to begin . To resume...
User manual
Page 27
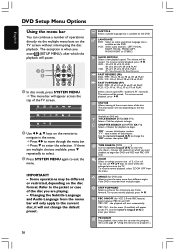
... the menu. 4 Press OK to confirm your TV. Helpful Hints: - You do not need to adjust the video output setting if you have connected the DVD system to your particular requirements. , 4 1 In disc mode, press SYSTEM MENU. ➜ Playback will not be available. Then press 3 4 to select ...one of video output that matches the video connection between the DVD system and your selection. Stop playback, then follow the steps of the features in "Getting Started." Y PR PB Select this if you to customize ...
... the menu. 4 Press OK to confirm your TV. Helpful Hints: - You do not need to adjust the video output setting if you have connected the DVD system to your particular requirements. , 4 1 In disc mode, press SYSTEM MENU. ➜ Playback will not be available. Then press 3 4 to select ...one of video output that matches the video connection between the DVD system and your selection. Stop playback, then follow the steps of the features in "Getting Started." Y PR PB Select this if you to customize ...
User manual
Page 28
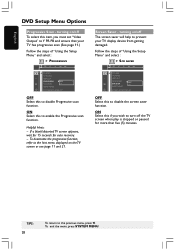
... your TV display device from getting damaged. TIPS: 28 To return to enable the Progressive scan function. To exit the menu, press SYSTEM MENU. English DVD Setup Menu Options Progressive Scan -
... your TV display device from getting damaged. TIPS: 28 To return to enable the Progressive scan function. To exit the menu, press SYSTEM MENU. English DVD Setup Menu Options Progressive Scan -
User manual
Page 29
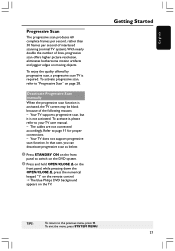
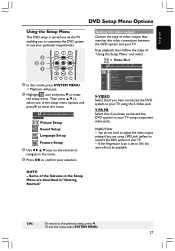
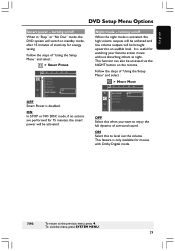
...via the NIGHT button on /off When the night mode is disabled. Night mode - turning on/off When in "Stop" or "No Disc" mode, the DVD system will switch to enjoy the full dynamic of "Using the Setup Menu" and select : > SMART POWER TV SHAPE TV SYSTEM VIDEO OUT PROGRESSIVE SCR... In STOP or NO DISC mode, if no actions are performed for energy saving. This feature is useful for movies with Dolby Digital mode. English DVD Setup Menu Options Smart power - It is only available for watching your favorite action movie without disturbing others at night. TIPS: To return to level...
...via the NIGHT button on /off When the night mode is disabled. Night mode - turning on/off When in "Stop" or "No Disc" mode, the DVD system will switch to enjoy the full dynamic of "Using the Setup Menu" and select : > SMART POWER TV SHAPE TV SYSTEM VIDEO OUT PROGRESSIVE SCR... In STOP or NO DISC mode, if no actions are performed for energy saving. This feature is useful for movies with Dolby Digital mode. English DVD Setup Menu Options Smart power - It is only available for watching your favorite action movie without disturbing others at night. TIPS: To return to level...
User manual
Page 30
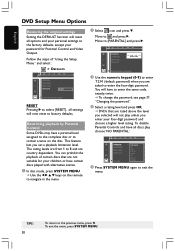
... SYSTEM MENU again to {PARENTAL} and press 2. Move to the previous menu, press 1. TIPS: 30 To return to and press 2. English DVD Setup Menu Options Restoring the original settings Setting the DEFAULT function will reset all options and your personal settings to 8 and are country dependent. This... defaults, except your password for your four-digit password and choose a higher level rating. Restricting playback by Parental Control Some DVDs may have to enter the four-digit password. Follow the steps of certain discs that are not suitable for Parental Control and...
... SYSTEM MENU again to {PARENTAL} and press 2. Move to the previous menu, press 1. TIPS: 30 To return to and press 2. English DVD Setup Menu Options Restoring the original settings Setting the DEFAULT function will reset all options and your personal settings to 8 and are country dependent. This... defaults, except your password for your four-digit password and choose a higher level rating. Restricting playback by Parental Control Some DVDs may have to enter the four-digit password. Follow the steps of certain discs that are not suitable for Parental Control and...


