
Leaflet
Page 1
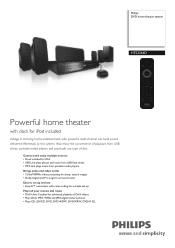
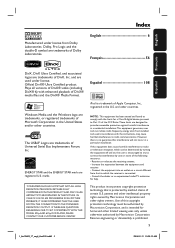
Philips DVD home theater system HTS3264D Powerful home theater with dock for iPod included Indulge in stunning home entertainment with color-coding for a simple set up Plays all your movies and music • DivX Ultra Certified for enhanced playback of disc. Connect and enjoy multiple sources • Dock included for sharp, natural images • Dolby Digital and Pro Logic II surround sound Easy to set -up and use • Easy-fit™ connectors with powerful multi-channel surround sound delivered effortlessly by...
Philips DVD home theater system HTS3264D Powerful home theater with dock for iPod included Indulge in stunning home entertainment with color-coding for a simple set up Plays all your movies and music • DivX Ultra Certified for enhanced playback of disc. Connect and enjoy multiple sources • Dock included for sharp, natural images • Dolby Digital and Pro Logic II surround sound Easy to set -up and use • Easy-fit™ connectors with powerful multi-channel surround sound delivered effortlessly by...
Leaflet
Page 3
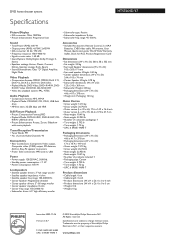
... N.V. of preset Audio Channels: 40 Connectivity • Rear Connections: Component Video output, Composite video (CVBS) output, FM Antenna, AUX in, Easy-Fit speaker connectors • Front / Side connections: MP3 Line-in, USB Power • Power supply: 120/230VAC, 50/60Hz • Standby power consumption: < 1 W • Power consumption: 100 W Loudspeakers • Satellite speaker drivers: 3" full range woofer • Satellite speaker impedance: 4 ohm • Satellite speaker freq range: 150-20000 Hz • Center Speaker: Magnetically shielded • Center speaker drivers: 3" full...
... N.V. of preset Audio Channels: 40 Connectivity • Rear Connections: Component Video output, Composite video (CVBS) output, FM Antenna, AUX in, Easy-Fit speaker connectors • Front / Side connections: MP3 Line-in, USB Power • Power supply: 120/230VAC, 50/60Hz • Standby power consumption: < 1 W • Power consumption: 100 W Loudspeakers • Satellite speaker drivers: 3" full range woofer • Satellite speaker impedance: 4 ohm • Satellite speaker freq range: 150-20000 Hz • Center Speaker: Magnetically shielded • Center speaker drivers: 3" full...
User manual
Page 2
..., or register online at: www.philips.com/welcome Know these safetysymbols CAUTION RISK OF ELECTRIC SHOCK DO NOT OPEN CAUTION: TO REDUCE THE RISK OF ELECTRIC SHOCK, DO NOT REMOVE COVER (OR BACK). P.S. Dear PHILIPS product owner: Thank you for your confidence in PHILIPS.You've selected one of the most comprehensive warranties and outstanding service networks in the industry...
..., or register online at: www.philips.com/welcome Know these safetysymbols CAUTION RISK OF ELECTRIC SHOCK DO NOT OPEN CAUTION: TO REDUCE THE RISK OF ELECTRIC SHOCK, DO NOT REMOVE COVER (OR BACK). P.S. Dear PHILIPS product owner: Thank you for your confidence in PHILIPS.You've selected one of the most comprehensive warranties and outstanding service networks in the industry...
User manual
Page 4
... (bags, protective foam sheet.) Your system consists of Philips Electronics North America Corp. LASER Type Wave length Output Power Beam divergence Semiconductor laser GaAIAs 645 - 660 nm (DVD) 770 - 800 nm (CD) 6 mW (DVD) 7 mW (VCD/CD) 60 degrees Canada English: This digital apparatus does not exceed the Class B limits for radio noise emissions from digital apparatus as set out...
... (bags, protective foam sheet.) Your system consists of Philips Electronics North America Corp. LASER Type Wave length Output Power Beam divergence Semiconductor laser GaAIAs 645 - 660 nm (DVD) 770 - 800 nm (CD) 6 mW (DVD) 7 mW (VCD/CD) 60 degrees Canada English: This digital apparatus does not exceed the Class B limits for radio noise emissions from digital apparatus as set out...
User manual
Page 5
... , the user is protected by one or more of DivX® media files and the DivX® Media Format. Official DivX® Ultra Certified product. IF THERE ARE QUESTIONS REGARDING OUR TV SET COMPATIBILITY WITH THIS MODEL 525p AND 625p DVD PLAYER, PLEASE CONTACT OUR CUSTOMER SERVICE CENTER.' Plays all versions of Microsoft Corporation in a residential installation.This equipment generates, uses and can...
... , the user is protected by one or more of DivX® media files and the DivX® Media Format. Official DivX® Ultra Certified product. IF THERE ARE QUESTIONS REGARDING OUR TV SET COMPATIBILITY WITH THIS MODEL 525p AND 625p DVD PLAYER, PLEASE CONTACT OUR CUSTOMER SERVICE CENTER.' Plays all versions of Microsoft Corporation in a residential installation.This equipment generates, uses and can...

User manual
Page 6
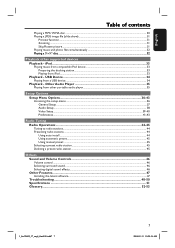
... component video input 15 Option 3: Using an accessory RF modulator 16 Step 3: Connecting speakers and subwoofer 17 Step 4: Connecting the FM antenna...18 Step 5: Connecting the power cord...18 Optional Connections ...19 Connecting audio from other devices...19 Basic Setup Getting Started...20-24 Finding the correct viewing channel ...20 Switching to different play source ...20 Setting language preferences...21-22 On-screen display (OSD) language ...21 Audio, Subtitle and Menu language for DVD playback 21-22 Setting...
... component video input 15 Option 3: Using an accessory RF modulator 16 Step 3: Connecting speakers and subwoofer 17 Step 4: Connecting the FM antenna...18 Step 5: Connecting the power cord...18 Optional Connections ...19 Connecting audio from other devices...19 Basic Setup Getting Started...20-24 Finding the correct viewing channel ...20 Switching to different play source ...20 Setting language preferences...21-22 On-screen display (OSD) language ...21 Audio, Subtitle and Menu language for DVD playback 21-22 Setting...
User manual
Page 7
... Accessing the setup menu...36 General Setup ...37 Audio Setup ...38 Video Setup...39-40 Preferences ...41-43 Radio Tuning Radio Operations...44-45 Tuning to radio stations...44 Presetting radio stations ...44 Using auto install ...44 Using automatic preset...45 Using manual preset ...45 Selecting a preset radio station...45 Deleting a preset radio station...45 Others Sound and Volume Controls 46 Volume control ...46 Selecting surround sound...46 Selecting digital sound effects...46 Other Features...47 Installing the latest software ...47 Troubleshooting...48-50 Specifications ...51 Glossary...
... Accessing the setup menu...36 General Setup ...37 Audio Setup ...38 Video Setup...39-40 Preferences ...41-43 Radio Tuning Radio Operations...44-45 Tuning to radio stations...44 Presetting radio stations ...44 Using auto install ...44 Using automatic preset...45 Using manual preset ...45 Selecting a preset radio station...45 Deleting a preset radio station...45 Others Sound and Volume Controls 46 Volume control ...46 Selecting surround sound...46 Selecting digital sound effects...46 Other Features...47 Installing the latest software ...47 Troubleshooting...48-50 Specifications ...51 Glossary...

User manual
Page 8
...work to prevent overheating. Setup precautions Finding a suitable location - Never place the unit on a flat, hard and stable surface. Accessories supplied - 1 subwoofer - 2 front speakers - 2 rear speakers - 1 center speaker - 1 remote control with adequate ventilation to dripping or splashing. - If you are disposing of an old machine, please take it up . Install... and 5cm (2") from the rear and the top of other equipment that might heat it to the edge in a location with batteries - 1 composite video cable (yellow) - 1 docking station for Apple iPod - 1 FM wire antenna -
...work to prevent overheating. Setup precautions Finding a suitable location - Never place the unit on a flat, hard and stable surface. Accessories supplied - 1 subwoofer - 2 front speakers - 2 rear speakers - 1 center speaker - 1 remote control with adequate ventilation to dripping or splashing. - If you are disposing of an old machine, please take it up . Install... and 5cm (2") from the rear and the top of other equipment that might heat it to the edge in a location with batteries - 1 composite video cable (yellow) - 1 docking station for Apple iPod - 1 FM wire antenna -

User manual
Page 9
... an operation. - h (USB) jack - i MP3 LINK jack - Selects the relevant active source mode: DISC, FM, AUX 1, AUX 2 or MP3 LINK. DISC: skips to standby mode. DISC: stops playback. - f SOURCE - Adjusts the volume level. RADIO: selects a preset radio station. (Stop) - English Front Panel View Main Unit 1 2 3 4 5 67 Inside VIew MP3 LINK 89 a 2 (Standby-On) - Note: The following jacks are under the flap at the right corner of the unit. Phono input for fast forward and backward search. - Turns on your portable audio player...
... an operation. - h (USB) jack - i MP3 LINK jack - Selects the relevant active source mode: DISC, FM, AUX 1, AUX 2 or MP3 LINK. DISC: skips to standby mode. DISC: stops playback. - f SOURCE - Adjusts the volume level. RADIO: selects a preset radio station. (Stop) - English Front Panel View Main Unit 1 2 3 4 5 67 Inside VIew MP3 LINK 89 a 2 (Standby-On) - Note: The following jacks are under the flap at the right corner of the unit. Phono input for fast forward and backward search. - Turns on your portable audio player...

User manual
Page 10
...2 (Standby-On) - Displays the current status or disc information. DISC: starts/pauses playback. - Selects an audio language/channel. - k SLEEP - AUX (MP3 LINK): switches to USB mode. - g Ç (Stop) - c Source buttons - DOCK: switches to the iPod that is slower than the audio output. RADIO: press and hold this unit or turns off to the docking station. h SOUND MODES +/- b ç (Open/Close) - d INFO - Sets the audio output delay times if the video playback is connected to standby mode. Selects a predefined sound effect. Enters or exits the system setup menu...
...2 (Standby-On) - Displays the current status or disc information. DISC: starts/pauses playback. - Selects an audio language/channel. - k SLEEP - AUX (MP3 LINK): switches to USB mode. - g Ç (Stop) - c Source buttons - DOCK: switches to the iPod that is slower than the audio output. RADIO: press and hold this unit or turns off to the docking station. h SOUND MODES +/- b ç (Open/Close) - d INFO - Sets the audio output delay times if the video playback is connected to standby mode. Selects a predefined sound effect. Enters or exits the system setup menu...

User manual
Page 23
..., resulting in an unnatural picture when playing back a DVD VIDEO disc in the menu and press OK. In such a case, turn off (or set to the correct viewing channel for this unit to a progressive scan TV (see 'Option 2: Connecting to select { Video Setup } icon, and press . D Press repeatedly to a Progressive Scan TV or component video input'.) A Turn on the remote control. If no picture on your TVs user manual. Helpful Hints: - Press OPTIONS to...
..., resulting in an unnatural picture when playing back a DVD VIDEO disc in the menu and press OK. In such a case, turn off (or set to the correct viewing channel for this unit to a progressive scan TV (see 'Option 2: Connecting to select { Video Setup } icon, and press . D Press repeatedly to a Progressive Scan TV or component video input'.) A Turn on the remote control. If no picture on your TVs user manual. Helpful Hints: - Press OPTIONS to...

User manual
Page 28
.... Helpful Hint: - Changing subtitle language This operation works only on DVDs that contain sequences recorded from different angles. This allows you want while playing a DVD. Playback continues. C If different camera angles choices are available, press and use the VOL +to the original size. Set your preferred default AUDIO SYNC setting in the menu. A During playback, press ZOOM repeatedly to select. For DVD Press AUDIO SYNC repeatedly to view the picture...
.... Helpful Hint: - Changing subtitle language This operation works only on DVDs that contain sequences recorded from different angles. This allows you want while playing a DVD. Playback continues. C If different camera angles choices are available, press and use the VOL +to the original size. Set your preferred default AUDIO SYNC setting in the menu. A During playback, press ZOOM repeatedly to select. For DVD Press AUDIO SYNC repeatedly to view the picture...
User manual
Page 37
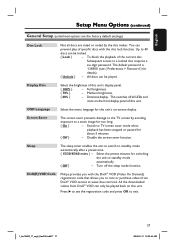
... the factory default settings) Disc Lock Not all LEDs and icons on the front display panel of this unit. You can be played. OSD Language Select the menu language for too long. { On } - The default password is '136900' (see the registration code and press OK to the TV screen by the disc maker. Disable the screen saver function. Subsequent access to standby mode automatically. { Off } - Select the preset minutes for details). { Unlock } - Screen...
... the factory default settings) Disc Lock Not all LEDs and icons on the front display panel of this unit. You can be played. OSD Language Select the menu language for too long. { On } - The default password is '136900' (see the registration code and press OK to the TV screen by the disc maker. Disable the screen saver function. Subsequent access to standby mode automatically. { Off } - Select the preset minutes for details). { Unlock } - Screen...

User manual
Page 38
... audio delay times if the video playback is equivalent to adjust the volume level for better sound quality. { Off } - Use keys to one (1) foot change in distance. Turn off the CD upsampling feature. See 'Getting Started - Setting the speakers' channels'. Use the longer delay time settings when the rear speakers are the factory default settings) Speakers Volume Access the speaker's level setup menu. CD Upsampling This feature enables you to set the delay times for the audio output between -6dB to Multi-channel mode...
... audio delay times if the video playback is equivalent to adjust the volume level for better sound quality. { Off } - Use keys to one (1) foot change in distance. Turn off the CD upsampling feature. See 'Getting Started - Setting the speakers' channels'. Use the longer delay time settings when the rear speakers are the factory default settings) Speakers Volume Access the speaker's level setup menu. CD Upsampling This feature enables you to set the delay times for the audio output between -6dB to Multi-channel mode...

User manual
Page 44
... tuning. Using auto install When you access the 'RADIO' mode for first time setup only) - B Press u. If no button is detected or less than 5 (five) stations are three different ways to start ..... PRESS PLAY' appears. Tuning to radio stations A Press SOURCE repeatedly until 'FM' appears on the display panel (or press RADIO on the remote control to program the radio stations: - There are detected during radio installation, 'CHECK ANTENNA' appears. This unit exits presetting mode if no stereo signal...
... tuning. Using auto install When you access the 'RADIO' mode for first time setup only) - B Press u. If no button is detected or less than 5 (five) stations are three different ways to start ..... PRESS PLAY' appears. Tuning to radio stations A Press SOURCE repeatedly until 'FM' appears on the display panel (or press RADIO on the remote control to program the radio stations: - There are detected during radio installation, 'CHECK ANTENNA' appears. This unit exits presetting mode if no stereo signal...

User manual
Page 48
..., AUX (MP3 LINK)) to choose the device that the source you are connected and press the correct source button (for the auto recover or switch to the default mode as below before pressing the function button (u, í / ë). - Press DISC to select other audio track. - Press SURROUND to select a correct surround sound setting. - The remote control does not function properly. - Adjust the volume. - Problem (General) Solution No picture. - Check the speaker connections and settings. - Check the video connection. - Clean the disc. Point...
..., AUX (MP3 LINK)) to choose the device that the source you are connected and press the correct source button (for the auto recover or switch to the default mode as below before pressing the function button (u, í / ë). - Press DISC to select other audio track. - Press SURROUND to select a correct surround sound setting. - The remote control does not function properly. - Adjust the volume. - Problem (General) Solution No picture. - Check the speaker connections and settings. - Check the video connection. - Clean the disc. Point...

User manual
Page 49
... possible to turn off the system setup menu screen. - Depending on for playback. - Press x twice before selecting the system setup menu. - Press OPTIONS to change the aspect ratio. Angles, Subtitles, or - Load a readable disc with the DivX® encoder. - If the signal is too weak, adjust the antenna or connect an external antenna for the sound or subtitle is encoded according to the 'Home Theater Profile' with...
... possible to turn off the system setup menu screen. - Depending on for playback. - Press x twice before selecting the system setup menu. - Press OPTIONS to change the aspect ratio. Angles, Subtitles, or - Load a readable disc with the DivX® encoder. - If the signal is too weak, adjust the antenna or connect an external antenna for the sound or subtitle is encoded according to the 'Home Theater Profile' with...

User manual
Page 52
... HDCP (High-bandwidth Digital Content Protection) is available if you record. These red and white jacks send audio through two channels, the left and right, center and subwoofer). A still-picture data compression system proposed by DivX® Networks, Inc., that has not been turned into numbers. Bit Rate: The amount of data used in most consumer video products. Analogue sound is a specification that has component video input jacks (R/ G/B, Y/Pb/Pr...
... HDCP (High-bandwidth Digital Content Protection) is available if you record. These red and white jacks send audio through two channels, the left and right, center and subwoofer). A still-picture data compression system proposed by DivX® Networks, Inc., that has not been turned into numbers. Bit Rate: The amount of data used in most consumer video products. Analogue sound is a specification that has component video input jacks (R/ G/B, Y/Pb/Pr...
Quick start guide
Page 1
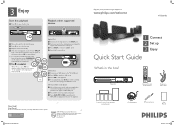
.... C Press DOCK to switch to fit it last stopped. B Press USB to switch to the playback. Need help? z To enjoy the powerful surround sound from where it . Other portable audio player A Use a 3.5mm stereo audio cable (not supplied) to MP3 LINK jack. C Press AUX (MP3 LINK) repeatedly until 'MP3 LINK' is displayed to listen to 'USB' mode. Printed in the box? Main Unit Remote Control and 2 batteries Composite video cable 1 center, 2 front, 2 rear speakers and subwoofer Docking station FM wire antenna User Manual 2008-03...
.... C Press DOCK to switch to fit it last stopped. B Press USB to switch to the playback. Need help? z To enjoy the powerful surround sound from where it . Other portable audio player A Use a 3.5mm stereo audio cable (not supplied) to MP3 LINK jack. C Press AUX (MP3 LINK) repeatedly until 'MP3 LINK' is displayed to listen to 'USB' mode. Printed in the box? Main Unit Remote Control and 2 batteries Composite video cable 1 center, 2 front, 2 rear speakers and subwoofer Docking station FM wire antenna User Manual 2008-03...

Quick start guide
Page 2
... this unit, use a red and white audio cables (not supplied) to connect the AUDIO IN-AUX jacks on the main unit to the user manual for the DVD disc menu. B Turn on the screen A Press OPTIONS. Use the TVs remote control to confirm. The { General Setup } appears. keys to select { OSD Language } and press D Use keys to select a language option in the factory.) Extend the wire for the correct viewing channel, press the Channel Down button on . Refer...
... this unit, use a red and white audio cables (not supplied) to connect the AUDIO IN-AUX jacks on the main unit to the user manual for the DVD disc menu. B Turn on the screen A Press OPTIONS. Use the TVs remote control to confirm. The { General Setup } appears. keys to select { OSD Language } and press D Use keys to select a language option in the factory.) Extend the wire for the correct viewing channel, press the Channel Down button on . Refer...


