
Leaflet
Page 2
...; Auto digital tuning • Station presets: 40 • Tuner Bands: FM Stereo, MW • Tuner Enhancements: Auto Store, Easy Set (Plug & Play) Connectivity • Aux in: Line in, Gameport • Headphone: 3.5 mm • Other connections: Composite video (CVBS) out, FM Antenna, MW Antenna Convenience • Alarms: CD Alarm, Radio Alarm, Sleep timer • Clock: On main display • Display Type: FTD • Eco Power Standby: 1 watt • Indications: album name, album number, Cd functions, date, DIM mode, time, track Accessories • Included Accessories: AC Power Cord...
...; Auto digital tuning • Station presets: 40 • Tuner Bands: FM Stereo, MW • Tuner Enhancements: Auto Store, Easy Set (Plug & Play) Connectivity • Aux in: Line in, Gameport • Headphone: 3.5 mm • Other connections: Composite video (CVBS) out, FM Antenna, MW Antenna Convenience • Alarms: CD Alarm, Radio Alarm, Sleep timer • Clock: On main display • Display Type: FTD • Eco Power Standby: 1 watt • Indications: album name, album number, Cd functions, date, DIM mode, time, track Accessories • Included Accessories: AC Power Cord...
User manual
Page 1
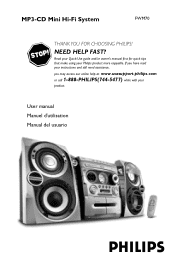
If you have read your instructions and still need assistance, you may access our online help at www.usasupport.philips.com or call 1-888-PHILIPS(744-5477) while with your Philips product more enjoyable. Read your Quick-Use guide and/or owner's manual first for quick tips that make using your product. User manual Manuel d'utilisation Manual del usuario MP3-CD Mini Hi-Fi System FWM70 THANK YOU FOR CHOOSING PHILIPS! NEED HELP FAST?
If you have read your instructions and still need assistance, you may access our online help at www.usasupport.philips.com or call 1-888-PHILIPS(744-5477) while with your Philips product more enjoyable. Read your Quick-Use guide and/or owner's manual first for quick tips that make using your product. User manual Manuel d'utilisation Manual del usuario MP3-CD Mini Hi-Fi System FWM70 THANK YOU FOR CHOOSING PHILIPS! NEED HELP FAST?
User manual
Page 4
... SHOCK DO NOT OPEN CAUTION: TO REDUCE THE RISK OF ELECTRIC SHOCK, DO NOT REMOVE COVER (OR BACK). NO USER-SERVICEABLE PARTS INSIDE. REFER SERVICING TO QUALIFIED SERVICE PERSONNEL. For the safety of everyone in the rare case of a product recall or safety defect. *Additional Benefits of the valuable benefits listed below the Serial No. in your product guaran- Registering your...
... SHOCK DO NOT OPEN CAUTION: TO REDUCE THE RISK OF ELECTRIC SHOCK, DO NOT REMOVE COVER (OR BACK). NO USER-SERVICEABLE PARTS INSIDE. REFER SERVICING TO QUALIFIED SERVICE PERSONNEL. For the safety of everyone in the rare case of a product recall or safety defect. *Additional Benefits of the valuable benefits listed below the Serial No. in your product guaran- Registering your...

User manual
Page 8
... clock) ... 16 Demonstration mode 16 Setting the clock 16 Dimming system's display screen 17 Volume control 17 Sound control 17 wOOx 17 Digital sound control 17 Virtual ambience control 17 Incredible Surround 17 Disc Operations Playable discs 18 Loading discs 18 Basic playback controls 18 Playing an MP3 disc 19 Repeat and shuffle 19 Repeat play 19 Random play 19 Programming the disc tracks 20 Checking the programme 20 Clearing the programme 20 8 Tuner Operations Tuning to radio stations 21 Presetting radio stations 21 Using the plug...
... clock) ... 16 Demonstration mode 16 Setting the clock 16 Dimming system's display screen 17 Volume control 17 Sound control 17 wOOx 17 Digital sound control 17 Virtual ambience control 17 Incredible Surround 17 Disc Operations Playable discs 18 Loading discs 18 Basic playback controls 18 Playing an MP3 disc 19 Repeat and shuffle 19 Repeat play 19 Random play 19 Programming the disc tracks 20 Checking the programme 20 Clearing the programme 20 8 Tuner Operations Tuning to radio stations 21 Presetting radio stations 21 Using the plug...
User manual
Page 9
... condensation problem - To clean a CD, wipe it impossible to the standby mode. Handle the disc by heating equipment or direct sunlight). Video cinch cable (yellow) - Care and safety information (page 3 - A cleaning agent may switch to humidity, rain, sand or excessive heat (caused by its edge, do not touch the surface. P1) - Remote control and two AA batteries. - Do not expose the system, batteries or discs...
... condensation problem - To clean a CD, wipe it impossible to the standby mode. Handle the disc by heating equipment or direct sunlight). Video cinch cable (yellow) - Care and safety information (page 3 - A cleaning agent may switch to humidity, rain, sand or excessive heat (caused by its edge, do not touch the surface. P1) - Remote control and two AA batteries. - Do not expose the system, batteries or discs...
User manual
Page 10
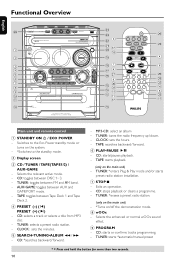
.... - TAPE: starts playback. (only on the system. - *Switches to the standby mode. 2 Display screen 3 CD / TUNER / TAPE(TAPE1/2) / AUX•GAME - Exits an operation. - Selects the relevant active mode. - CLOCK: sets the minutes. 5 SEARCH•TUNING•ALBUM 1 / ¡ - CD: *searches backward/ forward. - Selects the enhanced or normal wOOx sound effect. 9 PROGRAM - CD: selects a track or selects a title from MP3 disc. - CLOCK: sets the hours. - CD: stops playback or clears a programme. - TUNER: starts *automatic/manual preset * = Press and hold the button...
.... - TAPE: starts playback. (only on the system. - *Switches to the standby mode. 2 Display screen 3 CD / TUNER / TAPE(TAPE1/2) / AUX•GAME - Exits an operation. - Selects the relevant active mode. - CLOCK: sets the minutes. 5 SEARCH•TUNING•ALBUM 1 / ¡ - CD: *searches backward/ forward. - Selects the enhanced or normal wOOx sound effect. 9 PROGRAM - CD: selects a track or selects a title from MP3 disc. - CLOCK: sets the hours. - CD: stops playback or clears a programme. - TUNER: starts *automatic/manual preset * = Press and hold the button...
User manual
Page 11
...'s video output. Use a video cable to connect to your game console's left /right channel. ™ DISC TRAY £ OPEN•CLOSE 0 (DISC 1~3) - Selects different type of these music sources (CD,TUNER AUX or TAPE). Adjusts the game's output volume level. - Opens/closes the respective disc tray. ≤ DISC 1, 2 and 3 - Switches to the Eco Power standby mode. - *Switches to playback ∞ DISC CHANGE - The speakers output will be cancelled. ( MASTER VOLUME (VOL + -) - Points the remote control towards this sensor. ¡ VU meters - Changes discs Control buttons available...
...'s video output. Use a video cable to connect to your game console's left /right channel. ™ DISC TRAY £ OPEN•CLOSE 0 (DISC 1~3) - Selects different type of these music sources (CD,TUNER AUX or TAPE). Adjusts the game's output volume level. - Opens/closes the respective disc tray. ≤ DISC 1, 2 and 3 - Switches to the Eco Power standby mode. - *Switches to playback ∞ DISC CHANGE - The speakers output will be cancelled. ( MASTER VOLUME (VOL + -) - Points the remote control towards this sensor. ¡ VU meters - Changes discs Control buttons available...
User manual
Page 13
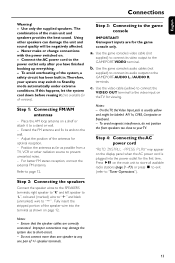
...! Extend the FM antenna and fix its audio outputs to the wall. - c. English Connections Warning! - Adjust the position of the speaker wire into the power outlet for viewing. Refer to "Tuner Operations"). Use the game console's audio cables (not supplied) to connect its ends to the GAMEPORT-AUDIO L. / AUDIO R. Step 4: Connecting the AC power cord "AUTO INSTALL - Ensure that the speaker cables are for all available radio stations (page 3 - Never make or change connections with the power switched on the main unit...
...! Extend the FM antenna and fix its audio outputs to the wall. - c. English Connections Warning! - Adjust the position of the speaker wire into the power outlet for viewing. Refer to "Tuner Operations"). Use the game console's audio cables (not supplied) to connect its ends to the GAMEPORT-AUDIO L. / AUDIO R. Step 4: Connecting the AC power cord "AUTO INSTALL - Ensure that the speaker cables are for all available radio stations (page 3 - Never make or change connections with the power switched on the main unit...
User manual
Page 15
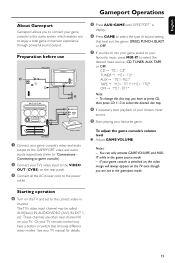
... Gameport Operations About Gameport Gameport allows you to connect your game console to this audio system which enables you to select the desired disc tray. 8 If necessary, start playback of sound setting that chooses different video modes. CD ™ "MIX-CD" TUNER ™ "MIX-TU" AUX ™ "MIX-AUX" TAPE ™ "MIX-TA1" / "MIX-TA2" OFF ™ "MIX-OFF" Note: - To change the disc tray, you have a button or switch that best suit...
... Gameport Operations About Gameport Gameport allows you to connect your game console to this audio system which enables you to select the desired disc tray. 8 If necessary, start playback of sound setting that chooses different video modes. CD ™ "MIX-CD" TUNER ™ "MIX-TU" AUX ™ "MIX-AUX" TAPE ™ "MIX-TA1" / "MIX-TA2" OFF ™ "MIX-OFF" Note: - To change the disc tray, you have a button or switch that best suit...
User manual
Page 16
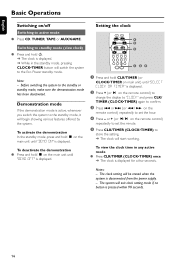
... the remote control) repeatedly to the Eco Power standby mode. Note: - Setting the clock 4 2 3 125 1 Press and hold B. ➜ The clock is displayed. ➜ While in any active mode ● Press CLK/TIMER (CLOCK•TIMER) once. ➜ The clock is displayed. To view the clock time in the standby mode, pressing CLOCK•TIMER button will begin showing various features offered by the system. Before switching the system to active mode ● Press CD, TUNER, TAPE or AUX/GAME. Demonstration mode If...
... the remote control) repeatedly to the Eco Power standby mode. Note: - Setting the clock 4 2 3 125 1 Press and hold B. ➜ The clock is displayed. ➜ While in any active mode ● Press CLK/TIMER (CLOCK•TIMER) once. ➜ The clock is displayed. To view the clock time in the standby mode, pressing CLOCK•TIMER button will begin showing various features offered by the system. Before switching the system to active mode ● Press CD, TUNER, TAPE or AUX/GAME. Demonstration mode If...
User manual
Page 17
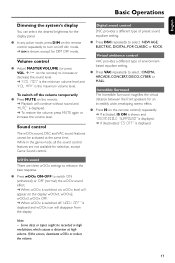
..., except Game Sound control. While in high modulation, which causes a distortion at the same time. If this occurs, deactivate wOOx or reduce the volume. 17 English Basic Operations Dimming the system's display You can select the desired brightness for the display panel. ● In any active mode, press DIM on the remote control repeatedly to turn on/off , "WOOX OFF" is displayed. Volume control ● Adjust MASTER VOLUME (or press...
..., except Game Sound control. While in high modulation, which causes a distortion at the same time. If this occurs, deactivate wOOx or reduce the volume. 17 English Basic Operations Dimming the system's display You can select the desired brightness for the display panel. ● In any active mode, press DIM on the remote control repeatedly to turn on/off , "WOOX OFF" is displayed. Volume control ● Adjust MASTER VOLUME (or press...
User manual
Page 18
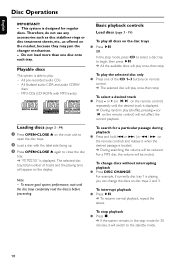
... disc tray. ➜ "READING" is able to the standby mode. 18 OR In the stop mode, press CD to select a disc tray to open the disc trays. 2 Load a disc with MP3 tracks) Basic playback controls Load discs (page 3 - Loading discs (page 3 - P4) 1 Press OPEN•CLOSE 0 on the remote control) will switch to play once, then stop . This system is displayed. ➜ During random play the selected disc only ● Press one disc onto each tray...
... disc tray. ➜ "READING" is able to the standby mode. 18 OR In the stop mode, press CD to select a disc tray to open the disc trays. 2 Load a disc with MP3 tracks) Basic playback controls Load discs (page 3 - Loading discs (page 3 - P4) 1 Press OPEN•CLOSE 0 on the remote control) will switch to play once, then stop . This system is displayed. ➜ During random play the selected disc only ● Press one disc onto each tray...
User manual
Page 19
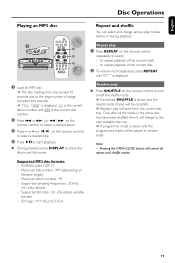
... ÉÅto start from the current disc tray. Maximum title number : 999 (depending on /off the shuffle mode. ➜ If activated, SHUFFLE is active, only the programmed tracks will be cancelled. ➜ Random play ● Press SHUFFLE on the remote control to repeat playback of the current disc. 2 To resume normal playback, press REPEAT until "OFF" is displayed. Supported Bit-rates : 32~256...
... ÉÅto start from the current disc tray. Maximum title number : 999 (depending on /off the shuffle mode. ➜ If activated, SHUFFLE is active, only the programmed tracks will be cancelled. ➜ Random play ● Press SHUFFLE on the remote control to repeat playback of the current disc. 2 To resume normal playback, press REPEAT until "OFF" is displayed. Supported Bit-rates : 32~256...
User manual
Page 21
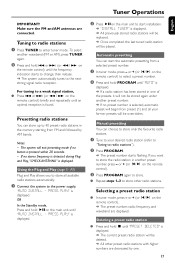
... be replaced. ➜ Once completed, the last tuned radio station will begin from preset (1) and all available radio stations automatically. 1 Connect the system to your former presets will exit presetting mode if no preset number is displayed. ➜ The current preset radio station will be played. or + (or í/ë on the main unit to radio stations"). 2 Press PROGRAM. ➜ The preset number starts flashing. Automatic presetting You can choose to store only the favourite radio stations. 1 Tune to the power supply, "AUTO INSTALL...
... be replaced. ➜ Once completed, the last tuned radio station will begin from preset (1) and all available radio stations automatically. 1 Connect the system to your former presets will exit presetting mode if no preset number is displayed. ➜ The current preset radio station will be played. or + (or í/ë on the main unit to radio stations"). 2 Press PROGRAM. ➜ The preset number starts flashing. Automatic presetting You can choose to store only the favourite radio stations. 1 Tune to the power supply, "AUTO INSTALL...

User manual
Page 22
... slack tape with the open the tape deck door. 2 Insert a recorded tape and close to start playback. At the beginning and end of the tape, nothing will be played once. ● Press REC in Tuner, Disc or AUX mode, press REC, and "CHECK TAPE" will replay up to max. 10 times or until you want to protect. 3 Press TAPE or TAPE1/2 on the display if...
... slack tape with the open the tape deck door. 2 Insert a recorded tape and close to start playback. At the beginning and end of the tape, nothing will be played once. ● Press REC in Tuner, Disc or AUX mode, press REC, and "CHECK TAPE" will replay up to max. 10 times or until you want to protect. 3 Press TAPE or TAPE1/2 on the display if...
User manual
Page 24
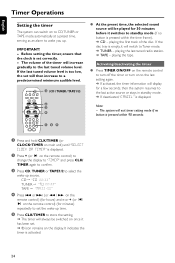
The volume of the disc. IMPORTANT! - playing the last tuned radio station. ➜ TAPE - Activating/deactivating the timer ● Press TIMER ON/OFF on the remote control to turn off the timer or turn on to the last setting again. ➜ If activated, the timer information will exit timer setting mode if no button is displayed. 2 Press + (or ë on the remote control) to change the display to "TIMER" and press CLK/ TIMER again to confirm. 3 Press CD, TUNER or TAPE1/2 to...
The volume of the disc. IMPORTANT! - playing the last tuned radio station. ➜ TAPE - Activating/deactivating the timer ● Press TIMER ON/OFF on the remote control to turn off the timer or turn on to the last setting again. ➜ If activated, the timer information will exit timer setting mode if no button is displayed. 2 Press + (or ë on the remote control) to change the display to "TIMER" and press CLK/ TIMER again to confirm. 3 Press CD, TUNER or TAPE1/2 to...
User manual
Page 25
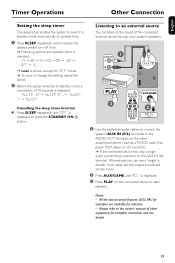
... source You can use details. 25 Always refer to the owner's manual of other audio/visual device (such as a TV,VCR, Laser Disc player, DVD player or CD recorder) ➜ If the connected device has only a single audio out terminal, connect it reaches the desired preset turn-off time. ➜ Following options are available for selection. - English Timer Operations Other Connection Setting the sleep timer The sleep timer enables the system to switch to standby mode automatically at a preset time...
... source You can use details. 25 Always refer to the owner's manual of other audio/visual device (such as a TV,VCR, Laser Disc player, DVD player or CD recorder) ➜ If the connected device has only a single audio out terminal, connect it reaches the desired preset turn-off time. ➜ Following options are available for selection. - English Timer Operations Other Connection Setting the sleep timer The sleep timer enables the system to switch to standby mode automatically at a preset time...
User manual
Page 27
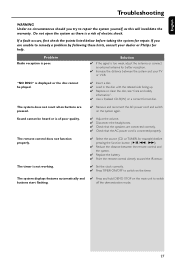
... system displays features automatically and ✔ Press and hold DEMO STOP on the system again. Do not open the system as this will invalidate the warranty. "NO DISC" is a risk of poor quality. ✔ Adjust the volume. ✔ Disconnect the headphones. ✔ Check that the AC power cord is connected properly. If you try to switch buttons start flashing. Problem Radio reception is of electric shock. Sound cannot be played...
... system displays features automatically and ✔ Press and hold DEMO STOP on the system again. Do not open the system as this will invalidate the warranty. "NO DISC" is a risk of poor quality. ✔ Adjust the volume. ✔ Disconnect the headphones. ✔ Check that the AC power cord is connected properly. If you try to switch buttons start flashing. Problem Radio reception is of electric shock. Sound cannot be played...
User manual
Page 28
... on the product, and installation or repair of antenna systems outside of the product. • Product repair and/or part replacement because of improper installation, connections to improper voltage supply, abuse, neglect, misuse, accident, unauthorized repair or other rights which it is unable to Philips for repair, you will supply, at no signature verification of purchase, Philips will pay the shipping costs when returning the product to Philips. Philips will no...
... on the product, and installation or repair of antenna systems outside of the product. • Product repair and/or part replacement because of improper installation, connections to improper voltage supply, abuse, neglect, misuse, accident, unauthorized repair or other rights which it is unable to Philips for repair, you will supply, at no signature verification of purchase, Philips will pay the shipping costs when returning the product to Philips. Philips will no...

Quick start guide
Page 2
...) until "SELECT CLOCK OR TIMER" is displayed. A Plug and Play 1 Gameport Operations 15 Basic Operations 16~17 Disc Operations 18~20 1 When you turn on the system to start installation. Timer Operations 24~25 ➜ "INSTALL" is displayed, followed Troubleshooting 27 by "TUNER" and "AUTO". ➜ PROG starts flashing. ➜ When all the available radio stations are stored or the memory for 40 presets are used, the last preset radio station (or the first available RDS station) will be played. 2 B Timer Operations 1 Press...
...) until "SELECT CLOCK OR TIMER" is displayed. A Plug and Play 1 Gameport Operations 15 Basic Operations 16~17 Disc Operations 18~20 1 When you turn on the system to start installation. Timer Operations 24~25 ➜ "INSTALL" is displayed, followed Troubleshooting 27 by "TUNER" and "AUTO". ➜ PROG starts flashing. ➜ When all the available radio stations are stored or the memory for 40 presets are used, the last preset radio station (or the first available RDS station) will be played. 2 B Timer Operations 1 Press...


