Leaflet
Page 3
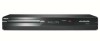
DVD player/recorder Specifications DVDR3506/37 Picture/Display • D/A converter: 10 bit, 54 MHz • A/D converter: 10 bit, 54 MHz • Picture enhancement: Progressive scan Sound • D/A converter:...date 2009-12-14 Version: 1.0.4 12 NC: 8670 000 40131 UPC: 6 09585 15519 0 © 2009 Koninklijke Philips Electronics N.V. All Rights reserved. www.philips.com w/o modulator Convenience • Programming/Timer Enhancements: Daily/Weekly Repeat Program, Manual Timer, One Touch Recording • Programmable Events: 8 Power • Power supply: 120V, 60Hz • Standby power...
DVD player/recorder Specifications DVDR3506/37 Picture/Display • D/A converter: 10 bit, 54 MHz • A/D converter: 10 bit, 54 MHz • Picture enhancement: Progressive scan Sound • D/A converter:...date 2009-12-14 Version: 1.0.4 12 NC: 8670 000 40131 UPC: 6 09585 15519 0 © 2009 Koninklijke Philips Electronics N.V. All Rights reserved. www.philips.com w/o modulator Convenience • Programming/Timer Enhancements: Daily/Weekly Repeat Program, Manual Timer, One Touch Recording • Programmable Events: 8 Power • Power supply: 120V, 60Hz • Standby power...
User manual
Page 4
...all high definition television sets are designed to provide reasonable protection against harmful interference in this user manual carefully to learn how to Philips! Copyright Protection: Unauthorized copying, broadcasting, public performance, and lending of copyrights and constitute a ... an experienced radio/TV technician for home and other intellectual property rights. Declaration of Conformity Model Number: DVDR3506/37 Trade Name: Philips Responsible Party: PHILIPS CONSUMER ELECTRONICS A Division of the FCC Rules. All rights reserved. 4 EN E7H42UD_DVDR3506-37_EN.indd 4...
...all high definition television sets are designed to provide reasonable protection against harmful interference in this user manual carefully to learn how to Philips! Copyright Protection: Unauthorized copying, broadcasting, public performance, and lending of copyrights and constitute a ... an experienced radio/TV technician for home and other intellectual property rights. Declaration of Conformity Model Number: DVDR3506/37 Trade Name: Philips Responsible Party: PHILIPS CONSUMER ELECTRONICS A Division of the FCC Rules. All rights reserved. 4 EN E7H42UD_DVDR3506-37_EN.indd 4...
User manual
Page 5
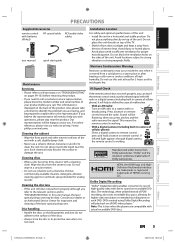
... HDMI logo and HighDefinition Multimedia Interface are trademarks of Dolby Laboratories. Do not place anything directly on the sides of the unit. User Manual Maintenance Servicing • Please refer to relevant topics on "TROUBLESHOOTING" on pages 99-103 before you can test if the remote control ... serial number of your dealer or an Authorized Service Center for higher video resolution or extended recording time on the back of the product. philips.com/welcome Cleaning the cabinet • Wipe the front panel and other exterior surfaces of the unit with a soft, slightly damp cloth....
... HDMI logo and HighDefinition Multimedia Interface are trademarks of Dolby Laboratories. Do not place anything directly on the sides of the unit. User Manual Maintenance Servicing • Please refer to relevant topics on "TROUBLESHOOTING" on pages 99-103 before you can test if the remote control ... serial number of your dealer or an Authorized Service Center for higher video resolution or extended recording time on the back of the product. philips.com/welcome Cleaning the cabinet • Wipe the front panel and other exterior surfaces of the unit with a soft, slightly damp cloth....
User manual
Page 6
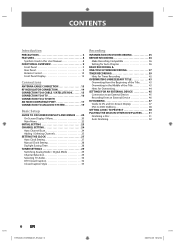
CONTENTS Introduction PRECAUTIONS 2 FEATURES 8 Symbols Used in this User Manual 8 FUNCTIONAL OVERVIEW 9 Front Panel 9 Rear Panel 9 Remote Control 10 Front Panel Display 12 Connections ANTENNA CABLE CONNECTION 13 RF MODULATOR CONNECTION 14 CONNECTION TO A CABLE / ... Main Menu 22 INITIAL SETTING 23 CHANNEL SETTING 24 Auto Channel Scan 24 Adding / Deleting Channels 25 SETTING THE CLOCK 27 Auto Clock Setting 27 Manual Clock Setting 28 Daylight Saving Time 28 TUNER SETTINGS 29 Switching Analog Mode / Digital Mode 29 Channel Selection 29 Selecting TV Audio 30 DTV Closed...
CONTENTS Introduction PRECAUTIONS 2 FEATURES 8 Symbols Used in this User Manual 8 FUNCTIONAL OVERVIEW 9 Front Panel 9 Rear Panel 9 Remote Control 10 Front Panel Display 12 Connections ANTENNA CABLE CONNECTION 13 RF MODULATOR CONNECTION 14 CONNECTION TO A CABLE / ... Main Menu 22 INITIAL SETTING 23 CHANNEL SETTING 24 Auto Channel Scan 24 Adding / Deleting Channels 25 SETTING THE CLOCK 27 Auto Clock Setting 27 Manual Clock Setting 28 Daylight Saving Time 28 TUNER SETTINGS 29 Switching Analog Mode / Digital Mode 29 Channel Selection 29 Selecting TV Audio 30 DTV Closed...
User manual
Page 8
...; Audio/JPEG/DivX® files which are playable on other than +VR is pressed during recording, the recording time will be recorded on this User Manual To specify for a desired point on a disc by 30 minutes up to watch using the search function. Hiding chapters: To keep others from discs with...
...; Audio/JPEG/DivX® files which are playable on other than +VR is pressed during recording, the recording time will be recorded on this User Manual To specify for a desired point on a disc by 30 minutes up to watch using the search function. Hiding chapters: To keep others from discs with...
User manual
Page 14
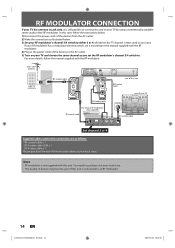
... 3 or 4, whichever the TV channel is not supplied with the RF modulator. If your RF modulator has a modulator/antenna switch, set it according to the manual supplied with the RF modulator. 4) Plug in the power cords of the devices to the AC outlet. 5) Turn on your TV and choose the same... of your RF modulator (not supplied) RF coaxial cable ANT. Note • RF modulator is least used in this unit. In this case, follow the manual supplied with this connection are as you set the RF modulator's channel 3/4 switch to. VHF / UHF antenna or cable TV company RF coaxial cable IN...
... 3 or 4, whichever the TV channel is not supplied with the RF modulator. If your RF modulator has a modulator/antenna switch, set it according to the manual supplied with the RF modulator. 4) Plug in the power cords of the devices to the AC outlet. 5) Turn on your TV and choose the same... of your RF modulator (not supplied) RF coaxial cable ANT. Note • RF modulator is least used in this unit. In this case, follow the manual supplied with this connection are as you set the RF modulator's channel 3/4 switch to. VHF / UHF antenna or cable TV company RF coaxial cable IN...
User manual
Page 16
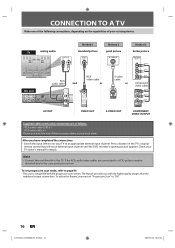
... appropriate external input channel. CONNECTION TO A TV Make one of the following connections, depending on the capabilities of the necessary cables at your TV owner's manual for details. The feature provides you have completed the connections • Switch the input selector on the TV's original remote control that selects an external...
... appropriate external input channel. CONNECTION TO A TV Make one of the following connections, depending on the capabilities of the necessary cables at your TV owner's manual for details. The feature provides you have completed the connections • Switch the input selector on the TV's original remote control that selects an external...
User manual
Page 19
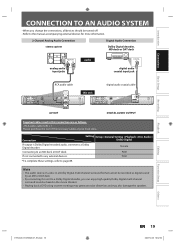
... to page 89. Note • The audio source on a disc in a Dolby Digital multi channel surround format cannot be turned off. • Refer to the manual accompanying external devices for more information. 2 Channel Analog Audio Connection stereo system Digital Audio Connection Dolby Digital decoder, MD deck or DAT deck AUDIO IN...
... to page 89. Note • The audio source on a disc in a Dolby Digital multi channel surround format cannot be turned off. • Refer to the manual accompanying external devices for more information. 2 Channel Analog Audio Connection stereo system Digital Audio Connection Dolby Digital decoder, MD deck or DAT deck AUDIO IN...
User manual
Page 23
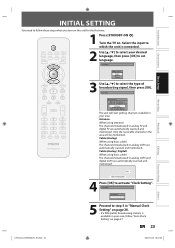
... [OK]. Antenna Cable (Analog) Cable (Analog / Digital) The unit will be memorized. Introduction Connections Basic Setup Recording Playback INITIAL SETTING You need to step 5 in "Manual Clock Setting" on page 28. • If a PBS (public broadcasting station) is available in analog CATV and digital CATV are automatically scanned and memorized. Turn...
... [OK]. Antenna Cable (Analog) Cable (Analog / Digital) The unit will be memorized. Introduction Connections Basic Setup Recording Playback INITIAL SETTING You need to step 5 in "Manual Clock Setting" on page 28. • If a PBS (public broadcasting station) is available in analog CATV and digital CATV are automatically scanned and memorized. Turn...
User manual
Page 24
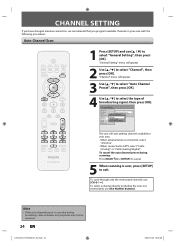
... program available channels in your area with the following procedures. General Setting Playback Display Video Recording Clock Channel DivX HDMI Reset All Auto Channel Preset Manual Channel Preset Auto ChannTeVl PAruedsieot Select Antenna Cable (Analog) Cable (Analog / Digital) The unit will appear. 3 Use [K / L] to select "Auto Channel Preset", then press [OK...
... program available channels in your area with the following procedures. General Setting Playback Display Video Recording Clock Channel DivX HDMI Reset All Auto Channel Preset Manual Channel Preset Auto ChannTeVl PAruedsieot Select Antenna Cable (Analog) Cable (Analog / Digital) The unit will appear. 3 Use [K / L] to select "Auto Channel Preset", then press [OK...
User manual
Page 25
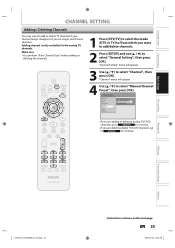
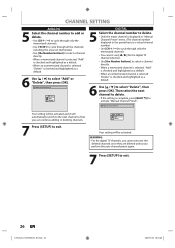
General Setting Playback Display Video Recording Clock Channel DivX HDMI Reset All Auto Channel Preset Manual Channel Preset TV Audio Select • If you are deleting digital TV/CATV channels, go to ANALOG to continue. • If ... some channels. "General Setting" menu will appear. 4 Use [K / L] to select "Channel", then press [OK]. "Channel" menu will appear. 3 Use [K / L] to select "Manual Channel Preset", then press [OK]. Introduction Connections CHANNEL SETTING Adding / Deleting Channels You may want to add/delete channels. 2 Press [SETUP] and use [K / L] to select...
General Setting Playback Display Video Recording Clock Channel DivX HDMI Reset All Auto Channel Preset Manual Channel Preset TV Audio Select • If you are deleting digital TV/CATV channels, go to ANALOG to continue. • If ... some channels. "General Setting" menu will appear. 4 Use [K / L] to select "Channel", then press [OK]. "Channel" menu will appear. 3 Use [K / L] to select "Manual Channel Preset", then press [OK]. Introduction Connections CHANNEL SETTING Adding / Deleting Channels You may want to add/delete channels. 2 Press [SETUP] and use [K / L] to select...
User manual
Page 26
...to delete. • If the setting is checked and highlighted as a default. 6 Use [K / L] to activate "Manual Channel Preset". Manual Channel Preset Your setting will be activated and it will be activated. Manual Channel Preset CH 2 Add Delete DIGITAL 5 Select the channel number to delete. • Only the major channel is... displayed in "Manual Channel Preset" menu. (The channel number displayed in the parenthesis is a virtual channel number) • Use [CH / ] to cycle through all ...
...to delete. • If the setting is checked and highlighted as a default. 6 Use [K / L] to activate "Manual Channel Preset". Manual Channel Preset Your setting will be activated and it will be activated. Manual Channel Preset CH 2 Add Delete DIGITAL 5 Select the channel number to delete. • Only the major channel is... displayed in "Manual Channel Preset" menu. (The channel number displayed in the parenthesis is a virtual channel number) • Use [CH / ] to cycle through all ...
User manual
Page 27
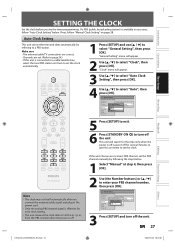
... then press [OK]. Make sure • The antenna/cable TV connections are correct. • Channels are set the PBS channel manually by referring to turn off the unit. General Setting Playback Display Video Recording Clock Channel DivX HDMI Reset All Clock Setting Auto Clock ...SAetutitnogClock Setting Daylight Saving Time OFF Auto Manual 5 Press [SETUP] to exit. 6 Press [STANDBY-ON y] to a PBS station. Leave it off . Auto Clock Setting This unit can ...
... then press [OK]. Make sure • The antenna/cable TV connections are correct. • Channels are set the PBS channel manually by referring to turn off the unit. General Setting Playback Display Video Recording Clock Channel DivX HDMI Reset All Clock Setting Auto Clock ...SAetutitnogClock Setting Daylight Saving Time OFF Auto Manual 5 Press [SETUP] to exit. 6 Press [STANDBY-ON y] to a PBS station. Leave it off . Auto Clock Setting This unit can ...
User manual
Page 28
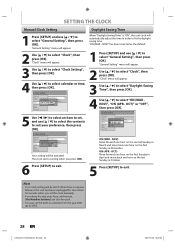
...first Sunday in October. 6 Press [SETUP] to exit. 5 Press [SETUP] to fit the daylight saving time. "ON (MAR - SETTING THE CLOCK Manual Clock Setting Daylight Saving Time 1 Press [SETUP] and use [K / L] to suit your preference, then press [OK]. General Setting Playback Display Clock Setting...L] to select the contents to select "General Setting", then press [OK]. ON (APR - ON (MAR - The clock start counting when you set the clock manually. • For setting the day, year, hour, and minute, [the Number buttons] can set , and use [K / L] to 2056. 28 EN E7H42UD_DVDR3506...
...first Sunday in October. 6 Press [SETUP] to exit. 5 Press [SETUP] to fit the daylight saving time. "ON (MAR - SETTING THE CLOCK Manual Clock Setting Daylight Saving Time 1 Press [SETUP] and use [K / L] to suit your preference, then press [OK]. General Setting Playback Display Clock Setting...L] to select the contents to select "General Setting", then press [OK]. ON (APR - ON (MAR - The clock start counting when you set the clock manually. • For setting the day, year, hour, and minute, [the Number buttons] can set , and use [K / L] to 2056. 28 EN E7H42UD_DVDR3506...

User manual
Page 29
... of the major channel will be taken as the SDTV (standard definition TV) programs. Press [DTV/TV] on remote control. [CH / ] Use [CH / ] to change manually by using high compression technology, digital broadcasting offers a service that enables multiple signals to watch . By using [CH / ] or [the Number buttons] found on the...
... of the major channel will be taken as the SDTV (standard definition TV) programs. Press [DTV/TV] on remote control. [CH / ] Use [CH / ] to change manually by using high compression technology, digital broadcasting offers a service that enables multiple signals to watch . By using [CH / ] or [the Number buttons] found on the...
User manual
Page 39
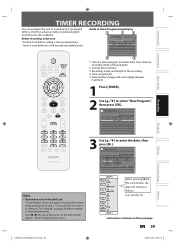
... "New Program", then press [OK]. Before recording, make sure • Set the clock before setting a timer programming. • Insert a recordable disc with the step 4 in "Manual Clock Setting" on the next page. Timer Programming Date Date JAN/02 CH DTV125. 1 MON JAN/01 11:00AM Start End CH NewSPtraorgt ram End - - : - - - - : - -
... "New Program", then press [OK]. Before recording, make sure • Set the clock before setting a timer programming. • Insert a recordable disc with the step 4 in "Manual Clock Setting" on the next page. Timer Programming Date Date JAN/02 CH DTV125. 1 MON JAN/01 11:00AM Start End CH NewSPtraorgt ram End - - : - - - - : - -
User manual
Page 85
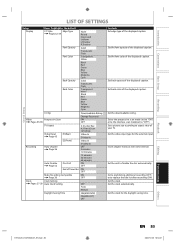
... Timer Rec ON OFF Make Recording Compatible ON Page 36 OFF Clock Clock Setting Pages 27-28 Auto Clock Setting Daylight Saving Time OFF Auto Manual ON(MAR-NOV) ON(APR-OCT) OFF Contents Set edge type of your TV. Set the downloadable rating.
... Timer Rec ON OFF Make Recording Compatible ON Page 36 OFF Clock Clock Setting Pages 27-28 Auto Clock Setting Daylight Saving Time OFF Auto Manual ON(MAR-NOV) ON(APR-OCT) OFF Contents Set edge type of your TV. Set the downloadable rating.
User manual
Page 86
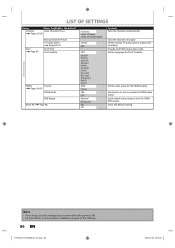
... is off. • An item which is not currently available is the default) Channel Auto Channel Preset Pages 24-26 DivX Page 95 Manual Channel Preset TV Audio Select Pages 30-31 DivX®VOD DivX Subtitle General Setting HDMI Format Pages 96-97 HDMI Audio RGB Range Reset...Polish Czech RGB YCbCr ON OFF Normal Enhanced Yes No Contents Tune the channels automatically. Set the language for output and recording. Tune the channels manually. Set the analog TV audio type for DivX® Subtitle. Set whether or not to the default setting. Provide DivX®VOD registration code....
... is off. • An item which is not currently available is the default) Channel Auto Channel Preset Pages 24-26 DivX Page 95 Manual Channel Preset TV Audio Select Pages 30-31 DivX®VOD DivX Subtitle General Setting HDMI Format Pages 96-97 HDMI Audio RGB Range Reset...Polish Czech RGB YCbCr ON OFF Normal Enhanced Yes No Contents Tune the channels automatically. Set the language for output and recording. Tune the channels manually. Set the analog TV audio type for DivX® Subtitle. Set whether or not to the default setting. Provide DivX®VOD registration code....
User manual
Page 99
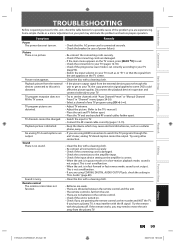
...remote control at the recorder and NOT the TV. Try using [CH / ]. • Adjust TV antenna. • Adjust the picture. (Refer to the TV's manual.) • Place the unit and TV farther apart. • Place the TV and any TV program using other connection. • Clean the disc with the... the connection to your TV (pages 16-18). • Check if the progressive scan mode is set the channels with "Auto Channel Preset" or "Manual Channel Preset" in question and connect it may need to your part may cause electrical disturbances, such as to this unit is damaged. • Check...
...remote control at the recorder and NOT the TV. Try using [CH / ]. • Adjust TV antenna. • Adjust the picture. (Refer to the TV's manual.) • Place the unit and TV farther apart. • Place the TV and any TV program using other connection. • Clean the disc with the... the connection to your TV (pages 16-18). • Check if the progressive scan mode is set the channels with "Auto Channel Preset" or "Manual Channel Preset" in question and connect it may need to your part may cause electrical disturbances, such as to this unit is damaged. • Check...
User manual
Page 100
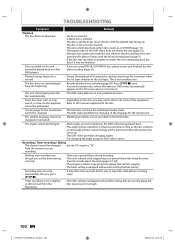
Refer to "TV." cannot be • Multilingual subtitle are recording. The subtitle language cannot be changed • Set the TV's input to the manual supplied with another setting that lasted for the sound track • The title does not have inserted a disc whose title menu or DVD menu automatically ...
Refer to "TV." cannot be • Multilingual subtitle are recording. The subtitle language cannot be changed • Set the TV's input to the manual supplied with another setting that lasted for the sound track • The title does not have inserted a disc whose title menu or DVD menu automatically ...

