Leaflet
Page 3
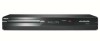
... Repeat Program, Manual Timer, One Touch Recording • Programmable Events: 8 Power • Power supply: 120V, 60Hz • Standby power consumption: < 2.8 W Accessories • Included accessories: Remote Control, User Manual, Quick start guide, RF antenna cable, Warranty Leaflet, 2 x AAA Batteries, A/V Cable • Remote Control 12NC: Black Slim Sofa Dimensions • Weight incl. Trademarks are subject to change without notice. or their respective owners. www.philips.com All Rights reserved. DVD player/recorder Specifications DVDR3506/37 Picture/Display • D/A converter...
... Repeat Program, Manual Timer, One Touch Recording • Programmable Events: 8 Power • Power supply: 120V, 60Hz • Standby power consumption: < 2.8 W Accessories • Included accessories: Remote Control, User Manual, Quick start guide, RF antenna cable, Warranty Leaflet, 2 x AAA Batteries, A/V Cable • Remote Control 12NC: Black Slim Sofa Dimensions • Weight incl. Trademarks are subject to change without notice. or their respective owners. www.philips.com All Rights reserved. DVD player/recorder Specifications DVDR3506/37 Picture/Display • D/A converter...
User manual
Page 3
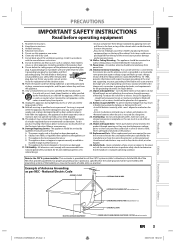
... IN WIRE Recording Playback Editing Function Setup E7H42UD_DVDR3506-37_EN.indd 3 ELECTRIC SERVICE EQUIPMENT ANTENNA DISCHARGE UNIT (NEC SECTION 810-20) GROUNDING CONDUCTORS (NEC SECTION 810-21) GROUND CLAMPS POWER SERVICE GROUNDING ELECTRODE SYSTEM (NEC ART 250, PART H) EN 3 2007/12/28 10:52:41 Others Heed all instructions. 5. Do not block any way, such as close to the unit: ● Install all servicing to...
... IN WIRE Recording Playback Editing Function Setup E7H42UD_DVDR3506-37_EN.indd 3 ELECTRIC SERVICE EQUIPMENT ANTENNA DISCHARGE UNIT (NEC SECTION 810-20) GROUNDING CONDUCTORS (NEC SECTION 810-21) GROUND CLAMPS POWER SERVICE GROUNDING ELECTRODE SYSTEM (NEC ART 250, PART H) EN 3 2007/12/28 10:52:41 Others Heed all instructions. 5. Do not block any way, such as close to the unit: ● Install all servicing to...
User manual
Page 4
... turning the device off and on DVD and playback DVD/CD of Philips Electronics North America Corp P.O. Install the unit in accordance with this device void the user's authority to remove the disc and unplug the AC power cord from that to the 'standard definition' output. Laser Safety: This unit employs a laser. Only a qualified service person should not be an infringement of copy-protected material, including computer programs, files, broadcasts and sound recordings...
... turning the device off and on DVD and playback DVD/CD of Philips Electronics North America Corp P.O. Install the unit in accordance with this device void the user's authority to remove the disc and unplug the AC power cord from that to the 'standard definition' output. Laser Safety: This unit employs a laser. Only a qualified service person should not be an infringement of copy-protected material, including computer programs, files, broadcasts and sound recordings...
User manual
Page 5
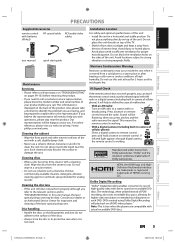
... a button on the back of the product. Manufactured under conditions of intense heat. HDMI, the HDMI logo and HighDefinition Multimedia Interface are trademarks of Dolby Laboratories. The technology, when utilized instead of PCM recording, also saves recordable disc space, allowing for inspection and cleaning of the laser optical pickup unit. Introduction Connections Basic Setup Recording Playback PRECAUTIONS Supplied Accessories remote control with batteries (AAAx2) RF coaxial cable RCA audio/video cables user manual quick start guide Installation...
... a button on the back of the product. Manufactured under conditions of intense heat. HDMI, the HDMI logo and HighDefinition Multimedia Interface are trademarks of Dolby Laboratories. The technology, when utilized instead of PCM recording, also saves recordable disc space, allowing for inspection and cleaning of the laser optical pickup unit. Introduction Connections Basic Setup Recording Playback PRECAUTIONS Supplied Accessories remote control with batteries (AAAx2) RF coaxial cable RCA audio/video cables user manual quick start guide Installation...
User manual
Page 6
... CONNECTION TO AN AUDIO SYSTEM 19 Basic Setup GUIDE TO ON-SCREEN DISPLAYS AND MENUS . . . . 20 On-Screen Display / Menu 20 Main Menu 22 INITIAL SETTING 23 CHANNEL SETTING 24 Auto Channel Scan 24 Adding / Deleting Channels 25 SETTING THE CLOCK 27 Auto Clock Setting 27 Manual Clock Setting 28 Daylight Saving Time 28 TUNER SETTINGS 29 Switching Analog Mode / Digital Mode 29 Channel Selection 29 Selecting TV Audio 30 DTV Closed Caption 32 Closed Caption Style 33 Recording INFORMATION ON DVD RECORDING 35 BEFORE RECORDING 36 Make Recording Compatible 36 Setting for Auto Chapter...
... CONNECTION TO AN AUDIO SYSTEM 19 Basic Setup GUIDE TO ON-SCREEN DISPLAYS AND MENUS . . . . 20 On-Screen Display / Menu 20 Main Menu 22 INITIAL SETTING 23 CHANNEL SETTING 24 Auto Channel Scan 24 Adding / Deleting Channels 25 SETTING THE CLOCK 27 Auto Clock Setting 27 Manual Clock Setting 28 Daylight Saving Time 28 TUNER SETTINGS 29 Switching Analog Mode / Digital Mode 29 Channel Selection 29 Selecting TV Audio 30 DTV Closed Caption 32 Closed Caption Style 33 Recording INFORMATION ON DVD RECORDING 35 BEFORE RECORDING 36 Make Recording Compatible 36 Setting for Auto Chapter...

User manual
Page 7
... ON DISC EDITING 71 Guide to a Title List 71 Editing Discs 71 EDITING DISCS 72 Deleting Titles 72 Putting Names on Titles 73 Setting Chapter Marks 74 Clearing Chapter Marks 75 Hiding Chapters 77 Setting Pictures for Thumbnails 78 Dividing a Title 79 Putting Name on Disc 80 Setting or Releasing Disc Protect 81 Erasing Disc 82 Making Edits Compatible 83 Function Setup LIST OF SETTINGS 84 SETUPS 87 Playback 87 Display 91 Video 93 DivX 95 HDMI 96 Reset All 98 Others TROUBLESHOOTING 99 Frequently Asked Questions 103 LANGUAGE CODE...
... ON DISC EDITING 71 Guide to a Title List 71 Editing Discs 71 EDITING DISCS 72 Deleting Titles 72 Putting Names on Titles 73 Setting Chapter Marks 74 Clearing Chapter Marks 75 Hiding Chapters 77 Setting Pictures for Thumbnails 78 Dividing a Title 79 Putting Name on Disc 80 Setting or Releasing Disc Protect 81 Erasing Disc 82 Making Edits Compatible 83 Function Setup LIST OF SETTINGS 84 SETUPS 87 Playback 87 Display 91 Video 93 DivX 95 HDMI 96 Reset All 98 Others TROUBLESHOOTING 99 Frequently Asked Questions 103 LANGUAGE CODE...
User manual
Page 8
... to DVD-R For Playback only Description refers to DVD+R DL Description refers to play on DVD+RW/+R or DVD-RW/-R. Setting pictures for thumbnails: You can change pictures for a desired point on DVD and edit them after that of the left channel monaural input as you do not need to finalize the recorded discs to DVD-video Editing Deleting titles: You can delete titles which is not recordable on CD-RW/-R. Description refers to audio CD...
... to DVD-R For Playback only Description refers to DVD+R DL Description refers to play on DVD+RW/+R or DVD-RW/-R. Setting pictures for thumbnails: You can change pictures for a desired point on DVD and edit them after that of the left channel monaural input as you do not need to finalize the recorded discs to DVD-video Editing Deleting titles: You can delete titles which is not recordable on CD-RW/-R. Description refers to audio CD...
User manual
Page 16
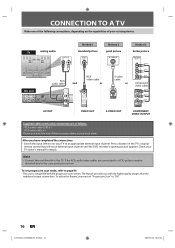
...) PR/CR COMPONENT VIDEO OUTPUT COMPONENT VIDEO OUTPUT Supplied cables used in this feature, you have completed the connections • Switch the input selector on the TV's original remote control that selects an external input channel until the DVD recorder's opening picture appears. After you must set progressive scan mode, refer to the TV. Check your TV owner's manual for details. Press a button on your TV to the copy protection system. To utilize this connection are connected to a VCR, pictures may be distorted...
...) PR/CR COMPONENT VIDEO OUTPUT COMPONENT VIDEO OUTPUT Supplied cables used in this feature, you have completed the connections • Switch the input selector on the TV's original remote control that selects an external input channel until the DVD recorder's opening picture appears. After you must set progressive scan mode, refer to the TV. Check your TV owner's manual for details. Press a button on your TV to the copy protection system. To utilize this connection are connected to a VCR, pictures may be distorted...
User manual
Page 19
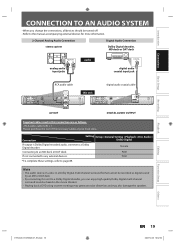
... COMPONENT VIDEO OUTPUT S-VIDEO HDMI OUT COAXIAL DIGITAL AUDIO OUTPUT PCM / BITSTREAM COAXIAL DIGITAL AUDIO OUTPUT PCM / BITSTREAM DIGITAL AUDIO OUTPUT Supplied cables used in this unit to a Dolby Digital decoder, you change the connections, all devices should be recorded as digital sound by an MD or DAT deck. • By connecting this connection are as heard in the movie theaters. • Playing back a DVD using incorrect settings may generate noise distortion and may also damage the speakers. Playback Editing Function Setup...
... COMPONENT VIDEO OUTPUT S-VIDEO HDMI OUT COAXIAL DIGITAL AUDIO OUTPUT PCM / BITSTREAM COAXIAL DIGITAL AUDIO OUTPUT PCM / BITSTREAM DIGITAL AUDIO OUTPUT Supplied cables used in this unit to a Dolby Digital decoder, you change the connections, all devices should be recorded as digital sound by an MD or DAT deck. • By connecting this connection are as heard in the movie theaters. • Playing back a DVD using incorrect settings may generate noise distortion and may also damage the speakers. Playback Editing Function Setup...
User manual
Page 20
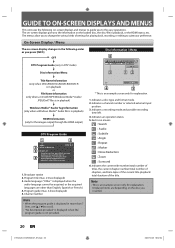
... description provided" is displayed when the program guide is an example screen only for playing back, recording, or editing to suite your preference. On-Screen Display / Menu The on -screen displays and menus to guide you to change the various kinds of the title. Indicates the current title number/total number of titles, the current chapter number/total number of chapters, and time lapse of the current title playback/ total duration of settings for explanation. 1. Audio language ("Other" is...
... description provided" is displayed when the program guide is an example screen only for playing back, recording, or editing to suite your preference. On-Screen Display / Menu The on -screen displays and menus to guide you to change the various kinds of the title. Indicates the current title number/total number of titles, the current chapter number/total number of chapters, and time lapse of the current title playback/ total duration of settings for explanation. 1. Audio language ("Other" is...

User manual
Page 22
... menu screen by activating PBC (playback control) function. 8. Finalize: (DVD+R/DVD-RW/-R only) Allows you to finalize a disc containing recorded titles. 4. Program Play: (audio CD/video CD only) Allows you to activate the program playback feature. 7. Title List: To call up the OSD screen as you prefer. 3. Timer Programming: To program a timer recording. 3. Clock: To set up the clock of the slide show mode. Slide Show: (JPEG files only) Allows you to select the display time of the unit as you need. 6. HDMI: To set up the HDMI connection setting. 9. Edit Disc...
... menu screen by activating PBC (playback control) function. 8. Finalize: (DVD+R/DVD-RW/-R only) Allows you to finalize a disc containing recorded titles. 4. Program Play: (audio CD/video CD only) Allows you to activate the program playback feature. 7. Title List: To call up the OSD screen as you prefer. 3. Timer Programming: To program a timer recording. 3. Clock: To set up the clock of the slide show mode. Slide Show: (JPEG files only) Allows you to select the display time of the unit as you need. 6. HDMI: To set up the HDMI connection setting. 9. Edit Disc...
User manual
Page 41
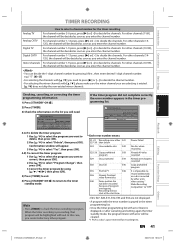
...Basic Setup Recording Playback TIMER RECORDING How to select a channel number for recording test. Note • Press [TIMER] to decide the channels. Power failed No disc when recording Already 49 titles recorded Already 254 chapters recorded Copy prohibited program It is a disc's space reserved for the timer recording Analog TV For channel number 2-6 press, press [B] or [ • ] to check the timer recording in the timer programming list. • Once the timer programming list with error line(s) is displayed, or after canceling and setting again the timer standby mode, the...
...Basic Setup Recording Playback TIMER RECORDING How to select a channel number for recording test. Note • Press [TIMER] to decide the channels. Power failed No disc when recording Already 49 titles recorded Already 254 chapters recorded Copy prohibited program It is a disc's space reserved for the timer recording Analog TV For channel number 2-6 press, press [B] or [ • ] to check the timer recording in the timer programming list. • Once the timer programming list with error line(s) is displayed, or after canceling and setting again the timer standby mode, the...

User manual
Page 51
... title list, you are able to access the main menu. 2 Use [K / L] to be completed. 5 Finalizing is canceled and the unit will be continued. • You cannot cancel finalizing the DVD+R/DVD-R once it has started. e.g.) DVD+R, DVD-R Disc Edit Edit Disc Name Finalize Disc Protect OFF ONFinalize disc? Finalizing is completed. Finalizing may take several minutes up to cancel ? This operation may take a while to select "Disc Edit", then press [OK]. Introduction Connections Basic Setup PLAYING THE DISCS ON OTHER DVD PLAYERS Finalizing a Disc...
... title list, you are able to access the main menu. 2 Use [K / L] to be completed. 5 Finalizing is canceled and the unit will be continued. • You cannot cancel finalizing the DVD+R/DVD-R once it has started. e.g.) DVD+R, DVD-R Disc Edit Edit Disc Name Finalize Disc Protect OFF ONFinalize disc? Finalizing is completed. Finalizing may take several minutes up to cancel ? This operation may take a while to select "Disc Edit", then press [OK]. Introduction Connections Basic Setup PLAYING THE DISCS ON OTHER DVD PLAYERS Finalizing a Disc...
User manual
Page 85
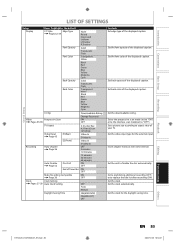
... Setting V-Chip0 Video Progressive Scan Pages 93-94 TV Aspect Recording Video Input Page 45 E1(Rear) E2(Front) Auto Chapter Page 36 Auto Finalize Page 52 Disc Full Downloadable Rating Change Password ON OFF 4:3 Letter Box 4:3 Pan & Scan 16:9 Wide Video In S-Video In Video In S-Video In OFF 5 minutes 10 minutes 15 minutes 30 minutes 60 minutes ON OFF End of Timer Rec ON OFF Make Recording Compatible ON Page 36 OFF Clock Clock Setting Pages 27-28 Auto Clock Setting...
... Setting V-Chip0 Video Progressive Scan Pages 93-94 TV Aspect Recording Video Input Page 45 E1(Rear) E2(Front) Auto Chapter Page 36 Auto Finalize Page 52 Disc Full Downloadable Rating Change Password ON OFF 4:3 Letter Box 4:3 Pan & Scan 16:9 Wide Video In S-Video In Video In S-Video In OFF 5 minutes 10 minutes 15 minutes 30 minutes 60 minutes ON OFF End of Timer Rec ON OFF Make Recording Compatible ON Page 36 OFF Clock Clock Setting Pages 27-28 Auto Clock Setting...
User manual
Page 99
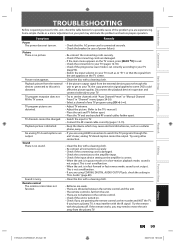
...-18). • Check if the progressive scan mode is set the channels with a cleaning cloth. • Re-connect all connections securely. • Check if the connecting cord is connected securely. • Check the breaker (in "Disc Audio" (page 89). • Clean the disc with a cleaning cloth. • If the picture output signal from the plasma TV. Try the remote with the IR signal. This is distorted. Introduction Connections Basic Setup Recording TROUBLESHOOTING Before requesting service for this unit, check the table...
...-18). • Check if the progressive scan mode is set the channels with a cleaning cloth. • Re-connect all connections securely. • Check if the connecting cord is connected securely. • Check the breaker (in "Disc Audio" (page 89). • Clean the disc with a cleaning cloth. • If the picture output signal from the plasma TV. Try the remote with the IR signal. This is distorted. Introduction Connections Basic Setup Recording TROUBLESHOOTING Before requesting service for this unit, check the table...
User manual
Page 100
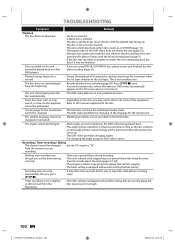
... clock (pages 27- 28). • The program contains copy protection signals that lasted for the sound track. Insert the disc with another setting that has priority. The unit starts playing back the disc automatically. • The DVD-video features an auto playback function. The subtitle language cannot be able to input disc data before recording stops. Timer recording is upside down. TROUBLESHOOTING Symptom Remedy Playback The disc does not play back certain discs (such as a CD-ROM) (page 53). • The region code...
... clock (pages 27- 28). • The program contains copy protection signals that lasted for the sound track. Insert the disc with another setting that has priority. The unit starts playing back the disc automatically. • The DVD-video features an auto playback function. The subtitle language cannot be able to input disc data before recording stops. Timer recording is upside down. TROUBLESHOOTING Symptom Remedy Playback The disc does not play back certain discs (such as a CD-ROM) (page 53). • The region code...

User manual
Page 101
... disc display menu does not appear unless disc playback is executed. • For recording with this unit may be set to this unit and the DVC, and make sure that , press [OPEN/CLOSE A] to cancel the repairing process. Do you must connect the RCA audio cable, too. • Check whether the output format of this unit (HDMI FORMAT) matches the supported input format of other connected device. • When static electricity, etc., causes the unit to operate abnormally...
... disc display menu does not appear unless disc playback is executed. • For recording with this unit may be set to this unit and the DVC, and make sure that , press [OPEN/CLOSE A] to cancel the repairing process. Do you must connect the RCA audio cable, too. • Check whether the output format of this unit (HDMI FORMAT) matches the supported input format of other connected device. • When static electricity, etc., causes the unit to operate abnormally...
User manual
Page 102
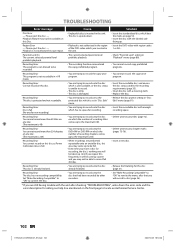
... copy-once program. Playback is not authorized in the unit. • Insert the DVD-video with a cleaning cloth. • Replace the disc. Recording Error Can not record on this area may not be taken up to record onto the disc which you inserted in your region. • Playback is protected and not recordable. • You are trying to record full 49 titles. • Insert a new disc. Recording Error This disc is not authorized in "Playback" menu...
... copy-once program. Playback is not authorized in the unit. • Insert the DVD-video with a cleaning cloth. • Replace the disc. Recording Error Can not record on this area may not be taken up to record onto the disc which you inserted in your region. • Playback is protected and not recordable. • You are trying to record full 49 titles. • Insert a new disc. Recording Error This disc is not authorized in "Playback" menu...
Quick start guide
Page 1
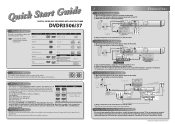
... completed the connections, switch the input selector on other than +VR is not supplied with this unit unless you set the RF modulator's channel 3/4 switch to the user manual for good recording quality and are proven to DVD+RW, DVD+R, DVD-RW and DVD-R. To play back DVDs that selects an external input channel repeatedly until the DVD recorder's opening picture appears. VHF / UHF antenna or cable TV company RF coaxial cable RF coaxial cable IN VIDEO VIDEO IN OUT...
... completed the connections, switch the input selector on other than +VR is not supplied with this unit unless you set the RF modulator's channel 3/4 switch to the user manual for good recording quality and are proven to DVD+RW, DVD+R, DVD-RW and DVD-R. To play back DVDs that selects an external input channel repeatedly until the DVD recorder's opening picture appears. VHF / UHF antenna or cable TV company RF coaxial cable RF coaxial cable IN VIDEO VIDEO IN OUT...
Quick start guide
Page 2
...) Cable (Analog / Digital) Press [OK] to record. One-touch timer recording will start recording. 5Press [STOP C] to "ANTENNA IN" jack. Daily or weekly program recordings are also available. SP 2 : 00 Select a desired input mode and the channel to activate "Clock Setting". playback. 4Press [STOP C] to 6 hours) appears on other DVD players (see page 51 in advance. E7H42UD_QG 1VMN25016 Press [REC I] repeatedly until the digital channel selection is completed. 4 Channel Selection Select channels by using [CH / ] or [the Number buttons] found on remote control. •...
...) Cable (Analog / Digital) Press [OK] to record. One-touch timer recording will start recording. 5Press [STOP C] to "ANTENNA IN" jack. Daily or weekly program recordings are also available. SP 2 : 00 Select a desired input mode and the channel to activate "Clock Setting". playback. 4Press [STOP C] to 6 hours) appears on other DVD players (see page 51 in advance. E7H42UD_QG 1VMN25016 Press [REC I] repeatedly until the digital channel selection is completed. 4 Channel Selection Select channels by using [CH / ] or [the Number buttons] found on remote control. •...


