
Leaflet
Page 3
.... Trademarks are subject to change without notice. Specifications are the property of Koninklijke Philips Electronics N.V. Docking Entertainment System Specifications DCM250/37 iPhone compatibility • Compatible with: iPhone, iPhone 3G iPod compatibility •... Alarms: Radio Alarm, Sleep timer • Clock/Version: Digital Power • Mains power Accessories • Included accessories: AC Power Cord, User Manual, Remote Control, 3.5mm stereo line in cable, Component Video cable, Warranty certificate, World Wide Warranty leaflet Dimensions • Product dimensions (W ...
.... Trademarks are subject to change without notice. Specifications are the property of Koninklijke Philips Electronics N.V. Docking Entertainment System Specifications DCM250/37 iPhone compatibility • Compatible with: iPhone, iPhone 3G iPod compatibility •... Alarms: Radio Alarm, Sleep timer • Clock/Version: Digital Power • Mains power Accessories • Included accessories: AC Power Cord, User Manual, Remote Control, 3.5mm stereo line in cable, Component Video cable, Warranty certificate, World Wide Warranty leaflet Dimensions • Product dimensions (W ...

User manual
Page 9
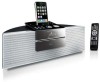
... • Power cord • AUX cable • User manual • Quick start guide EN 9 The DCM250 supports the following media formats: What's in the box Check and identify the contents of your product at www.Philips.com/welcome. Introduction With this DCM250, you multiple sound effect settings that Philips offers, register your package: • Main unit...
... • Power cord • AUX cable • User manual • Quick start guide EN 9 The DCM250 supports the following media formats: What's in the box Check and identify the contents of your product at www.Philips.com/welcome. Introduction With this DCM250, you multiple sound effect settings that Philips offers, register your package: • Main unit...

User manual
Page 13
FM aerial EN 13 Always follow the instructions in sequence. If you contact Philips, you will be asked for the model and serial number of your DCM250.Write the numbers here: Model No Serial No Connect FM antenna Tip • For optimal reception, fully extend and adjust the position of the ...aerial jack on the rear of the antenna. 1 Connect the supplied FM antenna to the FM aerial jack on the bottom of your DCM250.The model number and serial number are on the main unit. AM aerial Note • Position the antenna as far as stated in this chapter in this user manual.
FM aerial EN 13 Always follow the instructions in sequence. If you contact Philips, you will be asked for the model and serial number of your DCM250.Write the numbers here: Model No Serial No Connect FM antenna Tip • For optimal reception, fully extend and adjust the position of the ...aerial jack on the rear of the antenna. 1 Connect the supplied FM antenna to the FM aerial jack on the bottom of your DCM250.The model number and serial number are on the main unit. AM aerial Note • Position the antenna as far as stated in this chapter in this user manual.

Quick start guide
Page 1
...antenna AM antenna AUX cable Back plate AC adaptor Power cord Video cable XXXXXXX XXXXXX XXXXXX DCM250 Quick start guide 1 Connect 2 Setup 2 Enjoy Eng Remote Control Quick Start Guide User manual 1 Connect A Remove the protective tab 1 Remove the protective tab to the AC adaptor.... or their respective owners. B Connect power EN 1 Connect the power cord to activate the remote control battery. © Royal Philips Electronics N.V. 2009 All rights ...
...antenna AM antenna AUX cable Back plate AC adaptor Power cord Video cable XXXXXXX XXXXXX XXXXXX DCM250 Quick start guide 1 Connect 2 Setup 2 Enjoy Eng Remote Control Quick Start Guide User manual 1 Connect A Remove the protective tab 1 Remove the protective tab to the AC adaptor.... or their respective owners. B Connect power EN 1 Connect the power cord to activate the remote control battery. © Royal Philips Electronics N.V. 2009 All rights ...

Quick start guide
Page 2
... functions are displayed and begin to blink. 4 Press J/K to set the hour. 5 Press PROG. » The minute digits are described in the user manual. B 3 Enjoy A Play disc 1 Press CD to select the disc source. 2 Insert a disc into the socket. 2 Press USB to select the...The hour digits are displayed and begin to blink. 2 Setup 6 Press J/K to set the minute. 7 Press PROG to confirm. E Tip • See the User Manual for 2 seconds to activate automatic program mode. » [AUTO] (auto) is displayed. 3 Press 3 4 to select a folder. 4 Press J/K to select a fi...
... functions are displayed and begin to blink. 4 Press J/K to set the hour. 5 Press PROG. » The minute digits are described in the user manual. B 3 Enjoy A Play disc 1 Press CD to select the disc source. 2 Insert a disc into the socket. 2 Press USB to select the...The hour digits are displayed and begin to blink. 2 Setup 6 Press J/K to set the minute. 7 Press PROG to confirm. E Tip • See the User Manual for 2 seconds to activate automatic program mode. » [AUTO] (auto) is displayed. 3 Press 3 4 to select a folder. 4 Press J/K to select a fi...


