
Leaflet
Page 3
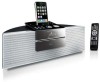
All Rights reserved. Docking Entertainment System Specifications DCM250/37 iPhone compatibility • Compatible with: iPhone, iPhone 3G iPod compatibility • Compatible with: iPod, iPod mini, iPod nano, iPod ... • Product dimensions (W x H x D): 390 x 140.5 x 200.5 mm • Issue date 2011-02-23 Version: 1.0.6 12 NC: 8670 000 50132 UPC: 6 09585 16629 5 © 2011 Koninklijke Philips Electronics N.V. or their respective owners. www.philips.com Specifications are the property of Koninklijke Philips Electronics N.V. Trademarks are subject to change without notice.
All Rights reserved. Docking Entertainment System Specifications DCM250/37 iPhone compatibility • Compatible with: iPhone, iPhone 3G iPod compatibility • Compatible with: iPod, iPod mini, iPod nano, iPod ... • Product dimensions (W x H x D): 390 x 140.5 x 200.5 mm • Issue date 2011-02-23 Version: 1.0.6 12 NC: 8670 000 50132 UPC: 6 09585 16629 5 © 2011 Koninklijke Philips Electronics N.V. or their respective owners. www.philips.com Specifications are the property of Koninklijke Philips Electronics N.V. Trademarks are subject to change without notice.

User manual
Page 4
... an external device 24 11 Product information 25 Specifications 25 USB playability information 26 Supported MP3 disc formats 26 RDS program types 27 12 Troubleshooting 28 4 EN
... an external device 24 11 Product information 25 Specifications 25 USB playability information 26 Supported MP3 disc formats 26 RDS program types 27 12 Troubleshooting 28 4 EN
User manual
Page 12
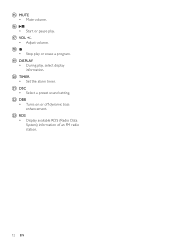
o MUTE • Mute volume. s DISPLAY • During play or erase a program. v DBB • Turns on or off dynamic bass enhancement. r • Stop play , select display information. q VOL +/• Adjust volume. w RDS • Display available RDS (Radio Data System) information of an FM radio station. 12 EN p • Start or pause play. t TIMER • Set the alarm timer. u DSC • Select a preset sound setting.
o MUTE • Mute volume. s DISPLAY • During play or erase a program. v DBB • Turns on or off dynamic bass enhancement. r • Stop play , select display information. q VOL +/• Adjust volume. w RDS • Display available RDS (Radio Data System) information of an FM radio station. 12 EN p • Start or pause play. t TIMER • Set the alarm timer. u DSC • Select a preset sound setting.

User manual
Page 15
... automatically. » The minute digits are not going to confirm. Switch to standby 1 Press to switch the DCM250 to standby mode. » The backlight on the display panel is displayed. 2 Press / to select 12 hour or 24 hour format. 3 Press PROG. » The hour digits are stored, the... DCM250 automatically begins to store radio stations. 1 Connect the DCM250 to activate the clock setting mode. » The 12 hour or 24 hour format is reduced. » The clock (if set the minute. 7 Press PROG to use the ...
... automatically. » The minute digits are not going to confirm. Switch to standby 1 Press to switch the DCM250 to standby mode. » The backlight on the display panel is displayed. 2 Press / to select 12 hour or 24 hour format. 3 Press PROG. » The hour digits are stored, the... DCM250 automatically begins to store radio stations. 1 Connect the DCM250 to activate the clock setting mode. » The 12 hour or 24 hour format is reduced. » The clock (if set the minute. 7 Press PROG to use the ...

User manual
Page 28
...has exceeded a certain limit. 12 Troubleshooting Caution • Never remove the casing of folders or files in USB device • The number of this DCM250, check the following points before requesting service. To keep the warranty valid, never try to the Philips web site (www. Poor... radio reception • Increase the distance between the remote control and the DCM250. • Insert the battery with the DCM250. Clock/timer setting erased • Power has been interrupted or...
...has exceeded a certain limit. 12 Troubleshooting Caution • Never remove the casing of folders or files in USB device • The number of this DCM250, check the following points before requesting service. To keep the warranty valid, never try to the Philips web site (www. Poor... radio reception • Increase the distance between the remote control and the DCM250. • Insert the battery with the DCM250. Clock/timer setting erased • Power has been interrupted or...

Quick start guide
Page 2
... to this system. 2 Setup A Set the clock 1 In standby mode, press PROG to activate the clock setting mode. » The 12 hour or 24 hour format is displayed. 2 Press J/K to select 12 hour or 24 hour format. 3 Press PROG. » The hour digits are displayed and begin to blink. 2 Setup 6 Press J/K to...
... to this system. 2 Setup A Set the clock 1 In standby mode, press PROG to activate the clock setting mode. » The 12 hour or 24 hour format is displayed. 2 Press J/K to select 12 hour or 24 hour format. 3 Press PROG. » The hour digits are displayed and begin to blink. 2 Setup 6 Press J/K to...


