Leaflet
Page 1
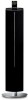
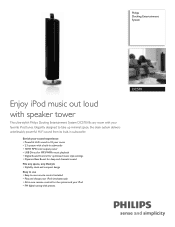
... Philips Docking Entertainment System DC570 fills any lifestyle • Stylishly sleek and compact design Easy to use • Easy-to-use remote control included • Play and charge your iPod simultaneously • All-in-one remote control for the system and your iPod • FM digital tuning with your room • 2.1 system with a built-in subwoofer • 100W RMS total output power • USB Direct for MP3/WMA music playback • Digital Sound Control for optimized music style settings • Dynamic Bass...
... Philips Docking Entertainment System DC570 fills any lifestyle • Stylishly sleek and compact design Easy to use • Easy-to-use remote control included • Play and charge your iPod simultaneously • All-in-one remote control for the system and your iPod • FM digital tuning with your room • 2.1 system with a built-in subwoofer • 100W RMS total output power • USB Direct for MP3/WMA music playback • Digital Sound Control for optimized music style settings • Dynamic Bass...
Leaflet
Page 2
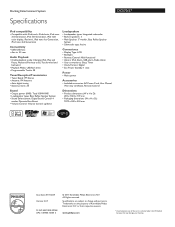
or their respective owners. Specifications are the property of the set in speakers: 3 • Main Speaker: 3" woofer, Bass Reflex Speaker System • Subwoofer type: Active Convenience • Display Type: LCD • Backlight • Remote Control: Multi-functional • Alarms: iPod Alarm, USB alarm, Radio Alarm • User convenience: Sleep Timer • Clock/Version: Digital • Eco Power Standby: 1 watt Power • Mains power Accessories • Included accessories: AC Power Cord, User Manual, Warranty certificate, Remote Control Sound • Output power (RMS):...
or their respective owners. Specifications are the property of the set in speakers: 3 • Main Speaker: 3" woofer, Bass Reflex Speaker System • Subwoofer type: Active Convenience • Display Type: LCD • Backlight • Remote Control: Multi-functional • Alarms: iPod Alarm, USB alarm, Radio Alarm • User convenience: Sleep Timer • Clock/Version: Digital • Eco Power Standby: 1 watt Power • Mains power Accessories • Included accessories: AC Power Cord, User Manual, Warranty certificate, Remote Control Sound • Output power (RMS):...
User manual
Page 2
...listed below the Serial No. To get the very most comprehensive warranties and outstanding service networks in our power to keep you happy with PHILIPS makes you 're entitled, including special money-saving offers. in the rare case of a product recall or safety defect. *Additional Benefits Registering your product guarantees that your date of plug... the most from you 'll receive notification directly from the manufacturer - Return your Product Registration Card or register online at www.philips.com/welcome today to prevent operating and maintenance problems. WARNING: To reduce the risk...
...listed below the Serial No. To get the very most comprehensive warranties and outstanding service networks in our power to keep you happy with PHILIPS makes you 're entitled, including special money-saving offers. in the rare case of a product recall or safety defect. *Additional Benefits Registering your product guarantees that your date of plug... the most from you 'll receive notification directly from the manufacturer - Return your Product Registration Card or register online at www.philips.com/welcome today to prevent operating and maintenance problems. WARNING: To reduce the risk...

User manual
Page 8
... sound 14 Sound control 15 USB playback functions Different play modes: SHUFFLE and REPEAT 16 Programming track numbers 16 Reviewing programmed tracks 16 Changing programmed tracks 16 Erasing the program 16 Radio Reception Tuning to radio stations 17 Programming radio stations 17 Automatic programming 17 Manual programming 17 Tuning to preset radio stations 17 External Sources Using a non-USB device 18 Using a USB mass storage device 18 Clock/Timer/Sleep Clock setting 20 Setting the Alarm Time 20 Stopping the alarm 20 Sleep timer setting 20 iPod Dock Compatible iPod players...
... sound 14 Sound control 15 USB playback functions Different play modes: SHUFFLE and REPEAT 16 Programming track numbers 16 Reviewing programmed tracks 16 Changing programmed tracks 16 Erasing the program 16 Radio Reception Tuning to radio stations 17 Programming radio stations 17 Automatic programming 17 Manual programming 17 Tuning to preset radio stations 17 External Sources Using a non-USB device 18 Using a USB mass storage device 18 Clock/Timer/Sleep Clock setting 20 Setting the Alarm Time 20 Stopping the alarm 20 Sleep timer setting 20 iPod Dock Compatible iPod players...
User manual
Page 9
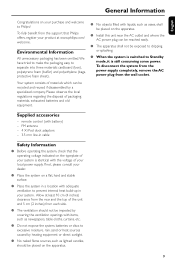
FM antenna - 4 X iPod dock adaptors - 3.5 mm line-in cable Safety Information ● Before operating the system, check that Philips offers, register your local power supply. Environmental Information All unnecessary packaging has been omitted.We have tried to make the packaging easy to Philips! Supplied accessories - To disconnect the system from the power supply completely, remove the AC power plug from the support that the operating voltage indicated on the typeplate of...
FM antenna - 4 X iPod dock adaptors - 3.5 mm line-in cable Safety Information ● Before operating the system, check that Philips offers, register your local power supply. Environmental Information All unnecessary packaging has been omitted.We have tried to make the packaging easy to Philips! Supplied accessories - To disconnect the system from the power supply completely, remove the AC power plug from the support that the operating voltage indicated on the typeplate of...
User manual
Page 10
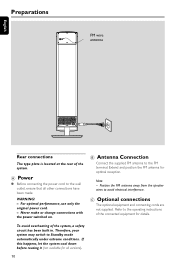
... details. Position the FM antenna away from the speaker wires to the FM terminal. Refer to the operating instructions of the connected equipment for all other connections have been made. For optimal performance, use only the original power cord. - B Antenna Connection Connect the supplied FM antenna to avoid electrical interference. C Optional connections The optional equipment and connecting cords are not supplied. Therefore, your system may switch to the wall outlet, ensure...
... details. Position the FM antenna away from the speaker wires to the FM terminal. Refer to the operating instructions of the connected equipment for all other connections have been made. For optimal performance, use only the original power cord. - B Antenna Connection Connect the supplied FM antenna to avoid electrical interference. C Optional connections The optional equipment and connecting cords are not supplied. Therefore, your system may switch to the wall outlet, ensure...

User manual
Page 11
... device's stored music through the powerful speakers of system. Remove battery if it is exhausted or will not be disposed of properly. - Batteries contain chemical substances, so they should be used for example ...≈ ). English Preparations Connecting a USB device By connecting a USB mass storage device (including USB flash memory, USB flash players) to the system, you wish to control by pressing one plug of the USB cable (not supplied) to the original position. 1 2 CR2025 3 CAUTION! - Replacing the remote control battery...
... device's stored music through the powerful speakers of system. Remove battery if it is exhausted or will not be disposed of properly. - Batteries contain chemical substances, so they should be used for example ...≈ ). English Preparations Connecting a USB device By connecting a USB mass storage device (including USB flash memory, USB flash players) to the system, you wish to control by pressing one plug of the USB cable (not supplied) to the original position. 1 2 CR2025 3 CAUTION! - Replacing the remote control battery...
User manual
Page 12
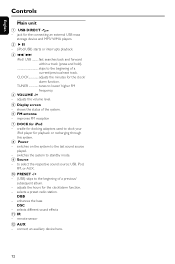
... DIRECT - jack for the clock/ alarm function. skips to the beginning of a previous/ subsequent album. - adjusts the volume level. 5 Display screen - switches on the system to standby mode. 9 Source - selects a preset radio station. remote sensor @ AUX - enhances the bass DSC - CLOCK adjusts the minutes for the connecting an external USB mass storage device and MP3/ WMA players. 2 ÉÅ - (iPod/USB) starts or interrupts playback. 3 S/ T iPod/ USB .......... improves FM reception 7 DOCK for the clock/alarm function. - DBB - switches the system to the last sound...
... DIRECT - jack for the clock/ alarm function. skips to the beginning of a previous/ subsequent album. - adjusts the volume level. 5 Display screen - switches on the system to standby mode. 9 Source - selects a preset radio station. remote sensor @ AUX - enhances the bass DSC - CLOCK adjusts the minutes for the connecting an external USB mass storage device and MP3/ WMA players. 2 ÉÅ - (iPod/USB) starts or interrupts playback. 3 S/ T iPod/ USB .......... improves FM reception 7 DOCK for the clock/alarm function. - DBB - switches the system to the last sound...
User manual
Page 13
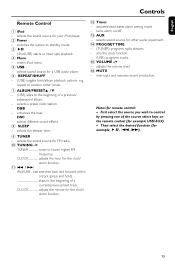
... iPod - switches the system to the beginning of a current/previous/next track. CLOCK adjusts the minute for remote control: - Notes for the clock/ alarm function. @ Timer - skips to standby mode. 3 ÉÅ - (iPod/USB) starts or interrupts playback. 4 Menu - activates/deactivates alarm setting mode - First select the source you wish to lower/ higher FM frequency. DBB - CLOCK adjusts the hour for example ÉÅ, S , T). 13 turns alarm on the remote control (for your iPod player. 2 Power - selects the sound source for FM radio. 0 TUNING -/+ TUNER tunes...
... iPod - switches the system to the beginning of a current/previous/next track. CLOCK adjusts the minute for remote control: - Notes for the clock/ alarm function. @ Timer - skips to standby mode. 3 ÉÅ - (iPod/USB) starts or interrupts playback. 4 Menu - activates/deactivates alarm setting mode - First select the source you wish to lower/ higher FM frequency. DBB - CLOCK adjusts the hour for example ÉÅ, S , T). 13 turns alarm on the remote control (for your iPod player. 2 Power - selects the sound source for FM radio. 0 TUNING -/+ TUNER tunes...
User manual
Page 14
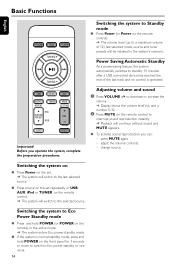
... the active mode. ➜ The system enters Eco power standby mode. ● If the system is operated. Basic Functions English POWER TUNER TUNING + TUNING USB MENU AUX SHUFFLE REPEAT TIMER DSC ALBUM/ PRESET DBB PROG SET TIME VOL SLEEP MUTE Important! press MUTE again; - Switching the system to Eco Power Standby mode ● Press and hold POWER (or POWER on the remote) in the system's memory. Switching the system on ● Press Power on the remote control. ➜ The system will continue without sound and...
... the active mode. ➜ The system enters Eco power standby mode. ● If the system is operated. Basic Functions English POWER TUNER TUNING + TUNING USB MENU AUX SHUFFLE REPEAT TIMER DSC ALBUM/ PRESET DBB PROG SET TIME VOL SLEEP MUTE Important! press MUTE again; - Switching the system to Eco Power Standby mode ● Press and hold POWER (or POWER on the remote) in the system's memory. Switching the system on ● Press Power on the remote control. ➜ The system will continue without sound and...
User manual
Page 16
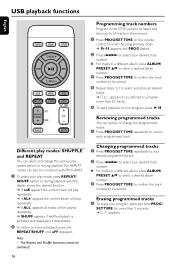
... the remote control to enter the programming mode. ➜ Pr 01 appears and PROG flashes. 2 Press S/T to select your desired track number. ● For tracks in a different album, press ALBUM/ PRESET 3/4 to select a desired album number. 3 Press PROG/SET TIME to confirm the track number to be stored. USB playback functions English POWER TUNER TUNING + TUNING USB MENU AUX SHUFFLE REPEAT TIMER DSC ALBUM/ PRESET DBB PROG SET TIME VOL SLEEP MUTE Different play modes...
... the remote control to enter the programming mode. ➜ Pr 01 appears and PROG flashes. 2 Press S/T to select your desired track number. ● For tracks in a different album, press ALBUM/ PRESET 3/4 to select a desired album number. 3 Press PROG/SET TIME to confirm the track number to be stored. USB playback functions English POWER TUNER TUNING + TUNING USB MENU AUX SHUFFLE REPEAT TIMER DSC ALBUM/ PRESET DBB PROG SET TIME VOL SLEEP MUTE Different play modes...
User manual
Page 17
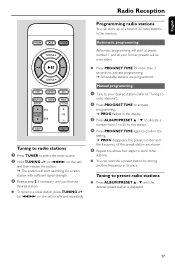
... Radio Reception POWER TUNER TUNING + TUNING USB MENU AUX SHUFFLE REPEAT TIMER DSC ALBUM/ PRESET DBB PROG SET TIME VOL SLEEP MUTE Tuning to radio stations 1 Press TUNER to select the tuner source. 2 Hold TUNING -/+ (or S/T on the set ) and then release the button. ➜ The system will start at preset number 1 and all your desired station (refer to "Tuning to radio stations"). 2 Press PROG/SET TIME to activate programming. ➜ PROG flashes in the display. 3 Press ALBUM/PRESET 3 / 4 to allocate a number from 1 to 20 to this station...
... Radio Reception POWER TUNER TUNING + TUNING USB MENU AUX SHUFFLE REPEAT TIMER DSC ALBUM/ PRESET DBB PROG SET TIME VOL SLEEP MUTE Tuning to radio stations 1 Press TUNER to select the tuner source. 2 Hold TUNING -/+ (or S/T on the set ) and then release the button. ➜ The system will start at preset number 1 and all your desired station (refer to "Tuning to radio stations"). 2 Press PROG/SET TIME to activate programming. ➜ PROG flashes in the display. 3 Press ALBUM/PRESET 3 / 4 to allocate a number from 1 to 20 to this station...
User manual
Page 18
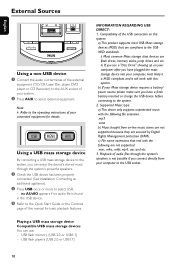
... work with this manual for details. b) If your Mass storage device requires a battery/ power source please make sure you can use: - USB flash memory (USB 2.0 or USB1.1) - English External Sources POWER SOURCE DBB DSC + PRESET + VOLUME Using a non-USB de+vice 1 Connect the audio out terminals of the external equipment (TV,VCR, Laser Disc player, DVD player or CD Recorder) to the AUX socket of your system. 2 Press AUX to the operating instructions of your connected equipment for basic playback features. USB MENU AUX Using a USB...
... work with this manual for details. b) If your Mass storage device requires a battery/ power source please make sure you can use: - USB flash memory (USB 2.0 or USB1.1) - English External Sources POWER SOURCE DBB DSC + PRESET + VOLUME Using a non-USB de+vice 1 Connect the audio out terminals of the external equipment (TV,VCR, Laser Disc player, DVD player or CD Recorder) to the AUX socket of your system. 2 Press AUX to the operating instructions of your connected equipment for basic playback features. USB MENU AUX Using a USB...
User manual
Page 20
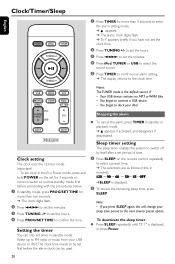
... to switch to normal standby mode first before the alarm clock can only set the hours. 4 Press PROG/SET TIME to the next shorter preset option. Sleep timer setting The sleep timer enables the system to switch off by itself after a set period of time. 1 Press SLEEP on the set the minutes. 4 Press iPod, TUNER or USB to select the sound source. 5 Press TIMER to confirm your alarm setting. ➜ The display returns to dock your sleep time...
... to switch to normal standby mode first before the alarm clock can only set the hours. 4 Press PROG/SET TIME to the next shorter preset option. Sleep timer setting The sleep timer enables the system to switch off by itself after a set period of time. 1 Press SLEEP on the set the minutes. 4 Press iPod, TUNER or USB to select the sound source. 5 Press TIMER to confirm your alarm setting. ➜ The display returns to dock your sleep time...
User manual
Page 21
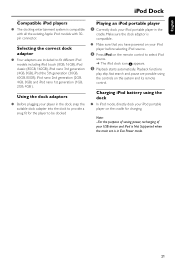
... using the dock ● In iPod mode, directly dock your iPod portable player on your USB device and iPod is Not Supported when the main set is in the cradle. Note: -For the purpose of saving power, recharging of your iPod player before selecting iPod source. 2 Press iPod on this system and its remote control. English iPod Dock Compatible iPod players ● The docking entertainment system is compatible. ● Make sure that you have powered on the cradle for the player to be docked Playing...
... using the dock ● In iPod mode, directly dock your iPod portable player on your USB device and iPod is Not Supported when the main set is in the cradle. Note: -For the purpose of saving power, recharging of your iPod player before selecting iPod source. 2 Press iPod on this system and its remote control. English iPod Dock Compatible iPod players ● The docking entertainment system is compatible. ● Make sure that you have powered on the cradle for the player to be docked Playing...
User manual
Page 23
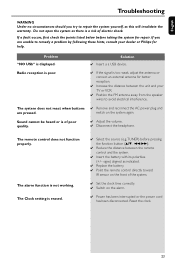
... buttons ✔ Remove and reconnect the AC power plug and are unable to remedy a problem by following these hints, consult your TV or VCR. ✔ Position the FM antenna away from the speaker wires to repair the system yourself, as indicated. ✔ Replace the battery. ✔ Point the remote control directly toward IR sensor on the front of the system. ✔ Set the clock time correctly. ✔ Switch on the system...
... buttons ✔ Remove and reconnect the AC power plug and are unable to remedy a problem by following these hints, consult your TV or VCR. ✔ Position the FM antenna away from the speaker wires to repair the system yourself, as indicated. ✔ Replace the battery. ✔ Point the remote control directly toward IR sensor on the front of the system. ✔ Set the clock time correctly. ✔ Switch on the system...
User manual
Page 24
... to operate per Owner's Manual. Some states do not allow the exclusions or limitation of incidental or consequential damages, or allow limitations on the product, and installation or repair of antenna/signal source systems outside of the product. • Product repair and/or part replacement because of improper installation or maintenance, connections to improper voltage supply, power line surge, lightning damage, retained images or screen markings resulting from viewing fixed...
... to operate per Owner's Manual. Some states do not allow the exclusions or limitation of incidental or consequential damages, or allow limitations on the product, and installation or repair of antenna/signal source systems outside of the product. • Product repair and/or part replacement because of improper installation or maintenance, connections to improper voltage supply, power line surge, lightning damage, retained images or screen markings resulting from viewing fixed...
Quick start guide
Page 1
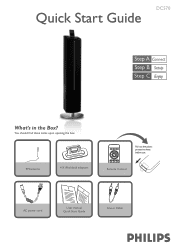
FM antenna 4 X iPod dock adaptors AC power cord 2 User Manual Q uick 1 Start G uide User manual Quick Start Guide POWER TUNER TUNING + TUNING USB SD SHUFFLE REPEAT MENU AUX TIMER PROG SET TIME DSC ALBUM/ PRESET VOL DBB Remote SLEEP MCUTE ontrol Pull out the plassttiicc protectivee sshheeeett before uusse.. DC570 Quick Start Guide What's in Cable You should find these items upon opening the box. Line-in the Box?
FM antenna 4 X iPod dock adaptors AC power cord 2 User Manual Q uick 1 Start G uide User manual Quick Start Guide POWER TUNER TUNING + TUNING USB SD SHUFFLE REPEAT MENU AUX TIMER PROG SET TIME DSC ALBUM/ PRESET VOL DBB Remote SLEEP MCUTE ontrol Pull out the plassttiicc protectivee sshheeeett before uusse.. DC570 Quick Start Guide What's in Cable You should find these items upon opening the box. Line-in the Box?
Quick start guide
Page 2
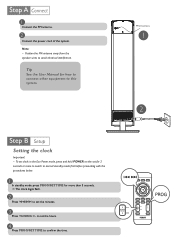
... REPEAT MENU TIMER DSC ALBUM/ PRESET DBB AUX PROG SET TIME VOL SLEEP MUTE to confirm the time. Tip See the User Manual for more to switch to normal standby mode first before proceeding with the procedures below. 1 In standby mode, press PROG/SET TIME for how to connect other equipment to avoid electrical interference. 1 Connect the FM antenna. 2 Connect the power cord of the system. Note: - Position the FM antenna away from the speaker wires...
... REPEAT MENU TIMER DSC ALBUM/ PRESET DBB AUX PROG SET TIME VOL SLEEP MUTE to confirm the time. Tip See the User Manual for more to switch to normal standby mode first before proceeding with the procedures below. 1 In standby mode, press PROG/SET TIME for how to connect other equipment to avoid electrical interference. 1 Connect the FM antenna. 2 Connect the power cord of the system. Note: - Position the FM antenna away from the speaker wires...

Quick start guide
Page 3
.../PRESET 3 / 4 until the desired preset station is displayed. DSC ALBUM/ PRESET DBB TUNER POWER TUNER TUNING + TUNING USB SD SHUFFLE REPEAT MENU TIMER DSC ALBUM/ PRESET DBB AUX PROG SET TIME VOL SLEEP MUTE PROG POWER TUNER TUNING + DSC ALBUM/ PRESET DBB TUNING USB SD SHUFFLE REPEAT MENU TIMER DSC ALBUM/ PRESET DBB AUX PROG SET TIME VOL SLEEP MUTE Before using the remote control 1 Pull out the plastic protective sheet. 2 Select the source you can use USB flash memory (USB 2.0 or USB1.1), USB flash players (USB 2.0 or USB1.1). 1 Insert the USB device's USB plug...
.../PRESET 3 / 4 until the desired preset station is displayed. DSC ALBUM/ PRESET DBB TUNER POWER TUNER TUNING + TUNING USB SD SHUFFLE REPEAT MENU TIMER DSC ALBUM/ PRESET DBB AUX PROG SET TIME VOL SLEEP MUTE PROG POWER TUNER TUNING + DSC ALBUM/ PRESET DBB TUNING USB SD SHUFFLE REPEAT MENU TIMER DSC ALBUM/ PRESET DBB AUX PROG SET TIME VOL SLEEP MUTE Before using the remote control 1 Pull out the plastic protective sheet. 2 Select the source you can use USB flash memory (USB 2.0 or USB1.1), USB flash players (USB 2.0 or USB1.1). 1 Insert the USB device's USB plug...


