Leaflet
Page 2
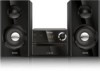
... Display type: LED display • Loader type: tray Accessories • Included accessories: AC Power Cord, FM antenna, User Manual • Remote control: 21-key remote Dimensions • Main unit width: 180 mm • Main unit height: 119 mm • Main unit depth: 220.4 mm •...04-25 Version: 1.0.5 12 NC: 8670 001 02917 UPC: 6 09585 23369 0 © 2013 Koninklijke Philips Electronics N.V. Micro music system Bluetooth 70W Highlights BTM2180/37 Specifications Wireless music streaming Bluetooth is a short range wireless communication technology that enhance the overall sound clarity ...
... Display type: LED display • Loader type: tray Accessories • Included accessories: AC Power Cord, FM antenna, User Manual • Remote control: 21-key remote Dimensions • Main unit width: 180 mm • Main unit height: 119 mm • Main unit depth: 220.4 mm •...04-25 Version: 1.0.5 12 NC: 8670 001 02917 UPC: 6 09585 23369 0 © 2013 Koninklijke Philips Electronics N.V. Micro music system Bluetooth 70W Highlights BTM2180/37 Specifications Wireless music streaming Bluetooth is a short range wireless communication technology that enhance the overall sound clarity ...
User manual
Page 2
... in the box 5 5 8 Troubleshooting 17 Overview of the main unit 6 Overview of the remote control 7 9 Notice 19 3 Get started 8 Connect speakers 8 Connect power 8 Demonstrate the features 8 Prepare the remote control 9 Set clock 9 Turn on 9 4 Play 10 Play from disc 10 Play from USB ...10 Control play 10 Skip to a track 11 Program tracks 11 Play from Bluetooth-enabled devices 11...
... in the box 5 5 8 Troubleshooting 17 Overview of the main unit 6 Overview of the remote control 7 9 Notice 19 3 Get started 8 Connect speakers 8 Connect power 8 Demonstrate the features 8 Prepare the remote control 9 Set clock 9 Turn on 9 4 Play 10 Play from disc 10 Play from USB ...10 Control play 10 Skip to a track 11 Program tracks 11 Play from Bluetooth-enabled devices 11...
User manual
Page 5
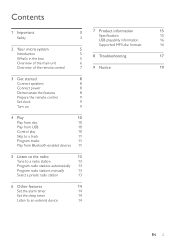
...-enabled devices, USB storage devices, or other external devices; • listen to Philips! You can : • enjoy audio from the support that Philips offers, register your product at www.philips.com/welcome. Introduction With this unit, you can enrich sound output with one AAA...SOURCE AUDIO IN VOLUME 5 EN 2 Your micro system Congratulations on your package: • Main unit • 2 x speakers • Remote control (with below sound effect: • Digital Sound Control (DSC) • DSC 1: Balanced • DSC 2: Clear • DSC 3: Powerful • DSC 4: Warm • DSC ...
...-enabled devices, USB storage devices, or other external devices; • listen to Philips! You can : • enjoy audio from the support that Philips offers, register your product at www.philips.com/welcome. Introduction With this unit, you can enrich sound output with one AAA...SOURCE AUDIO IN VOLUME 5 EN 2 Your micro system Congratulations on your package: • Main unit • 2 x speakers • Remote control (with below sound effect: • Digital Sound Control (DSC) • DSC 1: Balanced • DSC 2: Clear • DSC 3: Powerful • DSC 4: Warm • DSC ...
User manual
Page 7
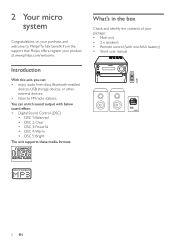
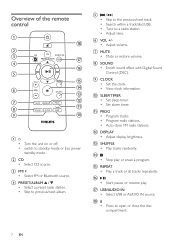
...; Program tracks. • Program radio stations. • Auto store FM radio stations. l DISPLAY • Adjust display brightness. m SHUFFLE • Play tracks randomly. Overview of the remote control a b c d e f g h i FM CD AUDIO IN PRESET/ALBUM REPEAT VOL SHUFFLE MUTE DISPLAY SOUND CLOCK PROG TIMER SLEEP r q p o n m l k j a • • Turn the unit on or off. e / Skip...
...; Program tracks. • Program radio stations. • Auto store FM radio stations. l DISPLAY • Adjust display brightness. m SHUFFLE • Play tracks randomly. Overview of the remote control a b c d e f g h i FM CD AUDIO IN PRESET/ALBUM REPEAT VOL SHUFFLE MUTE DISPLAY SOUND CLOCK PROG TIMER SLEEP r q p o n m l k j a • • Turn the unit on or off. e / Skip...
User manual
Page 9
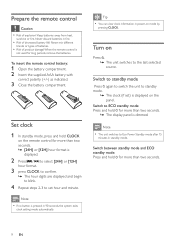
...displayed and begin to blink. 4 Repeat steps 2-3 to standby mode. »» The clock (if set hour and minute. Prepare the remote control Caution •• Risk of product damage! Keep batteries away from heat, sunshine or fire. Tip •• You can view clock... Switch between standby mode and ECO standby mode: Press and hold CLOCK on the panel. Never discard batteries in standby mode. To insert the remote control battery: 1 Open the battery compartment. 2 Insert the supplied AAA battery with correct polarity (+/-) as indicated. 3 Close the battery compartment. Set ...
...displayed and begin to blink. 4 Repeat steps 2-3 to standby mode. »» The clock (if set hour and minute. Prepare the remote control Caution •• Risk of product damage! Keep batteries away from heat, sunshine or fire. Tip •• You can view clock... Switch between standby mode and ECO standby mode: Press and hold CLOCK on the panel. Never discard batteries in standby mode. To insert the remote control battery: 1 Open the battery compartment. 2 Insert the supplied AAA battery with correct polarity (+/-) as indicated. 3 Close the battery compartment. Set ...
User manual
Page 17
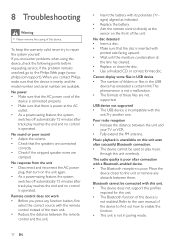
... 15 minutes after track play music through this unit or remove any function button, first select the correct source with the remote control instead of this unit even after connection with this unit. •• The device does not support the profiles required for...system yourself. If you contact Philips, make sure that the speakers are connected correctly. •• Check if the stripped speaker wires are not suppor ted. signs) aligned as indicated. •• Replace the battery. •• Aim the remote control directly at the lens has cleared...
... 15 minutes after track play music through this unit or remove any function button, first select the correct source with the remote control instead of this unit even after connection with this unit. •• The device does not support the profiles required for...system yourself. If you contact Philips, make sure that the speakers are connected correctly. •• Check if the stripped speaker wires are not suppor ted. signs) aligned as indicated. •• Replace the battery. •• Aim the remote control directly at the lens has cleared...


