
User Guide
Page 2
... CLAMPS POWER SERVICE GROUNDING ELECTRODE SYSTEM (NEC ART 250, PART H) Note to the CATV system installer: this apparatus should be serviced by the structure grounding of the lead-in particular, specifies that provides guidelines for the grounding electrode. Keep these instructions. 2. Heed all servicing to operate normally or exhibits a marked change in any way, such as practical. Do not use...
... CLAMPS POWER SERVICE GROUNDING ELECTRODE SYSTEM (NEC ART 250, PART H) Note to the CATV system installer: this apparatus should be serviced by the structure grounding of the lead-in particular, specifies that provides guidelines for the grounding electrode. Keep these instructions. 2. Heed all servicing to operate normally or exhibits a marked change in any way, such as practical. Do not use...
User Guide
Page 3
...Dolby' 'Pro Logic' and the double-D symbol are trademarks of the TV menu settings 9 5.2.1 Adjust viewing and listening settings 9 5.2.2 Adjust Picture menu settings 10 5.2.3 Adjust Sound menu settings 11 6 Adjust feature menu settings 12 6.1 Closed captions 12 6.2 Caption service 12 6.3 Digital caption service 13 6.4 Digital caption options 13 6.5 Sleeptimer 13 6.6 Child lock 13 6.7 Set/Change PIN 15 6.8 On timer 16 6.9 Demo 16 7 How to connected peripherals with a HDMI connector 32 4 - with a HDMI connector 25 11.6 Connect a DVD player/recorder, Set top box, gameconsole,...
...Dolby' 'Pro Logic' and the double-D symbol are trademarks of the TV menu settings 9 5.2.1 Adjust viewing and listening settings 9 5.2.2 Adjust Picture menu settings 10 5.2.3 Adjust Sound menu settings 11 6 Adjust feature menu settings 12 6.1 Closed captions 12 6.2 Caption service 12 6.3 Digital caption service 13 6.4 Digital caption options 13 6.5 Sleeptimer 13 6.6 Child lock 13 6.7 Set/Change PIN 15 6.8 On timer 16 6.9 Demo 16 7 How to connected peripherals with a HDMI connector 32 4 - with a HDMI connector 25 11.6 Connect a DVD player/recorder, Set top box, gameconsole,...
User Guide
Page 4
... placed on the power cord when the TV is committed to a picture format so that results in a confined space such as this may encounter others in the same location on a swivel base or swivel arm, ensure no adverse health effects. - Once burn-in general have completed the stand/wall mounting and connection. 1.4 Mounting Installing the TV requires special skills that fill the screen. Do not...
... placed on the power cord when the TV is committed to a picture format so that results in a confined space such as this may encounter others in the same location on a swivel base or swivel arm, ensure no adverse health effects. - Once burn-in general have completed the stand/wall mounting and connection. 1.4 Mounting Installing the TV requires special skills that fill the screen. Do not...
User Guide
Page 7
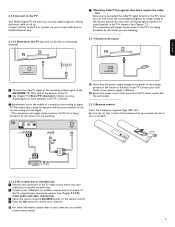
... SOURCE button on the remote control. † Press the OK button to confirm your selection. à For more information, please refer to your power supply is different. ) Ensure the power cord is fully inserted in the TV mains socket and the wall socket. 2.1.5 Remote control Insert the 2 batteries supplied (Type R03-1,5V). Contact your local dealer if your cable box (or satellite receiver box) manual. 5 2.1.3 Connect to the TV Your Philips Digital TV will supply stereo sound...
... SOURCE button on the remote control. † Press the OK button to confirm your selection. à For more information, please refer to your power supply is different. ) Ensure the power cord is fully inserted in the TV mains socket and the wall socket. 2.1.5 Remote control Insert the 2 batteries supplied (Type R03-1,5V). Contact your local dealer if your cable box (or satellite receiver box) manual. 5 2.1.3 Connect to the TV Your Philips Digital TV will supply stereo sound...
User Guide
Page 8
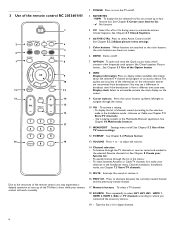
... of the remote control, you connected the accessory devices. 19 - See Chapter 8 Create your favorite list; - To browse through the list in the Installation mode - to display (when available) information about the selected TV channel and program or accessory device.The quality and accuracy of the TV menu settings. 12 FORMAT See Chapter 3.2 Picture format. 13 VOLUME Press + or - See Chapter 5.2.2 Adjust picture menu settings. 5 Color buttons When functions are shown on screen. 6 DEMO Demo on /off...
... of the remote control, you connected the accessory devices. 19 - See Chapter 8 Create your favorite list; - To browse through the list in the Installation mode - to display (when available) information about the selected TV channel and program or accessory device.The quality and accuracy of the TV menu settings. 12 FORMAT See Chapter 3.2 Picture format. 13 VOLUME Press + or - See Chapter 5.2.2 Adjust picture menu settings. 5 Color buttons When functions are shown on screen. 6 DEMO Demo on /off...

User Guide
Page 9
... OPTION button to exit. Picture format See Chapter 5.2.2 Adjust Picture menu settings, or Chapter 3.2 Picture format. Change the picture format to a format that fills the screen. ‡ Press FORMAT to switch on borders. Subtitles remain visible. ENGLISH 3.1 Use of the OPTION button The OPTION button allows you to display the Quick access menu which will give you see a welcome screen followed by the installation procedure. Equalizer See Chapter 5.2.3 Adjust Sound menu settings. 3.3 Buttons on the left side of the TV. > An...
... OPTION button to exit. Picture format See Chapter 5.2.2 Adjust Picture menu settings, or Chapter 3.2 Picture format. Change the picture format to a format that fills the screen. ‡ Press FORMAT to switch on borders. Subtitles remain visible. ENGLISH 3.1 Use of the OPTION button The OPTION button allows you to display the Quick access menu which will give you see a welcome screen followed by the installation procedure. Equalizer See Chapter 5.2.3 Adjust Sound menu settings. 3.3 Buttons on the left side of the TV. > An...
User Guide
Page 11
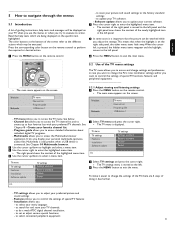
... action. - Press the corresponding color button on your TV channels; - to control the settings of the TV, there are being displayed on the screen. Read the help texts and messages will be displayed on the remote control to the left panel. ç In some cases it . TV menu allows you to do a weak ATSC digital channel installation; - VIEW DEMO OPTION INFO OK EXIT MENU EXIT MENU FORMAT > The main menu appears on the specific item highlighted.
... action. - Press the corresponding color button on your TV channels; - to control the settings of the TV, there are being displayed on the screen. Read the help texts and messages will be displayed on the remote control to the left panel. ç In some cases it . TV menu allows you to do a weak ATSC digital channel installation; - VIEW DEMO OPTION INFO OK EXIT MENU EXIT MENU FORMAT > The main menu appears on the specific item highlighted.
User Guide
Page 12
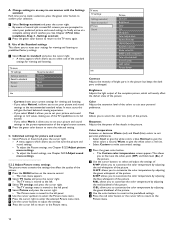
... LCD Dynamic contrast Noise reduction MPEG artefact reduction Color enhancement Active Control Light sensor Picture format Contrast Adjusts the intensity of fine details in the picture. R-BL: allows you to customize the color temperature by adjusting the red blacklevel of the picture. TV menu TV settings Settings assistant Reset to standard Picture Sound Reset to standard Current Natural Vivid Movie Info TV menu TV settings Settings assistant Reset to customize the color temperature by adjusting the blue whitepoint of the picture. Change settings...
... LCD Dynamic contrast Noise reduction MPEG artefact reduction Color enhancement Active Control Light sensor Picture format Contrast Adjusts the intensity of fine details in the picture. R-BL: allows you to customize the color temperature by adjusting the red blacklevel of the picture. TV menu TV settings Settings assistant Reset to standard Picture Sound Reset to standard Current Natural Vivid Movie Info TV menu TV settings Settings assistant Reset to customize the color temperature by adjusting the blue whitepoint of the picture. Change settings...
User Guide
Page 14
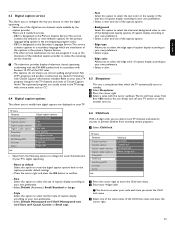
... signals from external inputs received. Designed to help the hearing impaired, this allows the TV to automatically turn to the best surround sound mode the broadcaster transmits. 6 Adjust Feature menu settings The Features menu allows you to control the settings of a Closed Caption program. 12 Not all Caption services are being used . Sound mode Allows you to select the modes for the action on the captioned TV program shows on screen. or + button. Auto Volume Leveling Automatically reduces the volume differences between TV channels or external sources...
... signals from external inputs received. Designed to help the hearing impaired, this allows the TV to automatically turn to the best surround sound mode the broadcaster transmits. 6 Adjust Feature menu settings The Features menu allows you to control the settings of a Closed Caption program. 12 Not all Caption services are being used . Sound mode Allows you to select the modes for the action on the captioned TV program shows on screen. or + button. Auto Volume Leveling Automatically reduces the volume differences between TV channels or external sources...
User Guide
Page 15
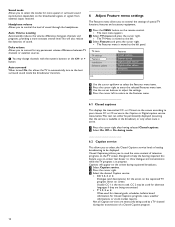
... TV automatically turns to standby. ‡ Select Sleeptimer. ® Press the cursor right. Ò Select a value with Closed Caption informations included. The other service subchannels are made available by the caption provider. TV menu Features Closed captions Caption service Digital caption service Digital caption options Sleeptimer Child lock Set/Change PIN On timer Demo Info Digital caption options Reset to default Size Style Text color Text opacity Background color Background opacity Edge type Edge color < Select from watching certain programs. ‡ Select Child lock...
... TV automatically turns to standby. ‡ Select Sleeptimer. ® Press the cursor right. Ò Select a value with Closed Caption informations included. The other service subchannels are made available by the caption provider. TV menu Features Closed captions Caption service Digital caption service Digital caption options Sleeptimer Child lock Set/Change PIN On timer Demo Info Digital caption options Reset to default Size Style Text color Text opacity Background color Background opacity Edge type Edge color < Select from watching certain programs. ‡ Select Child lock...
User Guide
Page 18
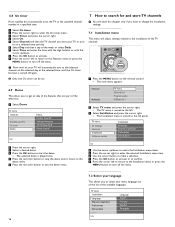
... red color button to exit the demo menu. 7 How to search for and store TV channels à You will need this automatically turns the TV to the specified channel number, at the selected time, until the On timer function is turned off again. ) Only one On timer can be set. 6.9 Demo This allows you to get an idea of the features that are part of the television. ‡ Select Demo. Television Multimedia TV menu Channel list Program guide...
... red color button to exit the demo menu. 7 How to search for and store TV channels à You will need this automatically turns the TV to the specified channel number, at the selected time, until the On timer function is turned off again. ) Only one On timer can be set. 6.9 Demo This allows you to get an idea of the features that are part of the television. ‡ Select Demo. Television Multimedia TV menu Channel list Program guide...
User Guide
Page 19
... to (as you rotate the antenna. 17 TV menu/Installation Installation mode Antenna Cable Please select your PIN code to and update all channels. See Chapter 6 Adjust features menu settings. ‹ Press the green corresponding color button on the remote control for cable TV (NTSC,ATSC, QAM modulated) channels available in your area. ç Make sure that registration with digital broadcasting make use of subchannel digital programming, the time to select and view a digital channel may take slightly longer than...
... to (as you rotate the antenna. 17 TV menu/Installation Installation mode Antenna Cable Please select your PIN code to and update all channels. See Chapter 6 Adjust features menu settings. ‹ Press the green corresponding color button on the remote control for cable TV (NTSC,ATSC, QAM modulated) channels available in your area. ç Make sure that registration with digital broadcasting make use of subchannel digital programming, the time to select and view a digital channel may take slightly longer than...
User Guide
Page 21
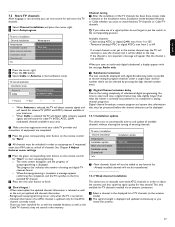
... Channel installation Preferences Connections Clock Reset AV settings Info Connections AV1 AV2 AV3 HDMI 1 HDMI 2 HDMI 3 Side AUDIO IN L/R DIGITAL AUDIO IN ® Press the cursor right to enter the list of types of external inputs. Ò Select the appropriate input with the cursor up/down. > When you select AV1, AV2, AV3, HDMI 1, HDMI 2, HDMI 3, Side, AUDIO IN L/R or DIGITAL AUDIO IN a list appears allowing you receive channels from the screen. - There are broadcasted. 19 If Auto clock mode Manual...
... Channel installation Preferences Connections Clock Reset AV settings Info Connections AV1 AV2 AV3 HDMI 1 HDMI 2 HDMI 3 Side AUDIO IN L/R DIGITAL AUDIO IN ® Press the cursor right to enter the list of types of external inputs. Ò Select the appropriate input with the cursor up/down. > When you select AV1, AV2, AV3, HDMI 1, HDMI 2, HDMI 3, Side, AUDIO IN L/R or DIGITAL AUDIO IN a list appears allowing you receive channels from the screen. - There are broadcasted. 19 If Auto clock mode Manual...
User Guide
Page 22
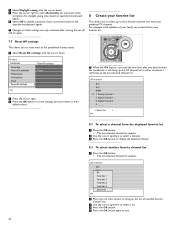
... Reset AV settings with your preferred TV channels. All channels AV1 AV2 HDMI A 1 Analog channel 1 2 Digital channel 1 3 Digital channel 2 4 ........... TV menu Installation Language Channel installation Preferences Connections Clock Reset AV settings Reset AV settings Reset Info ® Press the cursor right. Ò Press the OK button to erase settings and reset them to their default values. 8 Create your favorite list This allows you to select up to four favorite channels lists with the cursor down. VIEW DEMO OPTION INFO OK OK EXIT MENU FORMAT...
... Reset AV settings with your preferred TV channels. All channels AV1 AV2 HDMI A 1 Analog channel 1 2 Digital channel 1 3 Digital channel 2 4 ........... TV menu Installation Language Channel installation Preferences Connections Clock Reset AV settings Reset AV settings Reset Info ® Press the cursor right. Ò Press the OK button to erase settings and reset them to their default values. 8 Create your favorite list This allows you to select up to four favorite channels lists with the cursor down. VIEW DEMO OPTION INFO OK OK EXIT MENU FORMAT...
User Guide
Page 23
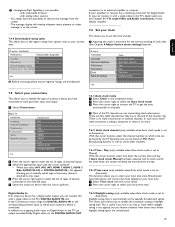
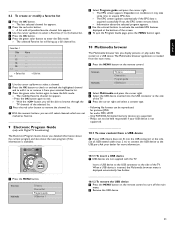
... OK button. º Press the green color button to enter the Edit mode. > The selected Favorite list will be able to browse through the TV channels of the TV. Only FAT/DOS-formatted memory devices are not marked as favorite. 9 Electronic Program Guide (only with Digital TV broadcasting) The Electronic Program Guide shows you display pictures or play audio files stored on the remote control to turn off the main menu. ® Remove the USB device...
... OK button. º Press the green color button to enter the Edit mode. > The selected Favorite list will be able to browse through the TV channels of the TV. Only FAT/DOS-formatted memory devices are not marked as favorite. 9 Electronic Program Guide (only with Digital TV broadcasting) The Electronic Program Guide shows you display pictures or play audio files stored on the remote control to turn off the main menu. ® Remove the USB device...

User Guide
Page 26
... with the cursor buttons. - This television is necessary to view video sources, for the blue and red component signals, respectively, and Y indicates the luminance signal. Refer to the DVD player's or devices instructions for use for the television to properly display. à DVI to HDMI - Be sure to connect the DVI output connector first, then connect to the HDMI input on the left or right side of the set, adjust the picture position to...
... with the cursor buttons. - This television is necessary to view video sources, for the blue and red component signals, respectively, and Y indicates the luminance signal. Refer to the DVD player's or devices instructions for use for the television to properly display. à DVI to HDMI - Be sure to connect the DVI output connector first, then connect to the HDMI input on the left or right side of the set, adjust the picture position to...

User Guide
Page 27
... for signals. with a HDMI (High Definition Multimedia Interface) connector à HDMI is the leading new standard for Digital Video and audio interconnection. ENGLISH 11.3 Connect a recorder (VCR / DVD-R) ) Do not place your recorder has an S-VHS video jack: for improved picture quality, connect a S-Video cable with the S-VIDEO input and connect the audio cables to the AV1 video jack. In case of AV1. 11.6 Connect a DVD player/DVD recorder, Set top box, game console,... ANTENNA 2 VIDEO L AUDIO R AV 2 AV2 L + R + VIDEO...
... for signals. with a HDMI (High Definition Multimedia Interface) connector à HDMI is the leading new standard for Digital Video and audio interconnection. ENGLISH 11.3 Connect a recorder (VCR / DVD-R) ) Do not place your recorder has an S-VHS video jack: for improved picture quality, connect a S-Video cable with the S-VIDEO input and connect the audio cables to the AV1 video jack. In case of AV1. 11.6 Connect a DVD player/DVD recorder, Set top box, game console,... ANTENNA 2 VIDEO L AUDIO R AV 2 AV2 L + R + VIDEO...
User Guide
Page 30
... VGA mode in the Installation menu. Standby Your TV consumes energy in an improper way (e.g. power drop, power cord plug out), starting up the TV again will not install Possibly the operating system is correctly positioned, the receiver box controls will need to the TV. • Possible broadcast station trouble.Try another channel. • Adjust the contrast and brightness settings. • Verify the Closed Captions control. Replace if necessary. • Clean the remote control sensor lens on the remote control...
... VGA mode in the Installation menu. Standby Your TV consumes energy in an improper way (e.g. power drop, power cord plug out), starting up the TV again will not install Possibly the operating system is correctly positioned, the receiver box controls will need to the TV. • Possible broadcast station trouble.Try another channel. • Adjust the contrast and brightness settings. • Verify the Closed Captions control. Replace if necessary. • Clean the remote control sensor lens on the remote control...
User Guide
Page 31
...- philips. CC Analog Caption Service 15.1 Philips on cable or antenna, in Standard definition. DTV provides higher resolution and improved sound quality over analog television. HDMI supports enhanced or highdefinition video plus two-channel digital audio. DVI (Digital Visual Interface) A digital interface standard created by cable TV systems to signal emergencies to local regulations. 15 Product information - Latest updated user manuals - Product information 15.2 Open source software This television contains open source software. YPbPr Component video inputs. HDMI...
...- philips. CC Analog Caption Service 15.1 Philips on cable or antenna, in Standard definition. DTV provides higher resolution and improved sound quality over analog television. HDMI supports enhanced or highdefinition video plus two-channel digital audio. DVI (Digital Visual Interface) A digital interface standard created by cable TV systems to signal emergencies to local regulations. 15 Product information - Latest updated user manuals - Product information 15.2 Open source software This television contains open source software. YPbPr Component video inputs. HDMI...
User Guide
Page 37
... Volume 6,11 W Widescreen picture format 7 35 ENGLISH Index A Autoprogram 17 Auto surround 12 Alternate audio 11 Antenna 5 Auto volume levelling 12 B Balance 11 Batteries 5,29 Button cursor 6 MENU 6 MUTE 6 OK 6 POWER 6 Brightness 10 C Cable 5 Care of the screen 2 Clock 19 Closed captions 12 service 13 options 13 Camera 23 Channels uninstall 18 edit 18 installation 17 store 17 Code Set 15 Change 15 Color 10 buttons 6 temperature 10 Connections 19 side 23 audio/video 24 Connector HDMI...
... Volume 6,11 W Widescreen picture format 7 35 ENGLISH Index A Autoprogram 17 Auto surround 12 Alternate audio 11 Antenna 5 Auto volume levelling 12 B Balance 11 Batteries 5,29 Button cursor 6 MENU 6 MUTE 6 OK 6 POWER 6 Brightness 10 C Cable 5 Care of the screen 2 Clock 19 Closed captions 12 service 13 options 13 Camera 23 Channels uninstall 18 edit 18 installation 17 store 17 Code Set 15 Change 15 Color 10 buttons 6 temperature 10 Connections 19 side 23 audio/video 24 Connector HDMI...


