User manual
Page 6
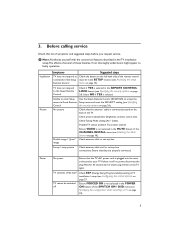
... is plugged into the main socket and to Check the button on the left hand side of the remote control commands of the CHANNEL INSTALL menu (see Specifying the security options on page 27. image Snowy / noisy picture Check antenna, cable and /or set -top box. Power No power Ensure... that they are properly connected. TV switches off by itself TV cannot be in the REMOTE CONTROL LOCK feature (see Selecting the Mute Source ...
... is plugged into the main socket and to Check the button on the left hand side of the remote control commands of the CHANNEL INSTALL menu (see Specifying the security options on page 27. image Snowy / noisy picture Check antenna, cable and /or set -top box. Power No power Ensure... that they are properly connected. TV switches off by itself TV cannot be in the REMOTE CONTROL LOCK feature (see Selecting the Mute Source ...
User manual
Page 7
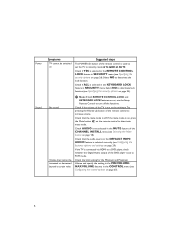
... connected via HDMI to a DVD player, check whether the Digital Audio output of the remote control is off the functions. Check if the volume of the TV is selected correctly (see Configuring the control options on page 27). 6 Check the limit setting for the Minimum and Maximum Volume and specify the setting...
... connected via HDMI to a DVD player, check whether the Digital Audio output of the remote control is off the functions. Check if the volume of the TV is selected correctly (see Configuring the control options on page 27). 6 Check the limit setting for the Minimum and Maximum Volume and specify the setting...

User manual
Page 17
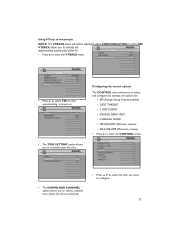
... 3-digit channel entry. (see Appendix A on page 38). • Select SMART RC to access the SMOOVIETM functionality on page 27) 16 • To use the specified color code to correspond to the remote control select MULTI RC (see Configuring the control options on this TV set. • Select STORE and... RING DIGITAL SETUP CONFIGURATION ENGLISH > > > NO NO RING1 > > CCHHAANNNNELELININSTSATALL L CHANNEL INPUT DIGITAL RINGS LABEL MUTE TV 2 TUNER NO (1 ) (2 ) (3 ) (4 ) ( )> NONE Select a Channel • Press 0 - 9 on the remote control to enter the CHANNEL INSTALL menu.
... 3-digit channel entry. (see Appendix A on page 38). • Select SMART RC to access the SMOOVIETM functionality on page 27) 16 • To use the specified color code to correspond to the remote control select MULTI RC (see Configuring the control options on this TV set. • Select STORE and... RING DIGITAL SETUP CONFIGURATION ENGLISH > > > NO NO RING1 > > CCHHAANNNNELELININSTSATALL L CHANNEL INPUT DIGITAL RINGS LABEL MUTE TV 2 TUNER NO (1 ) (2 ) (3 ) (4 ) ( )> NONE Select a Channel • Press 0 - 9 on the remote control to enter the CHANNEL INSTALL menu.
User manual
Page 27
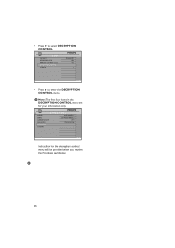
I MODEL CHADNENCERLYPINTSIOTANLCLONTROL 32HF5860D/27 SERIAL SV1A07071000012 CURRENT MODE PPV NEW MODE STANDALONE PASSWORD CONVERT > Instruction for your information only. D CHANNEL INSTALL 26 D Note: The first four items in ... the decryption control menu will be provided when you receive the Pro:Idiom certificates. • Press ï to select DECRYPTION CONTROL CHANNSEELCUINRSITAYLL SECURITY KEYBOARD LOCK REMOTE CONTROL LOCK DECRYPTION CONTROL VTRACK STANDARD ALL YES > > • Press Æ to enter the DECRYPTION CONTROL menu.
I MODEL CHADNENCERLYPINTSIOTANLCLONTROL 32HF5860D/27 SERIAL SV1A07071000012 CURRENT MODE PPV NEW MODE STANDALONE PASSWORD CONVERT > Instruction for your information only. D CHANNEL INSTALL 26 D Note: The first four items in ... the decryption control menu will be provided when you receive the Pro:Idiom certificates. • Press ï to select DECRYPTION CONTROL CHANNSEELCUINRSITAYLL SECURITY KEYBOARD LOCK REMOTE CONTROL LOCK DECRYPTION CONTROL VTRACK STANDARD ALL YES > > • Press Æ to enter the DECRYPTION CONTROL menu.
User manual
Page 28
... Æ to manually enter the time. VTRACK allows you want to OFF. TIME SETTING 12:00 DOWNLOAD CHANNEL TV2 CHANNEL INSTALL SECURITY SECURITY KEYBOARD LOCK REMOTE CONTROL LOCK DECRYPTION CONTROL VTRACK STANDARD ALL YES > > • Press Æ to select YES, so that watermarking is retrieved. • Press Î ï to select... item you to enter the VTRACK menu. Using V-Track to watermark NOTE: The VTRACK menu will not be displayed unless COMMUNICATION is set to configure. 27
... Æ to manually enter the time. VTRACK allows you want to OFF. TIME SETTING 12:00 DOWNLOAD CHANNEL TV2 CHANNEL INSTALL SECURITY SECURITY KEYBOARD LOCK REMOTE CONTROL LOCK DECRYPTION CONTROL VTRACK STANDARD ALL YES > > • Press Æ to select YES, so that watermarking is retrieved. • Press Î ï to select... item you to enter the VTRACK menu. Using V-Track to watermark NOTE: The VTRACK menu will not be displayed unless COMMUNICATION is set to configure. 27
User manual
Page 49
... 34 Important Safety Instructions 3 K Keyboard Lock 27 L Loud Speaker Mute 32 Low Power Standby 32 M Mains connection 9 Maximum volume 30 Minimum volume 30 MPEG Program number 18 Multi Remote Controls 38 N Naming a channel 19 O 48 Optional Remote Controls 12 Overview of TV Connectors and Controls ...10 P Physical Channel 21 Picture Format 26 R Remote Control Lock 27 RF Channel Number 18 RF Download 33 S Safety Information ...
... 34 Important Safety Instructions 3 K Keyboard Lock 27 L Loud Speaker Mute 32 Low Power Standby 32 M Mains connection 9 Maximum volume 30 Minimum volume 30 MPEG Program number 18 Multi Remote Controls 38 N Naming a channel 19 O 48 Optional Remote Controls 12 Overview of TV Connectors and Controls ...10 P Physical Channel 21 Picture Format 26 R Remote Control Lock 27 RF Channel Number 18 RF Download 33 S Safety Information ...
Quick start guide
Page 1
... desired maximum volume setting. SPI. Note: For the Pay-Per-View SmartCard to display the Setup menu. If SP - MODEL 26HF7945D / 27 07 08 COMMUNICATION SP - If SP - Check item 08 of Pay-Per-View SmartCard COMMUNICATION COMMUNICATION STORE DCM TYPE SP - FEATURES SMARTPOWER ...View SmartCard into the card slot of a channel - After SmartCard has been inserted and the cables connected, turn on the remote to the Data 1 (RJ 12) connector at www.philips.com/hospitality. B Note : Step B in Setup position). Perform this guide. Press Æ to the USB device. ...
... desired maximum volume setting. SPI. Note: For the Pay-Per-View SmartCard to display the Setup menu. If SP - MODEL 26HF7945D / 27 07 08 COMMUNICATION SP - If SP - Check item 08 of Pay-Per-View SmartCard COMMUNICATION COMMUNICATION STORE DCM TYPE SP - FEATURES SMARTPOWER ...View SmartCard into the card slot of a channel - After SmartCard has been inserted and the cables connected, turn on the remote to the Data 1 (RJ 12) connector at www.philips.com/hospitality. B Note : Step B in Setup position). Perform this guide. Press Æ to the USB device. ...
Leaflet
Page 3
...x D): 44.3 x 30.7 x 10.9 inch • Product weight (lb): 75 (with MPEG-4 Specifications 42HFL5860D/27 Picture/Display • Aspect ratio: 16:9, Widescreen • Color cabinet: Black w/gloss black bezel • ...remote control Multimedia Applications • Multimedia connections: USB • Playback Formats: JPEG Still pictures, MP3, Slideshow files (.alb) Green Specifications • Safety: Flame retardant housing • Eco Designed • SmartPower² • Issue date 2011-01-12 Version: 6.1.10 12 NC: 8670 000 37539 UPC: 6 09585 15040 9 © 2011 Koninklijke Philips...
...x D): 44.3 x 30.7 x 10.9 inch • Product weight (lb): 75 (with MPEG-4 Specifications 42HFL5860D/27 Picture/Display • Aspect ratio: 16:9, Widescreen • Color cabinet: Black w/gloss black bezel • ...remote control Multimedia Applications • Multimedia connections: USB • Playback Formats: JPEG Still pictures, MP3, Slideshow files (.alb) Green Specifications • Safety: Flame retardant housing • Eco Designed • SmartPower² • Issue date 2011-01-12 Version: 6.1.10 12 NC: 8670 000 37539 UPC: 6 09585 15040 9 © 2011 Koninklijke Philips...


