
User manual
Page 2
... 14 Switching audio mode 14 6 Use more of your TV 15 Changing picture and sound settings 15 Sleeptimer 18 Child and rating locks 18 Closed caption 20 EasyLink 21 Energy saving mode 21 Set your location to home 21 View photos and play music on a USB device 22 7 Install channels 24 Selecting your menu language 24 Autoprogram 24 Channel list 25 Add channels 25 Optimizing the signal quality from your antenna 25 8 Upgrade your TV software 26...
... 14 Switching audio mode 14 6 Use more of your TV 15 Changing picture and sound settings 15 Sleeptimer 18 Child and rating locks 18 Closed caption 20 EasyLink 21 Energy saving mode 21 Set your location to home 21 View photos and play music on a USB device 22 7 Install channels 24 Selecting your menu language 24 Autoprogram 24 Channel list 25 Add channels 25 Optimizing the signal quality from your antenna 25 8 Upgrade your TV software 26...

User manual
Page 4
... the apparatus. Use only with a cart, stand, tripod, bracket, or table specified by the manufacturer. 19. This product may be regulated due to the unit: • Install all servicing to a wall or ceiling only as power-supply cord or plug is used for replacement of the obsolete outlet. 10. The power supply cord or the plug has been damaged; or D. Power Lines - An outdoor antenna should be...
... the apparatus. Use only with a cart, stand, tripod, bracket, or table specified by the manufacturer. 19. This product may be regulated due to the unit: • Install all servicing to a wall or ceiling only as power-supply cord or plug is used for replacement of the obsolete outlet. 10. The power supply cord or the plug has been damaged; or D. Power Lines - An outdoor antenna should be...
User manual
Page 5
... best possible picture using the factory installed home mode settings. Philips cannot be done by Philips Consumer Electronics may appear constantly on the Philips support website as soon as a result of the product. This Class B digital apparatus meets all save money and protect the environment through energy efficient products and practices. Dolby and the double-D symbol are user serviceable. or their respective owners...
... best possible picture using the factory installed home mode settings. Philips cannot be done by Philips Consumer Electronics may appear constantly on the Philips support website as soon as a result of the product. This Class B digital apparatus meets all save money and protect the environment through energy efficient products and practices. Dolby and the double-D symbol are user serviceable. or their respective owners...
User manual
Page 8
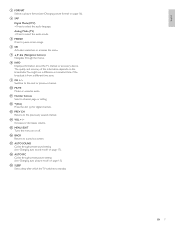
... or accesses the menu. n VOL + / Increases or decreases volume. i CH + / Switches to standby. k Number buttons Select a channel, page or setting. l • (Dot) Press the dot (•) for digital channels. EN 7 English r AUTO PIC Cycles through preset picture setting (see 'Changing picture format' on page 16). s SLEEP Sets a delay after which the TV switches to the next or previous channel. Analog Mode (TV) • Press to pause screen image. h INFO Displays information about the TV channel or...
... or accesses the menu. n VOL + / Increases or decreases volume. i CH + / Switches to standby. k Number buttons Select a channel, page or setting. l • (Dot) Press the dot (•) for digital channels. EN 7 English r AUTO PIC Cycles through preset picture setting (see 'Changing picture format' on page 16). s SLEEP Sets a delay after which the TV switches to the next or previous channel. Analog Mode (TV) • Press to pause screen image. h INFO Displays information about the TV channel or...
User manual
Page 9
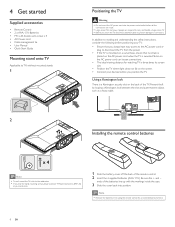
... time. 8 EN Using a Kensington lock There is swiveled. Note • Remove the batteries if not using the remote control for watching TV is three times its screen size. • Position the TV where light does not fall on the back of the TV. AC IN Installing the remote control batteries x 4 Note • To wall mount the TV, refer to the addendum. • If you lose the stand mounting screws...
... time. 8 EN Using a Kensington lock There is swiveled. Note • Remove the batteries if not using the remote control for watching TV is three times its screen size. • Position the TV where light does not fall on the back of the TV. AC IN Installing the remote control batteries x 4 Note • To wall mount the TV, refer to the addendum. • If you lose the stand mounting screws...
User manual
Page 10
... connected to a cable box or satellite set-top box via HDMI, make sure you select the correct component video source by the service provider. The TV produces stereo sound only if a stereo signal is connected to the channel specified by using SOURCE on this unit's remote control. If you connect a set-top box through an antenna connection. Cable If you might receive free digital and high definition programs (depending on this unit's remote control. If you connect...
... connected to a cable box or satellite set-top box via HDMI, make sure you select the correct component video source by the service provider. The TV produces stereo sound only if a stereo signal is connected to the channel specified by using SOURCE on this unit's remote control. If you connect a set-top box through an antenna connection. Cable If you might receive free digital and high definition programs (depending on this unit's remote control. If you connect...
User manual
Page 12
...;ned setting for retail displays. Installation takes approximately 10 minutes. In this setting will not be adjusted and saved as per your cable service, contact the CATV provider. • If you customize picture settings. Press OK to select the desired mode for either [Antenna] or [Cable] only once.When you change the connection (Antenna / Cable), set [Home]. Select OK Next BACK Back MENU Exit Press OK to reduce power...
...;ned setting for retail displays. Installation takes approximately 10 minutes. In this setting will not be adjusted and saved as per your cable service, contact the CATV provider. • If you customize picture settings. Press OK to select the desired mode for either [Antenna] or [Cable] only once.When you change the connection (Antenna / Cable), set [Home]. Select OK Next BACK Back MENU Exit Press OK to reduce power...
User manual
Page 14
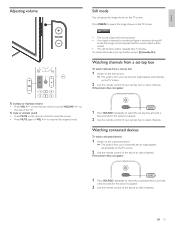
... screen. 2 Use the remote control of the device to select channels. EN 13 English Adjusting volume Still mode You can pause the image shown on the set -top box and wait a few seconds for the picture to appear. 2 Use the remote control of your set -top box to select channels. FREEZE • The sound output will not be paused. • If no signal is detected or protected signal is received during still mode...
... screen. 2 Use the remote control of the device to select channels. EN 13 English Adjusting volume Still mode You can pause the image shown on the set -top box and wait a few seconds for the picture to appear. 2 Use the remote control of your set -top box to select channels. FREEZE • The sound output will not be paused. • If no signal is detected or protected signal is received during still mode...

User manual
Page 16
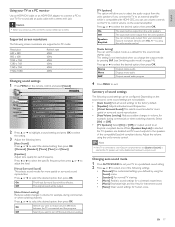
...) resolution feature. Changing auto picture mode 1 Press AUTO PIC to set your TV Changing picture and sound settings You must set [Home] in image details. • [Color Temperature]:To set [Auto Picture] to standby mode. Please ensure the room lighting is stable and the light sensor is a sudden change in TV brightness, it may be memorized after the unit goes to [Game]. Press Î or ï to exit. Otherwise, personalized picture and sound settings will automatically adjust...
...) resolution feature. Changing auto picture mode 1 Press AUTO PIC to set your TV Changing picture and sound settings You must set [Home] in image details. • [Color Temperature]:To set [Auto Picture] to standby mode. Please ensure the room lighting is stable and the light sensor is a sudden change in TV brightness, it may be memorized after the unit goes to [Game]. Press Î or ï to exit. Otherwise, personalized picture and sound settings will automatically adjust...
User manual
Page 18
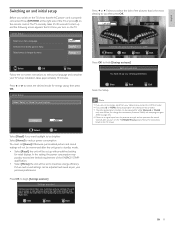
... compatible with VOL + / − by using the unit's remote control. Off The original sound will not be effective. for instrument sound. • [News]: Clear sound settings for each frequency. The sound will be configured. Changing auto sound mode 1 Press AUTO SOUND to set the output mode as a PC monitor Use an HDMI-DVI cable or an HDMI-DVI adaptor to connect a PC to select the desired option, then press OK. Picture Sound Setup Features Language USB Auto Sound...
... compatible with VOL + / − by using the unit's remote control. Off The original sound will not be effective. for instrument sound. • [News]: Clear sound settings for each frequency. The sound will be configured. Changing auto sound mode 1 Press AUTO SOUND to set the output mode as a PC monitor Use an HDMI-DVI cable or an HDMI-DVI adaptor to connect a PC to select the desired option, then press OK. Picture Sound Setup Features Language USB Auto Sound...
User manual
Page 19
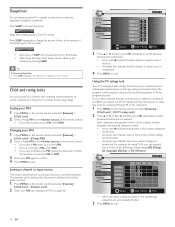
.... If you receive channels through RF or AV connectors. 1 Press MENU on the Number buttons of 30 minutes up your PIN, enter 0000. M A T V- 1 4 T V- For example, for rating TV-14, you can be connected through a set-top box or cable box connected by HDMI, you have not set the sleep timer. Y 7 T V- Locking a channel or input source This section describes how to 120 minutes). Picture Sound Setup Features Language USB Video 1 Video 2 Component HDMI 1 HDMI 2 HDMI 3 Select BACK OK View / Block Back...
.... If you receive channels through RF or AV connectors. 1 Press MENU on the Number buttons of 30 minutes up your PIN, enter 0000. M A T V- 1 4 T V- For example, for rating TV-14, you can be connected through a set-top box or cable box connected by HDMI, you have not set the sleep timer. Y 7 T V- Locking a channel or input source This section describes how to 120 minutes). Picture Sound Setup Features Language USB Video 1 Video 2 Component HDMI 1 HDMI 2 HDMI 3 Select BACK OK View / Block Back...

User manual
Page 21
... you will need to control Closed Captioning. • The captions do not want Digital Caption Service.This is the default. Select one of these before changing any consumer information and manuals / guides on closed caption program. and, • ensure that the captioning function on your DTV is turned on the external set top box to use the menu options on . Note • Not all caption services are watching television through an external cable or satellite set top box. CC...
... you will need to control Closed Captioning. • The captions do not want Digital Caption Service.This is the default. Select one of these before changing any consumer information and manuals / guides on closed caption program. and, • ensure that the captioning function on your DTV is turned on the external set top box to use the menu options on . Note • Not all caption services are watching television through an external cable or satellite set top box. CC...

User manual
Page 26
... they appear on your antenna You can select the memorized channels only. • In most cases, digital channels are removed as well. Picture Sound Setup Features Language USB Autoprogram Channel List Add Channels Antenna 2 Press Î or ï to select the channel you can optimize your local service provider. Those channels can be added using [Add channels] might not work for direct cable connections and if the digital signal is being broadcast, please...
... they appear on your antenna You can select the memorized channels only. • In most cases, digital channels are removed as well. Picture Sound Setup Features Language USB Autoprogram Channel List Add Channels Antenna 2 Press Î or ï to select the channel you can optimize your local service provider. Those channels can be added using [Add channels] might not work for direct cable connections and if the digital signal is being broadcast, please...

User manual
Page 27
... the remote control and select [Features] > [Current Software Info]. » The version and a description of your TV (e.g. 46PFL3705D) to exit. 8 Upgrade your TV software Philips continuously tries to continue with the installation. POWER at www.philips.com using the model number of the current software is supported. • New software can be downloaded from www.philips.com • Use only software upgrades that you upgrade the TV software when upgrades are displayed without starting software upgrade...
... the remote control and select [Features] > [Current Software Info]. » The version and a description of your TV (e.g. 46PFL3705D) to exit. 8 Upgrade your TV software Philips continuously tries to continue with the installation. POWER at www.philips.com using the model number of the current software is supported. • New software can be downloaded from www.philips.com • Use only software upgrades that you upgrade the TV software when upgrades are displayed without starting software upgrade...

User manual
Page 29
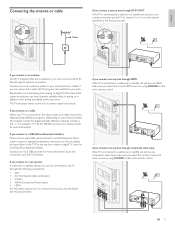
... combine a yellow video cable with an audio L / R cable. Note • Philips HDMI supports HDCP (High-bandwidth Digital Contents Protection). Composite - Component (Y Pb Pr) - Basic quality Composite video / audio cable (yellow / red / white) For analog connections. Match the cable colors when you connect to enable Philips EasyLink. Good quality Supports high-definition signals and gives highest picture and sound quality.Video and audio signals are combined in DVD or Blu-ray Discs. Component video cable (red / green / blue) and audio L/R cable (red / white) Supports high-de...
... combine a yellow video cable with an audio L / R cable. Note • Philips HDMI supports HDCP (High-bandwidth Digital Contents Protection). Composite - Component (Y Pb Pr) - Basic quality Composite video / audio cable (yellow / red / white) For analog connections. Match the cable colors when you connect to enable Philips EasyLink. Good quality Supports high-definition signals and gives highest picture and sound quality.Video and audio signals are combined in DVD or Blu-ray Discs. Component video cable (red / green / blue) and audio L/R cable (red / white) Supports high-de...

User manual
Page 30
.... Connecting a set -top box, DVD player / recorder via component video output connectors (YPbPr) and analog audio IN IN YPbPr AUDIO L/R OUT Set-top box or OUT DVD player Note • When you connect cables, match the cable colors to the connectors on the TV. Note • When you connect cables, match the cable colors to the connectors on the TV. EN 29 Connecting a set-top box, Blu-ray Disc player and HD game console via HDMI HDMI IN IN IN HDMI...
.... Connecting a set -top box, DVD player / recorder via component video output connectors (YPbPr) and analog audio IN IN YPbPr AUDIO L/R OUT Set-top box or OUT DVD player Note • When you connect cables, match the cable colors to the connectors on the TV. Note • When you connect cables, match the cable colors to the connectors on the TV. EN 29 Connecting a set-top box, Blu-ray Disc player and HD game console via HDMI HDMI IN IN IN HDMI...

User manual
Page 32
... via component cables. For HDMI connections, some accessory devices, the picture format must be due to [Off]. Turn on the remote control. picture misses red when connected to your TV, as well as high definition channels - for the accessory device is not blocked. If you can browse the catalog. 4 Click the description or model. 5 Under Product support, click "User manuals". No sound will automatically adjust the brightness based...
... via component cables. For HDMI connections, some accessory devices, the picture format must be due to [Off]. Turn on the remote control. picture misses red when connected to your TV, as well as high definition channels - for the accessory device is not blocked. If you can browse the catalog. 4 Click the description or model. 5 Under Product support, click "User manuals". No sound will automatically adjust the brightness based...
User manual
Page 35
... workmanship from the date of the replacement or repair for ninety (90) days or for the remaining portion of the original product's warranty, whichever provides longer coverage for installation or setup of customer controls on how long an implied warranty lasts, so the above limitations or exclusions may not apply to operate per Owner's Manual. Replacement product can be identified by...
... workmanship from the date of the replacement or repair for ninety (90) days or for the remaining portion of the original product's warranty, whichever provides longer coverage for installation or setup of customer controls on how long an implied warranty lasts, so the above limitations or exclusions may not apply to operate per Owner's Manual. Replacement product can be identified by...
User manual
Page 36
14 Index A Antenna, connect Audio Audio setting Auto device off Auto picture mode Auto sound mode Auto TV on Auto volume leveling C Cables component composite connection quality HDMI manage cables S-Video YPbPr Channels install list lock Child lock channel lock PIN ratings lock Closed caption Connections Controls Customer support service D Device List E EasyLink Energy saving mode ENERGY STAR® Environmental care Equalizer H Home mode I Initial setup L Location (retail or home) M Master EasyLink Mounting stand onto TV 9 17 17 21 15 17 21 17 28 28 28 28 10 28 28 24 25 18...
14 Index A Antenna, connect Audio Audio setting Auto device off Auto picture mode Auto sound mode Auto TV on Auto volume leveling C Cables component composite connection quality HDMI manage cables S-Video YPbPr Channels install list lock Child lock channel lock PIN ratings lock Closed caption Connections Controls Customer support service D Device List E EasyLink Energy saving mode ENERGY STAR® Environmental care Equalizer H Home mode I Initial setup L Location (retail or home) M Master EasyLink Mounting stand onto TV 9 17 17 21 15 17 21 17 28 28 28 28 10 28 28 24 25 18...
Leaflet
Page 3
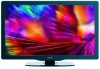
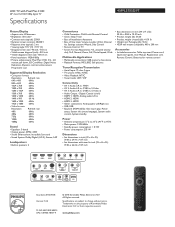
... change without notice. LCD TV with stand in inch (W x H x D): 39.06 x 26.22 x 9.37 inch Issue date 2010-09-06 Version: 1.2.2 12 NC: 8670 000 60515 UPC: 6 09585 18619 4 © 2010 Koninklijke Philips Electronics N.V. Packaging (lb): 55.12 • VESA wall mount compatible: 400 x 200 mm Accessories • Included accessories: Table top stand, Power cord, Quick start guide, User Manual, Registration card, Remote Control, Batteries for remote control • Tuner/Reception/Transmission • Aerial Input...
... change without notice. LCD TV with stand in inch (W x H x D): 39.06 x 26.22 x 9.37 inch Issue date 2010-09-06 Version: 1.2.2 12 NC: 8670 000 60515 UPC: 6 09585 18619 4 © 2010 Koninklijke Philips Electronics N.V. Packaging (lb): 55.12 • VESA wall mount compatible: 400 x 200 mm Accessories • Included accessories: Table top stand, Power cord, Quick start guide, User Manual, Registration card, Remote Control, Batteries for remote control • Tuner/Reception/Transmission • Aerial Input...


