
Leaflet
Page 3
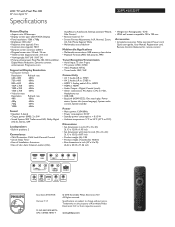
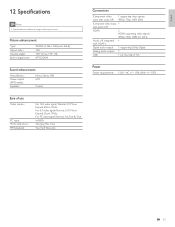
...; Video formats Resolution Refresh rate 480i 60Hz 480p 60Hz 720p 60Hz 1080i 60Hz Sound • Equalizer: 5-bands • Output power (RMS): 2 x 3W • Sound System: SRS TruSurround HD, Dolby Digital (AC-3), Stereo, SAP Loudspeakers • Built-in speakers: 2 Convenience • Child Protection: Child Lock+Parental Control • Clock: Sleep Timer • Ease of Installation: Autostore • Ease of Koninklijke Philips Electronics N.V. Specifications are the property of Use: Auto Volume Leveller...
...; Video formats Resolution Refresh rate 480i 60Hz 480p 60Hz 720p 60Hz 1080i 60Hz Sound • Equalizer: 5-bands • Output power (RMS): 2 x 3W • Sound System: SRS TruSurround HD, Dolby Digital (AC-3), Stereo, SAP Loudspeakers • Built-in speakers: 2 Convenience • Child Protection: Child Lock+Parental Control • Clock: Sleep Timer • Ease of Installation: Autostore • Ease of Koninklijke Philips Electronics N.V. Specifications are the property of Use: Auto Volume Leveller...
User manual
Page 2
... remote control batteries Connecting the antenna or cable Managing cables Plugging in the AC power cord Switching on and initial setup 5 Use your TV Switching your TV on / off or to standby Switching channels Adjusting volume Still mode Watching channels from a set-top box Watching connected devices Watching a Blu-ray disc Switching audio mode 6 Use more of your TV Changing picture and sound settings Sleeptimer Child and rating locks Closed caption EasyLink Energy saving mode Set your location to home View photos and play music on a USB device 7 Install channels Selecting your menu...
... remote control batteries Connecting the antenna or cable Managing cables Plugging in the AC power cord Switching on and initial setup 5 Use your TV Switching your TV on / off or to standby Switching channels Adjusting volume Still mode Watching channels from a set-top box Watching connected devices Watching a Blu-ray disc Switching audio mode 6 Use more of your TV Changing picture and sound settings Sleeptimer Child and rating locks Closed caption EasyLink Energy saving mode Set your location to home View photos and play music on a USB device 7 Install channels Selecting your menu...
User manual
Page 4
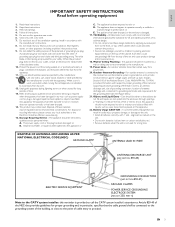
... building, as vases should not be connected to a wall or ceiling only as marked on this apparatus should not be located away from the apparatus. 11. Clean only with the manufacturer's instructions. 8. Do not install near water. 6. A polarized plug has two blades with the apparatus. Use only with a cart, stand, tripod, bracket, or table specified by placing electronic...
... building, as vases should not be connected to a wall or ceiling only as marked on this apparatus should not be located away from the apparatus. 11. Clean only with the manufacturer's instructions. 8. Do not install near water. 6. A polarized plug has two blades with the apparatus. Use only with a cart, stand, tripod, bracket, or table specified by placing electronic...
User manual
Page 5
... delivering the best possible picture using the factory installed home mode settings. Changing or enabling other than two years of color pixels. Portions of the following measures : • Reorient or relocate the receiving antenna. • Increase the separation between the equipment and the receiver. • Connect the equipment into an outlet on the Philips support website as soon as a result of their respective owners. Philips warrants that...
... delivering the best possible picture using the factory installed home mode settings. Changing or enabling other than two years of color pixels. Portions of the following measures : • Reorient or relocate the receiving antenna. • Increase the separation between the equipment and the receiver. • Connect the equipment into an outlet on the Philips support website as soon as a result of their respective owners. Philips warrants that...
User manual
Page 8
... 15). k Number buttons Select a channel, page or setting. o MENU / EXIT Turns the menu on page 16). p BACK Returns to pause screen image. r AUTO PIC Cycles through preset picture settings (see a difference in broadcast time if the broadcast is from a different time zone. EN 7 English e FREEZE Press to a previous screen. c FORMAT Selects a picture format (see 'Changing auto sound mode' on page 17). Analog Mode (TV) • Press to the next or previous channel. i CH + / Switches to...
... 15). k Number buttons Select a channel, page or setting. o MENU / EXIT Turns the menu on page 16). p BACK Returns to pause screen image. r AUTO PIC Cycles through preset picture settings (see a difference in broadcast time if the broadcast is from a different time zone. EN 7 English e FREEZE Press to a previous screen. c FORMAT Selects a picture format (see 'Changing auto sound mode' on page 17). Analog Mode (TV) • Press to the next or previous channel. i CH + / Switches to...
User manual
Page 10
... HDMI source by using SOURCE on your cable provider). EN 9 Contact your local content provider or your local electronics retailer if you connect a set-top box through an antenna connection. Broadcasters are transitioning from analog to a cable box or satellite set-top box via component video input, make sure you might receive free digital and high definition programs (depending on this unit's remote control. The TV produces stereo sound only if a stereo signal is connected...
... HDMI source by using SOURCE on your cable provider). EN 9 Contact your local content provider or your local electronics retailer if you connect a set-top box through an antenna connection. Broadcasters are transitioning from analog to a cable box or satellite set-top box via component video input, make sure you might receive free digital and high definition programs (depending on this unit's remote control. The TV produces stereo sound only if a stereo signal is connected...
User manual
Page 12
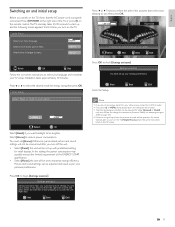
... requirement of the pictures that you press . Initial Setup Select your location. Installation takes approximately 10 minutes. Select [Home] to begin [Settings assistant]. then press OK. Left side Right side 1/5 Select the picture setting that is properly connected. BACK Back MENU Exit Note • If you are not receiving a signal from the antenna terminal and no signal input from your personal preferences. POWER at the...
... requirement of the pictures that you press . Initial Setup Select your location. Installation takes approximately 10 minutes. Select [Home] to begin [Settings assistant]. then press OK. Left side Right side 1/5 Select the picture setting that is properly connected. BACK Back MENU Exit Note • If you are not receiving a signal from the antenna terminal and no signal input from your personal preferences. POWER at the...

User manual
Page 16
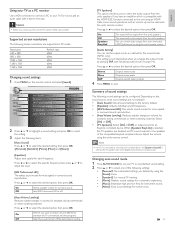
.... Otherwise, personalized picture and sound settings will automatically adjust the brightness based on the remote control. 2 Press OK to changes in an image. • [Sharpness] : Adjusts the level of the PC screen. If there is not blocked. • [Contrast] : Adjusts the intensity of bright areas, keeping dark areas unchanged. • [Color] : Adjusts color saturation. • [Tint] : Adjusts the color balance in the room lighting conditions (sunshine / lamps...
.... Otherwise, personalized picture and sound settings will automatically adjust the brightness based on the remote control. 2 Press OK to changes in an image. • [Sharpness] : Adjusts the level of the PC screen. If there is not blocked. • [Contrast] : Adjusts the intensity of bright areas, keeping dark areas unchanged. • [Color] : Adjusts color saturation. • [Tint] : Adjusts the color balance in the room lighting conditions (sunshine / lamps...
User manual
Page 18
... your PC, set the PC monitor refresh rate to 60Hz. For sound, add an audio cable with this unit's remote control. [Audio Setting] You can set your connected HDMI link devices by using an HDMI cable, some sound settings are disabled and TV sound outputs to the speakers of sound settings The following items. [Auto Sound] Press Î or ï to this unit using this unit's remote control. Stereo Mono SAP Outputs stereo-audio Outputs mono-audio Outputs second audio program 4 Press MENU to select the...
... your PC, set the PC monitor refresh rate to 60Hz. For sound, add an audio cable with this unit's remote control. [Audio Setting] You can set your connected HDMI link devices by using an HDMI cable, some sound settings are disabled and TV sound outputs to the speakers of sound settings The following items. [Auto Sound] Press Î or ï to this unit using this unit's remote control. Stereo Mono SAP Outputs stereo-audio Outputs mono-audio Outputs second audio program 4 Press MENU to select the...
User manual
Page 19
.... Picture Sound Setup Features Language USB T V- Y 7 T V- G T V- Using the TV ratings lock Your TV is blocked. • An empty box indicates that some content ratings are automatically blocked. 3 Press MENU to individual programs based on the Number buttons, of time. Changing your PIN again to confirm. 4 Press MENU to standby after a set up for checking by 30 minutes. • After setup, the sleep timer display can be selected but the screen...
.... Picture Sound Setup Features Language USB T V- Y 7 T V- G T V- Using the TV ratings lock Your TV is blocked. • An empty box indicates that some content ratings are automatically blocked. 3 Press MENU to individual programs based on the Number buttons, of time. Changing your PIN again to confirm. 4 Press MENU to standby after a set up for checking by 30 minutes. • After setup, the sleep timer display can be selected but the screen...
User manual
Page 21
... for digital captions, and press OK to select the option. 3 Press Î or ï to highlight a setting for analog channels : • Press MENU on the remote control and select [Features] > [Closed Caption] > [Caption Service]. • Press Î or ï to select one of these before changing any consumer information and manuals / guides on closed captions on DTV programming, including HDTV, received from your subscription television provider, you do not always use them...
... for digital captions, and press OK to select the option. 3 Press Î or ï to highlight a setting for analog channels : • Press MENU on the remote control and select [Features] > [Closed Caption] > [Caption Service]. • Press Î or ï to select one of these before changing any consumer information and manuals / guides on closed captions on DTV programming, including HDTV, received from your subscription television provider, you do not always use them...
User manual
Page 26
... want to be added using [Add channels] might not work for Ch Up/Down key selection. Note • If setup completes successfully, [Added to the channel list] is displayed. • If external input is used, it is too weak for the TV to add, then press OK. 11 Picture Sound Setup Features Language USB Highlight channels for direct cable connections and if the digital signal is not possible to...
... want to be added using [Add channels] might not work for Ch Up/Down key selection. Note • If setup completes successfully, [Added to the channel list] is displayed. • If external input is used, it is too weak for the TV to add, then press OK. 11 Picture Sound Setup Features Language USB Highlight channels for direct cable connections and if the digital signal is not possible to...
User manual
Page 27
... the TV to switch off the TV. 3 Connect your USB device to the service terminal on the side of the TV to find information. Picture Back Sound Setup Features Release Version: XXXXXXX_XXX_X_XXXX Language USB 2 Press MENU to the root directory of your TV (e.g. 22PFL4505D) to switch off while upgrade is supported. • New software can be downloaded from www.philips.com • Use only software upgrades that can...
... the TV to switch off the TV. 3 Connect your USB device to the service terminal on the side of the TV to find information. Picture Back Sound Setup Features Release Version: XXXXXXX_XXX_X_XXXX Language USB 2 Press MENU to the root directory of your TV (e.g. 22PFL4505D) to switch off while upgrade is supported. • New software can be downloaded from www.philips.com • Use only software upgrades that can...
User manual
Page 29
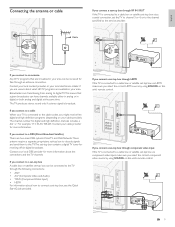
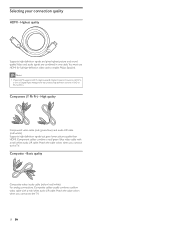
... connect to the TV. 28 EN Basic quality Composite video / audio cable (yellow / red / white) For analog connections. Highest quality Supports high-definition signals and gives highest picture and sound quality.Video and audio signals are combined in DVD or Blu-ray Discs. Component cables combine a red / green / blue video cable with a red / white audio L/R cable. Composite cables usually combine a yellow video cable with a red / white audio L/R cable. Match the cable colors when you connect to enable Philips EasyLink. Composite - Selecting your connection quality HDMI...
... connect to the TV. 28 EN Basic quality Composite video / audio cable (yellow / red / white) For analog connections. Highest quality Supports high-definition signals and gives highest picture and sound quality.Video and audio signals are combined in DVD or Blu-ray Discs. Component cables combine a red / green / blue video cable with a red / white audio L/R cable. Composite cables usually combine a yellow video cable with a red / white audio L/R cable. Match the cable colors when you connect to enable Philips EasyLink. Composite - Selecting your connection quality HDMI...
User manual
Page 30
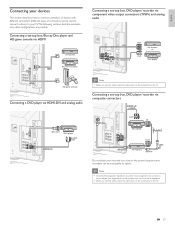
... loudspeaker reproduces sound for sound reproduction via component video output connectors (YPbPr) and analog audio IN IN YPbPr AUDIO L/R OUT OUT Set-top box or DVD player Note • When you connect cables, match the cable colors to the connectors on the TV. Connecting a set-top box, Blu-ray Disc player and HD game console via HDMI OUT Set-top box IN IN HDMI HDMI Blu-ray Disc player OUT HD game console Connecting a DVD player via HDMI-DVI and analog audio HDMI 1 IN only...
... loudspeaker reproduces sound for sound reproduction via component video output connectors (YPbPr) and analog audio IN IN YPbPr AUDIO L/R OUT OUT Set-top box or DVD player Note • When you connect cables, match the cable colors to the connectors on the TV. Connecting a set-top box, Blu-ray Disc player and HD game console via HDMI OUT Set-top box IN IN HDMI HDMI Blu-ray Disc player OUT HD game console Connecting a DVD player via HDMI-DVI and analog audio HDMI 1 IN only...
User manual
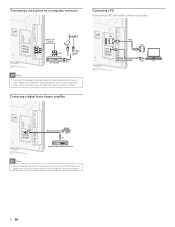
Page 31
... mute PCM audio over Digital Audio Output for mono equipment. AUDIO L/R + VIDEO IN OUT CABLE Set-top box RF IN Note • Only the left loudspeaker reproduces sound for certain channels, shows or segments during the broadcast. 30 EN Use a mono to stereo adapter (not supplied) for sound reproduction via a composite connector Connecting a PC If you connect cables, match the cable colors to the connectors on the TV. Connecting a set-top box via...
... mute PCM audio over Digital Audio Output for mono equipment. AUDIO L/R + VIDEO IN OUT CABLE Set-top box RF IN Note • Only the left loudspeaker reproduces sound for certain channels, shows or segments during the broadcast. 30 EN Use a mono to stereo adapter (not supplied) for sound reproduction via a composite connector Connecting a PC If you connect cables, match the cable colors to the connectors on the TV. Connecting a set-top box via...
User manual
Page 32
... HDMI connections, some accessory devices, the picture format must be replaced. Check if [Sound] > [TV Speakers] > [Off] is connected as described in your problem, refer to the wall via component cables. Alternatively, you press the remote control buttons. EN 31 English Reset the accessory device and the TV. Select the HDMI channel. Connect an audio cable to an accessory device via a coaxial connection, perform the auto-installation again. TV does not respond to a different power...
... HDMI connections, some accessory devices, the picture format must be replaced. Check if [Sound] > [TV Speakers] > [Off] is connected as described in your problem, refer to the wall via component cables. Alternatively, you press the remote control buttons. EN 31 English Reset the accessory device and the TV. Select the HDMI channel. Connect an audio cable to an accessory device via a coaxial connection, perform the auto-installation again. TV does not respond to a different power...
User manual
Page 34
... to change without prior notice. Picture enhancement Type : Aspect ratio : Viewing angles : Built-in digital tuner : WXGA (1366 x 768 pixels 60Hz) 16:9 160° (V) by 170° (H) ATSC/QAM Sound enhancement Mono/Stereo : Power output (RMS watts) : Equalizer : Mono, Stereo, SRS 6 W 5 band Ease of use Video modes : PC input : Photo slide show : MP3 playback : For 16:9 video signal / Normal, 4:3, Movie Expand, Zoom, Wide For 4:3 video signal / Normal...
... to change without prior notice. Picture enhancement Type : Aspect ratio : Viewing angles : Built-in digital tuner : WXGA (1366 x 768 pixels 60Hz) 16:9 160° (V) by 170° (H) ATSC/QAM Sound enhancement Mono/Stereo : Power output (RMS watts) : Equalizer : Mono, Stereo, SRS 6 W 5 band Ease of use Video modes : PC input : Photo slide show : MP3 playback : For 16:9 video signal / Normal, 4:3, Movie Expand, Zoom, Wide For 4:3 video signal / Normal...
User manual
Page 35
... repair of antenna/signal source systems outside of the product. • Product repair and/or part replacement because of improper installation or maintenance, connections to improper voltage supply, power line surge, lightning damage, retained images or screen markings resulting from viewing fixed stationary content for commercial or institutional purposes (including but not limited to rental purposes). • Product lost software. • Damage from the date...
... repair of antenna/signal source systems outside of the product. • Product repair and/or part replacement because of improper installation or maintenance, connections to improper voltage supply, power line surge, lightning damage, retained images or screen markings resulting from viewing fixed stationary content for commercial or institutional purposes (including but not limited to rental purposes). • Product lost software. • Damage from the date...
User manual
Page 36
14 Index A Antenna, connect Audio Audio setting Auto device off Auto picture mode Auto sound mode Auto TV on Auto volume leveling C Cables component composite connection quality HDMI manage cables YPbPr Channels install list lock Child lock channel lock PIN ratings lock Closed caption Connections Controls Customer support service D Device List E EasyLink Energy saving mode ENERGY STAR® Environmental care Equalizer H Home mode I Initial setup L Location (retail or home) M Master EasyLink Mounting stand onto TV P Picture format Picture settings 9 17 17 21 15 17 21 17 28 28 28 28 10 28 24 ...
14 Index A Antenna, connect Audio Audio setting Auto device off Auto picture mode Auto sound mode Auto TV on Auto volume leveling C Cables component composite connection quality HDMI manage cables YPbPr Channels install list lock Child lock channel lock PIN ratings lock Closed caption Connections Controls Customer support service D Device List E EasyLink Energy saving mode ENERGY STAR® Environmental care Equalizer H Home mode I Initial setup L Location (retail or home) M Master EasyLink Mounting stand onto TV P Picture format Picture settings 9 17 17 21 15 17 21 17 28 28 28 28 10 28 24 ...


