
User manual
Page 1
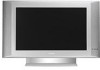
User Manual 15PF8946/37 17PF8946/37 20PF8946/37 23PF8946/37 LCD TV Thank you may access our online help fast? Model No.: Serial No.: 3139 125 33252 If you have read your instructions and still need assistance you for quick tips that make using your Philips product more enjoyable. Read your product. Need help at www.p4c.philips.com or call 1- 8888 - PHILIPS (744 - 5477) while with your User Manual and/or Quick-Use Guide first for choosing Philips.
User Manual 15PF8946/37 17PF8946/37 20PF8946/37 23PF8946/37 LCD TV Thank you may access our online help fast? Model No.: Serial No.: 3139 125 33252 If you have read your instructions and still need assistance you for quick tips that make using your Philips product more enjoyable. Read your product. Need help at www.p4c.philips.com or call 1- 8888 - PHILIPS (744 - 5477) while with your User Manual and/or Quick-Use Guide first for choosing Philips.
User manual
Page 5
...TV. Audio Volume Leveler (AVL) Control keeps the TV sound at the same time 15 Blocking programs based on Movie Ratings 16 Blocking programs based on TV Ratings 17... This owner's manual is only one 75Π (ohm) antenna plug on the back of TV 5 Timer allows ...TV to turn the TV on. Copyright 2001 Philips Consumer Electronics. *Manufactured under license from the list stored in to the wall outlet and turn the TV on. Color TV Quick Use and Setup Guide CONTENTS Important Notice/Warning 1 Making Basic TV Connections Basic Cable TV Connections 1 Basic Antenna TV Connections 1 Basic TV...
...TV. Audio Volume Leveler (AVL) Control keeps the TV sound at the same time 15 Blocking programs based on Movie Ratings 16 Blocking programs based on TV Ratings 17... This owner's manual is only one 75Π (ohm) antenna plug on the back of TV 5 Timer allows ...TV to turn the TV on. Copyright 2001 Philips Consumer Electronics. *Manufactured under license from the list stored in to the wall outlet and turn the TV on. Color TV Quick Use and Setup Guide CONTENTS Important Notice/Warning 1 Making Basic TV Connections Basic Cable TV Connections 1 Basic Antenna TV Connections 1 Basic TV...

User manual
Page 23
...of installed channels (the cur- 4 1 rent channel will be highlighted). 2 Press the CURSOR UP or DOWN buttons to scroll the list of this manual for . Program List 2 3 4 Ñ5 É 6 HOW TO SET THE ACTIVE CONTROL The Active Control monitors and adjusts incoming video signals to... activate the channel. TV Menu Picture Sound Features Install Mode 1 Press the MENU button on -screen menu. 2 Press the CURSOR DOWN to highlight Features. 6 3 Press the ...
...of installed channels (the cur- 4 1 rent channel will be highlighted). 2 Press the CURSOR UP or DOWN buttons to scroll the list of this manual for . Program List 2 3 4 Ñ5 É 6 HOW TO SET THE ACTIVE CONTROL The Active Control monitors and adjusts incoming video signals to... activate the channel. TV Menu Picture Sound Features Install Mode 1 Press the MENU button on -screen menu. 2 Press the CURSOR DOWN to highlight Features. 6 3 Press the ...
User manual
Page 26
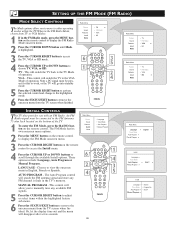
...antenna signal and store any available FM signals. 5 Press the CURSOR RIGHT button to adjust or select items within the TV. TV - MANUAL PROGRAM - These options include: Language, Auto Program or Manual Program. The Auto Program control will allow you with an FM Radio. Note a PC signal must be present for... this to work, or the TV will switch the TV to the VGA Mode of operation. Manual Program É SETTING UP THE FM MODE (FM RADIO) MODE SELECT CONTROLS The Mode options allow you to...
...antenna signal and store any available FM signals. 5 Press the CURSOR RIGHT button to adjust or select items within the TV. TV - MANUAL PROGRAM - These options include: Language, Auto Program or Manual Program. The Auto Program control will allow you with an FM Radio. Note a PC signal must be present for... this to work, or the TV will switch the TV to the VGA Mode of operation. Manual Program É SETTING UP THE FM MODE (FM RADIO) MODE SELECT CONTROLS The Mode options allow you to...
User manual
Page 38
...and Care 37 FM Radio Mode Controls AutoSound™ Control 29 Install Menu Controls Auto Program Control 26 Language Control 26 Manual Store Control 26 Mode Select Control 26 Screensaver Control 29 Sound Adjustment Controls AVL (Auto Volume Leveler) Control 28 Balance ... Controls 33 Sound Adjustment Controls 34 Index 38 VGA Mode Controls Audio Selection Controls 30 VGA Feature Controls 31 Picture Adjustment Controls 30 TV Ratings 17 Understanding the AutoLock™ Control 11 AutoSound™ Control 25 Auto Program Control 7 AutoPicture™ Control 25 AVL (Auto Volume ...
...and Care 37 FM Radio Mode Controls AutoSound™ Control 29 Install Menu Controls Auto Program Control 26 Language Control 26 Manual Store Control 26 Mode Select Control 26 Screensaver Control 29 Sound Adjustment Controls AVL (Auto Volume Leveler) Control 28 Balance ... Controls 33 Sound Adjustment Controls 34 Index 38 VGA Mode Controls Audio Selection Controls 30 VGA Feature Controls 31 Picture Adjustment Controls 30 TV Ratings 17 Understanding the AutoLock™ Control 11 AutoSound™ Control 25 Auto Program Control 7 AutoPicture™ Control 25 AVL (Auto Volume ...
Quick start guide (English)
Page 2
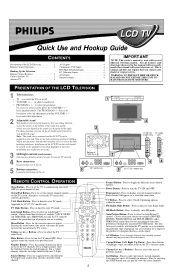
... to access the next or previous channel. Installation of the LCD TV on the right). 2 For tilting function, you can be installed on the TV screen. VGA Mode Button - Choose from the TV screen. Press to 10 channels in this manual will appear as to appear. Source Button - Program List ...VOLUME + / - : to adjust sound level. • PROGRAM + /- : to turn the TV ON and OFF. Appicable to access the four installing interfaces. Pull out the back plate cover to 15"/17"/23" models only. Press again to return the sound to directly enter PC mode. Each channel...
... to access the next or previous channel. Installation of the LCD TV on the right). 2 For tilting function, you can be installed on the TV screen. VGA Mode Button - Choose from the TV screen. Press to 10 channels in this manual will appear as to appear. Source Button - Program List ...VOLUME + / - : to adjust sound level. • PROGRAM + /- : to turn the TV ON and OFF. Appicable to access the four installing interfaces. Pull out the back plate cover to 15"/17"/23" models only. Press again to return the sound to directly enter PC mode. Each channel...
Quick start guide (English)
Page 4
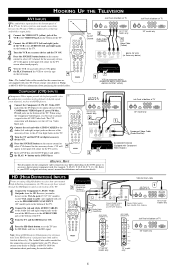
... the DVD player and press the PLAY É button on the DVD Player Jack Panel at bottom of TV Jack Panel at bottom of TV 15"/17"/23" models only 2 Audio Cables 1 (Red/White) S-VIDEO VIDEO AUDIO OUT OUT R OUT L COMP VIDEO Y Pr Pb 20" model only ...531-0039 for information about purchasing the needed cables. Refer to your dealer or Philips at 800-531-0039 for information about purchasing the needed cables. Y, B-Y, R-Y; Please contact your DVD or digital accessory owner's manual for definitions and connection details. VGA to Cinch cable 3 HD RECEIVER (Equipped ...
... the DVD player and press the PLAY É button on the DVD Player Jack Panel at bottom of TV Jack Panel at bottom of TV 15"/17"/23" models only 2 Audio Cables 1 (Red/White) S-VIDEO VIDEO AUDIO OUT OUT R OUT L COMP VIDEO Y Pr Pb 20" model only ...531-0039 for information about purchasing the needed cables. Refer to your dealer or Philips at 800-531-0039 for information about purchasing the needed cables. Y, B-Y, R-Y; Please contact your DVD or digital accessory owner's manual for definitions and connection details. VGA to Cinch cable 3 HD RECEIVER (Equipped ...

Quick start guide (English)
Page 5
... the R and L audio input jacks on your sound system or to your dealer or Philips at REAR of the TV. 3 Turn the Accessory Device and the TV ON. 4 Press the SOURCE button button on the remote control to select AV2 channel for items such as a PC Monitor. HOOKING UP THE ... Cable Audio Cable 2 17"/20"/23" models only 15" model only AV2 (SIDE) INPUTS M uch like the AV1 jacks, the AV2 jacks allow for extra accessory device connections for the accessory device. Note : For the display resolutions available to your TV, refer to the Operating Instruction Manual Please contact your headphone ...
... the R and L audio input jacks on your sound system or to your dealer or Philips at REAR of the TV. 3 Turn the Accessory Device and the TV ON. 4 Press the SOURCE button button on the remote control to select AV2 channel for items such as a PC Monitor. HOOKING UP THE ... Cable Audio Cable 2 17"/20"/23" models only 15" model only AV2 (SIDE) INPUTS M uch like the AV1 jacks, the AV2 jacks allow for extra accessory device connections for the accessory device. Note : For the display resolutions available to your TV, refer to the Operating Instruction Manual Please contact your headphone ...


