User manual
Page 3
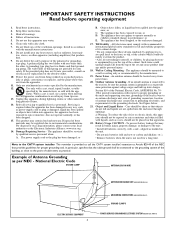
... for the grounding electrode. National Electric Code GROUND CLAMP ANTENNA LEAD IN WIRE ELECTRIC SERVICE EQUIPMENT 3 ANTENNA DISCHARGE UNIT (NEC SECTION 810-20) GROUNDING CONDUCTORS (NEC SECTION 810-21) GROUND CLAMPS POWER SERVICE GROUNDING ELECTRODE SYSTEM (NEC ART 250, PART H) IMPORTANT SAFETY INSTRUCTIONS Read before operating equipment 1. Use only with a cart, stand, tripod, bracket, or table specified by placing electronic equipment/toys on...
... for the grounding electrode. National Electric Code GROUND CLAMP ANTENNA LEAD IN WIRE ELECTRIC SERVICE EQUIPMENT 3 ANTENNA DISCHARGE UNIT (NEC SECTION 810-20) GROUNDING CONDUCTORS (NEC SECTION 810-21) GROUND CLAMPS POWER SERVICE GROUNDING ELECTRODE SYSTEM (NEC ART 250, PART H) IMPORTANT SAFETY INSTRUCTIONS Read before operating equipment 1. Use only with a cart, stand, tripod, bracket, or table specified by placing electronic equipment/toys on...
User manual
Page 4
... LCD TV is installed on the wall, installation should be recycled. the set is left exposed for companies that can cause damage to the LCD screen and elec trically parts. Condensation can be carried out by qualified servicemen. PRECAUTIONS ADDITIONAL SAFETY PRECAUTIONS • ENSURE that LCD TV stand is tightened properly to the set (See Quick Guide on the right way of tightening of the screw...
... LCD TV is installed on the wall, installation should be recycled. the set is left exposed for companies that can cause damage to the LCD screen and elec trically parts. Condensation can be carried out by qualified servicemen. PRECAUTIONS ADDITIONAL SAFETY PRECAUTIONS • ENSURE that LCD TV stand is tightened properly to the set (See Quick Guide on the right way of tightening of the screw...
User manual
Page 5
... or daily like an alarm clock. Color TV Quick Use and Setup Guide CONTENTS Important Notice/Warning 1 Making Basic TV Connections Basic Cable TV Connections 1 Basic Antenna TV Connections 1 Basic TV Operation 2 Remote Battery Installation 2 Remote Control Button Descriptions 2 How to Use the Installation Features 3-4 Using the Language Control 3 Setting the Tuner Mode Control 3 How to Automatically Program Channels 3 How to Add and Delete Channels 4 How to set to the TV. Audio/Video Jack Panel allows direct connections with your antenna has flat, twin-lead wire (300 ohm...
... or daily like an alarm clock. Color TV Quick Use and Setup Guide CONTENTS Important Notice/Warning 1 Making Basic TV Connections Basic Cable TV Connections 1 Basic Antenna TV Connections 1 Basic TV Operation 2 Remote Battery Installation 2 Remote Control Button Descriptions 2 How to Use the Installation Features 3-4 Using the Language Control 3 Setting the Tuner Mode Control 3 How to Automatically Program Channels 3 How to Add and Delete Channels 4 How to set to the TV. Audio/Video Jack Panel allows direct connections with your antenna has flat, twin-lead wire (300 ohm...
User manual
Page 6
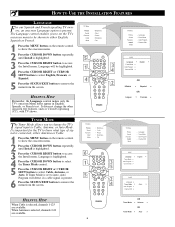
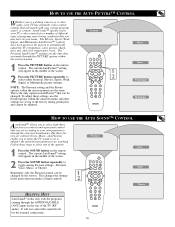
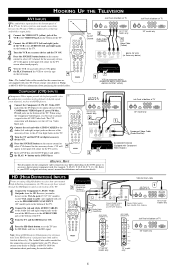
.... It does not change the TV's signal input to remove the menu from the screen. If Tuner Mode is selected, channels 2-69 are available. HOW TO USE THE INSTALLATION FEATURES LANGUAGE For our Spanish and French-speaking TV owners, an onscreen Language option is highlighted. 3 Press the CURSOR RIGHT button to select Cable, Antenna, or Auto. It s important for the TV to know what type of signal is connected, either English, Spanish...
.... It does not change the TV's signal input to remove the menu from the screen. If Tuner Mode is selected, channels 2-69 are available. HOW TO USE THE INSTALLATION FEATURES LANGUAGE For our Spanish and French-speaking TV owners, an onscreen Language option is highlighted. 3 Press the CURSOR RIGHT button to select Cable, Antenna, or Auto. It s important for the TV to know what type of signal is connected, either English, Spanish...
User manual
Page 7
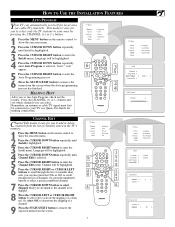
... a specific numbered channel. 7 Press the CURSOR DOWN button to select only the TV stations in the TV's memory. 1 Press the MENU button on the remote control to remove the onscreen menu from the screen when the Auto programming process has finished. This makes it easy for making connections. Channel will be highlighted. 6 Press the CURSOR RIGHT or CURSOR LEFT buttons to enter the Install menu. to enter the Install menu. TV Menu Picture Sound Features Install Mode Brightness Color Picture...
... a specific numbered channel. 7 Press the CURSOR DOWN button to select only the TV stations in the TV's memory. 1 Press the MENU button on the remote control to remove the onscreen menu from the screen when the Auto programming process has finished. This makes it easy for making connections. Channel will be highlighted. 6 Press the CURSOR RIGHT or CURSOR LEFT buttons to enter the Install menu. to enter the Install menu. TV Menu Picture Sound Features Install Mode Brightness Color Picture...
User manual
Page 10
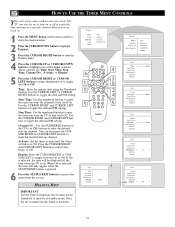
... CURSOR LEFT buttons to turn itself On. buttons to a specific channel when it powers itself Off. You can also be turned off at standby mode. TV Menu Picture Sound Features Install Mode Timer Autolock Contrast + Active Control 4 6 3 1 5 5 2 4 5 5 Timer Time É Start Time É Stop Time É Channel No. É Activate Ñ Display É Once ▼ É Features Timer É Autolock É Contrast + É Active Control É Time Start Time Stop Time Channel No. These controls are Time, Start Time, Stop Time, Channel No., Activate...
... CURSOR LEFT buttons to turn itself On. buttons to a specific channel when it powers itself Off. You can also be turned off at standby mode. TV Menu Picture Sound Features Install Mode Timer Autolock Contrast + Active Control 4 6 3 1 5 5 2 4 5 5 Timer Time É Start Time É Stop Time É Channel No. É Activate Ñ Display É Once ▼ É Features Timer É Autolock É Contrast + É Active Control É Time Start Time Stop Time Channel No. These controls are Time, Start Time, Stop Time, Channel No., Activate...
User manual
Page 12
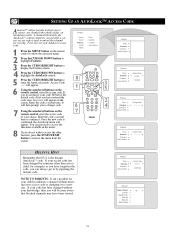
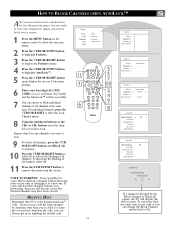
SETTING UP AN AUTOLOCK™ ACCESS CODE AutoLockTM allows parents to confirm it to change code. 7 Using the numbered buttons on the screen. It will then prompt you can proceed to access the functions available in by inputting the default code. TV Menu Picture Sound Features Install Mode Timer Autolock Contrast + Active Control 8 1 3 5 2 6 4 7 Features Timer É Autolock É Contrast + É Active Control É Features Timer É Access Code Autolock É Ñ Contrast + É Active Control É **** É Incorrect Features...
SETTING UP AN AUTOLOCK™ ACCESS CODE AutoLockTM allows parents to confirm it to change code. 7 Using the numbered buttons on the screen. It will then prompt you can proceed to access the functions available in by inputting the default code. TV Menu Picture Sound Features Install Mode Timer Autolock Contrast + Active Control 8 1 3 5 2 6 4 7 Features Timer É Autolock É Contrast + É Active Control É Features Timer É Access Code Autolock É Ñ Contrast + É Active Control É **** É Incorrect Features...
User manual
Page 13
... button to remove the menu from the screen. NOTE TO PARENTS: It isn t possible for any channels you wish to lock. TV Menu Picture Sound Features Install Mode • Timer • Autolock • Contrast + Active Control Features Timer É Autolock É Contrast + É Active Control É 11 1 6 3 5 7 10 2 4 9 8 Features Timer É Autolock É Contrast + É Active Control É Access Code - - - - HELPFUL HINT Remember that blocked channels may have forgotten the code, you want to lock...
... button to remove the menu from the screen. NOTE TO PARENTS: It isn t possible for any channels you wish to lock. TV Menu Picture Sound Features Install Mode • Timer • Autolock • Contrast + Active Control Features Timer É Autolock É Contrast + É Active Control É 11 1 6 3 5 7 10 2 4 9 8 Features Timer É Autolock É Contrast + É Active Control É Access Code - - - - HELPFUL HINT Remember that blocked channels may have forgotten the code, you want to lock...
User manual
Page 15
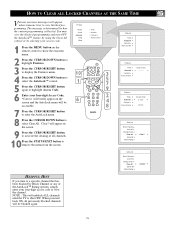
... highlight Access Code. 6 Enter your four-digit access code to view the channel. TV Menu Picture Sound Features Install Mode 10 1 6 Timer Autolock Contrast + Active Control 3 5 7 9 2 4 8 HELPFUL HINT If you tune to select Clear All. The message is shut OFF. will appear on the screen and the AutoLock menu will appear when someone tries to remove the menu from the screen. When powered back ON, all channels. 10Press the STATUS/EXIT button to view blocked programming.
... highlight Access Code. 6 Enter your four-digit access code to view the channel. TV Menu Picture Sound Features Install Mode 10 1 6 Timer Autolock Contrast + Active Control 3 5 7 9 2 4 8 HELPFUL HINT If you tune to select Clear All. The message is shut OFF. will appear on the screen and the AutoLock menu will appear when someone tries to remove the menu from the screen. When powered back ON, all channels. 10Press the STATUS/EXIT button to view blocked programming.
User manual
Page 16
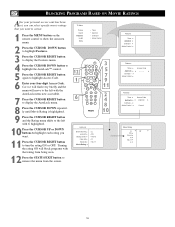
... CURSOR RIGHT button to remove the menu from the screen. TV Menu Picture Sound Features Install Mode Timer Autolock Contrast + Active Control 3 12 5 7 1 9 11 6 2 4 8 10 AutoLock ▼ Block Channel É • G Lock HD É • PG Change Code É • PG-13 Clear All É • R Block All É • NC-17 Movie Rating É Features Timer É Autolock É Contrast + É Active Control É Features Timer É Access Code Autolock Contrast...
... CURSOR RIGHT button to remove the menu from the screen. TV Menu Picture Sound Features Install Mode Timer Autolock Contrast + Active Control 3 12 5 7 1 9 11 6 2 4 8 10 AutoLock ▼ Block Channel É • G Lock HD É • PG Change Code É • PG-13 Clear All É • R Block All É • NC-17 Movie Rating É Features Timer É Autolock É Contrast + É Active Control É Features Timer É Access Code Autolock Contrast...
User manual
Page 22
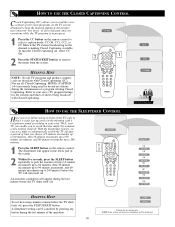
... operation. 22 Goodbye Sleep 9 During the last minute of time you to avoid that discomfort by pressing any button during the last minute before the TV shuts itself off , select CC Off. 2 Press the STATUS/EXIT button to select a caption mode: CC Off, CC1, CC2, or CC Mute if the TV station broadcasting on the remote control to remove the menu from the screen. Sleep...
... operation. 22 Goodbye Sleep 9 During the last minute of time you to avoid that discomfort by pressing any button during the last minute before the TV shuts itself off , select CC Off. 2 Press the STATUS/EXIT button to select a caption mode: CC Off, CC1, CC2, or CC Mute if the TV station broadcasting on the remote control to remove the menu from the screen. Sleep...
User manual
Page 25
... programs coming through the ANTENNA/CABLE (ANT) input on the rear of the screen. 2 Press the SOUND button repeatedly to select from three factory-set controls and a personal control that you set according to select either Personal, Movies, Sports, Weak Signal, or Multimedia picture settings. To adjust these steps to select any of the screen. 2 Press the PICTURE button repeatedly to your own preferences through the PICTURE options within the onscreen menu...
... programs coming through the ANTENNA/CABLE (ANT) input on the rear of the screen. 2 Press the SOUND button repeatedly to select from three factory-set controls and a personal control that you set according to select either Personal, Movies, Sports, Weak Signal, or Multimedia picture settings. To adjust these steps to select any of the screen. 2 Press the PICTURE button repeatedly to your own preferences through the PICTURE options within the onscreen menu...
User manual
Page 27
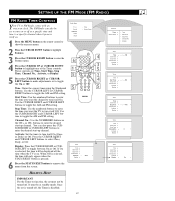
... button to highlight one of the Timer controls. Channel No. : Use the NUMBERED buttons or the CH + or CH- Radio Menu Picture Sound Features Install Mode Timer Screen Saver 4 6 3 1 5 5 2 4 5 5 Timer Time É Start Time É Stop Time É Channel No. É Activate Ñ Display É Once ▼ É 27 Features Timer É Screen Saver É Time Start Time Stop Time Channel No. buttons to toggle the AM and PM setting. It must not be displayed all the time when the TV...
... button to highlight one of the Timer controls. Channel No. : Use the NUMBERED buttons or the CH + or CH- Radio Menu Picture Sound Features Install Mode Timer Screen Saver 4 6 3 1 5 5 2 4 5 5 Timer Time É Start Time É Stop Time É Channel No. É Activate Ñ Display É Once ▼ É 27 Features Timer É Screen Saver É Time Start Time Stop Time Channel No. buttons to toggle the AM and PM setting. It must not be displayed all the time when the TV...
User manual
Page 30
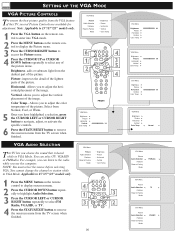
Allows you to remove the onscreen menu from the darkest part of the picture. VGA Menu Picture Audio Selection Features Reset to Factory Mode VGA/HD É You cannot change the channel or station while in VGA Mode. Picture- Vertical- Color Temp.- Note: Applicable to 15"/17"/23" models only. 1 Press the VGA button on the remote control to enter into VGA mode. 2 Press the MENU button on the remote control to display onscreen menu. 4 2 Press the CURSOR...
Allows you to remove the onscreen menu from the darkest part of the picture. VGA Menu Picture Audio Selection Features Reset to Factory Mode VGA/HD É You cannot change the channel or station while in VGA Mode. Picture- Vertical- Color Temp.- Note: Applicable to 15"/17"/23" models only. 1 Press the VGA button on the remote control to enter into VGA mode. 2 Press the MENU button on the remote control to display onscreen menu. 4 2 Press the CURSOR...

User manual
Page 36
... tuner set to the CABLE option and run the Auto Program feature to the VCR socket. Reconnect the S-Video socket of the Quick Use Guide for details. Remote Does Not Work • Check the batteries. If they properly secured to the TV's ANT 75P plug? • Check the TUNER MODE control for S-Video connection. TV Displays Wrong Channel or No Channels Above 13 • Repeat channel selection. • Add the desired channel numbers (using the CHANNEL EDIT control...
... tuner set to the CABLE option and run the Auto Program feature to the VCR socket. Reconnect the S-Video socket of the Quick Use Guide for details. Remote Does Not Work • Check the batteries. If they properly secured to the TV's ANT 75P plug? • Check the TUNER MODE control for S-Video connection. TV Displays Wrong Channel or No Channels Above 13 • Repeat channel selection. • Add the desired channel numbers (using the CHANNEL EDIT control...
Quick start guide (English)
Page 2
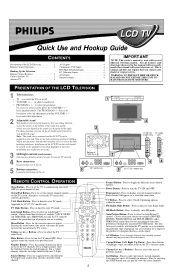
.... Not all features (and drawings) discussed in memory. TV Mode Button - Program List - Auto Picture Button - LCD TV Quick Use and Hookup Guide CONTENTS Presentation of the LCD Televison 2 Remote Control Operation 2 Hooking Up the Television Remote Control Batteries 3 Cable/Cable Box TV 3 Antenna TV 3 AV1 Inputs 4 Component (CVI) Inputs 4 HD (High Definition Inputs 4 PC (Monotor) Inputs 4 AV2 Inputs 4 Monitor Outputs 4 IMPORTANT NOTE: This owner's manual is normal and does not require that you can be installed on the wall should be carried out by pressing the SURF...
.... Not all features (and drawings) discussed in memory. TV Mode Button - Program List - Auto Picture Button - LCD TV Quick Use and Hookup Guide CONTENTS Presentation of the LCD Televison 2 Remote Control Operation 2 Hooking Up the Television Remote Control Batteries 3 Cable/Cable Box TV 3 Antenna TV 3 AV1 Inputs 4 Component (CVI) Inputs 4 HD (High Definition Inputs 4 PC (Monotor) Inputs 4 AV2 Inputs 4 Monitor Outputs 4 IMPORTANT NOTE: This owner's manual is normal and does not require that you can be installed on the wall should be carried out by pressing the SURF...
Quick start guide (English)
Page 3
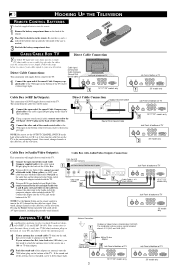
... TV. Once tuned, change channels at the cable box, not the television. Direct Cable Connections: This connection will scroll all the AV input channels, including the presently tuned channel. Screw it down finger tight. 1 15"/17"/23" models only Cable Box (w/RF In/Outputs): This connection will supply Stereo sound to the TV. 1 Connect the open end of the round Cable Company supplied cable to the cable signal IN(put ) plug on the cable box. The sound from Antenna 2 Jack Panel at bottom of TV...
... TV. Once tuned, change channels at the cable box, not the television. Direct Cable Connections: This connection will scroll all the AV input channels, including the presently tuned channel. Screw it down finger tight. 1 15"/17"/23" models only Cable Box (w/RF In/Outputs): This connection will supply Stereo sound to the TV. 1 Connect the open end of the round Cable Company supplied cable to the cable signal IN(put ) plug on the cable box. The sound from Antenna 2 Jack Panel at bottom of TV...
Quick start guide (English)
Page 4
... Channel 2 Audio Cables (Red/White) 15"/17"/23" models only 1 Video Cable (Yellow) 20" model only BACK OF VCR (or Accessory device) 5 3 VCR (or accessory device) (EQUIPPED WITH VIDEO AND AUDIO OUTPUT JACKS) COMPONENT (CVI) INPUTS C omponent Video inputs provide the highest possible color and picture resolution in the playback of digital signal CVI soure material, such as with Component Video Outputs) HELPFUL HINT The description for this connection are not supplied with Component Video Outputs) AUDIO L Y R PB RF PR PHONE JACK REMOTE VIDEO...
... Channel 2 Audio Cables (Red/White) 15"/17"/23" models only 1 Video Cable (Yellow) 20" model only BACK OF VCR (or Accessory device) 5 3 VCR (or accessory device) (EQUIPPED WITH VIDEO AND AUDIO OUTPUT JACKS) COMPONENT (CVI) INPUTS C omponent Video inputs provide the highest possible color and picture resolution in the playback of digital signal CVI soure material, such as with Component Video Outputs) HELPFUL HINT The description for this connection are not supplied with Component Video Outputs) AUDIO L Y R PB RF PR PHONE JACK REMOTE VIDEO...

Quick start guide (English)
Page 5
... Scan DVD playback. 4 1 Connect one end of the VGA video cable to the Monitor (video) output on the computer to the PC Input (VGA) jack on the bottom of the TV. 2 Connect the AUDIO PC/HD cable of the TV. 3 Turn the Accessory Device and the TV ON. 4 Press the SOURCE button button on the remote control to the Operating Instruction Manual Please contact your dealer or Philips at REAR of TV 3 PC 15"/17"/23" models only 1 VGA Cable Audio Cable 2 17...
... Scan DVD playback. 4 1 Connect one end of the VGA video cable to the Monitor (video) output on the computer to the PC Input (VGA) jack on the bottom of the TV. 2 Connect the AUDIO PC/HD cable of the TV. 3 Turn the Accessory Device and the TV ON. 4 Press the SOURCE button button on the remote control to the Operating Instruction Manual Please contact your dealer or Philips at REAR of TV 3 PC 15"/17"/23" models only 1 VGA Cable Audio Cable 2 17...
Leaflet
Page 2
... Use: Auto Volume Leveller (AVL), AutoPicture, AutoSound, Program List, Top Controls • Remote control type: RC19335021/01 • Clock: Sleep Timer • VESA Mount: 100 x 100 mm • Child Protection: Child Lock+Parental Control Tuner/Reception/Transmission • Tuner bands: Hyperband, S-Channel, UHF, VHF • TV system: NTSC • Video Playback: NTSC • Aerial Input: 75 ohm F-type • Tuner Display: PLL • Number of Preset Channels: 100 Connectivity • Number of AV connections: 2 • Other connections: FM Antenna, F-Type (75 ohm), HD input...
... Use: Auto Volume Leveller (AVL), AutoPicture, AutoSound, Program List, Top Controls • Remote control type: RC19335021/01 • Clock: Sleep Timer • VESA Mount: 100 x 100 mm • Child Protection: Child Lock+Parental Control Tuner/Reception/Transmission • Tuner bands: Hyperband, S-Channel, UHF, VHF • TV system: NTSC • Video Playback: NTSC • Aerial Input: 75 ohm F-type • Tuner Display: PLL • Number of Preset Channels: 100 Connectivity • Number of AV connections: 2 • Other connections: FM Antenna, F-Type (75 ohm), HD input...


