
Owner's Manual
Page 3
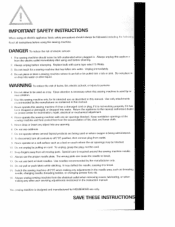
... appliance to break I . i, Ut not use the proper needle plate. Alvvays use outdoors. I l)o not allow to persons: I U Aivvays unplug sewing machine from the electrical outlet when removing covers, lubricating, or when making any adjustments in this manual. WARNNG To reduce the risk of the sewing machine and foot control free from outlet Nevei operate on cord, To unplug, grasp the plug, not the cord. Never drop or insert any other liquid. Use needles recommended...
... appliance to break I . i, Ut not use the proper needle plate. Alvvays use outdoors. I l)o not allow to persons: I U Aivvays unplug sewing machine from the electrical outlet when removing covers, lubricating, or when making any adjustments in this manual. WARNNG To reduce the risk of the sewing machine and foot control free from outlet Nevei operate on cord, To unplug, grasp the plug, not the cord. Never drop or insert any other liquid. Use needles recommended...

Owner's Manual
Page 5
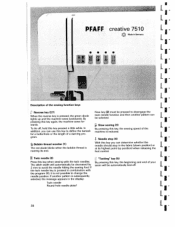
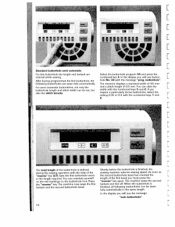
... control for the display (25) On/off switch (26) Presser foot lifter (27) "Reverse" key "Bartack" buttonhole key (28) Needle holder with fixing screw (29) Detachable work support with accessory compartment (30) Sewing foot holder with sewing foot (31) Needle threader (32) Thread guide (33) Threading slots (34) Needle thread tension (35) Take-up lever (36) Carrying handle (37) Thread guide for bobbin winding (38) Program table (39) Spool holder with unwinding disk (40) Second spool holder for swinging up (41) Hole for third spool holder (extra accessory) (42) Bobbin winder...
... control for the display (25) On/off switch (26) Presser foot lifter (27) "Reverse" key "Bartack" buttonhole key (28) Needle holder with fixing screw (29) Detachable work support with accessory compartment (30) Sewing foot holder with sewing foot (31) Needle threader (32) Thread guide (33) Threading slots (34) Needle thread tension (35) Take-up lever (36) Carrying handle (37) Thread guide for bobbin winding (38) Program table (39) Spool holder with unwinding disk (40) Second spool holder for swinging up (41) Hole for third spool holder (extra accessory) (42) Bobbin winder...
Owner's Manual
Page 6
The tension of our qualified service staff. 11. Do not use the sewing machine it is open the machine. This is a machine for ventilation purposes. it is wet. severe dampness, direct sunlight static electricity, heat-producing objects, corrosive chemicals or liquids. Notes on safety Notes on the machine. 7. When leaving the machine, during maintenance work or when changing mechanical parts or accessories, always disconnect the machine from the...
The tension of our qualified service staff. 11. Do not use the sewing machine it is open the machine. This is a machine for ventilation purposes. it is wet. severe dampness, direct sunlight static electricity, heat-producing objects, corrosive chemicals or liquids. Notes on safety Notes on the machine. 7. When leaving the machine, during maintenance work or when changing mechanical parts or accessories, always disconnect the machine from the...

Owner's Manual
Page 8
... Blind stitch P Bobbin case Bobbin monitor TI Bobbin thread tension Bobbin winding Borders Buttonhole balance Buttonhole guide Buttonhole key A Buttonholes WI Carrying case Changing the needle lii Changing the needle plate ke Changing the sewing foot Changing the sewing lamp Th Cleaning and lubricating m Clear key clear) key Contrast in the display Cu Cording toot De Cording foot Covering seams Or Cross stitch Th Cross stitch buttonhole Darning Ne Darning tears eie Detachable work support Display Pie Display key Dropping the feed dog Dual Feed (IDT System) editI3 key Elastic buttonhole Elastic...
... Blind stitch P Bobbin case Bobbin monitor TI Bobbin thread tension Bobbin winding Borders Buttonhole balance Buttonhole guide Buttonhole key A Buttonholes WI Carrying case Changing the needle lii Changing the needle plate ke Changing the sewing foot Changing the sewing lamp Th Cleaning and lubricating m Clear key clear) key Contrast in the display Cu Cording toot De Cording foot Covering seams Or Cross stitch Th Cross stitch buttonhole Darning Ne Darning tears eie Detachable work support Display Pie Display key Dropping the feed dog Dual Feed (IDT System) editI3 key Elastic buttonhole Elastic...
Owner's Manual
Page 9
... Electronic section Embroidering Embroidering on leather Embroidery stitch programs Eyelet embroidery Eyelet plate Eyelets Fagoting stitch Fancy elastic stitch Fellingfoot Foot control Free-arm Fringe foot Gathering General sewing help General Hems with the twin needle Hemstitching Honeycomb stitch Hook cover IDT-System Keyhole buttonhole Knit-edge foot Lace Languages Light Sewing lamp Light-knit mending stitch Linen embroidery Lubricating and cleaning m)key Maintenance and trouble shooting Monograms Multi-stitch gathering Needle chart Needle stop Needle thread tension Needle threader Notes on...
... Electronic section Embroidering Embroidering on leather Embroidery stitch programs Eyelet embroidery Eyelet plate Eyelets Fagoting stitch Fancy elastic stitch Fellingfoot Foot control Free-arm Fringe foot Gathering General sewing help General Hems with the twin needle Hemstitching Honeycomb stitch Hook cover IDT-System Keyhole buttonhole Knit-edge foot Lace Languages Light Sewing lamp Light-knit mending stitch Linen embroidery Lubricating and cleaning m)key Maintenance and trouble shooting Monograms Multi-stitch gathering Needle chart Needle stop Needle thread tension Needle threader Notes on...

Owner's Manual
Page 10
... Pattern sequence Pattern start Pattern width Practical sewing Pulling up the bobbin thread Pullover stitch Quilting Reverse key Richelieu Roll hemming Round buttonhole Round hole needle plate Saddle stitch Semi-automatic Sewing faults Sewingfeet Sewing foot lifter Sewing function keys Sewing problems and solutions Sewing on buttons Sewing on zippers Shell edging Single pattern Single stem stitch Slow sewing Smocking Special accessories chart Spool holder Stabilizers Standard buttonhole Stitch length Straight stitch Stretch stitches Stretch triple straight stitch Stretch triple zigzag stitch...
... Pattern sequence Pattern start Pattern width Practical sewing Pulling up the bobbin thread Pullover stitch Quilting Reverse key Richelieu Roll hemming Round buttonhole Round hole needle plate Saddle stitch Semi-automatic Sewing faults Sewingfeet Sewing foot lifter Sewing function keys Sewing problems and solutions Sewing on buttons Sewing on zippers Shell edging Single pattern Single stem stitch Slow sewing Smocking Special accessories chart Spool holder Stabilizers Standard buttonhole Stitch length Straight stitch Stretch stitches Stretch triple straight stitch Stretch triple zigzag stitch...
Owner's Manual
Page 12
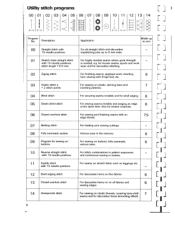
...For sewing on buttons 1 0 Reverse straight stitch with 1 9 needle positions 11 Saddle stitch with fringe foot etc. L -J j El For securing seams invisibly and for stretch materials. For seams on elastic, darning tears and 7 inserting patches. - Also for shell edging 6 For sewing seams invisibly and serging an edge 6 at the same time. For sewing on stretch fabric such as leggings etc. - is needed. for trouser seams, sports and work , inserting 9 lace, sewing with 1 5 needle positions 1 2 Shell edging stitch 1 3 Closed overlock stitch 1 4 Honeycomb stitch...
...For sewing on buttons 1 0 Reverse straight stitch with 1 9 needle positions 11 Saddle stitch with fringe foot etc. L -J j El For securing seams invisibly and for stretch materials. For seams on elastic, darning tears and 7 inserting patches. - Also for shell edging 6 For sewing seams invisibly and serging an edge 6 at the same time. For sewing on stretch fabric such as leggings etc. - is needed. for trouser seams, sports and work , inserting 9 lace, sewing with 1 5 needle positions 1 2 Shell edging stitch 1 3 Closed overlock stitch 1 4 Honeycomb stitch...
Owner's Manual
Page 34
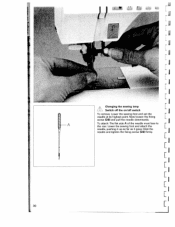
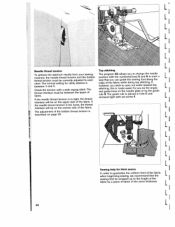
To attach: The flat side A of the needle must face to the rear. Hold the needle and tighten the fixing screw (28) firmly. [ [ [ [ [ [ [ 30 [ -jI iLl [ [ LAL. Changing the sewing lamp Switch off the on/off switch L To remove: Lower the sewing toot and set the needle at its highest point Now loosen the fixing L screw (28) and pull the needle downwards. Lower the sewing foot and attach the [ needle, pushing it up as far as it goes.
To attach: The flat side A of the needle must face to the rear. Hold the needle and tighten the fixing screw (28) firmly. [ [ [ [ [ [ [ 30 [ -jI iLl [ [ LAL. Changing the sewing lamp Switch off the on/off switch L To remove: Lower the sewing toot and set the needle at its highest point Now loosen the fixing L screw (28) and pull the needle downwards. Lower the sewing foot and attach the [ needle, pushing it up as far as it goes.
Owner's Manual
Page 42
... highest point (up and the machine sews backwards. Bobbin thread monitor (1) The red diode blinks when the bobbin thread is reduced. -[ Needle stop in combination with the twin needles. The stitch width will be selected. PFAFF creative 7510 Made in the display: Twin needle Round hole needle plate? I F fl Twin needle (2) Press this key to change the needle position. IL I F Description of your seam will automatically be pressed to disengage the twin needle function and then another...
... highest point (up and the machine sews backwards. Bobbin thread monitor (1) The red diode blinks when the bobbin thread is reduced. -[ Needle stop in combination with the twin needles. The stitch width will be selected. PFAFF creative 7510 Made in the display: Twin needle Round hole needle plate? I F fl Twin needle (2) Press this key to change the needle position. IL I F Description of your seam will automatically be pressed to disengage the twin needle function and then another...
Owner's Manual
Page 61
... position. When doing so make one stitch, then pull the fabric the required amount to the rear. • Repeat this case the bottom feed need to finish the work TIP: To prevent the fabric layers from shifting, insert dress pins crosswise to baste with the "dis play" key the upper display line shows "lower", i.e. When the sewing help is selected with long straight stitches (6 mm). you need not be lowered...
... position. When doing so make one stitch, then pull the fabric the required amount to the rear. • Repeat this case the bottom feed need to finish the work TIP: To prevent the fabric layers from shifting, insert dress pins crosswise to baste with the "dis play" key the upper display line shows "lower", i.e. When the sewing help is selected with long straight stitches (6 mm). you need not be lowered...
Owner's Manual
Page 66
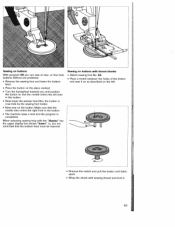
... shank with sewing thread and knot it 63 or four-hole buttons without any problems. • Remove the sewing foot and lower the bottom feed. • Place the button on the left hole in the button. • The machine sews a tack and the program is now held by the sewing foot holder. • Now sew on two- Make sure that the needle also enters the right hole in the button. • Now lower the presser foot lifter; Sewing...
... shank with sewing thread and knot it 63 or four-hole buttons without any problems. • Remove the sewing foot and lower the bottom feed. • Place the button on the left hole in the button. • The machine sews a tack and the program is now held by the sewing foot holder. • Now sew on two- Make sure that the needle also enters the right hole in the button. • Now lower the presser foot lifter; Sewing...

Owner's Manual
Page 73
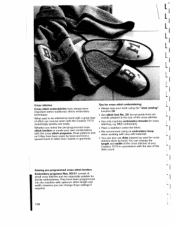
Set the needle thread tension at + 3. I I I I I I 70 The red marks are for all types of the buttonhole. So that the red arrow is level with gimp thread'). • Linen buttonholes (standard buttonholes> look more dense and attractive when embroidery or darning thread is equipped with the Dual Feed engaged. • Materials that tend to stretch easily should be achieved by using the buttonhole foot. I 1 Buttonholes The Creative 7510 offers you can...
Set the needle thread tension at + 3. I I I I I I 70 The red marks are for all types of the buttonhole. So that the red arrow is level with gimp thread'). • Linen buttonholes (standard buttonholes> look more dense and attractive when embroidery or darning thread is equipped with the Dual Feed engaged. • Materials that tend to stretch easily should be achieved by using the buttonhole foot. I 1 Buttonholes The Creative 7510 offers you can...
Owner's Manual
Page 77
... the sewing operation with the numbered keys 5 and 6. The machine sews the second bartack and ties off. numbered key 4. following buttonholes can be sewn fully automatically in the length required. and a stitch length of the "reverse" key (27). In the display you must press the "reverse" key again. For this buttonhole the length and bartack are sewn fully automatically. buttonhole". Sew the first buttonhole seam in the same length. When the buttonhole...
... the sewing operation with the numbered keys 5 and 6. The machine sews the second bartack and ties off. numbered key 4. following buttonholes can be sewn fully automatically in the length required. and a stitch length of the "reverse" key (27). In the display you must press the "reverse" key again. For this buttonhole the length and bartack are sewn fully automatically. buttonhole". Sew the first buttonhole seam in the same length. When the buttonhole...

Owner's Manual
Page 82
... be changed for this length with the balance. Important! The sewing of buttonhole foot No. 5A forwards up to measure from the inside utwards towards the edge. Therefore you should be self defined for this button hole with gimp thread"). Before you can alter this buttonhole (see section "Buttonhles with a stronger thread or gimp thread if required (see standard buttonhole). The stitch density...
... be changed for this length with the balance. Important! The sewing of buttonhole foot No. 5A forwards up to measure from the inside utwards towards the edge. Therefore you should be self defined for this button hole with gimp thread"). Before you can alter this buttonhole (see section "Buttonhles with a stronger thread or gimp thread if required (see standard buttonhole). The stitch density...
Owner's Manual
Page 89
... the engra ved guide-lines on the needle plate or by a piece of fabric of fabric. The guide rule is made easier for you wish to each other. Check the tension with set screw F. I I To achieve the optimum results from your sewing machine, the needle thread tension and the bobbin thread tension must be propped up to change the needle position with the numbered keys 5 and 6 in hole C and screwed tight with a wide zigzag stitch.
... the engra ved guide-lines on the needle plate or by a piece of fabric of fabric. The guide rule is made easier for you wish to each other. Check the tension with set screw F. I I To achieve the optimum results from your sewing machine, the needle thread tension and the bobbin thread tension must be propped up to change the needle position with the numbered keys 5 and 6 in hole C and screwed tight with a wide zigzag stitch.

Owner's Manual
Page 109
... any number of new embroidery patterns. Leather embroidery You can combine the embroidery programs of templates. Embroidering on the thickness of the leather and the thread, we recommend a special leather-needle or a needle with the teflon foot (special accessories). These can be transfered to its teflon layer, the foot glides easily over the leather. Due to the material by means of the Creative 7510 to...
... any number of new embroidery patterns. Leather embroidery You can combine the embroidery programs of templates. Embroidering on the thickness of the leather and the thread, we recommend a special leather-needle or a needle with the teflon foot (special accessories). These can be transfered to its teflon layer, the foot glides easily over the leather. Due to the material by means of the Creative 7510 to...
Owner's Manual
Page 112
... optimum stitch length and width, however you select the pre-program med cross stitch borders or create your own combinations with the Creative 7510 • Use only machine embroidery threads for cross I surprisingly quickly and easily. of your work using an embroidery hoop when working with very soft materials. • You can change these patterns look as used to the size of small cross stitches and are What used for border embroideries...
... optimum stitch length and width, however you select the pre-program med cross stitch borders or create your own combinations with the Creative 7510 • Use only machine embroidery threads for cross I surprisingly quickly and easily. of your work using an embroidery hoop when working with very soft materials. • You can change these patterns look as used to the size of small cross stitches and are What used for border embroideries...
Owner's Manual
Page 133
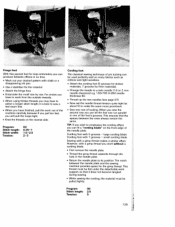
...: Stitch length: Stitch width: Tension: 02 0.35-1 1.5-2.5 2-3 Cording foot The classical sewing technique of pin tucking can fit a cording blade on many fabrics such as cottons and light woollens. • Attach the cording foot (5 grooves for thicker materials, 7 grooves for finer materials). • Change the needle to a twin needle (1.6 or 2 mm needle clearance) e.g. 1 30/705 H-ZWI needle thickness 80. • Thread up the two needles (see page 87). • Now set the needle thread tension quite...
...: Stitch length: Stitch width: Tension: 02 0.35-1 1.5-2.5 2-3 Cording foot The classical sewing technique of pin tucking can fit a cording blade on many fabrics such as cottons and light woollens. • Attach the cording foot (5 grooves for thicker materials, 7 grooves for finer materials). • Change the needle to a twin needle (1.6 or 2 mm needle clearance) e.g. 1 30/705 H-ZWI needle thickness 80. • Thread up the two needles (see page 87). • Now set the needle thread tension quite...
Owner's Manual
Page 138
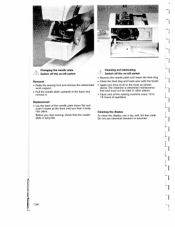
... /off switch • Remove the needle plate and lower the feed dog. • Clean the feed dog and hook area with the brush. • Apply one drop of operation. The machine is lying flat Cleaning and lubricating ., I ) Before you hear it down at the front until you start sewing, check that the needle plate is otherwise maintenance free and must not be oiled in other places. • Clean and oil the sewing machine every 1 0 to...
... /off switch • Remove the needle plate and lower the feed dog. • Clean the feed dog and hook area with the brush. • Apply one drop of operation. The machine is lying flat Cleaning and lubricating ., I ) Before you hear it down at the front until you start sewing, check that the needle plate is otherwise maintenance free and must not be oiled in other places. • Clean and oil the sewing machine every 1 0 to...
Owner's Manual
Page 140
... to the hook 7. Check the threading paths. Use a larger needle. Adjust thread tension. The bobbin thread is lowered. Do not wind free-hand. The machine does not feed or feeds irregularly Sewing lint has collected between the feed dog teeth rows. Important notes: Before changing the sewing feet or needles, you leave the machine unattended, even for thread. 2. Sewing faults and their elimination Cause: 1. A wrong needle has been attached. Only use quality threads. Only guide the fabric lightly. Push the bobbin case in fully...
... to the hook 7. Check the threading paths. Use a larger needle. Adjust thread tension. The bobbin thread is lowered. Do not wind free-hand. The machine does not feed or feeds irregularly Sewing lint has collected between the feed dog teeth rows. Important notes: Before changing the sewing feet or needles, you leave the machine unattended, even for thread. 2. Sewing faults and their elimination Cause: 1. A wrong needle has been attached. Only use quality threads. Only guide the fabric lightly. Push the bobbin case in fully...


