
Owner's Manual
Page 3
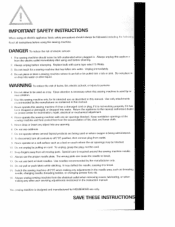
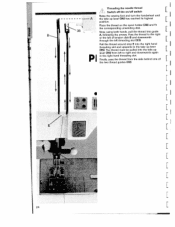
... attachments n'commended by pulling on a soft surface such as contained in . i, Ut not use bent or blunt needles. It may be used as threading needle, changing needle, threading bobbin, or changing presser foot etc. Switch the sewing machine off CD") position, then remove plug from the electric outlet immediately after using and...
... attachments n'commended by pulling on a soft surface such as contained in . i, Ut not use bent or blunt needles. It may be used as threading needle, changing needle, threading bobbin, or changing presser foot etc. Switch the sewing machine off CD") position, then remove plug from the electric outlet immediately after using and...
Owner's Manual
Page 5
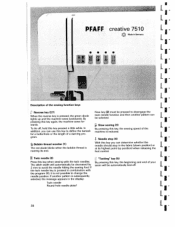
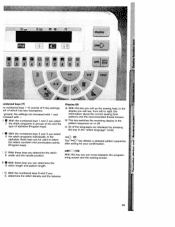
Parts of the Creative 7510 (1) Bobbin thread monitor and sewing function light "reverse sewing" (2) "Twin needle" key (3) "Slow sewing" key (4) "Needle up/down" key (5) "Tacking" key (6) Multi function display (7) Numbered keys (8) "...) Detachable work support with accessory compartment (30) Sewing foot holder with sewing foot (31) Needle threader (32) Thread guide (33) Threading slots (34) Needle thread tension (35) Take-up lever (36) Carrying handle (37) Thread guide for bobbin winding (38) Program table (39) Spool holder with unwinding disk (40) Second spool holder for...
Parts of the Creative 7510 (1) Bobbin thread monitor and sewing function light "reverse sewing" (2) "Twin needle" key (3) "Slow sewing" key (4) "Needle up/down" key (5) "Tacking" key (6) Multi function display (7) Numbered keys (8) "...) Detachable work support with accessory compartment (30) Sewing foot holder with sewing foot (31) Needle threader (32) Thread guide (33) Threading slots (34) Needle thread tension (35) Take-up lever (36) Carrying handle (37) Thread guide for bobbin winding (38) Program table (39) Spool holder with unwinding disk (40) Second spool holder for...

Owner's Manual
Page 8
... embroidery techniques Appliqué Appliqué foot Automatic darning Balance F Bartack Basting stitch Bias tape binder Ti Blind stitch P Bobbin case Bobbin monitor TI Bobbin thread tension Bobbin winding Borders Buttonhole balance Buttonhole guide Buttonhole key A Buttonholes WI Carrying case Changing the needle lii Changing the needle plate ke Changing the...
... embroidery techniques Appliqué Appliqué foot Automatic darning Balance F Bartack Basting stitch Bias tape binder Ti Blind stitch P Bobbin case Bobbin monitor TI Bobbin thread tension Bobbin winding Borders Buttonhole balance Buttonhole guide Buttonhole key A Buttonholes WI Carrying case Changing the needle lii Changing the needle plate ke Changing the...
Owner's Manual
Page 9
... Sewing lamp Light-knit mending stitch Linen embroidery Lubricating and cleaning m)key Maintenance and trouble shooting Monograms Multi-stitch gathering Needle chart Needle stop Needle thread tension Needle threader Notes on safety Numbered keys okkey On/oft switch Overlock stitches - 33-53 105 105 11 1 16. 1 1 7 116,117 64 68 C 68...
... Sewing lamp Light-knit mending stitch Linen embroidery Lubricating and cleaning m)key Maintenance and trouble shooting Monograms Multi-stitch gathering Needle chart Needle stop Needle thread tension Needle threader Notes on safety Numbered keys okkey On/oft switch Overlock stitches - 33-53 105 105 11 1 16. 1 1 7 116,117 64 68 C 68...

Owner's Manual
Page 10
... Pattern mirror Pattern length Pattern selection Pattern selection key Pattern sequence Pattern start Pattern width Practical sewing Pulling up the bobbin thread Pullover stitch Quilting Reverse key Richelieu Roll hemming Round buttonhole Round hole needle plate Saddle stitch Semi-automatic Sewing faults Sewingfeet ...buttonhole Stitch length Straight stitch Stretch stitches Stretch triple straight stitch Stretch triple zigzag stitch Tacking Technical section Thread tension Thread trimmer Threading the needle thread Threading the twin needle Topcover 92 44 40 43 41,42 42 48-53 40 43 83-97 26...
... Pattern mirror Pattern length Pattern selection Pattern selection key Pattern sequence Pattern start Pattern width Practical sewing Pulling up the bobbin thread Pullover stitch Quilting Reverse key Richelieu Roll hemming Round buttonhole Round hole needle plate Saddle stitch Semi-automatic Sewing faults Sewingfeet ...buttonhole Stitch length Straight stitch Stretch stitches Stretch triple straight stitch Stretch triple zigzag stitch Tacking Technical section Thread tension Thread trimmer Threading the needle thread Threading the twin needle Topcover 92 44 40 43 41,42 42 48-53 40 43 83-97 26...
Owner's Manual
Page 12
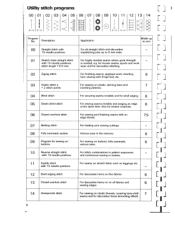
... and for stretch materials. e.g. For finishing seams, appliqué work wear and for decorative hems (smocking effect). [I - For sewing and finishing seams with an edge thread. is needed. For sewing on stretch fabric such as leggings etc. - For basting your sewing cuttings Various sizes in reverse. 75 U - [I] 9 6 [I - [J [J For seams on elastic... 03 04 05 06 07 08 09 10 11 12 I13 Program No. For decorative hems on fine fabrics 6 For decorative hems on on elastic threads, covering terry-cloth 7 seams and for decorative stitching.
... and for stretch materials. e.g. For finishing seams, appliqué work wear and for decorative hems (smocking effect). [I - For sewing and finishing seams with an edge thread. is needed. For sewing on stretch fabric such as leggings etc. - For basting your sewing cuttings Various sizes in reverse. 75 U - [I] 9 6 [I - [J [J For seams on elastic... 03 04 05 06 07 08 09 10 11 12 I13 Program No. For decorative hems on fine fabrics 6 For decorative hems on on elastic threads, covering terry-cloth 7 seams and for decorative stitching.
Owner's Manual
Page 19
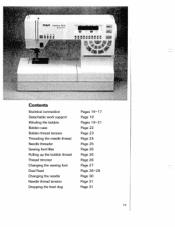
Contents Electrical connection Detachable work support Winding the bobbin Bobbin case Bobbin thread tension Threading the needle thread Needle threader Sewing foot lifter Pulling up the bobbin thread Thread trimmer Changing the sewing foot Dual Feed Changing the needle Needle thread tension Dropping the feed dog Pages 16-17 Page 18 Pages 19-21 Page 22 Page 23 Page 24 Page 25 Page 26 Page 26 Page 26 Page 27 Page 28-29 Page 30 Page 31 Page 31 15
Contents Electrical connection Detachable work support Winding the bobbin Bobbin case Bobbin thread tension Threading the needle thread Needle threader Sewing foot lifter Pulling up the bobbin thread Thread trimmer Changing the sewing foot Dual Feed Changing the needle Needle thread tension Dropping the feed dog Pages 16-17 Page 18 Pages 19-21 Page 22 Page 23 Page 24 Page 25 Page 26 Page 26 Page 26 Page 27 Page 28-29 Page 30 Page 31 Page 31 15

Owner's Manual
Page 24
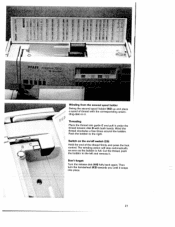
... foot control. The winding action will stop automatically as soon as the bobbin is full. Cut the thread, push the bobbin to the left and remove it snaps into guide C and pull it under the J thread tension disk B with both hands. I s/fr PC An I 1..TEh I lU IitIiIl 11 JIjLIHjiJJIJJIiiHJJ1 I I...I k I Winding the bobbin from the spooi holder I Place the sewing thread on /off switch (25) Hold the end of the thread spool. To guarantee free movement of the thread and to give additional hold to the thread spool, fit an unwinding disk corresponding to the right Switch on the on the...
... foot control. The winding action will stop automatically as soon as the bobbin is full. Cut the thread, push the bobbin to the left and remove it snaps into guide C and pull it under the J thread tension disk B with both hands. I s/fr PC An I 1..TEh I lU IitIiIl 11 JIjLIHjiJJIJJIiiHJJ1 I I...I k I Winding the bobbin from the spooi holder I Place the sewing thread on /off switch (25) Hold the end of the thread spool. To guarantee free movement of the thread and to give additional hold to the thread spool, fit an unwinding disk corresponding to the right Switch on the on the...
Owner's Manual
Page 25
... U If JJ iJiJiJiflJJ j Winding from the second spool holder Swing the second spool holder (40) up and place a spool of the thread firmly and press the foot control. Wind the thread clockwise a few times around the bobbin. Then turn the handwheel (43) towards you until it Don't forget Turn the release disk... the bobbin to the right Switch on the on/off switch (25) Hold the end of thread with the corresponding unwin ding-disk on it Threading Place the thread into place. 21 The winding action will stop automatically as soon as the bobbin is full. Push the bobbin to the left and remove...
... U If JJ iJiJiJiflJJ j Winding from the second spool holder Swing the second spool holder (40) up and place a spool of the thread firmly and press the foot control. Wind the thread clockwise a few times around the bobbin. Then turn the handwheel (43) towards you until it Don't forget Turn the release disk... the bobbin to the right Switch on the on/off switch (25) Hold the end of thread with the corresponding unwin ding-disk on it Threading Place the thread into place. 21 The winding action will stop automatically as soon as the bobbin is full. Push the bobbin to the left and remove...
Owner's Manual
Page 26
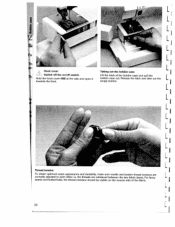
... are interlaced between the two fabric layers. LI I LI LI LI LI LI L I L I LI LI I -I 22 L j i.e. the threads are correctly adjusted to each other; L L L L L L 0 Hook cover L L Switch off the on the reverse side of the bobbin case and pull the bobbin case out ...
... are interlaced between the two fabric layers. LI I LI LI LI LI LI L I L I LI LI I -I 22 L j i.e. the threads are correctly adjusted to each other; L L L L L L 0 Hook cover L L Switch off the on the reverse side of the bobbin case and pull the bobbin case out ...
Owner's Manual
Page 27
...that it rests in the bobbin case. Check: Pull the bobbin thread sharply; the bobbin case must not fall out of the bobbin case must face upwards. Checking the bobbin thread tension Hold the bobbin case by the thread and move your hand sharply upwards. The bobbin case must turn clockwise...must slip downwards a little with each hand movement Correcting the tension: Turn adjusting screw C just a little counter clock wise to increase the bobbin thread tension. Inserting the bobbin case Lift latch F and push the bobbin case fully onto pin D of the sewing hook Opening E of the hook ...
...that it rests in the bobbin case. Check: Pull the bobbin thread sharply; the bobbin case must not fall out of the bobbin case must face upwards. Checking the bobbin thread tension Hold the bobbin case by the thread and move your hand sharply upwards. The bobbin case must turn clockwise...must slip downwards a little with each hand movement Correcting the tension: Turn adjusting screw C just a little counter clock wise to increase the bobbin thread tension. Inserting the bobbin case Lift latch F and push the bobbin case fully onto pin D of the sewing hook Opening E of the hook ...
Owner's Manual
Page 28
... spool holder (39) and fit - 35 the corresponding unwinding disk Now, using both hands, pull the thread into the take up [ I lever (35) from left threading slot (33). [ Pull the thread around stop E into the right hand threading slot and upwards to right and downwards again P1 in the right hand...the side behind one of tension disk B and downwards through the left to the take up lever (35). The thread must be pulled into guide [ A following the arrows. Place the thread on /off switch Raise the sewing foot and turn the handwheel until the take up lever (35) has reached...
... spool holder (39) and fit - 35 the corresponding unwinding disk Now, using both hands, pull the thread into the take up [ I lever (35) from left threading slot (33). [ Pull the thread around stop E into the right hand threading slot and upwards to right and downwards again P1 in the right hand...the side behind one of tension disk B and downwards through the left to the take up lever (35). The thread must be pulled into guide [ A following the arrows. Place the thread on /off switch Raise the sewing foot and turn the handwheel until the take up lever (35) has reached...
Owner's Manual
Page 29
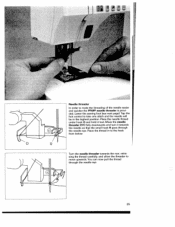
..., and allow the threader to take one stitch and the needle will be in to make the threading of the needle easier and quicker the PFAFF needle threader is provi ded. Turn the needle threader towards the needle so that the small hook R goes through the needle eye. 25 Tap the ...foot control to move upwards. Place the thread in the highest position. You can now pull the thread through the needle eye...
..., and allow the threader to take one stitch and the needle will be in to make the threading of the needle easier and quicker the PFAFF needle threader is provi ded. Turn the needle threader towards the needle so that the small hook R goes through the needle eye. 25 Tap the ...foot control to move upwards. Place the thread in the highest position. You can now pull the thread through the needle eye...

Owner's Manual
Page 30
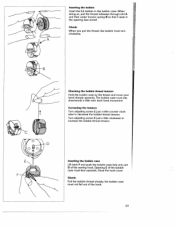
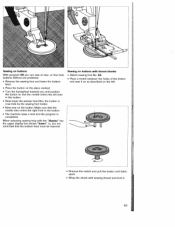
Thread trimmer Pull the threads from the back to the left 26 Pulling up the bobbin thread. L L L. Pull the needle thread to bring up the bobbin thread Raise the sewing foot Hold the needle thread and tap the foot control once to take one stitch so that the bobbin thread has formed a loop. L L L L L L L L L LI LI I II}"' L L[ LI LI L 1 L Presser foot lifter The sewing foot is raised and lowered with the presser foot lifter (26). Bobbin thread Close the hook cover (48) and pull the thread under the sewing foot to the front over the thread trimmer (51).
Thread trimmer Pull the threads from the back to the left 26 Pulling up the bobbin thread. L L L. Pull the needle thread to bring up the bobbin thread Raise the sewing foot Hold the needle thread and tap the foot control once to take one stitch so that the bobbin thread has formed a loop. L L L L L L L L L LI LI I II}"' L L[ LI LI L 1 L Presser foot lifter The sewing foot is raised and lowered with the presser foot lifter (26). Bobbin thread Close the hook cover (48) and pull the thread under the sewing foot to the front over the thread trimmer (51).
Owner's Manual
Page 35
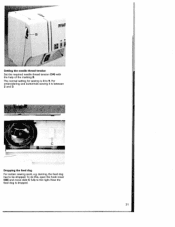
darning, the teed dog has to the right Now the feed dog is dropped. 31 For embroidering and buttonhole sewing it is 4 to 5. pFAF L Setting the needle thread tension Set the required needle thread tension (34) with the help of the marking B. e.g. To do this, open the hook cover (48) and move slide C fully to be dropped. The normal setting for sewing is between 2 and 3. C Dropping the feed dog For certain sewing work.
darning, the teed dog has to the right Now the feed dog is dropped. 31 For embroidering and buttonhole sewing it is 4 to 5. pFAF L Setting the needle thread tension Set the required needle thread tension (34) with the help of the marking B. e.g. To do this, open the hook cover (48) and move slide C fully to be dropped. The normal setting for sewing is between 2 and 3. C Dropping the feed dog For certain sewing work.
Owner's Manual
Page 42
... red diode blinks when the bobbin thread is subsequently selected, the message appears in the display: Twin needle Round hole needle plate? By pressing this key when sewing with the program 00, it is reduced. -[ Needle stop in the fabric (down position) or at its end. PFAFF creative 7510 Made in Germany I •$•...
... red diode blinks when the bobbin thread is subsequently selected, the message appears in the display: Twin needle Round hole needle plate? By pressing this key when sewing with the program 00, it is reduced. -[ Needle stop in the fabric (down position) or at its end. PFAFF creative 7510 Made in Germany I •$•...
Owner's Manual
Page 43
... of which has two inscriptions. a) With this key you can be used to right the information about the correct sewing foot patterns and the recommended thread tension. I With these keys can determine the 8 stitch length and pattern length. In the clear) (9) alphabet these keys you can move between the program ming...
... of which has two inscriptions. a) With this key you can be used to right the information about the correct sewing foot patterns and the recommended thread tension. I With these keys can determine the 8 stitch length and pattern length. In the clear) (9) alphabet these keys you can move between the program ming...

Owner's Manual
Page 50
Sewing help Pattern mirror (x) (axial mirror image) (mirroring With the "display" key, you can call up the help switches off. Thread tension (3-5) The sewing help is pressed, the sewing "1 help file is possible when an x appears in the display) for optimum sewing results. I II I a 112 jI4JI5I6171l-...
Sewing help Pattern mirror (x) (axial mirror image) (mirroring With the "display" key, you can call up the help switches off. Thread tension (3-5) The sewing help is pressed, the sewing "1 help file is possible when an x appears in the display) for optimum sewing results. I II I a 112 jI4JI5I6171l-...
Owner's Manual
Page 63
... along stop with regulating screw A. for I appliqué work I I For serging thin and difficult materials, blind stitch foot No. 3 is very suitable. When sewing, the thread goes over the edge alternately. That way you press the pattern mirYor key (20). The stitch length setting is flat and even and makes the...
... along stop with regulating screw A. for I appliqué work I I For serging thin and difficult materials, blind stitch foot No. 3 is very suitable. When sewing, the thread goes over the edge alternately. That way you press the pattern mirYor key (20). The stitch length setting is flat and even and makes the...
Owner's Manual
Page 66
... button so that the needle enters the left • Remove the match and pull the button and fabric apart. • Wrap the shank with sewing thread and knot it on as described on the left hole in the button. • The machine sews a tack and the program is now held by... the sewing foot holder. • Now sew on the button. When selecting sewing help with thread shanks • Attach sewing foot No. 2A. • Place a match between the holes of the button and sew it 63 Make sure that the needle...
... button so that the needle enters the left • Remove the match and pull the button and fabric apart. • Wrap the shank with sewing thread and knot it on as described on the left hole in the button. • The machine sews a tack and the program is now held by... the sewing foot holder. • Now sew on the button. When selecting sewing help with thread shanks • Attach sewing foot No. 2A. • Place a match between the holes of the button and sew it 63 Make sure that the needle...


