
Pfaff creative 7510 Support Question
Pfaff creative 7510 Support Question
Find answers below for this question about Pfaff creative 7510.Need a Pfaff creative 7510 manual? We have 1 online manual for this item!
Question posted by Lw8842 on November 11th, 2013
How To Remove Covers So Can Clean And Oil?
The person who posted this question about this Pfaff product did not include a detailed explanation. Please use the "Request More Information" button to the right if more details would help you to answer this question.
Current Answers
Related Pfaff creative 7510 Manual Pages
Owner's Manual - Page 3
... I U Do not unplug by or nar children.
2 Use this sewing machine only for a sewing machine that has fallen into water or other user servicing adjustments mentioned in
oi drop into water. Special care is being administered. I keep fingers away from the electrical outlet when removing covers, lubricating, or when making any adjustments in this manual. I Do...
Owner's Manual - Page 6
...is open the machine. This sewing machine is visible damage -
Do not use any stubborn dirt, use a dry, clean, soft, lint free cloth. When leaving the machine, during maintenance work...regard to clean the housing.
2 severe dampness, direct sunlight static electricity, heat-producing objects, corrosive chemicals or liquids. it being hit or dropped. To remove any insecticides...
Owner's Manual - Page 7
... touch of its features are the very latest in its stride and will find that offers unique benefits. Your PFAFF dealer is at your PFAFF sewing machine is just as simple to operate as this instruction book is no problem! a]
.1 Ii
3
J
II
I
3
j
J
Ii ii
Hil
Modern and uncompicated - its features If you...
Owner's Manual - Page 17
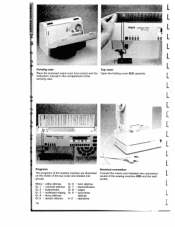
Operating the sewing machine
Technical section Pages 13-.31
13
Owner's Manual - Page 20
...
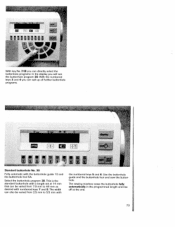
Connect the mains cord between the connection socket of the top cover and divided into groups. L 1717
L L
'
[
'
Programs
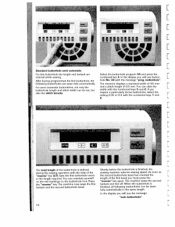
The programs of the sewing machine are illustrated on the inside of the sewing machine (45) and the wall socket
Menu - scalloped edging Gr. 9 - alphabets
16
L PFAFF creative 7510
)
C
I
Carrying case
Place the enclosed mains cord, foot control and...
Owner's Manual - Page 21
... I
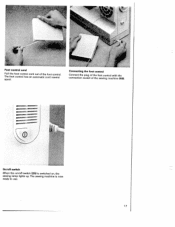
On/oft switch When the on , the sewing lamp lights up. Connecting the foot control Connect the plug of the foot control with the connection socket of the foot control.
The foot control has an automatic cord rewind spool.
Foot control cord Pull the foot control cord out of the sewing machine (46).
-
-- --
-
-
Owner's Manual - Page 22

... support to the left
L
L
I
L
L
Detachable work support
Accessory compartment
Swing out the detachable work support
The enclosed accessories are numbered. L
18
L I
L
F
L
L
I
L1 L
L
L
L
L
L
Sorting the accessories
Removing the detachable work support (29) to sew with the free-
Sort them (free-arm)
into the corresponding compartments of the sewing machine.
Owner's Manual - Page 41
LAI
L1 cii
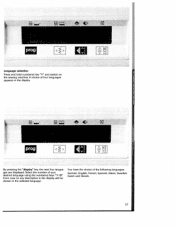
By pressing the "display" key, the next four langua ges are displayed. From now on the sewing machine. French, Spanish, Italian, Swedish, Dutch and Danish.
37 Select the number of the following languages:
German, English. You have the choice of your desired language ...
Owner's Manual - Page 62
...:
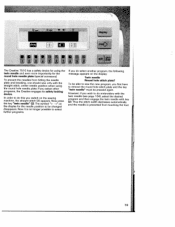
Twin needle Round hole stitch plate?
The Creative 7510 has a safety device for using the round hole needle plate. If you switch on the display for the round hole needle plate (special accessory). Now press the key twin needle (2).
To be changed disappears. on the sewing machine, the straight stitch 00 appears. Thus the...
Owner's Manual - Page 76
Use the buttonhole guide and the buttonhole foot and sew the button hole.
Select the buttonhole program 30. The sewing machine sews the buttonhole fully automatically in the programmed length and ties off at 14 mm that can be varied from 7.0 mm to 5.5 mm with
the numbered ...
Owner's Manual - Page 77
... the "reverse" key (27). Shortly before the buttonhole is finished, all following buttonholes are
Select the buttonhole program 30 and press the
entered while sewing. The machine sews the second bartack and ties off. In the display you must press the "reverse" key again.
following buttonholes can alter the width with the numbered...
Owner's Manual - Page 78

...out for all of the reverse bead by selecting another program.
75 The Creative will reduce the sewing speed before you press the "reverse' key before the buttonhole is possible to...manually" must be sewn automatically, however, the sewing machine will sew the second bartack and tie-off. As soon as the second buttonhole bead is deleted by removing your foot from the foot control. cii [1
...
Owner's Manual - Page 80
Use pearl cotton or a regular gimp thread as available at your sewing machine dealer.
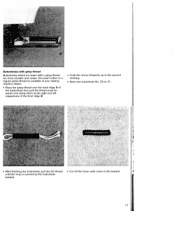
• Place the gimp thread over the back ridge A of the buttonhole...Push the runner forwards up to the second marking.
• Now sew buttonhole No. 30 or 31.
• After finishing the buttonhole, pull the left thread until the loop is covered by the buttonhole bartack.
• Cut off the loose ends close ...
Owner's Manual - Page 89
...the reverse side of the fabric. If, however, you to each other. L
IL
L
L
Sewing help for you can guide the sewing foot along the edge of fabric. Check the tension with set screw F.
L
L
86
L... ved guide-lines on page 25. I I
To achieve the optimum results from your sewing machine, the needle thread tension and the bobbin thread tension must be correctly adjusted to change ...
Owner's Manual - Page 116
... and your piece of unique embro idery is ready.
I
F
L
C
I
I
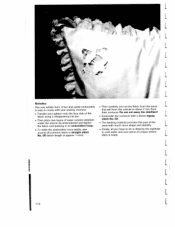
Richelieu
This very artistic form of bar and eyelet embroidery is easy to create with your sewing machine.
• Transfer your pattern onto the face side of the fabric using a disappearing ink pen.
• Then place two layers of water soluble stabilizer under...
Owner's Manual - Page 123
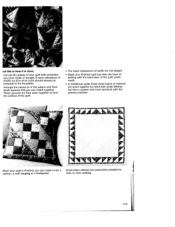
... by hand with small stitches but this is how it into a :ushion, a wall hanging or a bedspread. nd this is quicker and more practical with the sewing machine. g
Ihen your finished quilt top onto the layer of batting with the back layer of the quilt under neath.
• In traditional quilts, these three...
Owner's Manual - Page 132
...8226; Overlap the raw edge of a contrasting color.
under the sewing foot
• Then topstitch all contours with narrow and
• Sew along
guide the work more easily. the edge. Attach the felling...you
• Afterwards, pull the fabric layers apart and feed the protruding hem into the sewing
machine. • Transfer your drafted pattern to the paper side of the felling foot The ...
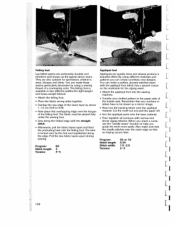
Owner's Manual - Page 133
...Sew one of tucking. small cording blade
Sewing with a gimp thread makes a similar effect However, with 5 grooves -
Cording foot with a gimp thread you work without a cording blade.
• First remove...under the detachable work support, so that the spaces between the needle plate and the sewing machine provides space for finer materials).
• Change the needle to a twin needle (1.6...
Owner's Manual - Page 138
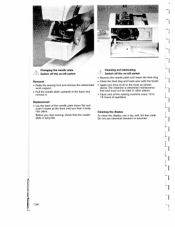
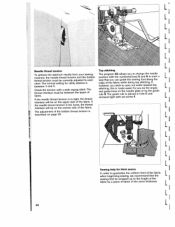
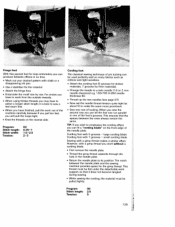
... upwards at the back and
remove it
Replacement • Lay the back of the needle plate down flat and
push it down at the front until you start sewing, check that the needle plate is otherwise maintenance free and must not be oiled in other places. • Clean and oil the sewing machine every 1 0 to the hook...
Owner's Manual - Page 139
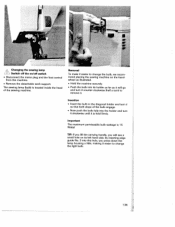
... clockwise until it
so that both stops of the sewing machine. The sewing lamp (bulb) is 1 5 Watts! Changing the sewing lamp Switch off switch • Disconnect the mains plug and the foot control from the machine. • Remove the detachable work support.
Removal To make it easier to remove it
Insertion • Insert the bulb in the diagonal...
Similar Questions


Machine Powers Up, But No Codes Etc. On Display, Its Blank
Machine powers up, but display is Blank. Will not sew etc
Machine powers up, but display is Blank. Will not sew etc
(Posted by prestre 4 years ago)

How Do You Put A Space Between Words In Writing A Pattern Sequence
(Posted by jennifergeraghty3 9 years ago)

Need Help With Thread Tension Pls.
I have a Pfaff Creative 7510 (which I normally love). I am having trouble with thread tension. I am ...
I have a Pfaff Creative 7510 (which I normally love). I am having trouble with thread tension. I am ...
(Posted by nandow52 10 years ago)