
PVDV73 User Guide
Page 5
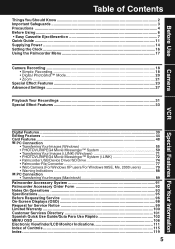
...Cassette Eject/Insertion 7 Quick Guide ...11 Supplying Power ...14 Setting the Clock ...16 Using the Palmcorder Menu 17 Camera Recording ...18 • Simple Recording 18 • Digital PhotoShot™ Mode 20 • Zoom ...21 Special Effect Features 23 Advanced Settings ...27 Playback Your Recordings ...Movie Messenger™ System (i.LINK 72 • Palmcorder USB Device Driver/SD Drive 74 • Palmcorder File Converter 77 • Web Camera (For Windows XP users/For Windows 98SE, Me, 2000 users 79 • Warning Indications 88 PC Connection • Transferring Your Images...
...Cassette Eject/Insertion 7 Quick Guide ...11 Supplying Power ...14 Setting the Clock ...16 Using the Palmcorder Menu 17 Camera Recording ...18 • Simple Recording 18 • Digital PhotoShot™ Mode 20 • Zoom ...21 Special Effect Features 23 Advanced Settings ...27 Playback Your Recordings ...Movie Messenger™ System (i.LINK 72 • Palmcorder USB Device Driver/SD Drive 74 • Palmcorder File Converter 77 • Web Camera (For Windows XP users/For Windows 98SE, Me, 2000 users 79 • Warning Indications 88 PC Connection • Transferring Your Images...
PVDV73 User Guide
Page 17
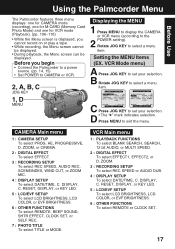
...EX. VCR Main menu 1 : PLAYBACK FUNCTIONS To select BLANK SEARCH, SEARCH, 12 bit AUDIO, or MULTI SPEED. 2 : DIGITAL EFFECT To select EFFECT1, EFFECT2, or D. CAMERA Main menu 1 : CAMERA SETUP To select PROG. DISPLAY, C. RESET, DISPLAY, or KEY LED. 5 : LCD/EVF SETUP To select LCD BRIGHTNESS, LCD.... ZOOM. 3 : RECORDING SETUP To select REC SPEED or AUDIO DUB. 4 : DISPLAY SETUP To select DATE/TIME, C. ZOOM, or CINEMA. 2 : DIGITAL EFFECT To select EFFECT. 3 : RECORDING SETUP To select REC SPEED, AUDIO REC, SCENEINDEX, WIND CUT, or ZOOM MIC. 4 : DISPLAY SETUP To select DATE...
...EX. VCR Main menu 1 : PLAYBACK FUNCTIONS To select BLANK SEARCH, SEARCH, 12 bit AUDIO, or MULTI SPEED. 2 : DIGITAL EFFECT To select EFFECT1, EFFECT2, or D. CAMERA Main menu 1 : CAMERA SETUP To select PROG. DISPLAY, C. RESET, DISPLAY, or KEY LED. 5 : LCD/EVF SETUP To select LCD BRIGHTNESS, LCD.... ZOOM. 3 : RECORDING SETUP To select REC SPEED or AUDIO DUB. 4 : DISPLAY SETUP To select DATE/TIME, C. ZOOM, or CINEMA. 2 : DIGITAL EFFECT To select EFFECT. 3 : RECORDING SETUP To select REC SPEED, AUDIO REC, SCENEINDEX, WIND CUT, or ZOOM MIC. 4 : DISPLAY SETUP To select DATE...
PVDV73 User Guide
Page 20
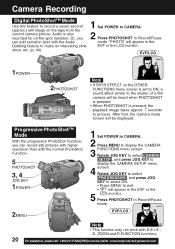
... D.FUNCTION functions. 20 Forassistance, pleasecall: 1-800-211-PANA(7262)orsende-mailto:consumerproducts@panasonic.com EVF/LCD 1POWER 2PHOTOSHOT Note • If SHTR EFFECT on -the-spot narration. After that, the Camera mode screen will appear in Record/Pause mode. Audio is also recorded for on ...the OTHER FUNCTIONS menu screen is pressed, the playback image takes approx. 7 seconds to process. Camera Recording Digital PhotoShot™ Mode Use this feature to display the CAMERA SETUP menu 4 screen. Rotate JOG KEY to select PROGRESSIVE , and press JOG KEY to select ON. &#...
... D.FUNCTION functions. 20 Forassistance, pleasecall: 1-800-211-PANA(7262)orsende-mailto:consumerproducts@panasonic.com EVF/LCD 1POWER 2PHOTOSHOT Note • If SHTR EFFECT on -the-spot narration. After that, the Camera mode screen will appear in Record/Pause mode. Audio is also recorded for on ...the OTHER FUNCTIONS menu screen is pressed, the playback image takes approx. 7 seconds to process. Camera Recording Digital PhotoShot™ Mode Use this feature to display the CAMERA SETUP menu 4 screen. Rotate JOG KEY to select PROGRESSIVE , and press JOG KEY to select ON. &#...
PVDV73 User Guide
Page 24
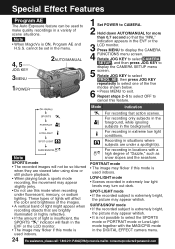
... " indicator will flash in extremely low light levels may appear whitish. • It is not possible to make quality recordings in the DIGITAL EFFECT camera menu. LOW-LIGHT mode • Scenes recorded in the EVF or the LCD monitor. • The image may flicker if this mode...KEY to select PROG. Note • When MagicVu is used indoors. 24 Forassistance, pleasecall: 1-800-211-PANA(7262)orsende-mailto:consumerproducts@panasonic.com For recording only subjects in the foreground, while ignoring subjects in extreme low light conditions. SURF&SNOW For recording in locations with the...
... " indicator will flash in extremely low light levels may appear whitish. • It is not possible to make quality recordings in the DIGITAL EFFECT camera menu. LOW-LIGHT mode • Scenes recorded in the EVF or the LCD monitor. • The image may flicker if this mode...KEY to select PROG. Note • When MagicVu is used indoors. 24 Forassistance, pleasecall: 1-800-211-PANA(7262)orsende-mailto:consumerproducts@panasonic.com For recording only subjects in the foreground, while ignoring subjects in extreme low light conditions. SURF&SNOW For recording in locations with the...
PVDV73 User Guide
Page 26
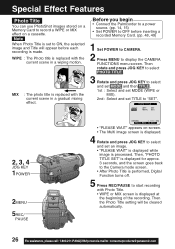
...displayed for approx. 3 seconds, and the screen goes back to the Camera mode screen. • After Photo Title is performed, Digital Function turns off. 5 Press REC/PAUSE to start recording with the... images stored on a cassette. Note When Photo Title is set to display the CAMERA FUNCTIONS menu screen. Then the Photo Title setting will appear before each recording is ...to OFF before inserting a recorded Memory Card. (pp. 48, 49) 1 Set POWER to CAMERA. 2 Press MENU to ON, the selected image and Title will be cleared automatically. 26 Forassistance, pleasecall: ...
...displayed for approx. 3 seconds, and the screen goes back to the Camera mode screen. • After Photo Title is performed, Digital Function turns off. 5 Press REC/PAUSE to start recording with the... images stored on a cassette. Note When Photo Title is set to display the CAMERA FUNCTIONS menu screen. Then the Photo Title setting will appear before each recording is ...to OFF before inserting a recorded Memory Card. (pp. 48, 49) 1 Set POWER to CAMERA. 2 Press MENU to ON, the selected image and Title will be cleared automatically. 26 Forassistance, pleasecall: ...

PVDV73 User Guide
Page 27
... in the EVF or the LCD monitor. 3 Press JOG KEY repeatedly until "AWB" appears in most lighting conditions. Rotate JOG KEY to CAMERA. 2 Hold down until White Balance is in poor lighting conditions. Mode Description Automatically maintains optimum AWB color balance in the EVF or LCD ...JOG KEY to 10X or higher, White Balance cannot be attainable manually in effect. When shooting fluorescent light. However, when using Digital Functions, etc., you may get better results by using the manual adjustment. 3, 4, A, B JOG KEY 1POWER 2AUTO/MANUAL 1 Set POWER to...
... in the EVF or the LCD monitor. 3 Press JOG KEY repeatedly until "AWB" appears in most lighting conditions. Rotate JOG KEY to CAMERA. 2 Hold down until White Balance is in poor lighting conditions. Mode Description Automatically maintains optimum AWB color balance in the EVF or LCD ...JOG KEY to 10X or higher, White Balance cannot be attainable manually in effect. When shooting fluorescent light. However, when using Digital Functions, etc., you may get better results by using the manual adjustment. 3, 4, A, B JOG KEY 1POWER 2AUTO/MANUAL 1 Set POWER to...
PVDV73 User Guide
Page 31
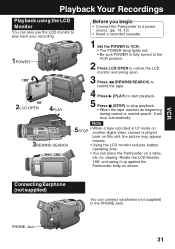
Rotate the LCD Monitor 180° and swing it will stop automatically. 3REWIND SEARCH Note 5 • When a tape recorded in LP mode on STOP another digital video camera is played back on this unit, the picture may appear mosaic. • Using the LCD monitor reduces battery operating time. • You can connect earphones (...
Rotate the LCD Monitor 180° and swing it will stop automatically. 3REWIND SEARCH Note 5 • When a tape recorded in LP mode on STOP another digital video camera is played back on this unit, the picture may appear mosaic. • Using the LCD monitor reduces battery operating time. • You can connect earphones (...
PVDV73 User Guide
Page 39
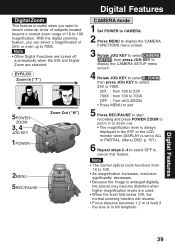
...is always displayed in full telephoto. Digital Features 39 EVF/LCD Zoom In ("T") D.ZOOM 5POWER ZOOM 3, 4 JOG KEY 1POWER Zoom Out ("W") 2MENU 5REC/PAUSE CAMERA mode 1 Set POWER to CAMERA. 2 Press MENU to display the CAMERA FUNCTIONS menu screen. 3 Rotate JOG KEY to select CAMERA SETUP , then press JOG KEY ...to display the CAMERA SETUP menu screen. 4 Rotate JOG KEY to 700X. Note • The normal optical zoom functions from 10X to 700X OFF : Turn off automatically when the EIS and Digital Zoom are used. • When...
...is always displayed in full telephoto. Digital Features 39 EVF/LCD Zoom In ("T") D.ZOOM 5POWER ZOOM 3, 4 JOG KEY 1POWER Zoom Out ("W") 2MENU 5REC/PAUSE CAMERA mode 1 Set POWER to CAMERA. 2 Press MENU to display the CAMERA FUNCTIONS menu screen. 3 Rotate JOG KEY to select CAMERA SETUP , then press JOG KEY ...to display the CAMERA SETUP menu screen. 4 Rotate JOG KEY to 700X. Note • The normal optical zoom functions from 10X to 700X OFF : Turn off automatically when the EIS and Digital Zoom are used. • When...
PVDV73 User Guide
Page 40
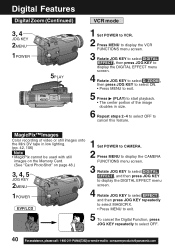
... page 48.) 3, 4, 5 JOG KEY 2MENU 1POWER EVF/LCD 1 Set POWER to CAMERA. 2 Press MENU to display the CAMERA FUNCTIONS menu screen. 3 Rotate JOG KEY to select DIGITAL EFFECT , and then press JOG KEY to display the DIGITAL EFFECT menu screen. 4 Rotate JOG KEY to select EFFECT , and then press JOG ... the DIGITAL EFFECT menu screen. 4 Rotate JOG KEY to select OFF. 40 Forassistance, pleasecall: 1-800-211-PANA(7262)orsende-mailto:consumerproducts@panasonic.com ZOOM , then press JOG KEY to select ON. • Press MENU to exit. 5 Press (PLAY) to start playback. • The center portion of video or ...
... page 48.) 3, 4, 5 JOG KEY 2MENU 1POWER EVF/LCD 1 Set POWER to CAMERA. 2 Press MENU to display the CAMERA FUNCTIONS menu screen. 3 Rotate JOG KEY to select DIGITAL EFFECT , and then press JOG KEY to display the DIGITAL EFFECT menu screen. 4 Rotate JOG KEY to select EFFECT , and then press JOG ... the DIGITAL EFFECT menu screen. 4 Rotate JOG KEY to select OFF. 40 Forassistance, pleasecall: 1-800-211-PANA(7262)orsende-mailto:consumerproducts@panasonic.com ZOOM , then press JOG KEY to select ON. • Press MENU to exit. 5 Press (PLAY) to start playback. • The center portion of video or ...
PVDV73 User Guide
Page 41
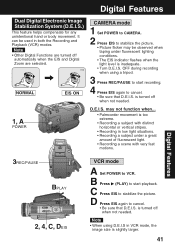
NORMAL 1, A POWER EIS ON CAMERA mode 1 Set POWER to CAMERA. 2 Press EIS to cancel. • Be sure that D.E.I .S in VCR mode, the image size is slightly larger. 41 C Press EIS to VCR. OFF during recording ... the picture. • Picture flicker may not function when... • Palmcorder movement is inadequate. • Turn D.E.I .S. is turned off automatically when the EIS and Digital Zoom are selected. Digital Features 3REC/PAUSE BPLAY 2, 4, C, DEIS VCR mode A Set POWER to stabilize the picture. is turned off when not needed . B Press (PLAY) to cancel...
NORMAL 1, A POWER EIS ON CAMERA mode 1 Set POWER to CAMERA. 2 Press EIS to cancel. • Be sure that D.E.I .S in VCR mode, the image size is slightly larger. 41 C Press EIS to VCR. OFF during recording ... the picture. • Picture flicker may not function when... • Palmcorder movement is inadequate. • Turn D.E.I .S. is turned off automatically when the EIS and Digital Zoom are selected. Digital Features 3REC/PAUSE BPLAY 2, 4, C, DEIS VCR mode A Set POWER to stabilize the picture. is turned off when not needed . B Press (PLAY) to cancel...
PVDV73 User Guide
Page 42
... is expanded vertically. MIX (Not available during playback) The current scene is finished, Digital Function turns OFF. 42 Forassistance, pleasecall: 1-800-211-PANA(7262)orsende-mailto:consumerproducts@panasonic.com d.Press RECORD/PAUSE to select one of the memorized scene. When Photo Title .... c. To use the WIPE function a. Digital Features Other Digital Functions Use the following scene during playback) Color recording of video or still images onto the Mini DV Tape in sepia, a brownish color, giving it an antique look. In Camera mode, set the "EFFECT" item in...
... is expanded vertically. MIX (Not available during playback) The current scene is finished, Digital Function turns OFF. 42 Forassistance, pleasecall: 1-800-211-PANA(7262)orsende-mailto:consumerproducts@panasonic.com d.Press RECORD/PAUSE to select one of the memorized scene. When Photo Title .... c. To use the WIPE function a. Digital Features Other Digital Functions Use the following scene during playback) Color recording of video or still images onto the Mini DV Tape in sepia, a brownish color, giving it an antique look. In Camera mode, set the "EFFECT" item in...
PVDV73 User Guide
Page 43
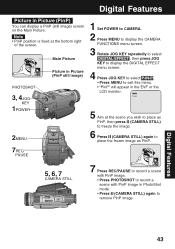
...KEY 1POWER Main Picture Picture in Picture (PinP still image) 2MENU 1 Set POWER to CAMERA. 2 Press MENU to display the CAMERA FUNCTIONS menu screen. 3 Rotate JOG KEY repeatedly to select DIGITAL EFFECT , then press JOG KEY to display the DIGITAL EFFECT menu screen. 4 Press JOG KEY to select P-IN-P . • Press... MENU to remove PinP image. Note • PinP position is fixed at the scene you wish to place as PinP, then press (CAMERA STILL) to freeze the image. 6 Press (CAMERA STILL) again to ...
...KEY 1POWER Main Picture Picture in Picture (PinP still image) 2MENU 1 Set POWER to CAMERA. 2 Press MENU to display the CAMERA FUNCTIONS menu screen. 3 Rotate JOG KEY repeatedly to select DIGITAL EFFECT , then press JOG KEY to display the DIGITAL EFFECT menu screen. 4 Press JOG KEY to select P-IN-P . • Press... MENU to remove PinP image. Note • PinP position is fixed at the scene you wish to place as PinP, then press (CAMERA STILL) to freeze the image. 6 Press (CAMERA STILL) again to ...
PVDV73 User Guide
Page 50
...Video Monitor and LCD Panel will not be viewed on this may cause irreversible damage to the Memory Card. • Press (M-STOP) to return to select BACK (previous image), MULTI (Multi Image screen), or NEXT (next image). Images saved on the Memory Card using other Digital Still Cameras...• "PLEASE WAIT" appears on the picture recorded of the Memory Card. 50 Forassistance, pleasecall: 1-800-211-PANA(7262)orsende-mailto:consumerproducts@panasonic.com Warning • While "PLEASE WAIT" is displayed, DO NOT turn off the Palmcorder or unplug the AC Adaptor (supplied) because this product...
...Video Monitor and LCD Panel will not be viewed on this may cause irreversible damage to the Memory Card. • Press (M-STOP) to return to select BACK (previous image), MULTI (Multi Image screen), or NEXT (next image). Images saved on the Memory Card using other Digital Still Cameras...• "PLEASE WAIT" appears on the picture recorded of the Memory Card. 50 Forassistance, pleasecall: 1-800-211-PANA(7262)orsende-mailto:consumerproducts@panasonic.com Warning • While "PLEASE WAIT" is displayed, DO NOT turn off the Palmcorder or unplug the AC Adaptor (supplied) because this product...
PVDV73 User Guide
Page 57
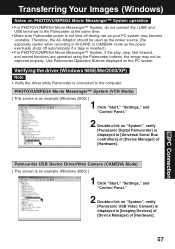
... example (Windows 2000) ] 1 Click "Start," "Settings," and "Control Panel." 2 Double-click on "System", verify [Panasonic USB Video Camera] is displayed in M-CARD or CAMERA mode as the power eventually shuts off automatically if a tape is not shut off during use as the power source. (Be... [ This screen is an example (Windows 2000) ] 1 Click "Start," "Settings," and "Control Panel." 2 Double-click on "System", verify [Panasonic Digital Palmcorder] is connected to the Palmcorder at the same time. • Make sure Palmcorder power is inserted.) • For PHOTOVU/MPEG4 Movie Messenger™...
... example (Windows 2000) ] 1 Click "Start," "Settings," and "Control Panel." 2 Double-click on "System", verify [Panasonic USB Video Camera] is displayed in M-CARD or CAMERA mode as the power eventually shuts off automatically if a tape is not shut off during use as the power source. (Be... [ This screen is an example (Windows 2000) ] 1 Click "Start," "Settings," and "Control Panel." 2 Double-click on "System", verify [Panasonic Digital Palmcorder] is connected to the Palmcorder at the same time. • Make sure Palmcorder power is inserted.) • For PHOTOVU/MPEG4 Movie Messenger™...
PVDV73 User Guide
Page 77
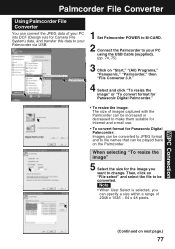
...on the Palmcorder. Palmcorder File Converter Using Palmcorder File Converter You can convert the JPEG data of your PC into DCF (Design rule for Camera File System) data, and transfer this data to your Palmcorder via USB. 1 Set Palmcorder POWER to M-CARD. 2 Connect the Palmcorder ...the USB Cable (supplied). (pp. 74, 75) 3 Click on "Start," "(All) Programs," "Panasonic," "Palmcorder," then "File Converter 3.0." 4 Select and click "To resize the image" or "To convert format for Panasonic Digital Palmcorder." • To resize the image: The size of images captured with the Palmcorder can be ...
...on the Palmcorder. Palmcorder File Converter Using Palmcorder File Converter You can convert the JPEG data of your PC into DCF (Design rule for Camera File System) data, and transfer this data to your Palmcorder via USB. 1 Set Palmcorder POWER to M-CARD. 2 Connect the Palmcorder ...the USB Cable (supplied). (pp. 74, 75) 3 Click on "Start," "(All) Programs," "Panasonic," "Palmcorder," then "File Converter 3.0." 4 Select and click "To resize the image" or "To convert format for Panasonic Digital Palmcorder." • To resize the image: The size of images captured with the Palmcorder can be ...
PVDV73 User Guide
Page 95
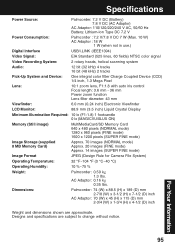
... : 7.2 V/7.8 V DC 7 W (Max. 10 W) AC Adaptor : 18 W 1 W (when not in use.) Digital Interface USB/i.LINK (IEEE1394) Video Signal: EIA Standard (525 lines, 60 fields) NTSC color signal Video Recording System: 2 rotary heads, helical scanning system Audio: 12 bit (32 kHz) 4 tracks 16 bit (48 kHz) 2... Approx. 70 images (NORMAL mode) Approx. 20 images (FINE mode) Approx. 14 images (SUPER FINE mode) Image Format JPEG (Design Rule for Camera File System) Operating Temperature: 32 °F~104 °F (0 °C~40 °C) Operating Humidity: 10 %~75 % Weight: Palmcorder : 0.59 kg...
... : 7.2 V/7.8 V DC 7 W (Max. 10 W) AC Adaptor : 18 W 1 W (when not in use.) Digital Interface USB/i.LINK (IEEE1394) Video Signal: EIA Standard (525 lines, 60 fields) NTSC color signal Video Recording System: 2 rotary heads, helical scanning system Audio: 12 bit (32 kHz) 4 tracks 16 bit (48 kHz) 2... Approx. 70 images (NORMAL mode) Approx. 20 images (FINE mode) Approx. 14 images (SUPER FINE mode) Image Format JPEG (Design Rule for Camera File System) Operating Temperature: 32 °F~104 °F (0 °C~40 °C) Operating Humidity: 10 %~75 % Weight: Palmcorder : 0.59 kg...
PVDV73 User Guide
Page 106
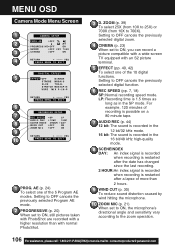
... wind hitting the microphone. 10 ZOOM MIC (p. 21) When set to the zoom operation. 106 Forassistance, pleasecall: 1-800-211-PANA(7262)orsende-mailto:consumerproducts@panasonic.com AE (p. 24) To select one of the 5 Program AE modes. Setting to OFF cancels the previously selected Program AE mode. 2 PROGRESSIVE (p. 20... the SP mode. ZOOM (p. 39) To select 25X (from 10X to 25X) or 700X (from 10X to OFF cancels the previously selected digital function. 6 REC SPEED (pp. 7, 18) SP: Normal recording speed mode. MENU OSD Camera Mode Menu Screen 1 2 3 4 5 6 7 8 9 10 1 PROG. Setting to 700X).
... wind hitting the microphone. 10 ZOOM MIC (p. 21) When set to the zoom operation. 106 Forassistance, pleasecall: 1-800-211-PANA(7262)orsende-mailto:consumerproducts@panasonic.com AE (p. 24) To select one of the 5 Program AE modes. Setting to OFF cancels the previously selected Program AE mode. 2 PROGRESSIVE (p. 20... the SP mode. ZOOM (p. 39) To select 25X (from 10X to 25X) or 700X (from 10X to OFF cancels the previously selected digital function. 6 REC SPEED (pp. 7, 18) SP: Normal recording speed mode. MENU OSD Camera Mode Menu Screen 1 2 3 4 5 6 7 8 9 10 1 PROG. Setting to 700X).
PVDV73 User Guide
Page 111
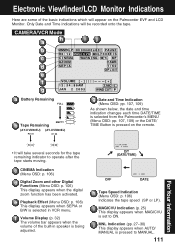
Only Date and Time indications will appear on the remote. CAMERA/VCR Mode a h b c d e f g ij a Battery Remaining FULL EMPTY b Tape Remaining (AY-DVM30EJ) (AY-DVM60EJ) R0:30 R1:00 g Date and Time Indication (Menu OSD: pp. 107... appears when AUTO/ MANUAL is set to operate after the tape starts moving. c CINEMA Indication (Menu OSD: p. 106) d Digital Zoom and other Digital Functions (Menu OSD: p. 106) This display appears when the digital zoom function has been activated. e Playback Effect (Menu OSD: p. 108) This display appears when SEPIA or B/W is selected in...
Only Date and Time indications will appear on the remote. CAMERA/VCR Mode a h b c d e f g ij a Battery Remaining FULL EMPTY b Tape Remaining (AY-DVM30EJ) (AY-DVM60EJ) R0:30 R1:00 g Date and Time Indication (Menu OSD: pp. 107... appears when AUTO/ MANUAL is set to operate after the tape starts moving. c CINEMA Indication (Menu OSD: p. 106) d Digital Zoom and other Digital Functions (Menu OSD: p. 106) This display appears when the digital zoom function has been activated. e Playback Effect (Menu OSD: p. 108) This display appears when SEPIA or B/W is selected in...
PVDV73 User Guide
Page 113
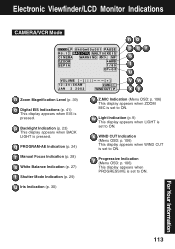
... set to ON. y Progressive Indication (Menu OSD: p. 106) This display appears when PROGRESSIVE is set to ON. Electronic Viewfinder/LCD Monitor Indications CAMERA/VCR Mode n Zoom Magnification Level (p. 39) o Digital EIS Indications (p. 41) This display appears when EIS is pressed. p Backlight Indication (p. 23) This display appears when BACK LIGHT is pressed. For...
... set to ON. y Progressive Indication (Menu OSD: p. 106) This display appears when PROGRESSIVE is set to ON. Electronic Viewfinder/LCD Monitor Indications CAMERA/VCR Mode n Zoom Magnification Level (p. 39) o Digital EIS Indications (p. 41) This display appears when EIS is pressed. p Backlight Indication (p. 23) This display appears when BACK LIGHT is pressed. For...
PVDV73 User Guide
Page 119
...Indication 111 DC Power Cable . 6, 15, 91 Delete All Image Pages 52 Delete Specific Images . 51 DEW Indication 98 Digital E.I.S 41 Digital Functions 42 Digital PhotoShot™ Mode 20 Digital Video Cassette Tape 7 Digital Zoom 39, 40 DV Interface Cable (i.LINK 47, 71, 91 DPOF Setting 54 E Easy Cassette Eject ....... 7 Erase ... the Palmcorder Menu 17 V Variable Speed Search .. 34 VHF Connecting Cable .. 46 Volume Display ..... 32, 111 W Warning Indications ...... 88 Web Camera 79~87 White Balance 27 WIND CUT 30 Z Zoom In/Out 21 Zoom Microphone ......... 21 119 For Your Information
...Indication 111 DC Power Cable . 6, 15, 91 Delete All Image Pages 52 Delete Specific Images . 51 DEW Indication 98 Digital E.I.S 41 Digital Functions 42 Digital PhotoShot™ Mode 20 Digital Video Cassette Tape 7 Digital Zoom 39, 40 DV Interface Cable (i.LINK 47, 71, 91 DPOF Setting 54 E Easy Cassette Eject ....... 7 Erase ... the Palmcorder Menu 17 V Variable Speed Search .. 34 VHF Connecting Cable .. 46 Volume Display ..... 32, 111 W Warning Indications ...... 88 Web Camera 79~87 White Balance 27 WIND CUT 30 Z Zoom In/Out 21 Zoom Microphone ......... 21 119 For Your Information


