

PVDV702 User Guide
Page 1
Spanish Quick Use Guide is included. Guía para rápida consulta en español está incluida. For assistance, please call : 1-800-211-PANA(7262) or send e-mail to connect, operate or adjust this product, please read these instructions thoroughly. PV-DV702 Mini Before attempting to : consumerproducts@panasonic.com LSQT0564A R Digital Video Camcorder Operating Instructions Model No.
Spanish Quick Use Guide is included. Guía para rápida consulta en español está incluida. For assistance, please call : 1-800-211-PANA(7262) or send e-mail to connect, operate or adjust this product, please read these instructions thoroughly. PV-DV702 Mini Before attempting to : consumerproducts@panasonic.com LSQT0564A R Digital Video Camcorder Operating Instructions Model No.
PVDV702 User Guide
Page 2
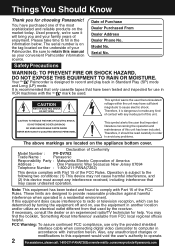
... the unit may cause undesired operation. Please take time to this manual as your convenient Palmcorder information source. Date of the FCC Rules. These limits are located on , use only the provided shielded interface cable when connecting digital video camcorder to : consumerproducts@panasonic.com Things You Should Know Thank you and your family years of enjoyment. The serial number is dangerous to provide...
... the unit may cause undesired operation. Please take time to this manual as your convenient Palmcorder information source. Date of the FCC Rules. These limits are located on , use only the provided shielded interface cable when connecting digital video camcorder to : consumerproducts@panasonic.com Things You Should Know Thank you and your family years of enjoyment. The serial number is dangerous to provide...
PVDV702 User Guide
Page 3
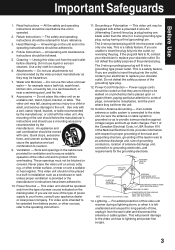
... read before cleaning. If an outside antenna or cable system is connected to cords of this video unit near or over a radiator or heat register. If you are not sure of the type of the video unit and to the operating instructions. 11. All the safety and operating instructions should be blocked or covered. These openings must not be operated only from battery power, or...
... read before cleaning. If an outside antenna or cable system is connected to cords of this video unit near or over a radiator or heat register. If you are not sure of the type of the video unit and to the operating instructions. 11. All the safety and operating instructions should be blocked or covered. These openings must not be operated only from battery power, or...

PVDV702 User Guide
Page 4
... technician to restore the video unit to qualified service personnel under the following the operating instructions. Such as contact with your Palmcorder. Use a commercial Palmcorder lens solution and lens paper when cleaning the lens. Overloading - Damage Requiring Service - Replacement Parts - When replacement parts are no user serviceable parts inside the unit. • DO NOT LEAVE YOUR PALMCORDER OR THE POWER SUPPLY TURNED ON WHEN NOT IN USE. • STORAGE OF...
... technician to restore the video unit to qualified service personnel under the following the operating instructions. Such as contact with your Palmcorder. Use a commercial Palmcorder lens solution and lens paper when cleaning the lens. Overloading - Damage Requiring Service - Replacement Parts - When replacement parts are no user serviceable parts inside the unit. • DO NOT LEAVE YOUR PALMCORDER OR THE POWER SUPPLY TURNED ON WHEN NOT IN USE. • STORAGE OF...
PVDV702 User Guide
Page 5
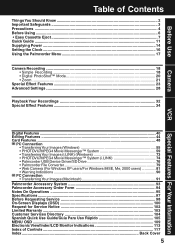
... Should Know 2 Important Safeguards ...3 Precautions ...4 Before Using ...6 • Easy Cassette Eject ...7 Quick Guide ...11 Supplying Power ...14 Setting the Clock ...16 Using the Palmcorder Menu 17 Camera Recording ...18 • Simple Recording 18 • Digital PhotoShot™ Mode 20 • Zoom ...21 Special Effect Features 23 Advanced Settings ...28 Playback Your Recordings 32 Special Effect Features 34 Digital Features ...40 Editing Features ...44 Card Features ...48 PC Connection • Transferring Your Images (Windows 55 •...
... Should Know 2 Important Safeguards ...3 Precautions ...4 Before Using ...6 • Easy Cassette Eject ...7 Quick Guide ...11 Supplying Power ...14 Setting the Clock ...16 Using the Palmcorder Menu 17 Camera Recording ...18 • Simple Recording 18 • Digital PhotoShot™ Mode 20 • Zoom ...21 Special Effect Features 23 Advanced Settings ...28 Playback Your Recordings 32 Special Effect Features 34 Digital Features ...40 Editing Features ...44 Card Features ...48 PC Connection • Transferring Your Images (Windows 55 •...

PVDV702 User Guide
Page 7
... ensure recordings are not accidentally erased. 1 To prevent accidental erasure: Slide the tab to close ). Before you begin • Connect the Palmcorder to a power source. (pp. 14, 15) 4PUSH CLOSE 2 1 TAPE EJECT Press LCD-OPEN to a power source, the cassette can be inserted and ejected without turning the Palmcorder on. Before Use Before Using Record Speed/Playback Time Use only those tapes having the Mini logo indicating the 6.35 mm digital standard...
... ensure recordings are not accidentally erased. 1 To prevent accidental erasure: Slide the tab to close ). Before you begin • Connect the Palmcorder to a power source. (pp. 14, 15) 4PUSH CLOSE 2 1 TAPE EJECT Press LCD-OPEN to a power source, the cassette can be inserted and ejected without turning the Palmcorder on. Before Use Before Using Record Speed/Playback Time Use only those tapes having the Mini logo indicating the 6.35 mm digital standard...

PVDV702 User Guide
Page 17
... ZOOM-MIC. 4 : SET-UP CAMERA SET-UP menu is displayed. Rotate JOG KEY to exit the menu. Press MENU twice to select a menu item. To select REMOTE or BEEP. 5 : DISPLAY SETTING DISPLAY SETTING menu is displayed. To select TITLE or MODE. Using the Palmcorder Menu Before Use The Palmcorder features three menu displays: one for CAMERA mode (recording), one for M-CARD (Memory Card Photo Mode) and one for VCR mode (Playback). (pp. 109~112) • While the Menu screen is displayed, you begin • Connect the Palmcorder to a power...
... ZOOM-MIC. 4 : SET-UP CAMERA SET-UP menu is displayed. Rotate JOG KEY to exit the menu. Press MENU twice to select a menu item. To select REMOTE or BEEP. 5 : DISPLAY SETTING DISPLAY SETTING menu is displayed. To select TITLE or MODE. Using the Palmcorder Menu Before Use The Palmcorder features three menu displays: one for CAMERA mode (recording), one for M-CARD (Memory Card Photo Mode) and one for VCR mode (Playback). (pp. 109~112) • While the Menu screen is displayed, you begin • Connect the Palmcorder to a power...

PVDV702 User Guide
Page 29
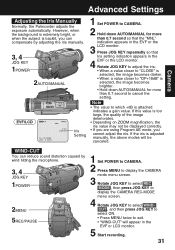
... zoom range. Manual Focus 1 Use Manual Focus (MF) when recording ... • a subject through glass. Macro Focus (for close as a white wall. 2 Hold down AUTO/MANUAL for MF, AE, W.BALANCE, or 5 3 M.FOCUS FOCUS RING BACK LIGHT to the maximum wide angle position. Camera Advanced Settings Auto Focus The Palmcorder automatically adjusts the focus over 2AUTO/MANUAL the entire zooming range. • It may be necessary to focus the image properly. Note • DISPLAY (Menu OSD: p. 110) must be displayed...
... zoom range. Manual Focus 1 Use Manual Focus (MF) when recording ... • a subject through glass. Macro Focus (for close as a white wall. 2 Hold down AUTO/MANUAL for MF, AE, W.BALANCE, or 5 3 M.FOCUS FOCUS RING BACK LIGHT to the maximum wide angle position. Camera Advanced Settings Auto Focus The Palmcorder automatically adjusts the focus over 2AUTO/MANUAL the entire zooming range. • It may be necessary to focus the image properly. Note • DISPLAY (Menu OSD: p. 110) must be displayed...
PVDV702 User Guide
Page 31
... KEY to display the CAMERA REC-MODE menu screen. 4 Rotate JOG KEY to select WINDCUT , and then press JOG KEY to select ON. • Press MENU twice to exit. • "WIND-CUT" will be displayed correctly. • If you are using Program AE mode, you can reduce sound distortion caused by adjusting the iris manually. 3, 4 JOG KEY 1POWER 2AUTO/MANUAL EVF/LCD Iris Setting 1 Set POWER to "OP...
... KEY to display the CAMERA REC-MODE menu screen. 4 Rotate JOG KEY to select WINDCUT , and then press JOG KEY to select ON. • Press MENU twice to exit. • "WIND-CUT" will be displayed correctly. • If you are using Program AE mode, you can reduce sound distortion caused by adjusting the iris manually. 3, 4 JOG KEY 1POWER 2AUTO/MANUAL EVF/LCD Iris Setting 1 Set POWER to "OP...
PVDV702 User Guide
Page 32
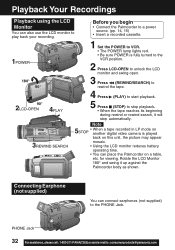
... • Connect the Palmcorder to a power source. (pp. 14, 15) • Insert a recorded cassette. 1POWER 1 Set the POWER to VCR. • The POWER lamp lights red. • Be sure POWER is played back on a table, etc. Rotate the LCD Monitor 180° and swing it will stop automatically. 3REWIND SEARCH Note 5 • When a tape recorded in LP mode on STOP another digital video camera is fully turned to the VCR position. 2 Press LCD-OPEN to...
... • Connect the Palmcorder to a power source. (pp. 14, 15) • Insert a recorded cassette. 1POWER 1 Set the POWER to VCR. • The POWER lamp lights red. • Be sure POWER is played back on a table, etc. Rotate the LCD Monitor 180° and swing it will stop automatically. 3REWIND SEARCH Note 5 • When a tape recorded in LP mode on STOP another digital video camera is fully turned to the VCR position. 2 Press LCD-OPEN to...

PVDV702 User Guide
Page 33
... Repeat Playback mode when the tape reaches its end. • The letter "R " will appear on the screen. 33 Adjusting the Volume 1, 2 VOLUME Built-in Speaker 1 Rotate VOLUME to adjust the volume of tape and start recording exactly where you left off. 3, 4, 5 JOG KEY 2MENU 1POWER EVF/LCD 1 Set POWER to VCR. 2 Press MENU to display the VCR mode menu screen. 3 Rotate JOG KEY to select PLAY MODE , then press JOG KEY to display the VCR PLAY MODE menu screen. 4 Rotate...
... Repeat Playback mode when the tape reaches its end. • The letter "R " will appear on the screen. 33 Adjusting the Volume 1, 2 VOLUME Built-in Speaker 1 Rotate VOLUME to adjust the volume of tape and start recording exactly where you left off. 3, 4, 5 JOG KEY 2MENU 1POWER EVF/LCD 1 Set POWER to VCR. 2 Press MENU to display the VCR mode menu screen. 3 Rotate JOG KEY to select PLAY MODE , then press JOG KEY to display the VCR PLAY MODE menu screen. 4 Rotate...

PVDV702 User Guide
Page 41
... 1POWER 5PLAY Digital Features VCR mode 1 Set POWER to VCR. 2 Press MENU to display the VCR MENU screen. 3 Rotate JOG KEY to select PLAY FUNCTION , then press JOG KEY to display the VCR PLAY FUNCTION menu screen. 4 Rotate JOG KEY to select D.ZOOM , then press JOG KEY to select ON. • Press MENU twice to exit. 5 Press (PLAY) to start playback. • The center portion of video or still images onto the Mini DV tape in size. 6 Repeat...
... 1POWER 5PLAY Digital Features VCR mode 1 Set POWER to VCR. 2 Press MENU to display the VCR MENU screen. 3 Rotate JOG KEY to select PLAY FUNCTION , then press JOG KEY to display the VCR PLAY FUNCTION menu screen. 4 Rotate JOG KEY to select D.ZOOM , then press JOG KEY to select ON. • Press MENU twice to exit. 5 Press (PLAY) to start playback. • The center portion of video or still images onto the Mini DV tape in size. 6 Repeat...

PVDV702 User Guide
Page 43
... Picture. Press REC/PAUSE to select OFF. d.Press RECORD/PAUSE to your recordings or playback. When Photo Title is selected. TRAIL The subject being recorded creates a trail when in sepia, a brownish color, giving it an antique look. Note • When Photo Title is played back in black-andwhite. 1 Set POWER to CAMERA or VCR. 2 Press MENU to display the menu screen. 3 Rotate JOG KEY to select D.FUNCTION in the CAMERA mode menu screen or PLAY FUNCTION in the VCR mode menu screen...
... Picture. Press REC/PAUSE to select OFF. d.Press RECORD/PAUSE to your recordings or playback. When Photo Title is selected. TRAIL The subject being recorded creates a trail when in sepia, a brownish color, giving it an antique look. Note • When Photo Title is played back in black-andwhite. 1 Set POWER to CAMERA or VCR. 2 Press MENU to display the menu screen. 3 Rotate JOG KEY to select D.FUNCTION in the CAMERA mode menu screen or PLAY FUNCTION in the VCR mode menu screen...
PVDV702 User Guide
Page 44
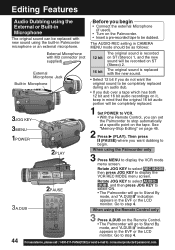
... By mode, and "A.DUB " indication appears in the EVF or the LCD monitor. Rotate JOG KEY to select REC MODE , then press JOG KEY to begin • Connect the external Microphone (if used). • Turn on the Palmcorder. • Insert a pre-recorded tape to display the VCR mode menu screen. Editing Features Audio Dubbing using the External or Built-in Microphone The original sound can set the Palmcorder to stop automatically at a specific point...
... By mode, and "A.DUB " indication appears in the EVF or the LCD monitor. Rotate JOG KEY to select REC MODE , then press JOG KEY to begin • Connect the external Microphone (if used). • Turn on the Palmcorder. • Insert a pre-recorded tape to display the VCR mode menu screen. Editing Features Audio Dubbing using the External or Built-in Microphone The original sound can set the Palmcorder to stop automatically at a specific point...
PVDV702 User Guide
Page 57
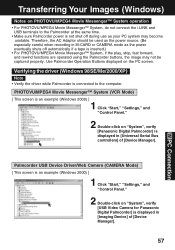
... when recording in M-CARD or CAMERA mode as the power eventually shuts off during use as your PC system may become unstable. Therefore, the AC Adaptor should be captured properly. Palmcorder USB Device Driver/Web Camera (CAMERA Mode) [ This screen is an example (Windows 2000) ] 1 Click "Start," "Settings," and "Control Panel." 2 Double-click on the PC screen. Transferring Your Images (Windows) Notes on "System", verify [Panasonic Digital Palmcorder] is displayed in [Universal Serial Bus controllers] of [Device...
... when recording in M-CARD or CAMERA mode as the power eventually shuts off during use as your PC system may become unstable. Therefore, the AC Adaptor should be captured properly. Palmcorder USB Device Driver/Web Camera (CAMERA Mode) [ This screen is an example (Windows 2000) ] 1 Click "Start," "Settings," and "Control Panel." 2 Double-click on the PC screen. Transferring Your Images (Windows) Notes on "System", verify [Panasonic Digital Palmcorder] is displayed in [Universal Serial Bus controllers] of [Device...

PVDV702 User Guide
Page 61
... a recorded tape. (p. 11) 1 Set Palmcorder POWER to VCR. 2 Connect the Palmcorder to Help on "Start," "(All) Programs," "Panasonic," "MPEG4 MovieMessenger System 1.00," then "MovieMessenger." 4 "PHOTOVU/MPEG4 MovieMessenger System 1.00" is running, do not perform the following operations... PHOTOVU/MPEG4 Movie Messenger™ System Running the PHOTOVU/ MPEG4 Movie Messenger™ System* * PHOTOVU: You can transfer Motion images from your PC using the USB Cable or DV Interface Cable...
... a recorded tape. (p. 11) 1 Set Palmcorder POWER to VCR. 2 Connect the Palmcorder to Help on "Start," "(All) Programs," "Panasonic," "MPEG4 MovieMessenger System 1.00," then "MovieMessenger." 4 "PHOTOVU/MPEG4 MovieMessenger System 1.00" is running, do not perform the following operations... PHOTOVU/MPEG4 Movie Messenger™ System Running the PHOTOVU/ MPEG4 Movie Messenger™ System* * PHOTOVU: You can transfer Motion images from your PC using the USB Cable or DV Interface Cable...

PVDV702 User Guide
Page 63
... software Help menu. 63 Note • If the image cannot be displayed as well. (Only size for still images.) To view Still images 4 Click on page 61 to run the PHOTOVU/MPEG4 Movie 2 You can also playback a motion image by simply pointing at the thumbnail with your mouse. Duration Rec Time, and size are displayed. Sound: Sound image data (*.WAV) is displayed. Messenger™ System. PHOTOVU/MPEG4 Movie Messenger™ System Playing back the saved Motion...
... software Help menu. 63 Note • If the image cannot be displayed as well. (Only size for still images.) To view Still images 4 Click on page 61 to run the PHOTOVU/MPEG4 Movie 2 You can also playback a motion image by simply pointing at the thumbnail with your mouse. Duration Rec Time, and size are displayed. Sound: Sound image data (*.WAV) is displayed. Messenger™ System. PHOTOVU/MPEG4 Movie Messenger™ System Playing back the saved Motion...

PVDV702 User Guide
Page 64
... Slide Edit A collection of the playback start position. 2 Movie Mode You can display motion images. 3 Open Movie You can open folders containing video files (*.AVI, *.WMV). 4 Open Audio You can open the View Manager screen. 6 Org. Valid only when the file is opened in the VideoGift screen. 5 View Manager You can open folders containing audio files (*.WAV). PHOTOVU/MPEG4 Movie Messenger™ System VideoGift Screen You can use these features using the VideoGift Screen. 14 1 9 15 2 10 3 11...
... Slide Edit A collection of the playback start position. 2 Movie Mode You can display motion images. 3 Open Movie You can open folders containing video files (*.AVI, *.WMV). 4 Open Audio You can open the View Manager screen. 6 Org. Valid only when the file is opened in the VideoGift screen. 5 View Manager You can open folders containing audio files (*.WAV). PHOTOVU/MPEG4 Movie Messenger™ System VideoGift Screen You can use these features using the VideoGift Screen. 14 1 9 15 2 10 3 11...

PVDV702 User Guide
Page 109
... record a picture compatible with a wide-screen TV equipped with a visual shutter effect and click sound. 10 SELF-REC (p. 22) NORMAL: During self-recording, the picture on the LCD Monitor is restarted after the date has changed since the last recording. 2 HOUR:An index signal is recorded when recording is the same as in the PhotoShot mode are recorded with an S2 picture terminal. 6 REC-SPEED (pp. 7, 18) SP: Normal recording speed mode. LP: Recording time...
... record a picture compatible with a wide-screen TV equipped with a visual shutter effect and click sound. 10 SELF-REC (p. 22) NORMAL: During self-recording, the picture on the LCD Monitor is restarted after the date has changed since the last recording. 2 HOUR:An index signal is recorded when recording is the same as in the PhotoShot mode are recorded with an S2 picture terminal. 6 REC-SPEED (pp. 7, 18) SP: Normal recording speed mode. LP: Recording time...
PVDV702 User Guide
Page 120
...CD-ROM 6, 56 CINEMA Mode 23 Cleaning Care for Video Heads 98 Clock Battery 100 Clock Set 16 Connecting Earphone .......... 32 Copying from Digital Equipment 47 Copying your Tapes 46 Customer Services Directory 104 D Date and Time Indication ... 113 DC Power Cable ......... 6, 15, 93 Delete All Image Pages ....... 52 Delete Specific Images ........ 51 DEW Indication 100 Digital E.I.S 42 Digital Functions 43 Digital PhotoShot™ Mode ... 20 Digital Video Cassette Tape ... 7 Digital Zoom 40, 41 DV Interface Cable (i.LINK 47, 73, 93 DPOF Setting 54 E Easy Cassette Eject 7 Erase...
...CD-ROM 6, 56 CINEMA Mode 23 Cleaning Care for Video Heads 98 Clock Battery 100 Clock Set 16 Connecting Earphone .......... 32 Copying from Digital Equipment 47 Copying your Tapes 46 Customer Services Directory 104 D Date and Time Indication ... 113 DC Power Cable ......... 6, 15, 93 Delete All Image Pages ....... 52 Delete Specific Images ........ 51 DEW Indication 100 Digital E.I.S 42 Digital Functions 43 Digital PhotoShot™ Mode ... 20 Digital Video Cassette Tape ... 7 Digital Zoom 40, 41 DV Interface Cable (i.LINK 47, 73, 93 DPOF Setting 54 E Easy Cassette Eject 7 Erase...


