
PVDV203 User Guide
Page 1
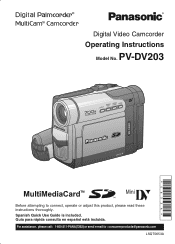
For assistance, please call : 1-800-211-PANA(7262) or send e-mail to connect, operate or adjust this product, please read these instructions thoroughly. Guía para rápida consulta en español está incluida. PV-DV203 Mini Before attempting to : consumerproducts@panasonic.com LSQT0653A R Digital Video Camcorder Operating Instructions Model No. Spanish Quick Use Guide is included.
For assistance, please call : 1-800-211-PANA(7262) or send e-mail to connect, operate or adjust this product, please read these instructions thoroughly. Guía para rápida consulta en español está incluida. PV-DV203 Mini Before attempting to : consumerproducts@panasonic.com LSQT0653A R Digital Video Camcorder Operating Instructions Model No. Spanish Quick Use Guide is included.
PVDV203 User Guide
Page 2
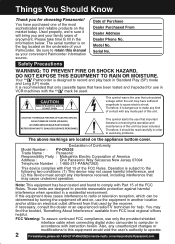
... changes or modifications to this unit has been included. Please take time to cause electric shock. Date of the most sophisticated and reliable products on , use only the provided shielded interface cable when connecting digital video camcorder to operate. 2 Forassistance, pleasecall: 1-800-211-PANA(7262)orsende-mailto:consumerproducts@panasonic.com CAUTION RISK OF ELECTRIC SHOCK DO NOT OPEN This symbol warns the user...
... changes or modifications to this unit has been included. Please take time to cause electric shock. Date of the most sophisticated and reliable products on , use only the provided shielded interface cable when connecting digital video camcorder to operate. 2 Forassistance, pleasecall: 1-800-211-PANA(7262)orsende-mailto:consumerproducts@panasonic.com CAUTION RISK OF ELECTRIC SHOCK DO NOT OPEN This symbol warns the user...
PVDV203 User Guide
Page 3
.... Part 1 of the Canadian Electrical Code, in the cabinet are not sure of the type of time, unplug it from the type of the polarized plug. Retain Instructions - Do not use a mounting accessory recommended by the video product manufacturer as they may be sure the antenna or cable system is grounded so as a bookcase or rack unless proper ventilation is connected...
.... Part 1 of the Canadian Electrical Code, in the cabinet are not sure of the type of time, unplug it from the type of the polarized plug. Retain Instructions - Do not use a mounting accessory recommended by the video product manufacturer as they may be sure the antenna or cable system is grounded so as a bookcase or rack unless proper ventilation is connected...

PVDV203 User Guide
Page 4
... of other hazards. 21. When the video unit exhibits a distinct change in fire, electric shock or other controls may expose you to qualified service personnel under the following the operating instructions. Replacement Parts - This action could permanently damage the internal parts of any chemical products, such as suntan lotion, as an improper adjustment of overhead power lines or other hazards. Objects and...
... of other hazards. 21. When the video unit exhibits a distinct change in fire, electric shock or other controls may expose you to qualified service personnel under the following the operating instructions. Replacement Parts - This action could permanently damage the internal parts of any chemical products, such as suntan lotion, as an improper adjustment of overhead power lines or other hazards. Objects and...
PVDV203 User Guide
Page 5
... Know 2 Important Safeguards ...3 Precautions ...4 Before Using ...6 • Easy Cassette Eject/Insertion 7 Quick Guide ...12 Supplying Power ...15 Setting the Clock ...17 Using the Palmcorder Menu 18 Camera Recording ...19 • Simple Recording 19 • Digital PhotoShot™ Mode 21 • Zoom ...22 Special Effect Features 24 Advanced Settings ...28 Playback Your Recordings 32 Special Effect Features 34 Digital Features ...40 Editing Features ...45 Card Features ...49 PC Connection • Transferring Your Images (Windows 56 •...
... Know 2 Important Safeguards ...3 Precautions ...4 Before Using ...6 • Easy Cassette Eject/Insertion 7 Quick Guide ...12 Supplying Power ...15 Setting the Clock ...17 Using the Palmcorder Menu 18 Camera Recording ...19 • Simple Recording 19 • Digital PhotoShot™ Mode 21 • Zoom ...22 Special Effect Features 24 Advanced Settings ...28 Playback Your Recordings 32 Special Effect Features 34 Digital Features ...40 Editing Features ...45 Card Features ...49 PC Connection • Transferring Your Images (Windows 56 •...
PVDV203 User Guide
Page 6
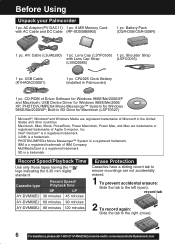
..., Power Macintosh, Power Mac, and Mac are not accidentally erased. 1 To prevent accidental erasure: Slide the tab to the right (close). 6 Forassistance, pleasecall: 1-800-211-PANA(7262)orsende-mailto:consumerproducts@panasonic.com PHOTOVU/MPEG4 Movie Messenger™ System is a registered trademark. Record Speed/Playback Time Use only those tapes having the Mini logo indicating the 6.35 mm digital standard. Before Using Unpack your Palmcorder 1 pc. Battery Pack...
..., Power Macintosh, Power Mac, and Mac are not accidentally erased. 1 To prevent accidental erasure: Slide the tab to the right (close). 6 Forassistance, pleasecall: 1-800-211-PANA(7262)orsende-mailto:consumerproducts@panasonic.com PHOTOVU/MPEG4 Movie Messenger™ System is a registered trademark. Record Speed/Playback Time Use only those tapes having the Mini logo indicating the 6.35 mm digital standard. Before Using Unpack your Palmcorder 1 pc. Battery Pack...
PVDV203 User Guide
Page 18
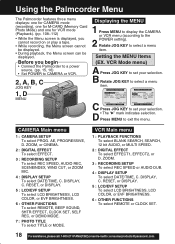
... LCD BRIGHTNESS, LCD COLOR, or EVF BRIGHTNESS. 6 : OTHER FUNCTIONS To select REMOTE, BEEP SOUND, SHTR EFFECT, CLOCK SET, SELF REC, or DEMO MODE. 7 : PHOTO TITLE To select TITLE or MODE. ZOOM. 3 : RECORDING SETUP To select REC SPEED or AUDIO DUB. 4 : DISPLAY SETUP To select DATE/TIME, C. D • The " " mark indicates selection. CAMERA Main menu 1 : CAMERA SETUP To select PROG. Press MENU to select a menu item. Before you cannot record on or play a tape. • While recording, the Menu screen cannot be displayed. • During playback, the Menu screen...
... LCD BRIGHTNESS, LCD COLOR, or EVF BRIGHTNESS. 6 : OTHER FUNCTIONS To select REMOTE, BEEP SOUND, SHTR EFFECT, CLOCK SET, SELF REC, or DEMO MODE. 7 : PHOTO TITLE To select TITLE or MODE. ZOOM. 3 : RECORDING SETUP To select REC SPEED or AUDIO DUB. 4 : DISPLAY SETUP To select DATE/TIME, C. D • The " " mark indicates selection. CAMERA Main menu 1 : CAMERA SETUP To select PROG. Press MENU to select a menu item. Before you cannot record on or play a tape. • While recording, the Menu screen cannot be displayed. • During playback, the Menu screen...
PVDV203 User Guide
Page 25
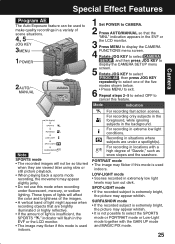
.... Press MENU to exit. For recording in the background. AE , then press JOG KEY repeatedly to select one of the five modes shown below. 6 • Press MENU to display the CAMERA 4 FUNCTIONS menu screen. Rotate JOG KEY to select CAMERA SETUP , and then press JOG KEY to display the CAMERA SETUP menu 5 screen. PORTRAIT mode • The image may flicker if this mode is used indoors. 1 Set POWER to CAMERA. 2 Press AUTO/MANUAL so that...
.... Press MENU to exit. For recording in the background. AE , then press JOG KEY repeatedly to select one of the five modes shown below. 6 • Press MENU to display the CAMERA 4 FUNCTIONS menu screen. Rotate JOG KEY to select CAMERA SETUP , and then press JOG KEY to display the CAMERA SETUP menu 5 screen. PORTRAIT mode • The image may flicker if this mode is used indoors. 1 Set POWER to CAMERA. 2 Press AUTO/MANUAL so that...
PVDV203 User Guide
Page 28
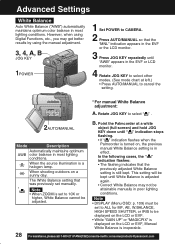
However, when using the manual adjustment. 3, 4, A, B JOG KEY 1POWER 1 Set POWER to select other modes. (See mode chart at a white object (full-screen) and hold JOG KEY down until "AWB" appears in poor lighting conditions. The White Balance setting that was previously set manually. * Note • When ZOOM is a halogen lamp. This setting will be attainable manually in the EVF or LCD monitor. 4 Rotate JOG KEY to CAMERA. 2 Press AUTO/MANUAL so that...
However, when using the manual adjustment. 3, 4, A, B JOG KEY 1POWER 1 Set POWER to select other modes. (See mode chart at a white object (full-screen) and hold JOG KEY down until "AWB" appears in poor lighting conditions. The White Balance setting that was previously set manually. * Note • When ZOOM is a halogen lamp. This setting will be attainable manually in the EVF or LCD monitor. 4 Rotate JOG KEY to CAMERA. 2 Press AUTO/MANUAL so that...

PVDV203 User Guide
Page 29
... or the LCD monitor. • a scene with the subject as close -ups) Press the "W" side of the lens. 29 Manual Focus 1 Use Manual Focus (MF) when recording ... • a subject through glass. Auto Focus will remain in . 4, 6POWER ZOOM 5M.FOCUS DIAL 1POWER 5 Turn M.FOCUS DIAL until the picture is far from the subject to "W" or "T" 3FOCUS as desired. • The subject will function with fast motions, like...
... or the LCD monitor. • a scene with the subject as close -ups) Press the "W" side of the lens. 29 Manual Focus 1 Use Manual Focus (MF) when recording ... • a subject through glass. Auto Focus will remain in . 4, 6POWER ZOOM 5M.FOCUS DIAL 1POWER 5 Turn M.FOCUS DIAL until the picture is far from the subject to "W" or "T" 3FOCUS as desired. • The subject will function with fast motions, like...
PVDV203 User Guide
Page 30
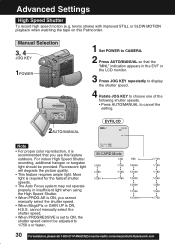
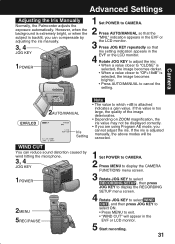
...:consumerproducts@panasonic.com Manual Selection 3, 4 JOG KEY 1POWER 1 Set POWER to CAMERA. 2 Press AUTO/MANUAL so that the "MNL" indication appears in insufficient light when using the High Speed Shutter. • When PROG.AE is ON, H.S.S. More light is required for the fastest shutter speeds. • The Auto Focus system may not operate properly in the EVF or the LCD monitor. 3 Press JOG KEY repeatedly to display the shutter speed. 4 Rotate...
...:consumerproducts@panasonic.com Manual Selection 3, 4 JOG KEY 1POWER 1 Set POWER to CAMERA. 2 Press AUTO/MANUAL so that the "MNL" indication appears in insufficient light when using the High Speed Shutter. • When PROG.AE is ON, H.S.S. More light is required for the fastest shutter speeds. • The Auto Focus system may not operate properly in the EVF or the LCD monitor. 3 Press JOG KEY repeatedly to display the shutter speed. 4 Rotate...
PVDV203 User Guide
Page 31
... value to cancel the setting. If this value is adjusted manually, the above modes will appear in the EVF or 3 the LCD monitor. WIND CUT You can compensate by wind hitting the microphone. 3, 4 JOG KEY 1POWER 2MENU 5REC/PAUSE 1 Set POWER to CAMERA. 2 Press MENU to display the CAMERA FUNCTIONS menu screen. 3 Rotate JOG KEY to select RECORDING SETUP , then press JOG KEY to display the RECORDING SETUP menu screen. 4 Rotate JOG KEY...
... value to cancel the setting. If this value is adjusted manually, the above modes will appear in the EVF or 3 the LCD monitor. WIND CUT You can compensate by wind hitting the microphone. 3, 4 JOG KEY 1POWER 2MENU 5REC/PAUSE 1 Set POWER to CAMERA. 2 Press MENU to display the CAMERA FUNCTIONS menu screen. 3 Rotate JOG KEY to select RECORDING SETUP , then press JOG KEY to display the RECORDING SETUP menu screen. 4 Rotate JOG KEY...
PVDV203 User Guide
Page 32
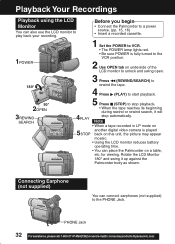
... a recorded cassette. 1POWER 1 Set the POWER to VCR. • The POWER lamp lights red. • Be sure POWER is played STOP back on this unit, the picture may appear mosaic. • Using the LCD monitor reduces battery operating time. • You can place the Palmcorder on underside of the LCD monitor to unlock and swing open. 180° 90° 3 Press (REWIND/SEARCH) to rewind the tape. 4 Press (PLAY) to start playback...
... a recorded cassette. 1POWER 1 Set the POWER to VCR. • The POWER lamp lights red. • Be sure POWER is played STOP back on this unit, the picture may appear mosaic. • Using the LCD monitor reduces battery operating time. • You can place the Palmcorder on underside of the LCD monitor to unlock and swing open. 180° 90° 3 Press (REWIND/SEARCH) to rewind the tape. 4 Press (PLAY) to start playback...
PVDV203 User Guide
Page 39
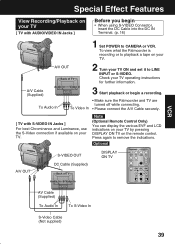
..., use the S-Video connection if available on your TV operating instructions for further information. Press again to LINE INPUT or S-VIDEO. Check your TV by pressing DISPLAY ON TV on your TV ON and set it to remove the indications. To view what the Palmcorder is recording or to playback a tape on the remote control. To Audio In • Make sure the Palmcorder and TV are turned off while connecting.
..., use the S-Video connection if available on your TV operating instructions for further information. Press again to LINE INPUT or S-VIDEO. Check your TV by pressing DISPLAY ON TV on your TV ON and set it to remove the indications. To view what the Palmcorder is recording or to playback a tape on the remote control. To Audio In • Make sure the Palmcorder and TV are turned off while connecting.

PVDV203 User Guide
Page 42
... VCR mode A Set POWER to VCR. is turned off when not needed . D Press EIS again to start playback. Note • Other Digital Functions are turned off when not needed . 1, A POWER D.E.I .S. may be used in low light situations. • Recording a subject under fluorescent lighting conditions. • The EIS indicator flashes when the light level is inadequate. • Turn D.E.I .S. C Press EIS to cancel. • Be sure that D.E.I .S. Note • When using a tripod. 3 Press REC/PAUSE to...
... VCR mode A Set POWER to VCR. is turned off when not needed . D Press EIS again to start playback. Note • Other Digital Functions are turned off when not needed . 1, A POWER D.E.I .S. may be used in low light situations. • Recording a subject under fluorescent lighting conditions. • The EIS indicator flashes when the light level is inadequate. • Turn D.E.I .S. C Press EIS to cancel. • Be sure that D.E.I .S. Note • When using a tripod. 3 Press REC/PAUSE to...
PVDV203 User Guide
Page 45
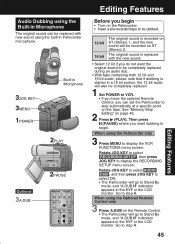
... at a specific point on the tape. Press (PLAY). When using the built-in Palmcorder microphone. 3JOG KEY 3MENU 1POWER Built-in the EVF or the LCD monitor. Rotate JOG KEY to select RECORDING SETUP , then press JOG KEY to step 4. 45 Editing Features See "Memory-Stop 2 Editing" on ST (Stereo) 2. When using the Palmcorder only 3 Press MENU to step 4. Go to display the VCR FUNCTIONS menu screen.
... at a specific point on the tape. Press (PLAY). When using the built-in Palmcorder microphone. 3JOG KEY 3MENU 1POWER Built-in the EVF or the LCD monitor. Rotate JOG KEY to select RECORDING SETUP , then press JOG KEY to step 4. 45 Editing Features See "Memory-Stop 2 Editing" on ST (Stereo) 2. When using the Palmcorder only 3 Press MENU to step 4. Go to display the VCR FUNCTIONS menu screen.
PVDV203 User Guide
Page 58
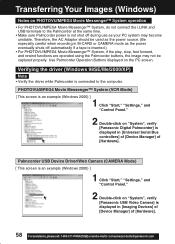
... the power source. (Be especially careful when recording in [Imaging Devices] of [Device Manager] of [Hardware]. Use Palmcorder Operation Buttons displayed on the PC screen. Palmcorder USB Device Driver/Web Camera (CAMERA Mode) [ This screen is an example (Windows 2000) ] 1 Click "Start," "Settings," and "Control Panel." 2 Double-click on "System", verify [Panasonic USB Video Camera] is inserted.) • For PHOTOVU/MPEG4 Movie Messenger™ System, if the play, stop, fast forward, and rewind functions are operated using the Palmcorder buttons, the image...
... the power source. (Be especially careful when recording in [Imaging Devices] of [Device Manager] of [Hardware]. Use Palmcorder Operation Buttons displayed on the PC screen. Palmcorder USB Device Driver/Web Camera (CAMERA Mode) [ This screen is an example (Windows 2000) ] 1 Click "Start," "Settings," and "Control Panel." 2 Double-click on "System", verify [Panasonic USB Video Camera] is inserted.) • For PHOTOVU/MPEG4 Movie Messenger™ System, if the play, stop, fast forward, and rewind functions are operated using the Palmcorder buttons, the image...

PVDV203 User Guide
Page 62
... PC using the USB Cable or DV Interface Cable (i.LINK). • Change the Palmcorder power switch (VCR/CAMERA). *You must first close the application. • Connect/disconnect the DV Interface Cable (i.LINK). • Connect/disconnect the USB Cable. 62 Forassistance,pleasecall:1-800-211-PANA(7262)orsende-mailto:consumerproducts@panasonic.com The PC system may become unstable. • Change the screen area or color pallet in the Display Properties window. • Turn...
... PC using the USB Cable or DV Interface Cable (i.LINK). • Change the Palmcorder power switch (VCR/CAMERA). *You must first close the application. • Connect/disconnect the DV Interface Cable (i.LINK). • Connect/disconnect the USB Cable. 62 Forassistance,pleasecall:1-800-211-PANA(7262)orsende-mailto:consumerproducts@panasonic.com The PC system may become unstable. • Change the screen area or color pallet in the Display Properties window. • Turn...

PVDV203 User Guide
Page 108
... minute tape. 7 AUDIO REC (p. 45) 12 bit: The sound is recorded in the 12 bit/32 kHz mode. 16 bit: The sound is restarted after a lapse of the 5 Program AE modes. AE (p. 25) To select one of the 10 digital functions. Setting to OFF cancels the previously selected digital zoom. 4 CINEMA (p. 24) When set to ON, the microphone's directional angle and sensitivity vary according to the zoom operation...
... minute tape. 7 AUDIO REC (p. 45) 12 bit: The sound is recorded in the 12 bit/32 kHz mode. 16 bit: The sound is restarted after a lapse of the 5 Program AE modes. AE (p. 25) To select one of the 10 digital functions. Setting to OFF cancels the previously selected digital zoom. 4 CINEMA (p. 24) When set to ON, the microphone's directional angle and sensitivity vary according to the zoom operation...
PVDV203 User Guide
Page 120
... Clock Battery 95, 100 Clock Set 17 Connecting Earphone ......... 32 Copying from Digital Equipment 48 Copying your Tapes 47 Customer Services Directory 103 D Date and Time Indication . 113 DC Power Cable ....... 6, 16, 92 Delete All Image Pages ...... 53 Delete Specific Images ...... 52 DEW Indication 100 Digital E.I.S 42 Digital Functions 43 Digital PhotoShot™ Mode .. 21 Digital Video Cassette Tape . 6 Digital Zoom 40, 41 DV Interface Cable (i.LINK 48, 72, 92 DPOF Setting 55 E Easy Cassette Eject 7 EfficiBright™ LED Light ........ 8 Erase Protection Tab 6 EVF/LCD...
... Clock Battery 95, 100 Clock Set 17 Connecting Earphone ......... 32 Copying from Digital Equipment 48 Copying your Tapes 47 Customer Services Directory 103 D Date and Time Indication . 113 DC Power Cable ....... 6, 16, 92 Delete All Image Pages ...... 53 Delete Specific Images ...... 52 DEW Indication 100 Digital E.I.S 42 Digital Functions 43 Digital PhotoShot™ Mode .. 21 Digital Video Cassette Tape . 6 Digital Zoom 40, 41 DV Interface Cable (i.LINK 48, 72, 92 DPOF Setting 55 E Easy Cassette Eject 7 EfficiBright™ LED Light ........ 8 Erase Protection Tab 6 EVF/LCD...


