Digital Video Camera - English/ Spanish
Page 2
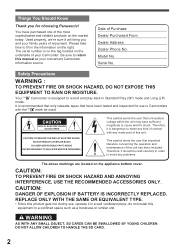
..., we're sure it will bring you for use , operate it in a well ventilated place; Serial No. CAUTION: DANGER OF EXPLOSION IF BATTERY IS INCORRECTLY REPLACED. DO NOT ALLOW CHILDREN TO HANDLE THE SD CARD. 2 Please take time to fill in the information on the underside of your...mode. This symbol alerts the user that have been tested and inspected for choosing Panasonic! Therefore, it should be used. Things You Should Know Thank you and your Camcorder. Be sure to record and play back in Camcorders with any problems. The above markings are located on the market today. Model ...
..., we're sure it will bring you for use , operate it in a well ventilated place; Serial No. CAUTION: DANGER OF EXPLOSION IF BATTERY IS INCORRECTLY REPLACED. DO NOT ALLOW CHILDREN TO HANDLE THE SD CARD. 2 Please take time to fill in the information on the underside of your...mode. This symbol alerts the user that have been tested and inspected for choosing Panasonic! Therefore, it should be used. Things You Should Know Thank you and your Camcorder. Be sure to record and play back in Camcorders with any problems. The above markings are located on the market today. Model ...

Digital Video Camera - English/ Spanish
Page 3
...have purchased. Any changes or modifications not expressly approved by one or more of the FCC Rules. Please call 1-800-8-BATTERY for compliance could void the user's authority to radio communications. If this device must accept any interference received, including ... 1-800-211-PANA(7262) This device complies with CANADIAN ICES-003. 3 Declaration of Conformity Trade Name : Panasonic Model No. : PV-GS29/PV-GS39/PV-GS59 Responsibility Party : Panasonic Corporation of the FCC Rules. These limits are designed to comply with the instructions, may cause undesired operation. ...
...have purchased. Any changes or modifications not expressly approved by one or more of the FCC Rules. Please call 1-800-8-BATTERY for compliance could void the user's authority to radio communications. If this device must accept any interference received, including ... 1-800-211-PANA(7262) This device complies with CANADIAN ICES-003. 3 Declaration of Conformity Trade Name : Panasonic Model No. : PV-GS29/PV-GS39/PV-GS59 Responsibility Party : Panasonic Corporation of the FCC Rules. These limits are designed to comply with the instructions, may cause undesired operation. ...
Digital Video Camera - English/ Spanish
Page 7
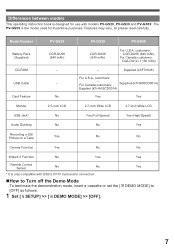
Differences between models This operating instruction book is only compatible with models PV-GS29, PV-GS39 and PV-GS59. customers: CGR-DU06 (640 mAh) For Canada customers: CGA-DU12 (1 150 mAh) CD-ROM USB Cable Card Feature - - Supplied (LSFT0648) For U.S.A. Yes ... Function No Yes Yes Remote Control Sensor No No * It is designed for illustrative purposes. The PV-GS59 is the model used for use with USB 2.0 PCI Card and/or connection. „How to 7 Model Number PV-GS29 PV-GS39 PV-GS59 Battery Pack (Supplied) CGR-DU06 (640 mAh) CGR-DU06 (640 mAh) For U.S.A.
Differences between models This operating instruction book is only compatible with models PV-GS29, PV-GS39 and PV-GS59. customers: CGR-DU06 (640 mAh) For Canada customers: CGA-DU12 (1 150 mAh) CD-ROM USB Cable Card Feature - - Supplied (LSFT0648) For U.S.A. Yes ... Function No Yes Yes Remote Control Sensor No No * It is designed for illustrative purposes. The PV-GS59 is the model used for use with USB 2.0 PCI Card and/or connection. „How to 7 Model Number PV-GS29 PV-GS39 PV-GS59 Battery Pack (Supplied) CGR-DU06 (640 mAh) CGR-DU06 (640 mAh) For U.S.A.
Digital Video Camera - English/ Spanish
Page 10
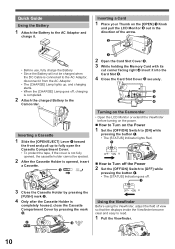
... right 4 insert it into the Card Slot 5 . 4 Close the Card Slot Cover 3 securely. 5 3 4 Turning on the Camcorder • Open the LCD Monitor or extend the Viewfinder before turning on the power. „ How to Turn on the [OPEN]...the Cassette Compartment Cover by pressing the [PUSH] mark 2 . 4 Only after the Cassette Holder is completed. 2 Attach the charged Battery to the AC Adaptor and charge it from the AC Adaptor. • The [CHARGE] Lamp lights up, and charging starts. &#...to read. 1 Pull the Viewfinder. 10 Quick Guide Using the Battery 1 Attach the Battery to the Camcorder.
... right 4 insert it into the Card Slot 5 . 4 Close the Card Slot Cover 3 securely. 5 3 4 Turning on the Camcorder • Open the LCD Monitor or extend the Viewfinder before turning on the power. „ How to Turn on the [OPEN]...the Cassette Compartment Cover by pressing the [PUSH] mark 2 . 4 Only after the Cassette Holder is completed. 2 Attach the charged Battery to the AC Adaptor and charge it from the AC Adaptor. • The [CHARGE] Lamp lights up, and charging starts. &#...to read. 1 Pull the Viewfinder. 10 Quick Guide Using the Battery 1 Attach the Battery to the Camcorder.

Digital Video Camera - English/ Spanish
Page 12
...Zoom Lever [W/T] (pp. 35, 36) Volume Lever [- / VOL +] (pp. 45, 47) 14 Microphone (built-in selecting an alternate AC plug. An AC plug adaptor may be required for assistance in , stereo) (pp. 35, 39) 12 Before Using Standard Accessories The following accessories are supplied with your Camcorder. 1) PV-DAC14D K2GJ2DC00011 K2CA2CA00025 2) 3) CGA-DU12 (PV... 120 V AC. We recommend using the accessory power plug adaptor (VJSS0070/KZDB4ZE00001) in an area which has special AC outlets. 2) Battery Pack (pp. 15~16) 3) AV Cable (pp. 51, 54) 4) Shoulder Strap (p. 18) 5) USB Cable and CD-...
...Zoom Lever [W/T] (pp. 35, 36) Volume Lever [- / VOL +] (pp. 45, 47) 14 Microphone (built-in selecting an alternate AC plug. An AC plug adaptor may be required for assistance in , stereo) (pp. 35, 39) 12 Before Using Standard Accessories The following accessories are supplied with your Camcorder. 1) PV-DAC14D K2GJ2DC00011 K2CA2CA00025 2) 3) CGA-DU12 (PV... 120 V AC. We recommend using the accessory power plug adaptor (VJSS0070/KZDB4ZE00001) in an area which has special AC outlets. 2) Battery Pack (pp. 15~16) 3) AV Cable (pp. 51, 54) 4) Shoulder Strap (p. 18) 5) USB Cable and CD-...
Digital Video Camera - English/ Spanish
Page 13
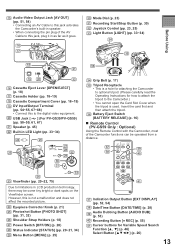
... 23 Viewfinder (pp. 20~22, 75) Due to the Camcorder.) • You cannot open the Card Slot Cover when the tripod is used. Insert the card first and then attach the tripod. 36 Battery Eject Switch [BATTERY RELEASE] (p. 16) „ Remote Control (PV-GS59 Only : Optional) Using the Remote Control with the... Camcorder, most of the AV Cable to this jack, plug it in as far as it goes....
... 23 Viewfinder (pp. 20~22, 75) Due to the Camcorder.) • You cannot open the Card Slot Cover when the tripod is used. Insert the card first and then attach the tripod. 36 Battery Eject Switch [BATTERY RELEASE] (p. 16) „ Remote Control (PV-GS59 Only : Optional) Using the Remote Control with the... Camcorder, most of the AV Cable to this jack, plug it in as far as it goes....

Digital Video Camera - English/ Spanish
Page 14
... CR2025 battery. (A battery is normally expected to match the poles correctly when inserting the button-type battery. CAUTION ●Dispose of used battery promptly. ●Do not recharge, disassemble or dispose of Battery can be swallowed by young children. However, it depends on the Camcorder. • When the button-type battery is exhausted, replace it with Panasonic type...
... CR2025 battery. (A battery is normally expected to match the poles correctly when inserting the button-type battery. CAUTION ●Dispose of used battery promptly. ●Do not recharge, disassemble or dispose of Battery can be swallowed by young children. However, it depends on the Camcorder. • When the button-type battery is exhausted, replace it with Panasonic type...

Digital Video Camera - English/ Spanish
Page 15
...for indoor use , fully charge the Battery. • We recommend using a Panasonic Battery. • We cannot guarantee the quality of this Camcorder when batteries from other , [REMOTE] will appear and operation is impossible. Outdoors or under strong light, the Camcorder may not operate properly even within ... The above ranges. „ Selecting Remote Control Modes When 2 Camcorders are used . 1 Attach the Battery to the AC Adaptor and the AC Jack. 1 2 3 Using the Battery Before use . Before Using Using the Remote Control (PV-GS59 Only : Optional) 1 Direct the Remote Control at the ...
...for indoor use , fully charge the Battery. • We recommend using a Panasonic Battery. • We cannot guarantee the quality of this Camcorder when batteries from other , [REMOTE] will appear and operation is impossible. Outdoors or under strong light, the Camcorder may not operate properly even within ... The above ranges. „ Selecting Remote Control Modes When 2 Camcorders are used . 1 Attach the Battery to the AC Adaptor and the AC Jack. 1 2 3 Using the Battery Before use . Before Using Using the Remote Control (PV-GS59 Only : Optional) 1 Direct the Remote Control at the ...

Digital Video Camera - English/ Spanish
Page 16
...h 35 min. (1 h 15 min.) 1 h 40 min. 1 h 45 min. (1 h 20 min.) 55 min. (40 min.) Optional battery A (PV-GS29) B CGA-DU12 (7.2 V / 1 150 mAh) C 2 h 25 min. 3 h 15 min. (2 h 40 min.) 1 h 40 min. (1 h 20 min.) Optional battery A (PV-GS39/PV-GS59 U.S.A.) B CGA-DU12 (7.2 V / 1 150 mAh) C 2 h 25 min. 3 h 10 min. (2 h 30 min.) 1 h... Attach the charged Battery to the Camcorder. „ Disconnecting the Power Source Set the [OFF/ON] Switch to [OFF], and while sliding the [BATTERY RELEASE] Switch, remove the Battery downward or DC Cable. • When attaching or removing Battery, set the [OFF...
...h 35 min. (1 h 15 min.) 1 h 40 min. 1 h 45 min. (1 h 20 min.) 55 min. (40 min.) Optional battery A (PV-GS29) B CGA-DU12 (7.2 V / 1 150 mAh) C 2 h 25 min. 3 h 15 min. (2 h 40 min.) 1 h 40 min. (1 h 20 min.) Optional battery A (PV-GS39/PV-GS59 U.S.A.) B CGA-DU12 (7.2 V / 1 150 mAh) C 2 h 25 min. 3 h 10 min. (2 h 30 min.) 1 h... Attach the charged Battery to the Camcorder. „ Disconnecting the Power Source Set the [OFF/ON] Switch to [OFF], and while sliding the [BATTERY RELEASE] Switch, remove the Battery downward or DC Cable. • When attaching or removing Battery, set the [OFF...

Digital Video Camera - English/ Spanish
Page 17
...the Lens surface, attach the Lens Cap. • The Lens Cap and Lens Cap Cord come preattached to remove the Sensor tag (For U.S.A. The Camcorder being used will change: → → → → . The numbers indicate the recording time when the Viewfinder is used . This is ... the size of the Grip Belt. indicates 1 hour and 40 minutes. • Battery CGR-DU06 (PV-GS29/PV-GS39/PV-GS59 U.S.A.) or CGA-DU12 (PV-GS59 Canada) is normal. • Along with the reduction of the battery capacity, the display will also heat up after use , the available recording time may...
...the Lens surface, attach the Lens Cap. • The Lens Cap and Lens Cap Cord come preattached to remove the Sensor tag (For U.S.A. The Camcorder being used will change: → → → → . The numbers indicate the recording time when the Viewfinder is used . This is ... the size of the Grip Belt. indicates 1 hour and 40 minutes. • Battery CGR-DU06 (PV-GS29/PV-GS39/PV-GS59 U.S.A.) or CGA-DU12 (PV-GS59 Canada) is normal. • Along with the reduction of the battery capacity, the display will also heat up after use , the available recording time may...
Digital Video Camera - English/ Spanish
Page 18
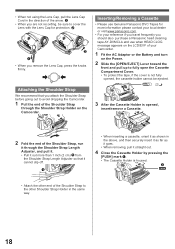
...• For your reference if you travel frequently you should also purchase a Panasonic head cleaning tape AY-DVMCLA and use when HEAD CLOG message appears on the LCD/EVF of your Camcorder. 1 Fit the AC Adaptor or the Battery and turn on the Power. 2 Slide the [OPEN/EJECT] Lever toward ...1 . • The Cassette Holder is not fully opened, the cassette holder cannot be sure to avoid dropping the Camcorder. 1 Pull the end of the Shoulder Strap through the Shoulder Strap Holder on the Camcorder. 3 After the Cassette Holder is opened, insert/remove a Cassette. 2 Fold the end of the arrow. 1 ...
...• For your reference if you travel frequently you should also purchase a Panasonic head cleaning tape AY-DVMCLA and use when HEAD CLOG message appears on the LCD/EVF of your Camcorder. 1 Fit the AC Adaptor or the Battery and turn on the Power. 2 Slide the [OPEN/EJECT] Lever toward ...1 . • The Cassette Holder is not fully opened, the cassette holder cannot be sure to avoid dropping the Camcorder. 1 Pull the end of the Shoulder Strap through the Shoulder Strap Holder on the Camcorder. 3 After the Cassette Holder is opened, insert/remove a Cassette. 2 Fold the end of the arrow. 1 ...
Digital Video Camera - English/ Spanish
Page 19
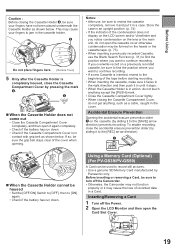
...Holder is completely housed, close the accidental erasure prevention slider (by Panasonic only. If so, be sure the grip belt stays clear ...case in the cover. Using a Memory Card (Optional) (For PV-GS39/PV-GS59) A Card can be used to record still pictures. ...battery has run down . Before Using Caution : Before closing the Cassette Compartment Cover, do not open the cassette cover otherwise condensation may be formed on the cassette (by sliding it to the [SAVE] arrow direction) prevents recording. Inserting/Removing a Card 1 Turn off the Camcorder. • Otherwise, the Camcorder...
...Holder is completely housed, close the accidental erasure prevention slider (by Panasonic only. If so, be sure the grip belt stays clear ...case in the cover. Using a Memory Card (Optional) (For PV-GS39/PV-GS59) A Card can be used to record still pictures. ...battery has run down . Before Using Caution : Before closing the Cassette Compartment Cover, do not open the cassette cover otherwise condensation may be formed on the cassette (by sliding it to the [SAVE] arrow direction) prevents recording. Inserting/Removing a Card 1 Turn off the Camcorder. • Otherwise, the Camcorder...
Digital Video Camera - English/ Spanish
Page 21
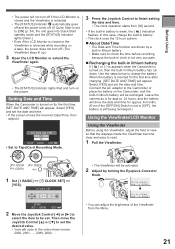
Select [YES] and set the date and time. When the battery is turned on the power. SET DATE AND TIME YES NO SETUP ENTER EXIT • Set to Tape/Card Recording Mode. 3 Press the Joystick Control to read. 1 Pull the Viewfinder. (PV-GS39/ (PV-GS29) PV-GS59) 1 Set [ BASIC] >> [ CLOCK SET] >> [YES...Switch is set the desired value. • Year will cycle in the order shown below to the Camcorder or place the battery on the Camcorder, and the built-in battery is turned on, then the built-in battery. • The clock uses the 12-hour system. „ About Date/Time • The ...
Select [YES] and set the date and time. When the battery is turned on the power. SET DATE AND TIME YES NO SETUP ENTER EXIT • Set to Tape/Card Recording Mode. 3 Press the Joystick Control to read. 1 Pull the Viewfinder. (PV-GS39/ (PV-GS29) PV-GS59) 1 Set [ BASIC] >> [ CLOCK SET] >> [YES...Switch is set the desired value. • Year will cycle in the order shown below to the Camcorder or place the battery on the Camcorder, and the built-in battery is turned on, then the built-in battery. • The clock uses the 12-hour system. „ About Date/Time • The ...
Digital Video Camera - English/ Spanish
Page 26
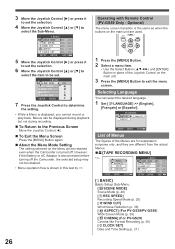
... Sub-Menu [ SCENE MODE] Scene Mode (p. 40) [ REC SPEED] Recording Speed Mode (p. 29) [ WIND CUT] Wind Noise Reduction (p. 39) [ ASPECT] (For PV-GS39/PV-GS59) Wide Screen Mode (p. 39) [ CINEMA] (For PV-GS29) Cinema-like Format Recording (p. 39) [ CLOCK SET] Date and Time Setting (p. 21) 26 3 Move the Joystick Control [►] or press it... [ENTER] Button in this text by >>. Menus can select the desired language. 1 Set [ LANGUAGE] >> [English], [Français] or [Español]. However, if the Battery or AC Adaptor is turned off the Camcorder, the selected setup may not be set.
... Sub-Menu [ SCENE MODE] Scene Mode (p. 40) [ REC SPEED] Recording Speed Mode (p. 29) [ WIND CUT] Wind Noise Reduction (p. 39) [ ASPECT] (For PV-GS39/PV-GS59) Wide Screen Mode (p. 39) [ CINEMA] (For PV-GS29) Cinema-like Format Recording (p. 39) [ CLOCK SET] Date and Time Setting (p. 21) 26 3 Move the Joystick Control [►] or press it... [ENTER] Button in this text by >>. Menus can select the desired language. 1 Set [ LANGUAGE] >> [English], [Français] or [Español]. However, if the Battery or AC Adaptor is turned off the Camcorder, the selected setup may not be set.

Digital Video Camera - English/ Spanish
Page 29
...approx. 10 minutes, the demonstration mode automatically starts. When the PC Mode (For PV-GS39/PV-GS59) Menus Related to Playback „ AUDIO OUT This switches the sound to the AC Jack (When using Panasonic cassettes marked LP mode. • Audio dubbing is canceled. LP Mode You can... „ INITIAL SET • Set to Tape Recording/Playback Mode. 1 Set [ BASIC] or [ ADVANCED] >> [ REC SPEED] >> [LP]. For normal use the Camcorder, turn off to protect the tape or to prevent the battery from running down. Playback of the LP mode, we recommend using the AC Adaptor) -
...approx. 10 minutes, the demonstration mode automatically starts. When the PC Mode (For PV-GS39/PV-GS59) Menus Related to Playback „ AUDIO OUT This switches the sound to the AC Jack (When using Panasonic cassettes marked LP mode. • Audio dubbing is canceled. LP Mode You can... „ INITIAL SET • Set to Tape Recording/Playback Mode. 1 Set [ BASIC] or [ ADVANCED] >> [ REC SPEED] >> [LP]. For normal use the Camcorder, turn off to protect the tape or to prevent the battery from running down. Playback of the LP mode, we recommend using the AC Adaptor) -

Digital Video Camera - English/ Spanish
Page 34
...and Card Recording Mode will not cancel Quick Start.) • When the Camcorder is Quick-Started with a Conversion lens attached, a slight vignetting (darkening around edges) effect occurs on in Quick Start standby, the zoom magnification becomes 5× and the picture size may take some time until... returns to 1 . 1 2 3 100 100 100 Notes: • The subject should be within 4.9 feet (1.5 meters) of the Camcorder. • Using the LED Video Light reduces battery time. • Set the LED Video Light to off when not in use. • Do not look directly into recording pause approx...
...and Card Recording Mode will not cancel Quick Start.) • When the Camcorder is Quick-Started with a Conversion lens attached, a slight vignetting (darkening around edges) effect occurs on in Quick Start standby, the zoom magnification becomes 5× and the picture size may take some time until... returns to 1 . 1 2 3 100 100 100 Notes: • The subject should be within 4.9 feet (1.5 meters) of the Camcorder. • Using the LED Video Light reduces battery time. • Set the LED Video Light to off when not in use. • Do not look directly into recording pause approx...
Digital Video Camera - English/ Spanish
Page 49
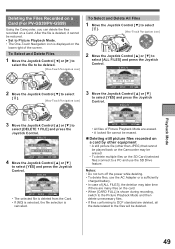
... select [DELETE 1 FILE] and press the Joystick Control. DELETE OK TO DELETE IMAGE? Deleting the Files Recorded on a Card (For PV-GS39/PV-GS59) Using the Camcorder, you can delete the files recorded on the card. • When [CARD FULL] is shown during recording, switch to the Picture Playback... DELETE THIS IMAGE? Notes: • Do not turn off the power while deleting. • To delete files, use the AC Adapter or a sufficiently charged battery. • In case of [ALL FILES], the deletion may be deleted. [One-Touch Navigation icon] 2 Move the Joystick Control [▼] to select [ ...
... select [DELETE 1 FILE] and press the Joystick Control. DELETE OK TO DELETE IMAGE? Deleting the Files Recorded on a Card (For PV-GS39/PV-GS59) Using the Camcorder, you can delete the files recorded on the card. • When [CARD FULL] is shown during recording, switch to the Picture Playback... DELETE THIS IMAGE? Notes: • Do not turn off the power while deleting. • To delete files, use the AC Adapter or a sufficiently charged battery. • In case of [ALL FILES], the deletion may be deleted. [One-Touch Navigation icon] 2 Move the Joystick Control [▼] to select [ ...
Digital Video Camera - English/ Spanish
Page 52
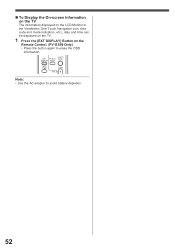
Note: • Use the AC adaptor to erase the OSD information. „ To Display the On-screen Information on the TV The information displayed on the LCD Monitor or the Viewfinder (One-Touch Navigation icon, time code and mode indication, etc.), date and time can be displayed on the TV. 1 Press the [EXT DISPLAY] Button on the Remote Control. (PV-GS59 Only) • Press the button again to avoid battery depletion. 52
Note: • Use the AC adaptor to erase the OSD information. „ To Display the On-screen Information on the TV The information displayed on the LCD Monitor or the Viewfinder (One-Touch Navigation icon, time code and mode indication, etc.), date and time can be displayed on the TV. 1 Press the [EXT DISPLAY] Button on the Remote Control. (PV-GS59 Only) • Press the button again to avoid battery depletion. 52

Digital Video Camera - English/ Spanish
Page 68
... USB Jack is referred to as the power source for the sake of example, other languages are supported as well. • In this Manual, the Panasonic make digital video camera with the DV Cable. 3 Click the [ iMovie HD] icon. 4 Click [Create a New Project]. 5 Click [Create] in the [...is connected to the personal computer, the operation mode of the Camcorder cannot be lost if the battery power is lost while transferring data. • If the Camcorder is used in these Operating Instructions are using the AC adaptor as Camcorder. • These instructions do not cover the basic operations ...
... USB Jack is referred to as the power source for the sake of example, other languages are supported as well. • In this Manual, the Panasonic make digital video camera with the DV Cable. 3 Click the [ iMovie HD] icon. 4 Click [Create a New Project]. 5 Click [Create] in the [...is connected to the personal computer, the operation mode of the Camcorder cannot be lost if the battery power is lost while transferring data. • If the Camcorder is used in these Operating Instructions are using the AC adaptor as Camcorder. • These instructions do not cover the basic operations ...
Digital Video Camera - English/ Spanish
Page 70
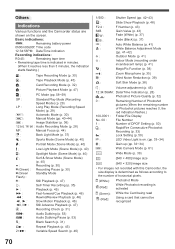
...0.2M [640 × 320] Image size • For images not recorded with this Camcorder, the size display is determined as follows according to the number of horizontal pixels. (White... read Using a card that cannot be recognized 70 Basic indications: : Remaining battery power 0h00m00s00f: Time code 12:34:56PM: Date/Time indication Recording indications:... 41~42) Outdoor Mode (p. 41) Indoor Mode (recording under incandescent lamp) (p. 41) : MagicPix Function (p. 38) : Zoom Microphone (p. 35) : Wind Noise Reduction (p. 39) : Soft Skin Mode (p. 38) : Volume adjustment (p. 45) 12:...
...0.2M [640 × 320] Image size • For images not recorded with this Camcorder, the size display is determined as follows according to the number of horizontal pixels. (White... read Using a card that cannot be recognized 70 Basic indications: : Remaining battery power 0h00m00s00f: Time code 12:34:56PM: Date/Time indication Recording indications:... 41~42) Outdoor Mode (p. 41) Indoor Mode (recording under incandescent lamp) (p. 41) : MagicPix Function (p. 38) : Zoom Microphone (p. 35) : Wind Noise Reduction (p. 39) : Soft Skin Mode (p. 38) : Volume adjustment (p. 45) 12:...


