Digital Video Camera - English/ Spanish
Page 7
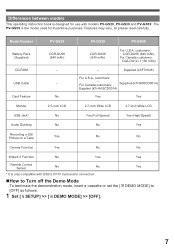
... only compatible with models PV-GS29, PV-GS39 and PV-GS59. customers: - - Features may vary, so please read carefully. customers: CGR-DU06 (640 mAh) For Canada customers: CGA-DU12 (1 150 mAh) CD-ROM USB Cable Card Feature - - Differences between models This operating instruction book is designed for illustrative purposes. Yes DEMO MODE] to Turn off the Demo Mode To terminate the demonstration mode, insert a cassette or set the [ [OFF] as follows. 1 Set [ SETUP] >> [ DEMO MODE] >> [OFF...
... only compatible with models PV-GS29, PV-GS39 and PV-GS59. customers: - - Features may vary, so please read carefully. customers: CGR-DU06 (640 mAh) For Canada customers: CGA-DU12 (1 150 mAh) CD-ROM USB Cable Card Feature - - Differences between models This operating instruction book is designed for illustrative purposes. Yes DEMO MODE] to Turn off the Demo Mode To terminate the demonstration mode, insert a cassette or set the [ [OFF] as follows. 1 Set [ SETUP] >> [ DEMO MODE] >> [OFF...
Digital Video Camera - English/ Spanish
Page 9
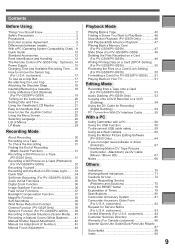
... the Shoulder Strap 18 Inserting/Removing a Cassette 18 Using a Memory Card (Optional) (For PV-GS39/PV-GS59 19 Turning on the Camcorder 20 Setting Date and Time 21 Using the Viewfinder/LCD Monitor 21 Easy to Use Mode Dial 23 How to Use the Joystick Control 23 Using the Menu Screen 25 Selecting Language 26 List of Menus 26 LP Mode 29 Recording Mode About Recording 30 Recording on a Tape 30 To Check the Recording 31 Finding the End of...
... the Shoulder Strap 18 Inserting/Removing a Cassette 18 Using a Memory Card (Optional) (For PV-GS39/PV-GS59 19 Turning on the Camcorder 20 Setting Date and Time 21 Using the Viewfinder/LCD Monitor 21 Easy to Use Mode Dial 23 How to Use the Joystick Control 23 Using the Menu Screen 25 Selecting Language 26 List of Menus 26 LP Mode 29 Recording Mode About Recording 30 Recording on a Tape 30 To Check the Recording 31 Finding the End of...
Digital Video Camera - English/ Spanish
Page 21
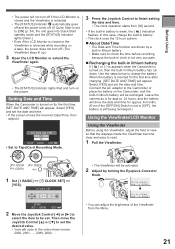
...:00AM SETUP SET ENTER EXIT 2 Move the Joystick Control [◄] or [►] to select the item to be recharged. Select [YES] and set the date and time. Leave the camera as is retracted while recording on a tape, the power does not turn off. (The Viewfinder stays lit up.) 3 Open the LCD Monitor or extend the Viewfinder again. • The [STATUS] Indicator lights Red and turn...
...:00AM SETUP SET ENTER EXIT 2 Move the Joystick Control [◄] or [►] to select the item to be recharged. Select [YES] and set the date and time. Leave the camera as is retracted while recording on a tape, the power does not turn off. (The Viewfinder stays lit up.) 3 Open the LCD Monitor or extend the Viewfinder again. • The [STATUS] Indicator lights Red and turn...
Digital Video Camera - English/ Spanish
Page 28
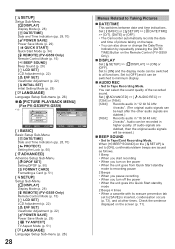
... [DATE/ TIME] Button on the screen (p. 71). Audio can be erased.) „ BEEP SOUND • Set to all functions. Set [ ADVANCED] >> [ AUDIO REC] >> [12bit] or [16bit]. [12bit]: Records audio in "12 bit 32 kHz 4 tracks". (The original audio signals can be recorded in higher quality. (If audio signals are dubbed.) [16bit]: Records audio in "16 bit 48 kHz 2 tracks". Check the sentence displayed on the Remote Control (PV-GS59 Only). „ DISPLAY Set [ SETUP] >> [ DISPLAY] >> [ON] or [OFF]. Set...
... [DATE/ TIME] Button on the screen (p. 71). Audio can be erased.) „ BEEP SOUND • Set to all functions. Set [ ADVANCED] >> [ AUDIO REC] >> [12bit] or [16bit]. [12bit]: Records audio in "12 bit 32 kHz 4 tracks". (The original audio signals can be recorded in higher quality. (If audio signals are dubbed.) [16bit]: Records audio in "16 bit 48 kHz 2 tracks". Check the sentence displayed on the Remote Control (PV-GS59 Only). „ DISPLAY Set [ SETUP] >> [ DISPLAY] >> [ON] or [OFF]. Set...

Digital Video Camera - English/ Spanish
Page 29
... LP mode. - Set to [YES] to change menu settings back to their factory default condition. • The initializing takes a little while. • Language setting cannot be disabled. - Playback of the LP mode, we recommend using Panasonic cassettes marked LP mode. • Audio dubbing is canceled. To terminate the demonstration mode, insert a cassette or a card, or set to [ DEMO MODE] >> [OFF]. LP Mode You can switch the tape recording speed. • Set to Tape Recording Mode. Slow Motion/Still Advance playback. 29 Playback on other digital video equipment recorded...
... LP mode. - Set to [YES] to change menu settings back to their factory default condition. • The initializing takes a little while. • Language setting cannot be disabled. - Playback of the LP mode, we recommend using Panasonic cassettes marked LP mode. • Audio dubbing is canceled. To terminate the demonstration mode, insert a cassette or a card, or set to [ DEMO MODE] >> [OFF]. LP Mode You can switch the tape recording speed. • Set to Tape Recording Mode. Slow Motion/Still Advance playback. 29 Playback on other digital video equipment recorded...
Digital Video Camera - English/ Spanish
Page 30
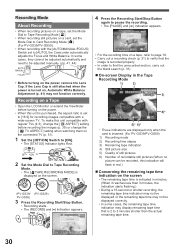
...-screen Display in red.) „ Concerning the remaining tape time indication on the power. • When this unit compatible with regular TVs (4:3), change the [ TV ASPECT] setting when watching them on the connected TV (p. 51). 1 Set the [OFF/ON] Switch to [ON]. • The [STATUS] Indicator lights Red. 2 Set the Mode Dial to Tape Recording Mode. • The [ TAPE RECORDING MODE] is set to [16:9] for recording images compatible with the [AUTO/MANUAL/FOCUS] Switch set to [AUTO], the Camcorder automatically adjusts the Focus and White Balance...
...-screen Display in red.) „ Concerning the remaining tape time indication on the power. • When this unit compatible with regular TVs (4:3), change the [ TV ASPECT] setting when watching them on the connected TV (p. 51). 1 Set the [OFF/ON] Switch to [ON]. • The [STATUS] Indicator lights Red. 2 Set the Mode Dial to Tape Recording Mode. • The [ TAPE RECORDING MODE] is set to [16:9] for recording images compatible with the [AUTO/MANUAL/FOCUS] Switch set to [AUTO], the Camcorder automatically adjusts the Focus and White Balance...

Digital Video Camera - English/ Spanish
Page 31
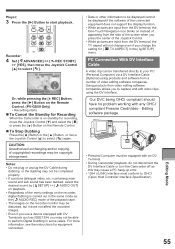
...], you can be recorded on a tape. • Set to Tape Recording Mode. 1 Press the [PHOTO SHOT] Button in the Recording Pause mode. • The Camcorder records a still picture for releasing the shutter. • Photoshot recording results in slightly inferior image quality. „ Continuous photoshot If you in locating the end of the recording on the Cassette quickly (unused part of the tape). • Set to Tape Recording/Playback Mode. 1 Press the Joystick Control to display the One-Touch Navigation...
...], you can be recorded on a tape. • Set to Tape Recording Mode. 1 Press the [PHOTO SHOT] Button in the Recording Pause mode. • The Camcorder records a still picture for releasing the shutter. • Photoshot recording results in slightly inferior image quality. „ Continuous photoshot If you in locating the end of the recording on the Cassette quickly (unused part of the tape). • Set to Tape Recording/Playback Mode. 1 Press the Joystick Control to display the One-Touch Navigation...

Digital Video Camera - English/ Spanish
Page 33
... [LIGHT] Button. 1 • The Built-in LED Video Light lights and the Gain Up mode is set to Tape/Card Recording Mode. 1 Rotate the LCD Monitor towards the lens side, the One-Touch Navigation icon will appear. 33 Notes: • Even if the [ SHTR EFFECT] is set to [ON], the Shutter Effect cannot be recorded on the picture. • When the color of the screen changes or blurs, adjust the shutter speed manually to...
... [LIGHT] Button. 1 • The Built-in LED Video Light lights and the Gain Up mode is set to Tape/Card Recording Mode. 1 Rotate the LCD Monitor towards the lens side, the One-Touch Navigation icon will appear. 33 Notes: • Even if the [ SHTR EFFECT] is set to [ON], the Shutter Effect cannot be recorded on the picture. • When the color of the screen changes or blurs, adjust the shutter speed manually to...

Digital Video Camera - English/ Spanish
Page 34
... turn the Camcorder on open the LCD Monitor and/or the Viewfinder. • If the Mode Dial is moved or the battery is removed in Quick Start standby mode, Quick Start is canceled and the power turns off even if the [OFF/ ON] Switch is set to [OFF]. (However, changing the mode between Tape Recording Mode and Card Recording Mode will make conditions even brighter. • The LED video light enables simply lightening the images...
... turn the Camcorder on open the LCD Monitor and/or the Viewfinder. • If the Mode Dial is moved or the battery is removed in Quick Start standby mode, Quick Start is canceled and the power turns off even if the [OFF/ ON] Switch is set to [OFF]. (However, changing the mode between Tape Recording Mode and Card Recording Mode will make conditions even brighter. • The LED video light enables simply lightening the images...
Digital Video Camera - English/ Spanish
Page 51
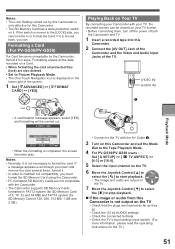
... or format the Card. Formatting erases all the data recorded on a Card. • When formatting the card all protected files (lock) are also deleted. • Set to Picture Playback Mode. • The One-Touch Navigation icon is displayed on your TV screen. • Before connecting them, turn off the power of both the Camcorder and TV. 1 Insert a recorded tape into this Camcorder. • The SD Memory Card has a write protection switch on the TV • Check that the plugs...
... or format the Card. Formatting erases all the data recorded on a Card. • When formatting the card all protected files (lock) are also deleted. • Set to Picture Playback Mode. • The One-Touch Navigation icon is displayed on your TV screen. • Before connecting them, turn off the power of both the Camcorder and TV. 1 Insert a recorded tape into this Camcorder. • The SD Memory Card has a write protection switch on the TV • Check that the plugs...
Digital Video Camera - English/ Spanish
Page 54
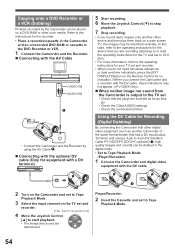
... to the operating instructions for your TV set to Tape Playback Mode. 54 Copying onto a DVD Recorder or a VCR (Dubbing) Pictures recorded by using a 4-pin to 4-pin DV Interface Cable PV-DDC9/PV-DDC9-K (optional) 1 , high quality images and sounds can be stretched vertically. In this Camcorder with other such media. Using the DV Cable for no indication. (When you connect the Camcorder and a recorder with a DV terminal) 5 Start recording. 6 Move the Joystick Control [▼] to stop playback. 7 Stop recording. •...
... to the operating instructions for your TV set to Tape Playback Mode. 54 Copying onto a DVD Recorder or a VCR (Dubbing) Pictures recorded by using a 4-pin to 4-pin DV Interface Cable PV-DDC9/PV-DDC9-K (optional) 1 , high quality images and sounds can be stretched vertically. In this Camcorder with other such media. Using the DV Cable for no indication. (When you connect the Camcorder and a recorder with a DV terminal) 5 Start recording. 6 Move the Joystick Control [▼] to stop playback. 7 Stop recording. •...
Digital Video Camera - English/ Spanish
Page 55
... software of the connected equipment does not support the display function. • While pictures are input from the side of the screen when you press the center of video editing software companies. Editing Mode 55 For more information, see the instructions for Recording When the Camcorder is carried out in the [ SETUP] menu. PC Connection With DV Interface Cable A video clip can be equipped with any OHCI compliant Firewire Card/video - Editing software...
... software of the connected equipment does not support the display function. • While pictures are input from the side of the screen when you press the center of video editing software companies. Editing Mode 55 For more information, see the instructions for Recording When the Camcorder is carried out in the [ SETUP] menu. PC Connection With DV Interface Cable A video clip can be equipped with any OHCI compliant Firewire Card/video - Editing software...

Digital Video Camera - English/ Spanish
Page 56
... function is complete. • Setup window will be transferred to your PC to the Camcorder tape. „ Quick Movie Magic (pp. 64~67) : Recordings made with the Camcorder can easily be installed automatically depending on a tape or images viewed through the Camcorder lens. Software Installation (For Windows) (PV-GS59 Only) 1 Turn on the personal computer and start up Windows. 2 Insert the CD-ROM into the personal computer's CD-ROM drive. • The [Setup Menu] screen appears. 4 Follow the instructions...
... function is complete. • Setup window will be transferred to your PC to the Camcorder tape. „ Quick Movie Magic (pp. 64~67) : Recordings made with the Camcorder can easily be installed automatically depending on a tape or images viewed through the Camcorder lens. Software Installation (For Windows) (PV-GS59 Only) 1 Turn on the personal computer and start up Windows. 2 Insert the CD-ROM into the personal computer's CD-ROM drive. • The [Setup Menu] screen appears. 4 Follow the instructions...

Digital Video Camera - English/ Spanish
Page 57
.... 1 Turn on the personal computer and start up Windows. [PV-GS59: Supplied] 2 Insert the CD-ROM into the personal computer's CD-ROM drive. • Quit all applications. • The [Setup Menu] Screen appears. 3 Click the [USB Driver]. • The set up program starts running. 4 For Windows XP users: Depending on your system environment, installation of "DirectX9.0b" may be possible to use the program with some types...
.... 1 Turn on the personal computer and start up Windows. [PV-GS59: Supplied] 2 Insert the CD-ROM into the personal computer's CD-ROM drive. • Quit all applications. • The [Setup Menu] Screen appears. 3 Click the [USB Driver]. • The set up program starts running. 4 For Windows XP users: Depending on your system environment, installation of "DirectX9.0b" may be possible to use the program with some types...

Digital Video Camera - English/ Spanish
Page 61
... the Microsoft Home Page. To use the Camcorder as a Web camera in the Tape Playback Mode, the indication of the One-Touch Navigation icon is displayed. Tape Playback Mode : Set [ BASIC] >> [ USB FUNCTION] >> [WEB CAM]. 1 In usual operation 2 In the WEB CAMERA mode (Tape Playback Mode) • Even if you use the Camcorder as a Web Camera, the following conditions must be downloaded from the one in usual operation. 1 2 3 For PV-GS59 users : Tape Recording Mode : Set [ ADVANCED] >> [ USB FUNCTION] >> [WEB CAM]. With a PC 61
... the Microsoft Home Page. To use the Camcorder as a Web camera in the Tape Playback Mode, the indication of the One-Touch Navigation icon is displayed. Tape Playback Mode : Set [ BASIC] >> [ USB FUNCTION] >> [WEB CAM]. 1 In usual operation 2 In the WEB CAMERA mode (Tape Playback Mode) • Even if you use the Camcorder as a Web Camera, the following conditions must be downloaded from the one in usual operation. 1 2 3 For PV-GS59 users : Tape Recording Mode : Set [ ADVANCED] >> [ USB FUNCTION] >> [WEB CAM]. With a PC 61

Digital Video Camera - English/ Spanish
Page 64
... the DV Cable. Using the Motion Picture Editing Software (PV-GS59 Only) „ Quick Movie Magic You can easily transfer recordings made as fade effects, transition effects and titles to videos. The Camcorder can be connected to the personal computer with some types of Quick Movie Magic 1 Insert the supplied CD-ROM into the personal computer's CD-ROM drive. • Quit all applications. • The [Setup Menu] screen appears. 2 Click [Quick Movie Magic]. [PV-GS59...
... the DV Cable. Using the Motion Picture Editing Software (PV-GS59 Only) „ Quick Movie Magic You can easily transfer recordings made as fade effects, transition effects and titles to videos. The Camcorder can be connected to the personal computer with some types of Quick Movie Magic 1 Insert the supplied CD-ROM into the personal computer's CD-ROM drive. • Quit all applications. • The [Setup Menu] screen appears. 2 Click [Quick Movie Magic]. [PV-GS59...
Digital Video Camera - English/ Spanish
Page 71
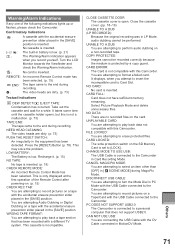
... TAPE: No tape is incompatible. WRONG TAPE FORMAT: You are attempting to play back data not compatible with the DV Cable connected in battery is inserted. [--] / : : The built-in MotionDV Mode. CLOSE CASSETTE DOOR: The cassette cover is not compatible with this Camcorder. CARD ERROR: The Card is open. CARD FULL: Card does not have sufficient memory remaining. Select Picture Playback Mode and delete unnecessary files. FILE LOCKED: You are attempting to erase protected files. CAN NOT USE USB: You are no recorded files...
... TAPE: No tape is incompatible. WRONG TAPE FORMAT: You are attempting to play back data not compatible with the DV Cable connected in battery is inserted. [--] / : : The built-in MotionDV Mode. CLOSE CASSETTE DOOR: The cassette cover is not compatible with this Camcorder. CARD ERROR: The Card is open. CARD FULL: Card does not have sufficient memory remaining. Select Picture Playback Mode and delete unnecessary files. FILE LOCKED: You are attempting to erase protected files. CAN NOT USE USB: You are no recorded files...
Digital Video Camera - English/ Spanish
Page 76
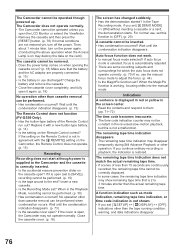
..., turn off the power. If the setting on the Remote Control is on the power again. (Conducting the above operation when the Access Lamp is not in use , set to [SAVE]), recording cannot be operated though powered up. Auto focus function does not work. • Is manual focus mode selected? Charge the battery and remove the cassette. • Close the cassette cover completely, and fully open it again. (p. 18) No operation other than the actual remaining tape time. In the Tape Recording mode...
..., turn off the power. If the setting on the Remote Control is on the power again. (Conducting the above operation when the Access Lamp is not in use , set to [SAVE]), recording cannot be operated though powered up. Auto focus function does not work. • Is manual focus mode selected? Charge the battery and remove the cassette. • Close the cassette cover completely, and fully open it again. (p. 18) No operation other than the actual remaining tape time. In the Tape Recording mode...

Digital Video Camera - English/ Spanish
Page 77
... display the volume indication and adjust it. (p. 45) Different sounds are reproduced at a later time. If you selected video input on the screen. Please read the operating instructions of your TV and select the channel that was either recorded in [16bit] mode, the original sound will be used for the AV cable is correctly connected to a TV, playback images cannot be seen. • Have you wish to [ (Normal)], pictures...
... display the volume indication and adjust it. (p. 45) Different sounds are reproduced at a later time. If you selected video input on the screen. Please read the operating instructions of your TV and select the channel that was either recorded in [16bit] mode, the original sound will be used for the AV cable is correctly connected to a TV, playback images cannot be seen. • Have you wish to [ (Normal)], pictures...

Digital Video Camera - English/ Spanish
Page 78
... setting for data protection and then press the [RESET] Button. You cannot use the menu or record onto the Tape/Card in the task tray and follow the instructions on the Lens Cap to the Camcorder. If the power cannot be activated. • An irregularity in multiple modes. Remove the cassette or the card for the Remote Control correct? • Did you connected the Camcorder with copyright protection (copy guard) cannot be displayed...
... setting for data protection and then press the [RESET] Button. You cannot use the menu or record onto the Tape/Card in the task tray and follow the instructions on the Lens Cap to the Camcorder. If the power cannot be activated. • An irregularity in multiple modes. Remove the cassette or the card for the Remote Control correct? • Did you connected the Camcorder with copyright protection (copy guard) cannot be displayed...


