Digital Video Camera
Page 7
...To View the Playback Picture 9 Controls and Components 10 Remote Controller 12 Power Supply 14 Charging Time and Available Recording Time 14 Lens Cap and Easy-Grip Strap 15 Attaching the Shoulder Strap 16 Inserting a Cassette 16 Turning on/off the Palmcorder and Selecting Modes ...Indications 64 Warning/Alarm Indications 66 Notes & Precautions 67 Cautions for Use 73 Explanation of Terms 76 Specifications 77 Palmcorder Accessory System 78 Palmcorder Accessory Order Form (For USA Customers 79 Before Requesting Service (Problems and Solutions)....... 80 Request for Service Notice 82...
...To View the Playback Picture 9 Controls and Components 10 Remote Controller 12 Power Supply 14 Charging Time and Available Recording Time 14 Lens Cap and Easy-Grip Strap 15 Attaching the Shoulder Strap 16 Inserting a Cassette 16 Turning on/off the Palmcorder and Selecting Modes ...Indications 64 Warning/Alarm Indications 66 Notes & Precautions 67 Cautions for Use 73 Explanation of Terms 76 Specifications 77 Palmcorder Accessory System 78 Palmcorder Accessory Order Form (For USA Customers 79 Before Requesting Service (Problems and Solutions)....... 80 Request for Service Notice 82...

Digital Video Camera
Page 8
1) PV-DAC11C 2) 3) CR2025 CGR-D16 4) N2QAEC000003 5) N2QCAD000002 VYK0J50 6) K2KC4CB00002 7) VFC3506 8) RP-..., other languages are supported as well. ≥In this Manual, the Panasonic make digital video camera with USB Terminal is referred to as Palmcorder. ≥These instructions do not cover the basic operations of the personal ...personal computer. 10) USB Cable (l 53) ...Extremely high precision technology is not a malfunction and does not affect the recorded picture... 8 Depending on 110/120/220/240 V AC. The result is a registered trademark of the Intel Corporation. ≥...
1) PV-DAC11C 2) 3) CR2025 CGR-D16 4) N2QAEC000003 5) N2QCAD000002 VYK0J50 6) K2KC4CB00002 7) VFC3506 8) RP-..., other languages are supported as well. ≥In this Manual, the Panasonic make digital video camera with USB Terminal is referred to as Palmcorder. ≥These instructions do not cover the basic operations of the personal ...personal computer. 10) USB Cable (l 53) ...Extremely high precision technology is not a malfunction and does not affect the recorded picture... 8 Depending on 110/120/220/240 V AC. The result is a registered trademark of the Intel Corporation. ≥...

Digital Video Camera
Page 9
... (l 17) ≥Set the 9 Switch to [OFF]. 9 To View the Playback Picture 5 Switch to the VCR Mode, rewind the tape, and play the tape back. (l... O O 6 SEARCH 8 WEB CAMERA 7 CAMERA VCR CARD P.B. 9 FF ON MODE 5 4 Start recording. (l 24) ≥Turn the Palmcorder on. (l 17) ≥Rotate the Switch 3 to [ON]. (The [CAMERA] Lamp lights up .) ≥Press the 6 Button. (...≥Press the 7 Button. (Playback starts.) ≥Press the 8 Button. (Playback stops.) 6 Turn the Palmcorder off , charging is connected to the AC Adaptor, disconnect it into the AC Wall Outlet. ≥Attach the ...
... (l 17) ≥Set the 9 Switch to [OFF]. 9 To View the Playback Picture 5 Switch to the VCR Mode, rewind the tape, and play the tape back. (l... O O 6 SEARCH 8 WEB CAMERA 7 CAMERA VCR CARD P.B. 9 FF ON MODE 5 4 Start recording. (l 24) ≥Turn the Palmcorder on. (l 17) ≥Rotate the Switch 3 to [ON]. (The [CAMERA] Lamp lights up .) ≥Press the 6 Button. (...≥Press the 7 Button. (Playback starts.) ≥Press the 8 Button. (Playback stops.) 6 Turn the Palmcorder off , charging is connected to the AC Adaptor, disconnect it into the AC Wall Outlet. ≥Attach the ...
Digital Video Camera
Page 10
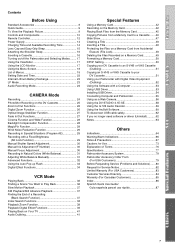
.../ON/MODE] (l 17, 24, 36) 29) Battery Holder (l 14) 30) Shoulder Strap Holders (l 16) 31) Tripod Receptacle ≥Use for mounting the Palmcorder on the LCD Monitor screen. FF ON MODE O 27) 28) 30) 32) Controls and Components 1) LCD Monitor (l 17, 75) ...≥Due to limitations in...Still Button [CAMERA STILL] (l 25) 10) 1.5 Times Tele Jump Zoom Button [TELE JUMP] (l 26) 11) Title Button [TITLE] (l 48) 12) Multi-Picture Button [MULTI] (l 35, 40) Picture-in-Picture Button [P-IN-P] (l 35) 13) Tape/Card Selector [TAPE/CARD/CARD MODE] (l 24, 42) 14) Card Access Lamp [ACCESS] (l 42) 15) Card...
.../ON/MODE] (l 17, 24, 36) 29) Battery Holder (l 14) 30) Shoulder Strap Holders (l 16) 31) Tripod Receptacle ≥Use for mounting the Palmcorder on the LCD Monitor screen. FF ON MODE O 27) 28) 30) 32) Controls and Components 1) LCD Monitor (l 17, 75) ...≥Due to limitations in...Still Button [CAMERA STILL] (l 25) 10) 1.5 Times Tele Jump Zoom Button [TELE JUMP] (l 26) 11) Title Button [TITLE] (l 48) 12) Multi-Picture Button [MULTI] (l 35, 40) Picture-in-Picture Button [P-IN-P] (l 35) 13) Tape/Card Selector [TAPE/CARD/CARD MODE] (l 24, 42) 14) Card Access Lamp [ACCESS] (l 42) 15) Card...
Digital Video Camera
Page 11
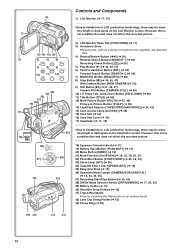
37) 38) 39) 34) 35) 36) DIGITAL STILL PICTURE DV 40) 41) 42) 43) MIC A/V IN/OUT PHONES/REMOTE USB 46) 44) 45) 47) 48) 49) 50) 34) Reset Button [RESET] (l 80) 35) Speaker .../Stop Button [REC] (l 24) 40) S-Video Input/Output Jack [S-VIDEO IN/OUT] (l 41) 41) Digital Still Picture Terminal [DIGITAL STILL PICTURE] 42) DV Input/Output Terminal [DV] (l 52) ≥Connect this to this Jack activates the Palmcorder's built-in , stereo) 53) White Balance Sensor (l 31, 76) 54) Optical Image Stabilizer Button [OPTICAL IMAGE...
37) 38) 39) 34) 35) 36) DIGITAL STILL PICTURE DV 40) 41) 42) 43) MIC A/V IN/OUT PHONES/REMOTE USB 46) 44) 45) 47) 48) 49) 50) 34) Reset Button [RESET] (l 80) 35) Speaker .../Stop Button [REC] (l 24) 40) S-Video Input/Output Jack [S-VIDEO IN/OUT] (l 41) 41) Digital Still Picture Terminal [DIGITAL STILL PICTURE] 42) DV Input/Output Terminal [DV] (l 52) ≥Connect this to this Jack activates the Palmcorder's built-in , stereo) 53) White Balance Sensor (l 31, 76) 54) Optical Image Stabilizer Button [OPTICAL IMAGE...
Digital Video Camera
Page 12
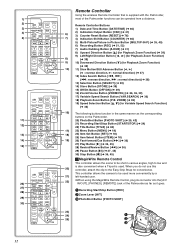
... user. 22) ≥When using the MagicWire Remote Control, plug its connector into the [A/V IN/OUT], [PHONES], [REMOTE] Jack of the Palmcorder functions can be used . ZOOM] (l 39) 19) Speed Selection Button [π, ∫] (for Variable Speed Search Function) (l 36) 16... 76) 7) 4) Indication Shift Button [COUNTER] (l 66) 5) Multi-Picture/Picture-in various angles, high to low and is also convenient when a Tripod is supplied with the Palmcorder, most of the Palmcorder as far as the corresponding buttons on the Palmcorder. 20) PhotoShot Button [PHOTO SHOT] (l 25, 42) 21) Recording...
... user. 22) ≥When using the MagicWire Remote Control, plug its connector into the [A/V IN/OUT], [PHONES], [REMOTE] Jack of the Palmcorder functions can be used . ZOOM] (l 39) 19) Speed Selection Button [π, ∫] (for Variable Speed Search Function) (l 36) 16... 76) 7) 4) Indication Shift Button [COUNTER] (l 66) 5) Multi-Picture/Picture-in various angles, high to low and is also convenient when a Tripod is supplied with the Palmcorder, most of the Palmcorder as far as the corresponding buttons on the Palmcorder. 20) PhotoShot Button [PHOTO SHOT] (l 25, 42) 21) Recording...

Digital Video Camera
Page 17
Forcefully rotating the LCD monitor beyond these ranges will damage the Palmcorder. LCD Color Level [LCD COLOR LEVEL] Adjusts the color saturation of vertical bars indicates stronger brightness or color saturation. To Change the Picture Quality of Camera Mode, VCR Mode, and Card Playback Mode. ≥The appropriate Mode Lamp... [OFF/ON/MODE] Switch. ≥With each rotate, the Mode switches in the direction of the arrow. ≥The Viewfinder goes off the Palmcorder and Selecting Modes Turn on the power first and then select Modes. ª How to Turn on the Power 1 Set the [OFF/ON/MODE...
Forcefully rotating the LCD monitor beyond these ranges will damage the Palmcorder. LCD Color Level [LCD COLOR LEVEL] Adjusts the color saturation of vertical bars indicates stronger brightness or color saturation. To Change the Picture Quality of Camera Mode, VCR Mode, and Card Playback Mode. ≥The appropriate Mode Lamp... [OFF/ON/MODE] Switch. ≥With each rotate, the Mode switches in the direction of the arrow. ≥The Viewfinder goes off the Palmcorder and Selecting Modes Turn on the power first and then select Modes. ª How to Turn on the Power 1 Set the [OFF/ON/MODE...

Digital Video Camera
Page 18
...ADV PAUSE STILL ADV E ; To Exit the Menu Screen Press the [MENU] Button again. In this case, carry out the following instructions.) 18 PICTURE 8 No.25 100-0012 SEARCH P.B. Menu items that cannot be used in combination with the selected menu items are displayed in dark blue. ≥... selection of the [PUSH] Dial, the cursor [1] brings up a subsequent Mode. However, if the Battery or AC Adaptor is disconnected before turning the Palmcorder off . Menus can be displayed during playback but not during Menu Operations. D INDEX STOP INDEX K ∫ L SELECT VAR. ZOOM STORE MENU OFF...
...ADV PAUSE STILL ADV E ; To Exit the Menu Screen Press the [MENU] Button again. In this case, carry out the following instructions.) 18 PICTURE 8 No.25 100-0012 SEARCH P.B. Menu items that cannot be used in combination with the selected menu items are displayed in dark blue. ≥... selection of the [PUSH] Dial, the cursor [1] brings up a subsequent Mode. However, if the Battery or AC Adaptor is disconnected before turning the Palmcorder off . Menus can be displayed during playback but not during Menu Operations. D INDEX STOP INDEX K ∫ L SELECT VAR. ZOOM STORE MENU OFF...

Digital Video Camera
Page 19
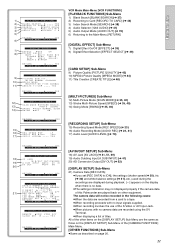
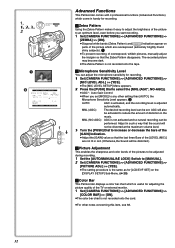
...PUSH MENU TO EXIT [ADVANCED FUNCTIONS] Sub-Menu 8) Zebra Pattern [ZEBRA] (l 32) 9) Microphones Sensitivity Level [MIC LEVEL ADJ.] (l 32) 10) Picture Adjustment [PICTURE ADJ.] (l 32) 11) Color Bar [COLOR BAR] (l 32) 12) 13) DIGITAL EFFECT EFFECT1 EFFECT2 OFF MULTI P-IN-P WIPE MIX STROBE GAIN... FINE NORMAL LOW LIGHT SHOT OFF AUTO CREATE TITLE ---- YES PUSH MENU TO EXIT [CARD SETUP] Sub-Menu 14) Picture Size [PICTURE SIZE] (l 43) 15) Picture Quality [PICTURE QUALITY] (l 43) 16) MPEG4 Picture Quality [MPEG4 MODE] (l 44) 17) Low Light Recording [LOW LIGHT SHOT] (l 42) 18) Title Creation [...
...PUSH MENU TO EXIT [ADVANCED FUNCTIONS] Sub-Menu 8) Zebra Pattern [ZEBRA] (l 32) 9) Microphones Sensitivity Level [MIC LEVEL ADJ.] (l 32) 10) Picture Adjustment [PICTURE ADJ.] (l 32) 11) Color Bar [COLOR BAR] (l 32) 12) 13) DIGITAL EFFECT EFFECT1 EFFECT2 OFF MULTI P-IN-P WIPE MIX STROBE GAIN... FINE NORMAL LOW LIGHT SHOT OFF AUTO CREATE TITLE ---- YES PUSH MENU TO EXIT [CARD SETUP] Sub-Menu 14) Picture Size [PICTURE SIZE] (l 43) 15) Picture Quality [PICTURE QUALITY] (l 43) 16) MPEG4 Picture Quality [MPEG4 MODE] (l 44) 17) Low Light Recording [LOW LIGHT SHOT] (l 42) 18) Title Creation [...
Digital Video Camera
Page 21
...;When recording involves the use of the S-Video or AV Input Jack. ≥When pictures with no data. ≥The settings information may not displayed properly if the camera data of this Palmcorder are the same as those on the [DISPLAY SETUP] Sub-Menu of the other equipment... OFF D/T DATE C.DISPLAY COUNTER MEMORY TIMECODE C.RESET ---- YES RETURN ---- YES RETURN ---- YES PUSH MENU TO EXIT 9) 10) 11) CARD SETUP PICTURE QUALITY FINE NORMAL ECONOMY MPEG4 MODE SUPERFINE FINE NORMAL CREATE TITLE ---- The camera data will not be recorded in the following cases: ≥When the...
...;When recording involves the use of the S-Video or AV Input Jack. ≥When pictures with no data. ≥The settings information may not displayed properly if the camera data of this Palmcorder are the same as those on the [DISPLAY SETUP] Sub-Menu of the other equipment... OFF D/T DATE C.DISPLAY COUNTER MEMORY TIMECODE C.RESET ---- YES RETURN ---- YES RETURN ---- YES PUSH MENU TO EXIT 9) 10) 11) CARD SETUP PICTURE QUALITY FINE NORMAL ECONOMY MPEG4 MODE SUPERFINE FINE NORMAL CREATE TITLE ---- The camera data will not be recorded in the following cases: ≥When the...

Digital Video Camera
Page 22
... SEARCH]: The [FILE SEARCH] Menu for finding files by number appears. (l 46) 11) [DELETE FILE]: The [DELETE FILE] Menu for the displayed picture appears. (l 50) Use this Menu after the picture whose DPOF settings are to Cassette [RECORD TO TAPE] (l 46) 5) Searching a File [FILE SEARCH] (l 46) 6) Setting the Lock [FILE LOCK] (l 49...
... SEARCH]: The [FILE SEARCH] Menu for finding files by number appears. (l 46) 11) [DELETE FILE]: The [DELETE FILE] Menu for the displayed picture appears. (l 50) Use this Menu after the picture whose DPOF settings are to Cassette [RECORD TO TAPE] (l 46) 5) Searching a File [FILE SEARCH] (l 46) 6) Setting the Lock [FILE LOCK] (l 49...
Digital Video Camera
Page 23
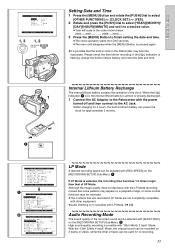
...the built-in lithium battery can be used for approximately 3 months. 1 CAMERA FUNCTIONS 1.CAMERA SETUP 2.ADVANCED FUNCTIONS 3.DIGITAL EFFECT 4.CARD SETUP 5.MULTI-PICTURES 6.RECORDING SETUP 7.DISPLAY SETUP 8.OTHER FUNCTIONS 9.DEMO MODE PUSH MENU TO EXIT 1 2 RECORDING SETUP REC SPEED SP LP AUDIO REC 12bit SCENEINDEX 2HOUR.... ≥The menu will disappear when the [MENU] Button is pressed again. ≥It is possible that the built-in clock in the Palmcorder may be restricted. ≥The contents that of SP Mode. With the "12bit 32kHz 4 track" Mode, the original sound can be recorded ...
...the built-in lithium battery can be used for approximately 3 months. 1 CAMERA FUNCTIONS 1.CAMERA SETUP 2.ADVANCED FUNCTIONS 3.DIGITAL EFFECT 4.CARD SETUP 5.MULTI-PICTURES 6.RECORDING SETUP 7.DISPLAY SETUP 8.OTHER FUNCTIONS 9.DEMO MODE PUSH MENU TO EXIT 1 2 RECORDING SETUP REC SPEED SP LP AUDIO REC 12bit SCENEINDEX 2HOUR.... ≥The menu will disappear when the [MENU] Button is pressed again. ≥It is possible that the built-in clock in the Palmcorder may be restricted. ≥The contents that of SP Mode. With the "12bit 32kHz 4 track" Mode, the original sound can be recorded ...

Digital Video Camera
Page 25
...Slide the [TAPE/CARD/CARD MODE] Selector to [TAPE]. 2 Press the [PHOTO SHOT] Button in the Recording Pause Mode. ≥The Palmcorder records a still picture for regular recording. 25 However, when the LCD Monitor is rotated forward, the image is also shown in the Viewfinder. ≥If you ...is disabled automatically. PhotoShot Recording on the DV Cassette With this function, you can record still pictures with the [SHTR EFFECT] of the Sub-Menu [OTHER FUNCTIONS] set to [ON], the Palmcorder will record still images without interruptions every 0.7 seconds until the button is released. ≥The...
...Slide the [TAPE/CARD/CARD MODE] Selector to [TAPE]. 2 Press the [PHOTO SHOT] Button in the Recording Pause Mode. ≥The Palmcorder records a still picture for regular recording. 25 However, when the LCD Monitor is rotated forward, the image is also shown in the Viewfinder. ≥If you ...is disabled automatically. PhotoShot Recording on the DV Cassette With this function, you can record still pictures with the [SHTR EFFECT] of the Sub-Menu [OTHER FUNCTIONS] set to [ON], the Palmcorder will record still images without interruptions every 0.7 seconds until the button is released. ≥The...

Digital Video Camera
Page 27
...EIS (Optical Image Stabilizer) Function will only work when performing Card Photo Shot Function. We recommend MEGA EIS for the small still picture in the Picture-in-Picture Mode. 27 Fade Out 2 Fade Out causes images and sounds to disappear gradually, leaving a black screen at the beginning of ...function to correct for camera shake in these images. ≥If the Palmcorder shakes too much, this function may not be used when recording still pictures in the PhotoShot Mode, Digital Still Picture Mode, Multi-Picture Mode, and for Card PhotoShot Function. 3 Press the [OPTICAL IMAGE ...
...EIS (Optical Image Stabilizer) Function will only work when performing Card Photo Shot Function. We recommend MEGA EIS for the small still picture in the Picture-in-Picture Mode. 27 Fade Out 2 Fade Out causes images and sounds to disappear gradually, leaving a black screen at the beginning of ...function to correct for camera shake in these images. ≥If the Palmcorder shakes too much, this function may not be used when recording still pictures in the PhotoShot Mode, Digital Still Picture Mode, Multi-Picture Mode, and for Card PhotoShot Function. 3 Press the [OPTICAL IMAGE ...

Digital Video Camera
Page 28
... Function This function is for recording in a cinema-like wide screen. 1 Set [CAMERA FUNCTIONS] >> [CAMERA SETUP] >> [ASPECT] >> [16:9]. ≥The picture stretches vertically. 2 ≥Wide-screen TV equipped with S-Video picture terminal and Zoom/ Wide features is set. To Cancel the MagicPix Function Press the [MAGICPIX] Button. ≥For other notes, see...
... Function This function is for recording in a cinema-like wide screen. 1 Set [CAMERA FUNCTIONS] >> [CAMERA SETUP] >> [ASPECT] >> [16:9]. ≥The picture stretches vertically. 2 ≥Wide-screen TV equipped with S-Video picture terminal and Zoom/ Wide features is set. To Cancel the MagicPix Function Press the [MAGICPIX] Button. ≥For other notes, see...
Digital Video Camera
Page 29
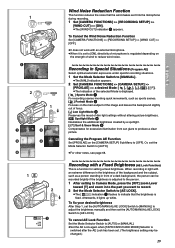
...Noise Reduction Function This function reduces the noise that the brightness is set the [AUTO/MANUAL/AE LOCK] Switch to produce a clear picture. To cancel AE Lock Function Set the Mode Selector Switch to [AUTO] or [MANUAL]. ≥Set the AE Lock again ... >> [RECORDING SETUP] >> [WIND CUT] >> [OFF]. ≥It does not work with an extreme difference in front of dim light settings without altering picture brightness. [Ω] Spotlight Mode 4 Neutralizes the additional brightness created by a spotlight. [º] Surf & Snow Mode 5 Compensates for setting a fixed brightness. ...
...Noise Reduction Function This function reduces the noise that the brightness is set the [AUTO/MANUAL/AE LOCK] Switch to produce a clear picture. To cancel AE Lock Function Set the Mode Selector Switch to [AUTO] or [MANUAL]. ≥Set the AE Lock again ... >> [RECORDING SETUP] >> [WIND CUT] >> [OFF]. ≥It does not work with an extreme difference in front of dim light settings without altering picture brightness. [Ω] Spotlight Mode 4 Neutralizes the additional brightness created by a spotlight. [º] Surf & Snow Mode 5 Compensates for setting a fixed brightness. ...
Digital Video Camera
Page 32
...;Diagonal white bands (Zebra Pattern) and [ ZEBRA ] Indication appear on the [DISPLAY SETUP] Sub-Menu. (l 20) ª Color Bar This Palmcorder displays a color bar chart which is useful for adjusting the picture quality of the TV or external monitor. 1 Set [CAMERA FUNCTIONS] >> [ADVANCED FUNCTIONS] >> [COLOR BAR] >> [ON]. ≥The color bar chart...
...;Diagonal white bands (Zebra Pattern) and [ ZEBRA ] Indication appear on the [DISPLAY SETUP] Sub-Menu. (l 20) ª Color Bar This Palmcorder displays a color bar chart which is useful for adjusting the picture quality of the TV or external monitor. 1 Set [CAMERA FUNCTIONS] >> [ADVANCED FUNCTIONS] >> [COLOR BAR] >> [ON]. ≥The color bar chart...

Digital Video Camera
Page 33
..., and the image becomes still. 3 Press the [PHOTO SHOT] Button or Recording Start/Stop Button. ≥Flash is not lit, when the Palmcorder is set it to record still pictures in a dark place. 1 Set [CAMERA FUNCTIONS] >> [RECORDING SETUP] >> [FLASH] >> [ON] or [AUTO]. ≥If [AUTO] is selected, the [ßA] Indication is displayed...
..., and the image becomes still. 3 Press the [PHOTO SHOT] Button or Recording Start/Stop Button. ≥Flash is not lit, when the Palmcorder is set it to record still pictures in a dark place. 1 Set [CAMERA FUNCTIONS] >> [RECORDING SETUP] >> [FLASH] >> [ON] or [AUTO]. ≥If [AUTO] is selected, the [ßA] Indication is displayed...

Digital Video Camera
Page 34
... scene. Canceling the digital effect Set [CAMERA FUNCTIONS] >> [DIGITAL EFFECT] >> [EFFECT1] or [EFFECT2] >>[OFF]. ≥If the Palmcorder is turned off, the [EFFECT2] settings are inverted as seen in a negative. 11) [SEPIA] Sepia Mode ≥Records a scene ...JOG PUSH WIPE WIPE WIPE MIX MIX MIX 34 Digital Effect Functions This Palmcorder is equipped with a trailing effect. 8) [MOSAIC] Mosaic Mode ≥Produces a mosaic-like effect. Digital Effects 1 [EFFECT1] 1) [MULTI] Multi-Picture Mode 2) [P-IN-P] Picture-in memory. Selecting a desired digital effect Set [CAMERA FUNCTIONS] >>...
... scene. Canceling the digital effect Set [CAMERA FUNCTIONS] >> [DIGITAL EFFECT] >> [EFFECT1] or [EFFECT2] >>[OFF]. ≥If the Palmcorder is turned off, the [EFFECT2] settings are inverted as seen in a negative. 11) [SEPIA] Sepia Mode ≥Records a scene ...JOG PUSH WIPE WIPE WIPE MIX MIX MIX 34 Digital Effect Functions This Palmcorder is equipped with a trailing effect. 8) [MOSAIC] Mosaic Mode ≥Produces a mosaic-like effect. Digital Effects 1 [EFFECT1] 1) [MULTI] Multi-Picture Mode 2) [P-IN-P] Picture-in memory. Selecting a desired digital effect Set [CAMERA FUNCTIONS] >>...

Digital Video Camera
Page 35
... at each scene you want to insert a small still picture. 2 Exit the menu by pressing the [MENU] Button. 3 Aim the Palmcorder at the beginning and end than in -Picture Mode You can capture 9 consecutive still pictures within approximately 1.5 seconds [SLOW]: You can display a sub-screen (still picture) inside the screen. After setting [CAMERA FUNCTIONS] >> [DIGITAL...
... at each scene you want to insert a small still picture. 2 Exit the menu by pressing the [MENU] Button. 3 Aim the Palmcorder at the beginning and end than in -Picture Mode You can capture 9 consecutive still pictures within approximately 1.5 seconds [SLOW]: You can display a sub-screen (still picture) inside the screen. After setting [CAMERA FUNCTIONS] >> [DIGITAL...


