

Multi Media Display
Page 1
... connecting, operating or adjusting this product will successfully receive digital television transmissions that meet your product can help us at www.panasonic.com/register ATSC CERTIFIED * DIGITAL TELEVISION * The presence of the DTV certification mark indicates that this product, please read the instructions completely. Please keep this manual show the PT-52LCX35. Multimedia Projection HDTV Operating Instructions Models No. Registering your needs. Register online at...
... connecting, operating or adjusting this product will successfully receive digital television transmissions that meet your product can help us at www.panasonic.com/register ATSC CERTIFIED * DIGITAL TELEVISION * The presence of the DTV certification mark indicates that this product, please read the instructions completely. Please keep this manual show the PT-52LCX35. Multimedia Projection HDTV Operating Instructions Models No. Registering your needs. Register online at...

Multi Media Display
Page 2
... these instructions before using, connecting or adjusting this product. 2) Keep these instructions for proper grounding and, in particular, specifies that the cable ground shall be read carefully in this Operating Instructions manual. 4) Follow all warnings on a bed, sofa or similar surfaces. 8) Do not install near any problems. The pictorial representation of the lamp unit is intended to cause electric shock. Replace the lamp unit...
... these instructions before using, connecting or adjusting this product. 2) Keep these instructions for proper grounding and, in particular, specifies that the cable ground shall be read carefully in this Operating Instructions manual. 4) Follow all warnings on a bed, sofa or similar surfaces. 8) Do not install near any problems. The pictorial representation of the lamp unit is intended to cause electric shock. Replace the lamp unit...

Multi Media Display
Page 4
... the attached installation instructions and use only shielded interface cables when connecting to provide reasonable protection against harmful interference in a particular installation. ANY CHANGES OR MODIFICATIONS TO THIS PTV RECEIVER NOT EXPRESSLY APPROVED BY PANASONIC CORPORATION OF NORTH AMERICA COULD CAUSE HARMFUL INTERFERENCE, WHICH WOULD VOID THE USER'S AUTHORITY TO OPERATE THIS EQUIPMENT. Visit our Panasonic Web Site for a Class B digital device, pursuant...
... the attached installation instructions and use only shielded interface cables when connecting to provide reasonable protection against harmful interference in a particular installation. ANY CHANGES OR MODIFICATIONS TO THIS PTV RECEIVER NOT EXPRESSLY APPROVED BY PANASONIC CORPORATION OF NORTH AMERICA COULD CAUSE HARMFUL INTERFERENCE, WHICH WOULD VOID THE USER'S AUTHORITY TO OPERATE THIS EQUIPMENT. Visit our Panasonic Web Site for a Class B digital device, pursuant...

Multi Media Display
Page 5
... Basic Operation Advanced Operation Use Now ! Power ON / OFF 24 Basic Menu Navigation 26 Tuning channels 28 Projection Display operation 32 ASPECT Controls 36 Split screen 37 Enjoy More ! Picture Adjustments 39 Audio Adjustments 42 Sleep Timer Feature 44 Lock Feature 45 Photo Viewer 49 Setup Features 54 Other Remote Control Quick Reference Guide (Operating peripheral equipment) ......58 Information ! IMPORTANT SAFETY INSTRUCTIONS 2 Before Using 6 Location of Contents To Start ! Warning Indicators 65 Replacing the lamp unit 66 Troubleshooting 68 Specifications...
... Basic Operation Advanced Operation Use Now ! Power ON / OFF 24 Basic Menu Navigation 26 Tuning channels 28 Projection Display operation 32 ASPECT Controls 36 Split screen 37 Enjoy More ! Picture Adjustments 39 Audio Adjustments 42 Sleep Timer Feature 44 Lock Feature 45 Photo Viewer 49 Setup Features 54 Other Remote Control Quick Reference Guide (Operating peripheral equipment) ......58 Information ! IMPORTANT SAFETY INSTRUCTIONS 2 Before Using 6 Location of Contents To Start ! Warning Indicators 65 Replacing the lamp unit 66 Troubleshooting 68 Specifications...

Multi Media Display
Page 7
...; is installed, the cable MSO (multiple system owner/operator) may need to the channel as directed by the EAS message. These messages are intended to alert the general public of arrow until it snaps shut. Always use new batteries when replacing the old set . Do not attempt to the remote control. CH VOL OK VOL CH Press the VOL- Getting Started Remote Control Battery Installation Requires two AA batteries (supplied). 1. We...
...; is installed, the cable MSO (multiple system owner/operator) may need to the channel as directed by the EAS message. These messages are intended to alert the general public of arrow until it snaps shut. Always use new batteries when replacing the old set . Do not attempt to the remote control. CH VOL OK VOL CH Press the VOL- Getting Started Remote Control Battery Installation Requires two AA batteries (supplied). 1. We...

Multi Media Display
Page 9
..., RCVR, DBS/CBL, AUX Sets the remote to communicate with Split screen. Press to display Main Menu. Press to access next audio track. In digital mode, press to swap Main screen with other modes, see pages 58-64. 9 Press to set unit to shut itself off after entering major channel numbers to access audio modes (Stereo, SAP or Mono). For other devices. 3 TV/VIDEO Changes Input source. 4 SD Accesses the...
..., RCVR, DBS/CBL, AUX Sets the remote to communicate with Split screen. Press to display Main Menu. Press to access next audio track. In digital mode, press to swap Main screen with other modes, see pages 58-64. 9 Press to set unit to shut itself off after entering major channel numbers to access audio modes (Stereo, SAP or Mono). For other devices. 3 TV/VIDEO Changes Input source. 4 SD Accesses the...

Multi Media Display
Page 10
.... Lights up when temperature inside unit is malfunctioning. (P. 65) Connect from other component. (Video 3) 5 Video Input Connector 3 Audio Input 6 Connector (Shared with both Video 3 and PC) Connect from other component. (Video 3) Connect from other component. (Video 3) Connect from PC. (PC) 7 PC (RGB) Input Connector Connect from Remote Control. POWER button / POWER indicator Remote Control Sensor Using your finger, slide Cover in menus. Note: • Buttons listed above operate the same as remote control buttons of arrow to change channels and navigate in direction of...
.... Lights up when temperature inside unit is malfunctioning. (P. 65) Connect from other component. (Video 3) 5 Video Input Connector 3 Audio Input 6 Connector (Shared with both Video 3 and PC) Connect from other component. (Video 3) Connect from other component. (Video 3) Connect from PC. (PC) 7 PC (RGB) Input Connector Connect from Remote Control. POWER button / POWER indicator Remote Control Sensor Using your finger, slide Cover in menus. Note: • Buttons listed above operate the same as remote control buttons of arrow to change channels and navigate in direction of...

Multi Media Display
Page 19
... Frequency Effect) subwoofer channel, For a full Home Theater sound experience, an external Dolby Digital decoder and a multichannel amplifier must be connected to a Dolby Digital decoder. Getting Started Digital Audio Out Use the diagram below to connect the Digital Audio Output of your DVD player and DVD-Audio software the copyright protection function may operate and disable optical output. But, if NTSC channel is selected, the output from the Digital Audio Out jack on the unit to the connector...
... Frequency Effect) subwoofer channel, For a full Home Theater sound experience, an external Dolby Digital decoder and a multichannel amplifier must be connected to a Dolby Digital decoder. Getting Started Digital Audio Out Use the diagram below to connect the Digital Audio Output of your DVD player and DVD-Audio software the copyright protection function may operate and disable optical output. But, if NTSC channel is selected, the output from the Digital Audio Out jack on the unit to the connector...

Multi Media Display
Page 20
... 12 11 Connection port view Pin No. There is no need to use the RGB cable (D-SUB 15P) (Not included) to connect a Macintosh computer to the set. Installation (continued) How to connect the PC IN Terminals Connecting a PC to PC IN COMPUTER Audio Input Connector (Shared with PC / AT compatible D-SUB 15P terminal. • The computer shown in the illustration is for example purposes only. Signal name...
... 12 11 Connection port view Pin No. There is no need to use the RGB cable (D-SUB 15P) (Not included) to connect a Macintosh computer to the set. Installation (continued) How to connect the PC IN Terminals Connecting a PC to PC IN COMPUTER Audio Input Connector (Shared with PC / AT compatible D-SUB 15P terminal. • The computer shown in the illustration is for example purposes only. Signal name...

Multi Media Display
Page 24
... set's tuner for a few seconds. The Power Indicator blinks Red for about 1 minute and then LED turns off To extend lamp life, if there is still operating. Power ON Press POWER on Projection Display or Remote Control to light lamp) Notes: • If the POWER button is accidentally turned off during the Black Screen display, Power is disconnected, the internal cooling fan stops operating. POWER button/ POWER indicator Note: • When the power cord is turned...
... set's tuner for a few seconds. The Power Indicator blinks Red for about 1 minute and then LED turns off To extend lamp life, if there is still operating. Power ON Press POWER on Projection Display or Remote Control to light lamp) Notes: • If the POWER button is accidentally turned off during the Black Screen display, Power is disconnected, the internal cooling fan stops operating. POWER button/ POWER indicator Note: • When the power cord is turned...

Multi Media Display
Page 25
..., the channels will return to Manual Program mode. Auto program ANT In ◄ Cable ► Mode All Start scan Press to display Auto program screen. Channels available for reception will be done when you change the antenna configuration. • Depending on -screen for setting up the features. Progress Auto program You can select English, Spanish or French as the factory setting. Press to select Mode. Basic Operation First Time Setup For your convenience, First Time Set up menu will be...
..., the channels will return to Manual Program mode. Auto program ANT In ◄ Cable ► Mode All Start scan Press to display Auto program screen. Channels available for reception will be done when you change the antenna configuration. • Depending on -screen for setting up the features. Progress Auto program You can select English, Spanish or French as the factory setting. Press to select Mode. Basic Operation First Time Setup For your convenience, First Time Set up menu will be...

Multi Media Display
Page 29
... the cursor to enter the Auto menu. Press to select "All" or "Analog". Press to display the Setup menu. Now scanning analog channel ... Press to select "Start scan". Setup CH scan All Language Program channel Input labels CC Other adjust Press to select "Auto". 6 CH VOL OK VOL CH Press to select "Antenna" or "Cable". Picture Audio Timer Lock Memory Card Setup 5 CH VOL OK VOL CH Press to display the Program channel menu. If OK is not...
... the cursor to enter the Auto menu. Press to select "All" or "Analog". Press to display the Setup menu. Now scanning analog channel ... Press to select "Start scan". Setup CH scan All Language Program channel Input labels CC Other adjust Press to select "Auto". 6 CH VOL OK VOL CH Press to select "Antenna" or "Cable". Picture Audio Timer Lock Memory Card Setup 5 CH VOL OK VOL CH Press to display the Program channel menu. If OK is not...

Multi Media Display
Page 32
... VOL CH Press corresponding NUMBER keys on the Remote Control to select the input of source connected to HDMI IN 2 is displayed. HDMI 2*2 Signal of your choice, then press "OK". • If, during selection, no action is taken for several seconds, the Input selection menu is exited and the current input is displayed. Rapid Tuning Switches between the current and last channel or input modes. Video 3 Signal of your choice...
... VOL CH Press corresponding NUMBER keys on the Remote Control to select the input of source connected to HDMI IN 2 is displayed. HDMI 2*2 Signal of your choice, then press "OK". • If, during selection, no action is taken for several seconds, the Input selection menu is exited and the current input is displayed. Rapid Tuning Switches between the current and last channel or input modes. Video 3 Signal of your choice...
Multi Media Display
Page 33
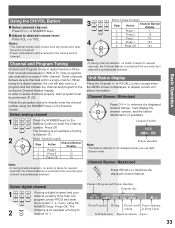
... Remote Control. In order to directly enter the channel number using the NUMBER keys. Select analog channel 11 4 2 5 3 6 7 8 9 0 2 CH VOL OK VOL CH Press the NUMBER keys on -screen Channel Banner display. Channel Number 15-2 ABC - HD Station identifier Note: • The Station identifier is automatically selected. HD CC SAP TV-G 1080i STANDARD 4 : 3 30 Closed Caption Rating Picture mode Time remaining setting in digital television differs from conventional television. Basic Operation Using the CH/VOL Button...
... Remote Control. In order to directly enter the channel number using the NUMBER keys. Select analog channel 11 4 2 5 3 6 7 8 9 0 2 CH VOL OK VOL CH Press the NUMBER keys on -screen Channel Banner display. Channel Number 15-2 ABC - HD Station identifier Note: • The Station identifier is automatically selected. HD CC SAP TV-G 1080i STANDARD 4 : 3 30 Closed Caption Rating Picture mode Time remaining setting in digital television differs from conventional television. Basic Operation Using the CH/VOL Button...
Multi Media Display
Page 34
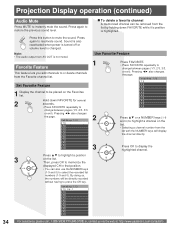
... display the highlighted channel. Sound is also reactivated when power is turned off or volume level is not muted. Favorite Feature This feature lets you add channels to or delete channels from the list with the NUMBER keys will be directly recorded without having to mute the sound. Hold down FAVORITE while it's position is highlighted. Press this button to press the OK key. Set Favorite Feature 1 Display...
... display the highlighted channel. Sound is also reactivated when power is turned off or volume level is not muted. Favorite Feature This feature lets you add channels to or delete channels from the list with the NUMBER keys will be directly recorded without having to mute the sound. Hold down FAVORITE while it's position is highlighted. Press this button to press the OK key. Set Favorite Feature 1 Display...

Multi Media Display
Page 35
... Audio Program (sub language.) Select SAP audio mode for the sub language. Basic Operation Audio track 1 of time from the Menu screen. (P. 44). • The on -screen displays. SLEEP Press SLEEP repeatedly to select the next audio track (if available) when receiving a digital channel. MTS Stereo and SAP broadcast Multi-channel Television Sound Stereo (main language) and Secondary Audio Program (sub language) broadcasts are possible broadcast types with first press of SAP button...
... Audio Program (sub language.) Select SAP audio mode for the sub language. Basic Operation Audio track 1 of time from the Menu screen. (P. 44). • The on -screen displays. SLEEP Press SLEEP repeatedly to select the next audio track (if available) when receiving a digital channel. MTS Stereo and SAP broadcast Multi-channel Television Sound Stereo (main language) and Secondary Audio Program (sub language) broadcasts are possible broadcast types with first press of SAP button...

Multi Media Display
Page 43
... Press to the input signal type. Speakers This feature is not available in VIDEO mode). Digital : Forces use of the sound image are output from the rear AUDIO OUT and DIGITAL AUDIO OUT terminal. (PP. 18-19). • When volume is adjusted or the MUTE button is pressed from the Remote Control, a message will be displayed. 43 Analog : Forces use of digital audio input signal transmitted via separate RCA terminals. *1 For models PT-44LCX65...
... Press to the input signal type. Speakers This feature is not available in VIDEO mode). Digital : Forces use of the sound image are output from the rear AUDIO OUT and DIGITAL AUDIO OUT terminal. (PP. 18-19). • When volume is adjusted or the MUTE button is pressed from the Remote Control, a message will be displayed. 43 Analog : Forces use of digital audio input signal transmitted via separate RCA terminals. *1 For models PT-44LCX65...

Multi Media Display
Page 58
... CH Press OK and POWER together, for at : http://www.panasonic.com/contactinfo Setting up the remote using the numerical keys. (When code is known): 1 POWER Confirm that the external component is entered, or if the procedure takes longer than 30 seconds, the programming will turn on. Programming Without a Code This procedure searches all codes and is plugged and operating. Remote Control Quick Reference Guide (Operating peripheral equipment) POWER SAP LIGHT TV VCR DVD...
... CH Press OK and POWER together, for at : http://www.panasonic.com/contactinfo Setting up the remote using the numerical keys. (When code is known): 1 POWER Confirm that the external component is entered, or if the procedure takes longer than 30 seconds, the programming will turn on. Programming Without a Code This procedure searches all codes and is plugged and operating. Remote Control Quick Reference Guide (Operating peripheral equipment) POWER SAP LIGHT TV VCR DVD...

Multi Media Display
Page 59
... the code numbers from tables in all models. • After entering the proper infrared code, press the desired Mode Selection button on operating peripheral equipment using the Remote Control. If the procedure was successful, the component will serve as a reference if you need to store the code. Component Codes The Universal Remote Control is found, press OK to program your Remote Control. CABLE Cable Box DBS Digital Broadcast System VCR Video Cassette Recorder RCVR Receiver...
... the code numbers from tables in all models. • After entering the proper infrared code, press the desired Mode Selection button on operating peripheral equipment using the Remote Control. If the procedure was successful, the component will serve as a reference if you need to store the code. Component Codes The Universal Remote Control is found, press OK to program your Remote Control. CABLE Cable Box DBS Digital Broadcast System VCR Video Cassette Recorder RCVR Receiver...

Multi Media Display
Page 68
... . Firmly replace the cover. Image shakes. • Is the antenna or antenna cable old, broken or shorted? • Is the antenna cable connected properly? Troubleshooting Before you correctly set the Remote Control code? These symptoms will stop after about 1 minute. 24 An OSD instructing to normal. - Color patches or no picture at the top and bottom of the screen. • When using a VCR and selecting channels on...
... . Firmly replace the cover. Image shakes. • Is the antenna or antenna cable old, broken or shorted? • Is the antenna cable connected properly? Troubleshooting Before you correctly set the Remote Control code? These symptoms will stop after about 1 minute. 24 An OSD instructing to normal. - Color patches or no picture at the top and bottom of the screen. • When using a VCR and selecting channels on...


