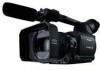
Operating Instructions
Page 7
... drive (1394 HOST mode 84 Warnings 85 Dubbing 86 Dubbing the contents of P2 cards onto a tape (dubbing mode 86 Digital input/output (P2 card/Tape 87 Analog output (P2 card/Tape 88 Analog input (Tape 89 Displays Screen displays 90 Regular displays 90 Warnings 93 Setting the DISPLAY items 95 Menus...
... drive (1394 HOST mode 84 Warnings 85 Dubbing 86 Dubbing the contents of P2 cards onto a tape (dubbing mode 86 Digital input/output (P2 card/Tape 87 Analog output (P2 card/Tape 88 Analog input (Tape 89 Displays Screen displays 90 Regular displays 90 Warnings 93 Setting the DISPLAY items 95 Menus...

Operating Instructions
Page 14
...) 10 VIDEO IN/OUT terminal (Page 79) 11 INPUT 1/2 terminal (XLR, 3 pin) (Pages 52 and 80) 12 S-VIDEO IN/OUT terminal (Page 79) 13 COMPONENT OUTPUT terminal (Page 79) Do not connect any equipment except the remote controller is connected, the pictures will be affected e.g. ZOOM S/S (2.5 mm super mini jack) You...
...) 10 VIDEO IN/OUT terminal (Page 79) 11 INPUT 1/2 terminal (XLR, 3 pin) (Pages 52 and 80) 12 S-VIDEO IN/OUT terminal (Page 79) 13 COMPONENT OUTPUT terminal (Page 79) Do not connect any equipment except the remote controller is connected, the pictures will be affected e.g. ZOOM S/S (2.5 mm super mini jack) You...
Operating Instructions
Page 35
...using the FRAME RATE function (page 100). 4 Press the START/STOP button to start or stop native recording in VFR mode. • No signals are output from the nonlinear editing system in 1080i/24P or 720P/60P (24P over 60P) format. • The 24P format is used for both recording and... a recorded clip lasting a long time is to be slight discrepancies between the recording frame rate displayed and the frame rate at which the images are output from the 1394 terminal during recording or recording standby in 1080i/24P or 720P/60P (24P over 60P) format. 1 Using the REC FORMAT (P2) ...
...using the FRAME RATE function (page 100). 4 Press the START/STOP button to start or stop native recording in VFR mode. • No signals are output from the nonlinear editing system in 1080i/24P or 720P/60P (24P over 60P) format. • The 24P format is used for both recording and... a recorded clip lasting a long time is to be slight discrepancies between the recording frame rate displayed and the frame rate at which the images are output from the 1394 terminal during recording or recording standby in 1080i/24P or 720P/60P (24P over 60P) format. 1 Using the REC FORMAT (P2) ...

Operating Instructions
Page 37
... in progressive mode. • You cannot have a gain of 18dB. • Set the shutter speed to 1/50 (OFF) or 1/60 for shooting. For output and recording, the 24-frame-persecond signal is converted to a movie shot with the advanced method, editing will also yield better quality images than those...24P or 480i/24PA in the REC FORMAT option (page 106) of recording when you images similar to 60-field-per-second interlace. For output and recording, the 24-frame-persecond signal is three seconds. 60 i AoAeBoBeBoCeCoDeDoDeEoEeFoFe Fo Ge GoHe Ho He 24P advanced mode: Shoot 24 frames ...
... in progressive mode. • You cannot have a gain of 18dB. • Set the shutter speed to 1/50 (OFF) or 1/60 for shooting. For output and recording, the 24-frame-persecond signal is converted to a movie shot with the advanced method, editing will also yield better quality images than those...24P or 480i/24PA in the REC FORMAT option (page 106) of recording when you images similar to 60-field-per-second interlace. For output and recording, the 24-frame-persecond signal is three seconds. 60 i AoAeBoBeBoCeCoDeDoDeEoEeFoFe Fo Ge GoHe Ho He 24P advanced mode: Shoot 24 frames ...

Operating Instructions
Page 45
... allocated to the buttons at the time of shipping. appears on the screen when this function is released.) Color bars Press the BARS button to output a color bar screen to your images. Audio also fades out. WHITEFADE: Press and hold to fade out to turn the feature off . Use these buttons...
... allocated to the buttons at the time of shipping. appears on the screen when this function is released.) Color bars Press the BARS button to output a color bar screen to your images. Audio also fades out. WHITEFADE: Press and hold to fade out to turn the feature off . Use these buttons...

Operating Instructions
Page 46
...page 114) on the OTHER FUNCTIONS screen. • If the DATE/TIME button on the remote control is pressed, the date and time will be output to receive 1394 signals before you operate the camera-recorder. • If you use the camera-recorder with the PAGE, AUDIO MON/VAR button. •... OSD • OFF for DATE/TIME Note the following when backup recording. • When performing backup recording while a tape is used , no images are output during rec check. • You cannot perform backup recording when the unit is set up for native recording. • Backup recording does not work in...
...page 114) on the OTHER FUNCTIONS screen. • If the DATE/TIME button on the remote control is pressed, the date and time will be output to receive 1394 signals before you operate the camera-recorder. • If you use the camera-recorder with the PAGE, AUDIO MON/VAR button. •... OSD • OFF for DATE/TIME Note the following when backup recording. • When performing backup recording while a tape is used , no images are output during rec check. • You cannot perform backup recording when the unit is set up for native recording. • Backup recording does not work in...
Operating Instructions
Page 47
...8226; The following displays will appear on the left of seconds (approx. 3 seconds for HD recordings or approx. 7 seconds for the 1394 output images. 47 Shooting Recording continues for a set time. 1 Select INTERVAL under REC FUNCTION. • The following displays will appear on the left... while this mode is active will be possible to repeat a cycle of recording one frame and then going on standby for the 1394 output images. In temporary standby: I -" of IPAUSE flashes. • No other operations are acknowledged during IEEE1394 input recording, transitions...
...8226; The following displays will appear on the left of seconds (approx. 3 seconds for HD recordings or approx. 7 seconds for the 1394 output images. 47 Shooting Recording continues for a set time. 1 Select INTERVAL under REC FUNCTION. • The following displays will appear on the left... while this mode is active will be possible to repeat a cycle of recording one frame and then going on standby for the 1394 output images. In temporary standby: I -" of IPAUSE flashes. • No other operations are acknowledged during IEEE1394 input recording, transitions...
Operating Instructions
Page 58
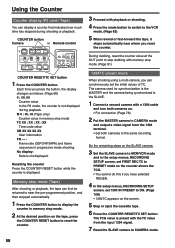
... A.DUB /REW PLAY FF/ COUNTER RESET/TC SET button 1 Press the COUNTER button. Frame rate (30P/24P/24PA) and frame sequence in CAMERA mode and output a video signal from the input 1394 signal. 7 Reset the SLAVE camera to CAMERA mode. 58 The camera used for synchronization is the MASTER and the...
... A.DUB /REW PLAY FF/ COUNTER RESET/TC SET button 1 Press the COUNTER button. Frame rate (30P/24P/24PA) and frame sequence in CAMERA mode and output a video signal from the input 1394 signal. 7 Reset the SLAVE camera to CAMERA mode. 58 The camera used for synchronization is the MASTER and the...
Operating Instructions
Page 64
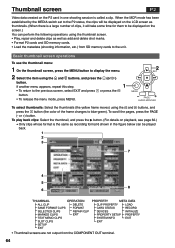
... SETUP EXIT PROPERTY META DATA CLIP PROPERTY LOAD CARD STATUS RECORD DEVICES INITIALIZE PROPERTY SETUP PROPERTY SYSTEM INFO EXIT EXIT • Thumbnail screens are not output from the COMPONENT OUT terminal. 64 To scroll the pages, press the PAGE (- Basic thumbnail screen operations To use the thumbnail menu: 1 On the thumbnail...
... SETUP EXIT PROPERTY META DATA CLIP PROPERTY LOAD CARD STATUS RECORD DEVICES INITIALIZE PROPERTY SETUP PROPERTY SYSTEM INFO EXIT EXIT • Thumbnail screens are not output from the COMPONENT OUT terminal. 64 To scroll the pages, press the PAGE (- Basic thumbnail screen operations To use the thumbnail menu: 1 On the thumbnail...

Operating Instructions
Page 75
... card / Tape) Checking the date and time (P2 card / Tape) Press the DATE/TIME button on the remote control to show the information that is output from that section. (Up to nine scenes before or ahead on the tape can be performed using an AV cable (not included), S-video cable (not...
... card / Tape) Checking the date and time (P2 card / Tape) Press the DATE/TIME button on the remote control to show the information that is output from that section. (Up to nine scenes before or ahead on the tape can be performed using an AV cable (not included), S-video cable (not...

Operating Instructions
Page 77
... turning on the camera. (Page 66) • No guarantees are given for images and audio signals which are output simultaneously from a non-linear editor, cancel the thumbnail screen on the power of the X.X GB Panasonic disc, and click "Mount." • When the P2 card access lamp is still not mounted, disconnect the...
... turning on the camera. (Page 66) • No guarantees are given for images and audio signals which are output simultaneously from a non-linear editor, cancel the thumbnail screen on the power of the X.X GB Panasonic disc, and click "Mount." • When the P2 card access lamp is still not mounted, disconnect the...
Operating Instructions
Page 78
... connector and digitally transfer video and audio signals as well as this may lead to a failure to recognize the signals when you do not stop output on 6-pin 4-pin type type the external unit side or disconnect any of cables. Furthermore, connect the 1394 cable to the unit which uses a 6-pin...
... connector and digitally transfer video and audio signals as well as this may lead to a failure to recognize the signals when you do not stop output on 6-pin 4-pin type type the external unit side or disconnect any of cables. Furthermore, connect the 1394 cable to the unit which uses a 6-pin...

Operating Instructions
Page 79
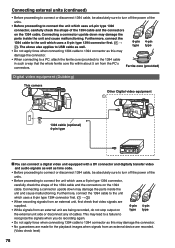
.../OUT S-video cable (optional) COMPONENT OUT Component video cable (included) TV/Monitor Connect one of the S-VIDEO IN/OUT terminal take priority. Connect to the output terminal on the external device when the video signals and audio signals of an external device are to be input to the unit. (Tape mode... using the component video cable, if the terminal on the device to which it is to be connected is used for the connection, only the output signals from the unit will be available. Audio cable (optional) White: CH1 (left channel) sound Red: CH2 (right channel) sound CH1 IN/ AUDIO OUT ...
.../OUT S-video cable (optional) COMPONENT OUT Component video cable (included) TV/Monitor Connect one of the S-VIDEO IN/OUT terminal take priority. Connect to the output terminal on the external device when the video signals and audio signals of an external device are to be input to the unit. (Tape mode... using the component video cable, if the terminal on the device to which it is to be connected is used for the connection, only the output signals from the unit will be available. Audio cable (optional) White: CH1 (left channel) sound Red: CH2 (right channel) sound CH1 IN/ AUDIO OUT ...
Operating Instructions
Page 87
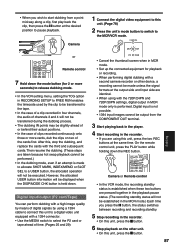
... the playback pause status. (The recording standby status will be displayed when the DISP/MODE CHK button is made unless the signal formats at the output side and input side are identical. • When using with a second camera-recorder or other unit. • On this unit, press the button.... ADV INDEX STOP INDEX or Remote control 7 Hold down the REC button. Digital input is performed. However, the allocated USER button information will not be output from a point mid-way along a clip, first play back the clip, then press the button at the desired position to a digital video...
... the playback pause status. (The recording standby status will be displayed when the DISP/MODE CHK button is made unless the signal formats at the output side and input side are identical. • When using with a second camera-recorder or other unit. • On this unit, press the button.... ADV INDEX STOP INDEX or Remote control 7 Hold down the REC button. Digital input is performed. However, the allocated USER button information will not be output from a point mid-way along a clip, first play back the clip, then press the button at the desired position to a digital video...
Operating Instructions
Page 88
... images on the recording unit's screen. In the case of the P2 card, the DV format is completed, stop playback, press the button. 88 Analog output (P2 card/Tape) You can record images you have set 1394TC REGEN or 1394UB REGEN to on in a video deck. • Use the MEDIA switch...
... images on the recording unit's screen. In the case of the P2 card, the DV format is completed, stop playback, press the button. 88 Analog output (P2 card/Tape) You can record images you have set 1394TC REGEN or 1394UB REGEN to on in a video deck. • Use the MEDIA switch...

Operating Instructions
Page 89
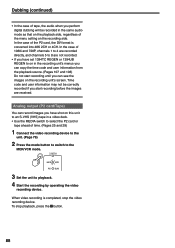
... standby. In the setup menus, AV IN/OUT SETUP screen, set 1394 OUT to playback. 4 Press the two REC buttons simultaneously. Each time you to output digital images, which were input as analog signals from an external unit, through this unit to a video deck or a television. (Page 79) 2 Press the mode...
... standby. In the setup menus, AV IN/OUT SETUP screen, set 1394 OUT to playback. 4 Press the two REC buttons simultaneously. Each time you to output digital images, which were input as analog signals from an external unit, through this unit to a video deck or a television. (Page 79) 2 Press the mode...

Operating Instructions
Page 93
... since the battery charge is to ON. 35 Monitor sound volume level meter When you press the PAGE/AUDIO MON/VAR button, the sound volume output from the builtin speaker and PHONE jack is writeprotected. CARD FULL The P2 card does not have enough free space for saving data). WRITE PROTECTED...
... since the battery charge is to ON. 35 Monitor sound volume level meter When you press the PAGE/AUDIO MON/VAR button, the sound volume output from the builtin speaker and PHONE jack is writeprotected. CARD FULL The P2 card does not have enough free space for saving data). WRITE PROTECTED...

Operating Instructions
Page 102
...the scene file dial are played on a monitoring television (60i interlace), you exit the menu mode, switch to 7.5% for both the camera output and the recording. 7.5%: Setup is switched to the MCR/ VCR mode or turn the camera off without selecting SAVE. indicates the factory setting. ...102 ON OFF (Camera) Sets the vertical detail for both the camera output and the recording. Setup menu list (continued) SCENE FILE screen (continued) Item SKIN TONE DTL P2 TAPE V DETAIL FREQ P2 TAPE NAME ...
...the scene file dial are played on a monitoring television (60i interlace), you exit the menu mode, switch to 7.5% for both the camera output and the recording. 7.5%: Setup is switched to the MCR/ VCR mode or turn the camera off without selecting SAVE. indicates the factory setting. ...102 ON OFF (Camera) Sets the vertical detail for both the camera output and the recording. Setup menu list (continued) SCENE FILE screen (continued) Item SKIN TONE DTL P2 TAPE V DETAIL FREQ P2 TAPE NAME ...

Operating Instructions
Page 106
... be input to two channels (always CH1 and CH2) when there are two 1394 input channels. • Similarly, even when 4CH is selected, the 1394 output signals will be delivered to two channels (always CH1 and CH2). indicates the factory setting. 106 This setting does not change the audio signal recording...
... be input to two channels (always CH1 and CH2) when there are two 1394 input channels. • Similarly, even when 4CH is selected, the 1394 output signals will be delivered to two channels (always CH1 and CH2). indicates the factory setting. 106 This setting does not change the audio signal recording...

Operating Instructions
Page 109
...· CH2: CH1 output = CH1 signals, CH2 output = CH2 signals CH1: CH1 output = CH1 signals, CH2 output = CH1 signals CH2: CH1 output = CH2 signals, CH2 output = CH2 signals CH3 · CH4: (P2 card only) CH1 output = CH3 signals, CH2 output = CH4 signals CH3: (P2 card only) CH1 output = CH3 signals, CH2 output = CH3 signals CH4:...dubbed on the next page) Menu 109 CH1 signals = CH1 track CH2 signals = CH2 track (MCR/ VCR) Sets the audio signals to output as CH1 and CH2 signals when playing back a tape recorded in shooting and audio dubbing. CH1 signals = CH1 track CH2 signals = CH2 track...
...· CH2: CH1 output = CH1 signals, CH2 output = CH2 signals CH1: CH1 output = CH1 signals, CH2 output = CH1 signals CH2: CH1 output = CH2 signals, CH2 output = CH2 signals CH3 · CH4: (P2 card only) CH1 output = CH3 signals, CH2 output = CH4 signals CH3: (P2 card only) CH1 output = CH3 signals, CH2 output = CH3 signals CH4:...dubbed on the next page) Menu 109 CH1 signals = CH1 track CH2 signals = CH2 track (MCR/ VCR) Sets the audio signals to output as CH1 and CH2 signals when playing back a tape recorded in shooting and audio dubbing. CH1 signals = CH1 track CH2 signals = CH2 track...

