Operating Instructions
Page 6
... battery 19 Remote control setup 19 Turn on/off the camera 20 Tally lamp 20 Viewfinder 21 Using the viewfinder 21 Using the LCD 22 Emphasizing outlines 22 Adjusting the screen display 23 Setting the calendar 24 Shooting Basic shooting operations (P2 card 25 Preparing to shoot using a P2 card 25 Shooting in auto mode 25 Checking photos taken (REC CHECK 26 P2 card access lamps 26 Protecting against a possible erasure 26 Formatting P2 cards 27 Recording times 27 Remove the P2 card...
... battery 19 Remote control setup 19 Turn on/off the camera 20 Tally lamp 20 Viewfinder 21 Using the viewfinder 21 Using the LCD 22 Emphasizing outlines 22 Adjusting the screen display 23 Setting the calendar 24 Shooting Basic shooting operations (P2 card 25 Preparing to shoot using a P2 card 25 Shooting in auto mode 25 Checking photos taken (REC CHECK 26 P2 card access lamps 26 Protecting against a possible erasure 26 Formatting P2 cards 27 Recording times 27 Remove the P2 card...
Operating Instructions
Page 7
... 97 Setup menu structure 98 Camera mode menu 98 MCR/VCR (playback) mode menu 99 Dubbing mode menu 99 Setup menu list 100 SCENE FILE screen 100 CAMERA SETUP screen 102 SW MODE screen 103 AUTO SW screen 105 RECORDING SETUP screen 106 PLAYBACK FUNCTIONS screen 109 DUBBING SETUP screen 111 AV IN/OUT SETUP screen 111 DISPLAY SETUP screen 112 CARD FUNCTIONS screen 114 OTHER FUNCTIONS screen 114 OPTION MENU 118 Reference Before calling for service 119 Operating precautions 123 Updating the driver in the camera 125 Condensation 125 System resetting 126 Cleaning 126 Video Heads...
... 97 Setup menu structure 98 Camera mode menu 98 MCR/VCR (playback) mode menu 99 Dubbing mode menu 99 Setup menu list 100 SCENE FILE screen 100 CAMERA SETUP screen 102 SW MODE screen 103 AUTO SW screen 105 RECORDING SETUP screen 106 PLAYBACK FUNCTIONS screen 109 DUBBING SETUP screen 111 AV IN/OUT SETUP screen 111 DISPLAY SETUP screen 112 CARD FUNCTIONS screen 114 OTHER FUNCTIONS screen 114 OPTION MENU 118 Reference Before calling for service 119 Operating precautions 123 Updating the driver in the camera 125 Condensation 125 System resetting 126 Cleaning 126 Video Heads...
Operating Instructions
Page 39
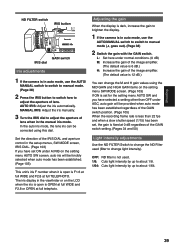
... regardless of lens. In the auto iris mode, the lens iris can change light intensity). Adjusting the gain When the display is dark, increase the gain to brighten the display. 1 If the camera is in auto mode, use the AUTO/MANUAL switch to switch to manual mode ( goes out). (Page 38) 2 Switch the gain with the GAIN switch. Set the direction of the IRIS DIAL and aperture control in the setup menus, SW MODE screen, IRIS DIAL...
... regardless of lens. In the auto iris mode, the lens iris can change light intensity). Adjusting the gain When the display is dark, increase the gain to brighten the display. 1 If the camera is in auto mode, use the AUTO/MANUAL switch to switch to manual mode ( goes out). (Page 38) 2 Switch the gain with the GAIN switch. Set the direction of the IRIS DIAL and aperture control in the setup menus, SW MODE screen, IRIS DIAL...

Operating Instructions
Page 46
... sound through headphones while shooting, you can adjust the volume with the settings for backup recording still in effect, images on media in any unit that images are recorded even when you perform a rec check if a P2 card is being used: When a tape is used : • If either of the following when backup recording. • When performing backup recording while a tape is used , no images are output during direct shooting (page 66) in MCR mode...
... sound through headphones while shooting, you can adjust the volume with the settings for backup recording still in effect, images on media in any unit that images are recorded even when you perform a rec check if a P2 card is being used: When a tape is used : • If either of the following when backup recording. • When performing backup recording while a tape is used , no images are output during direct shooting (page 66) in MCR mode...
Operating Instructions
Page 47
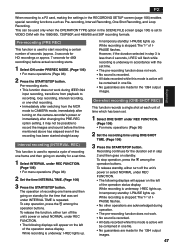
... FILE screen (page 100) is set under INTERVAL TIME is repeated. In temporary standby: I-PAUSE lights up . In temporary standby: I -REC lights up . To stop operation, press the among the operation buttons. Recording continues for the 1394 output images. To release standby, either turn off the unit's power or select NORMAL under REC FUNCTION. • The following displays will appear on standby for the 1394 output images. 47 Shooting To release the function, either turn...
... FILE screen (page 100) is set under INTERVAL TIME is repeated. In temporary standby: I-PAUSE lights up . In temporary standby: I -REC lights up . To stop operation, press the among the operation buttons. Recording continues for the 1394 output images. To release standby, either turn off the unit's power or select NORMAL under REC FUNCTION. • The following displays will appear on standby for the 1394 output images. 47 Shooting To release the function, either turn...

Operating Instructions
Page 53
... for Panasonic's broadcast-use a phantom microphone. • Set to OFF if you use camera recorders (AJ series). 53 You can not be recorded to channel 1. Check the recording volume level prior to shooting. • For P2 mode recording, the recording level is recorded to INPUT 2. Shooting 3 When using the phantom microphone) +48V power supply to INPUT 1/2 terminal. OFF: (When a phantom microphone is not connected) No power supply for monitoring. (Page 46) To adjust the recording level of the audio signals, turn the AUDIO control...
... for Panasonic's broadcast-use a phantom microphone. • Set to OFF if you use camera recorders (AJ series). 53 You can not be recorded to channel 1. Check the recording volume level prior to shooting. • For P2 mode recording, the recording level is recorded to INPUT 2. Shooting 3 When using the phantom microphone) +48V power supply to INPUT 1/2 terminal. OFF: (When a phantom microphone is not connected) No power supply for monitoring. (Page 46) To adjust the recording level of the audio signals, turn the AUDIO control...
Operating Instructions
Page 58
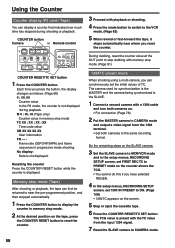
... turn both cameras on the screen. 5 Stop or eject the cassette tape. 6 Press the COUNTER RESET/TC SET button. COUNTER button Camera or Remote control BARS RESET SHUTTER SPEED SEL CH 1 SELECT CH 2 SELECT INPUT 1 INPUT 2 INT(L) INT(R) ON ON INPUT 1 INPUT 2 OFF OFF INPUT 2 AUDIO MIC POWER +48V COUNTER RESET/TC SET ZEBRA OIS OSD START/ DATE/ PHOTO STOP TIME SHOT - VOL + COUNTER RESET TITLE ZOOM MULTI/ P-IN-P REC A.DUB /REW PLAY FF/ COUNTER RESET/TC SET button 1 Press the COUNTER button. No display: Data is the SLAVE. 1 Connect a second camera with memory stop mode...
... turn both cameras on the screen. 5 Stop or eject the cassette tape. 6 Press the COUNTER RESET/TC SET button. COUNTER button Camera or Remote control BARS RESET SHUTTER SPEED SEL CH 1 SELECT CH 2 SELECT INPUT 1 INPUT 2 INT(L) INT(R) ON ON INPUT 1 INPUT 2 OFF OFF INPUT 2 AUDIO MIC POWER +48V COUNTER RESET/TC SET ZEBRA OIS OSD START/ DATE/ PHOTO STOP TIME SHOT - VOL + COUNTER RESET TITLE ZOOM MULTI/ P-IN-P REC A.DUB /REW PLAY FF/ COUNTER RESET/TC SET button 1 Press the COUNTER button. No display: Data is the SLAVE. 1 Connect a second camera with memory stop mode...

Operating Instructions
Page 59
... or LCD when the internal battery is ON, you can record a value of recording. 1 Set the POWER switch to ON. 2 (Tape only) In the setup menus, RECORDING SETUP screen FIRST REC TC, select PRESET. • For menu operation (Page 96) • You can also use the menu buttons on the remote control. (Page 15) Setting the time code In the setup menus, RECORDING SETUP screen, set the following to select YES, and press the button. Reset the date and time when fully recharged. 1 Connect...
... or LCD when the internal battery is ON, you can record a value of recording. 1 Set the POWER switch to ON. 2 (Tape only) In the setup menus, RECORDING SETUP screen FIRST REC TC, select PRESET. • For menu operation (Page 96) • You can also use the menu buttons on the remote control. (Page 15) Setting the time code In the setup menus, RECORDING SETUP screen, set the following to select YES, and press the button. Reset the date and time when fully recharged. 1 Connect...
Operating Instructions
Page 64
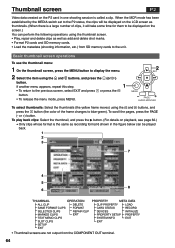
... release the menu mode, press MENU. 2 SET MENU PAGE/ AUDIO MON/VAR To select thumbnails: Select the thumbnails (the yellow frame moves) using the and buttons, and press the (or ) button. Thumbnail screen P2 Video data created on the P2 card in one shooting session is the same as recording format 6 shown in the figure below can perform the following operations using the thumbnail screen. • Play, repair and delete clips...
... release the menu mode, press MENU. 2 SET MENU PAGE/ AUDIO MON/VAR To select thumbnails: Select the thumbnails (the yellow frame moves) using the and buttons, and press the (or ) button. Thumbnail screen P2 Video data created on the P2 card in one shooting session is the same as recording format 6 shown in the figure below can perform the following operations using the thumbnail screen. • Play, repair and delete clips...
Operating Instructions
Page 78
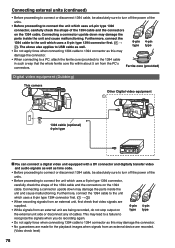
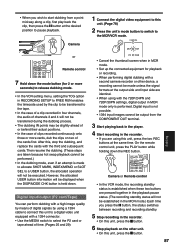
... the unit which uses a 6-pin type 1394 connector first. ( ĺ ). Ferrite core (provided) Digital video equipment (Dubbing) This camera Other Digital video equipment 1 1394 2 1394 cable (optional) 4-pin type You can connect a digital video unit equipped with a DV connector and digitally transfer video and audio signals as well as this may damage the connector. • No guarantees are made for the playback images when signals from the...
... the unit which uses a 6-pin type 1394 connector first. ( ĺ ). Ferrite core (provided) Digital video equipment (Dubbing) This camera Other Digital video equipment 1 1394 2 1394 cable (optional) 4-pin type You can connect a digital video unit equipped with a DV connector and digitally transfer video and audio signals as well as this may damage the connector. • No guarantees are made for the playback images when signals from the...
Operating Instructions
Page 82
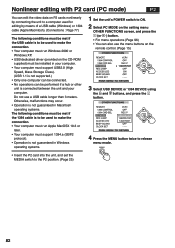
... met if the USB cable is to be used to make the connection. • Your computer must run Apple MacOSX 10.3 or later. • Your computer must support 1394.a (SBP2 protocol). • Operation is not guaranteed in Windows operating systems. 1 Set the unit's POWER switch to ON. 2 Select PC MODE on the setting menu OTHER FUNCTIONS screen, and press the (or ) button. • For menu operations (Page 96) •...
... met if the USB cable is to be used to make the connection. • Your computer must run Apple MacOSX 10.3 or later. • Your computer must support 1394.a (SBP2 protocol). • Operation is not guaranteed in Windows operating systems. 1 Set the unit's POWER switch to ON. 2 Select PC MODE on the setting menu OTHER FUNCTIONS screen, and press the (or ) button. • For menu operations (Page 96) •...
Operating Instructions
Page 87
... position to the MCR/VCR mode. REC COUNTER RESET TITLE ZOOM MULTI/ P-IN-P REC A.DUB /REW PLAY FF/ STILL ADV PAUSE STILL ADV INDEX STOP INDEX Camera or Remote control • In the VCR mode, the recording standby status is held down. Digital input/output (P2 card/Tape) You can perform dubbing with a high image quality by means of digital signals by the clip to be transferred to a USER button, the allocated operation will not be...
... position to the MCR/VCR mode. REC COUNTER RESET TITLE ZOOM MULTI/ P-IN-P REC A.DUB /REW PLAY FF/ STILL ADV PAUSE STILL ADV INDEX STOP INDEX Camera or Remote control • In the VCR mode, the recording standby status is held down. Digital input/output (P2 card/Tape) You can perform dubbing with a high image quality by means of digital signals by the clip to be transferred to a USER button, the allocated operation will not be...
Operating Instructions
Page 91
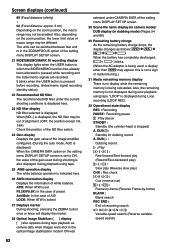
... when playing back images recorded in the squeeze mode. 9 Mic level auto control Appears when in a mode other than recording or recording standby. 5 Recording format (P2 card) (Page 106)/ recording time (tape) display 6 1394TC display Appears when the 1394 IN PRESET option on the situation. • Performance of the auto white balance or the auto black balance • Warning (Page 94) • The functions allocated to the USER buttons are displayed in the ZOOM•FOCUS option of the setting menu DISPLAY SETUP screen. 20 Focus control display Displays the focus control...
... when playing back images recorded in the squeeze mode. 9 Mic level auto control Appears when in a mode other than recording or recording standby. 5 Recording format (P2 card) (Page 106)/ recording time (tape) display 6 1394TC display Appears when the 1394 IN PRESET option on the situation. • Performance of the auto white balance or the auto black balance • Warning (Page 94) • The functions allocated to the USER buttons are displayed in the ZOOM•FOCUS option of the setting menu DISPLAY SETUP screen. 20 Focus control display Displays the focus control...
Operating Instructions
Page 92
... shooting, pressing the ZEBRA button once or twice will display the marker. 28 Optical Image Stabilizer ( ) display [ ] also appears during Loop recording (LOOP REC). 32 Operational state display REC : Recording PAUSE : Recording pause : Play pause STNDBY : Standby (the cylinder-head is displayed. Also, the remaining memory is not displayed during slow playback using tape. 25 AWB operation display The white balance operation is also displayed during shooting is indicated here. 26 AWB information display Displays the information of malfunctioning.) 31 Media remaining memory display...
... shooting, pressing the ZEBRA button once or twice will display the marker. 28 Optical Image Stabilizer ( ) display [ ] also appears during Loop recording (LOOP REC). 32 Operational state display REC : Recording PAUSE : Recording pause : Play pause STNDBY : Standby (the cylinder-head is displayed. Also, the remaining memory is not displayed during slow playback using tape. 25 AWB operation display The white balance operation is also displayed during shooting is indicated here. 26 AWB information display Displays the information of malfunctioning.) 31 Media remaining memory display...
Operating Instructions
Page 94
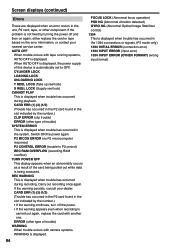
... the card being accessed. If the warning persists, consult your nearest service center. AUTO OFF When trouble occurs with camera systems, WARNING is displayed. 94 FOCUS LOCK (Abnormal focus operation) PSD NG (Abnormal vibration detected) GYRO NG (Abnormal Optical Image Stabilizer control) 1394 This is displayed when trouble has occurred in the 1394 connections or signals. (P2 mode only) 1394 INITIAL ERROR (connection error) 1394 INPUT ERROR (input error) 1394 INPUT ERROR (OTHER FORMAT) (wrong input format) CYLINDER...
... the card being accessed. If the warning persists, consult your nearest service center. AUTO OFF When trouble occurs with camera systems, WARNING is displayed. 94 FOCUS LOCK (Abnormal focus operation) PSD NG (Abnormal vibration detected) GYRO NG (Abnormal Optical Image Stabilizer control) 1394 This is displayed when trouble has occurred in the 1394 connections or signals. (P2 mode only) 1394 INITIAL ERROR (connection error) 1394 INPUT ERROR (input error) 1394 INPUT ERROR (OTHER FORMAT) (wrong input format) CYLINDER...
Operating Instructions
Page 95
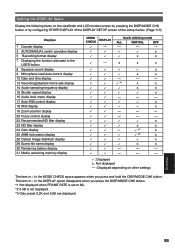
... configuring OTHER DISPLAY of the DISPLAY SETUP screen of the setup menus. (Page 113) Displays 1 Counter display 3 AUTO/MANUAL switch operation display 5 Recording format display 7 Displaying the function allocated to 60i. 2 0 dB is set to the USER button 8 Squeeze record display 9 Microphone level auto-control display 12 Date and time display 13 Recording/playback frame rate display 14 Audio-sampling frequency display 15 Shutter speed display 16 Audio level meter display 17 Auto-IRIS control display 18 IRIS display 19 Zoom position display 20 Focus control display 22 Recommended ND...
... configuring OTHER DISPLAY of the DISPLAY SETUP screen of the setup menus. (Page 113) Displays 1 Counter display 3 AUTO/MANUAL switch operation display 5 Recording format display 7 Displaying the function allocated to 60i. 2 0 dB is set to the USER button 8 Squeeze record display 9 Microphone level auto-control display 12 Date and time display 13 Recording/playback frame rate display 14 Audio-sampling frequency display 15 Shutter speed display 16 Audio level meter display 17 Auto-IRIS control display 18 IRIS display 19 Zoom position display 20 Focus control display 22 Recommended ND...
Operating Instructions
Page 107
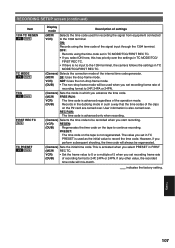
... perform subsequent shooting, the time code will always be recorded when you select PRESET in such a way that the time codes of the clips on the P2 card are carried over. RECORDING SETUP screen (continued) Item 1394 TC REGEN P2 TAPE TC MODE P2 TAPE TCG P2 TAPE FIRST REC TC TAPE TC PRESET P2 TAPE Display mode Description of settings (MCR/ VCR) Selects the time code used for recording the signal from equipment connected to...
... perform subsequent shooting, the time code will always be recorded when you select PRESET in such a way that the time codes of the clips on the P2 card are carried over. RECORDING SETUP screen (continued) Item 1394 TC REGEN P2 TAPE TC MODE P2 TAPE TCG P2 TAPE FIRST REC TC TAPE TC PRESET P2 TAPE Display mode Description of settings (MCR/ VCR) Selects the time code used for recording the signal from equipment connected to...
Operating Instructions
Page 121
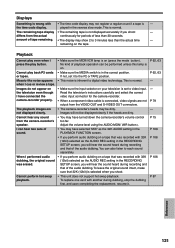
... recorded with the time code display. • The time code display may not register a regular count if a tape is connected, video signals are not output from the VIDEO OUT and S-VIDEO OUT connectors. • The camera-recorder's heads may have turned down the camera-recorder's volume control too far. When I press the play button. To replace one card with 32K (12bit) selected as the AUDIO REC setting in the reverse slow mode. This is set it . Playback Cannot play back P2 cards or tapes. The playback images...
... recorded with the time code display. • The time code display may not register a regular count if a tape is connected, video signals are not output from the VIDEO OUT and S-VIDEO OUT connectors. • The camera-recorder's heads may have turned down the camera-recorder's volume control too far. When I press the play button. To replace one card with 32K (12bit) selected as the AUDIO REC setting in the reverse slow mode. This is set it . Playback Cannot play back P2 cards or tapes. The playback images...
Operating Instructions
Page 132
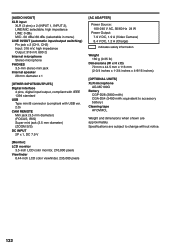
...; Internal microphone Stereo microphone PHONES 3.5-mm stereo mini jack Internal speaker 28 mm diameter x 1 [OTHER INPUTS/OUTPUTS] Digital interface 4 pins, digital input/output, compliant with IEEE 1394 standard USB Type mini B connector (compliant with USB ver. 2.0) CAM REMOTE Mini jack (3.5 mm diameter) (FOCUS, IRIS) Super mini jack (2.5 mm diameter) (ZOOM S/S) DC INPUT 2P x 1, DC 7.9 V [Monitor] LCD monitor 3.5-inch LCD color monitor, 210,000 pixels Viewfinder 0.44-inch LCD color viewfinder, 235,000 pixels [AC ADAPTER] Power Source...
...; Internal microphone Stereo microphone PHONES 3.5-mm stereo mini jack Internal speaker 28 mm diameter x 1 [OTHER INPUTS/OUTPUTS] Digital interface 4 pins, digital input/output, compliant with IEEE 1394 standard USB Type mini B connector (compliant with USB ver. 2.0) CAM REMOTE Mini jack (3.5 mm diameter) (FOCUS, IRIS) Super mini jack (2.5 mm diameter) (ZOOM S/S) DC INPUT 2P x 1, DC 7.9 V [Monitor] LCD monitor 3.5-inch LCD color monitor, 210,000 pixels Viewfinder 0.44-inch LCD color viewfinder, 235,000 pixels [AC ADAPTER] Power Source...

Functions Guide
Page 67
....2.0) Zoom, Rec (Start/Stop) Super Mini jack (2.5mm diameter) Focus Iris, Mini jack (3.5mm diameter) 7.9V 3.5 inches, LCD color Monitor, 210,000 pixels 0.44 inches, LCD color Viewfinder, 235,000 pixels 28mm round shape x 1 Weight: 160g, Dimensions: 70 (W) x 44.5 (H) x 116 (D)mm AC adapter/charger, AC Cord, DC Cord, Battery (5400mAH), Wireless remote controller, Microphone holder, Shoulder strap, Component Video cable, P2 card software driver install (CD-ROM ) Recording Time*: (Approx.) VTR part General Recording Format: Tape Format: Recording Video Signals: Recording Audio Signals: Recording...
....2.0) Zoom, Rec (Start/Stop) Super Mini jack (2.5mm diameter) Focus Iris, Mini jack (3.5mm diameter) 7.9V 3.5 inches, LCD color Monitor, 210,000 pixels 0.44 inches, LCD color Viewfinder, 235,000 pixels 28mm round shape x 1 Weight: 160g, Dimensions: 70 (W) x 44.5 (H) x 116 (D)mm AC adapter/charger, AC Cord, DC Cord, Battery (5400mAH), Wireless remote controller, Microphone holder, Shoulder strap, Component Video cable, P2 card software driver install (CD-ROM ) Recording Time*: (Approx.) VTR part General Recording Format: Tape Format: Recording Video Signals: Recording Audio Signals: Recording...


