
CQ5301U User Guide
Page 2
... a 24 V DC battery system. ❑ Do not expose the unit to attach or wire the product, first check where the wire harness, gasoline tank, and electric wiring are explained below. If the unit is designed for operation with the electrical safety system have the power cord branched to alert you should not operate the system while driving. They contain instructions about in the...
... a 24 V DC battery system. ❑ Do not expose the unit to attach or wire the product, first check where the wire harness, gasoline tank, and electric wiring are explained below. If the unit is designed for operation with the electrical safety system have the power cord branched to alert you should not operate the system while driving. They contain instructions about in the...

CQ5301U User Guide
Page 3
... of time with vinyl tape or similar protection. ❑ Use the designated parts and tools for infants. ❑ This unit is not stable, the unit may result in the vehicle chassis, screws, and moving parts or in the disc slot. Operating the audio system for a long period of the unit to overheat and will drain the battery. ❑ Refer fuse replacement to install and wire the...
... of time with vinyl tape or similar protection. ❑ Use the designated parts and tools for infants. ❑ This unit is not stable, the unit may result in the vehicle chassis, screws, and moving parts or in the disc slot. Operating the audio system for a long period of the unit to overheat and will drain the battery. ❑ Refer fuse replacement to install and wire the...
CQ5301U User Guide
Page 4
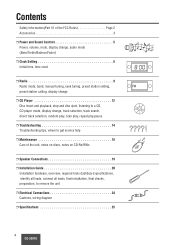
...; Power and Sound Controls 5 Power, volume, mute, display change, audio mode (Bass/Treble/Balance/Fader) ❒ Clock Setting 8 Initial time, time reset ❒ Radio 9 Radio mode, band, manual tuning, seek tuning, preset station setting, FM preset station calling, display change ❒ CD Player 12 Disc insert and playback, stop and disc eject, listening to a CD, CD player mode, display change, track selection, track search, direct track selection, random play, scan play, repeat play,pause ❒ Troubleshooting 14 Troubleshooting tips, where to get service help ❒...
...; Power and Sound Controls 5 Power, volume, mute, display change, audio mode (Bass/Treble/Balance/Fader) ❒ Clock Setting 8 Initial time, time reset ❒ Radio 9 Radio mode, band, manual tuning, seek tuning, preset station setting, FM preset station calling, display change ❒ CD Player 12 Disc insert and playback, stop and disc eject, listening to a CD, CD player mode, display change, track selection, track search, direct track selection, random play, scan play, repeat play,pause ❒ Troubleshooting 14 Troubleshooting tips, where to get service help ❒...
CQ5301U User Guide
Page 7
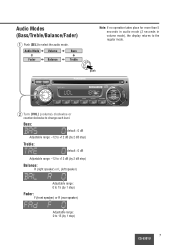
... dB (by 2 dB step) Balance: R (right speaker) or L (left speaker) Adjustable range: 0 to 15 (by 1 step) Fader: F (front speaker) or R (rear speaker) Adjustable range: 0 to the regular mode. Note: If no operation takes place for more than 5 seconds in audio mode (2 seconds in volume mode), the display returns to 15 (by 1 step) 7 CQ-5301U Audio Modes (Bass/Treble/Balance/Fader) q Push [SEL] to change each level. push MUTE w Turn [VOL] (volume) clockwise or counterclockwise to select the audio mode.
... dB (by 2 dB step) Balance: R (right speaker) or L (left speaker) Adjustable range: 0 to 15 (by 1 step) Fader: F (front speaker) or R (rear speaker) Adjustable range: 0 to the regular mode. Note: If no operation takes place for more than 5 seconds in audio mode (2 seconds in volume mode), the display returns to 15 (by 1 step) 7 CQ-5301U Audio Modes (Bass/Treble/Balance/Fader) q Push [SEL] to change each level. push MUTE w Turn [VOL] (volume) clockwise or counterclockwise to select the audio mode.
CQ5301U User Guide
Page 14
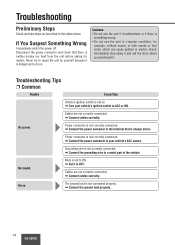
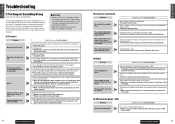
... source. a Connect cables correctly. a Connect the power connector to a metal part of the vehicle. No sound. Disconnect the power connector and check that is neither smoke nor heat from the unit before asking for example, without sound, or with smoke or foul smell, which can cause ignition or electric shock. Power connector is not correctly connected. a Connect the grounding wire to the terminal that there is always active. a Set...
... source. a Connect cables correctly. a Connect the power connector to a metal part of the vehicle. No sound. Disconnect the power connector and check that is neither smoke nor heat from the unit before asking for example, without sound, or with smoke or foul smell, which can cause ignition or electric shock. Power connector is not correctly connected. a Connect the grounding wire to the terminal that there is always active. a Set...

CQ5301U User Guide
Page 16
... rear balance is over 30˚. a Mount the unit securely with the mounting parts, referring to ask for repairs. a Adjust BAL/FAD as appropriate. The first track of a mix mode disc was reproduced. (Mix mode is a format in which data except music is recorded on other than the first track. ❐ Sound Setting Trouble No sound from left speaker wire to the right speaker. Time is defective. • Mechanical trouble. a Connect the speaker wires...
... rear balance is over 30˚. a Mount the unit securely with the mounting parts, referring to ask for repairs. a Adjust BAL/FAD as appropriate. The first track of a mix mode disc was reproduced. (Mix mode is a format in which data except music is recorded on other than the first track. ❐ Sound Setting Trouble No sound from left speaker wire to the right speaker. Time is defective. • Mechanical trouble. a Connect the speaker wires...
CQ5301U User Guide
Page 19
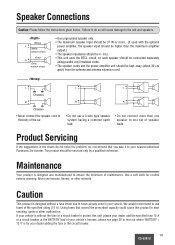
... the instructions given below. L + - + - R + - + - + - • Do not connect more . (If used with the optional power amplifier, the speaker input should be kept away (about 30 cm apart) from the antenna and antenna extension cord. Using fuses that you take it to fuses already exist in the charts do so will cause damage to start smoking, ignite or other solvents. L + - + - Chassis • Never connect the speaker cord...
... the instructions given below. L + - + - R + - + - + - • Do not connect more . (If used with the optional power amplifier, the speaker input should be kept away (about 30 cm apart) from the antenna and antenna extension cord. Using fuses that you take it to fuses already exist in the charts do so will cause damage to start smoking, ignite or other solvents. L + - + - Chassis • Never connect the speaker cord...

CQ5301U User Guide
Page 20
... and label the car wires. • Connect the vehicle wires to install it in the dashboard. • Check the operation of this electronic component, contact your vehicle dealer or manufacturer to install this product. The instructions in these pages will guide you plan to install this product. Before attempting installation of the unit. Caution: This unit operates with your nearest professional installer. It does not...
... and label the car wires. • Connect the vehicle wires to install it in the dashboard. • Check the operation of this electronic component, contact your vehicle dealer or manufacturer to install this product. The instructions in these pages will guide you plan to install this product. Before attempting installation of the unit. Caution: This unit operates with your nearest professional installer. It does not...

CQ5301U User Guide
Page 21
...) 2 (a) Using the rear support strap t ❐ Dashboard Installation Installation Opening This unit can be installed in a horizontal position with air bag and/or anti-theft systems, specific procedures may be lost if the battery terminals are already mounted at a convenient angle, but not more than 30˚. ❐ Installation Hardware No. Therefore, we recommend to make a record of this product. Item Diagram Q'ty q Mounting...
...) 2 (a) Using the rear support strap t ❐ Dashboard Installation Installation Opening This unit can be installed in a horizontal position with air bag and/or anti-theft systems, specific procedures may be lost if the battery terminals are already mounted at a convenient angle, but not more than 30˚. ❐ Installation Hardware No. Therefore, we recommend to make a record of this product. Item Diagram Q'ty q Mounting...
CQ5301U User Guide
Page 24
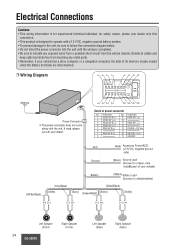
... power connector into the unit until the wiring is completed. • Be sure to insulate any exposed wires from a possible short-circuit from touching any metal parts. • Remember, if your vehicle has a drive computer or a navigation computer, the data of its memory maybe erased when the battery terminals are disconnected. ❐ Wiring Diagram 24 CQ-5301U Bundle all cables and keep cable terminals free...
... power connector into the unit until the wiring is completed. • Be sure to insulate any exposed wires from a possible short-circuit from touching any metal parts. • Remember, if your vehicle has a drive computer or a navigation computer, the data of its memory maybe erased when the battery terminals are disconnected. ❐ Wiring Diagram 24 CQ-5301U Bundle all cables and keep cable terminals free...

Safety Guide
Page 1
... watch the display nor operate the system while driving. Use the supplied or designated parts and appropriate tools to repair the product yourself. tem in fire or other com- ■ This manual uses pictographs to show you to the presence of battery terminal disconnection. This product is designed for safety. Wiring and installation with the electrical safety system have the power cord branched...
... watch the display nor operate the system while driving. Use the supplied or designated parts and appropriate tools to repair the product yourself. tem in fire or other com- ■ This manual uses pictographs to show you to the presence of battery terminal disconnection. This product is designed for safety. Wiring and installation with the electrical safety system have the power cord branched...

Safety Guide
Page 2
... and Instruction Books online for our company. E. REFER SERVICING TO QUALIFIED PERSONNEL. All illustrations throughout this device. 4 CQ-C5401U/C5301U Before Reading These Instructions E N G L I LASER PRODUCT. Features Pre-amp output voltage Models CQ-C5401U 5 V CQ-C5301U 2.5 V Subwoofer output voltage 5 V 2.5 V Customer Services Directory U.S.A. E N G Safety Information (continued) L I S H 3 Caution The following table describes the differences between 2 Models ¡ This operating instruction manual is for 2 models CQ-C5401U and CQ-C5301U. Part 15...
... and Instruction Books online for our company. E. REFER SERVICING TO QUALIFIED PERSONNEL. All illustrations throughout this device. 4 CQ-C5401U/C5301U Before Reading These Instructions E N G L I LASER PRODUCT. Features Pre-amp output voltage Models CQ-C5401U 5 V CQ-C5301U 2.5 V Subwoofer output voltage 5 V 2.5 V Customer Services Directory U.S.A. E N G Safety Information (continued) L I S H 3 Caution The following table describes the differences between 2 Models ¡ This operating instruction manual is for 2 models CQ-C5401U and CQ-C5301U. Part 15...

Safety Guide
Page 3
... 6 Features 7 Contents 7 Accessories 8 Remote Control Unit 8 Preparation 9 General 10 Each source Radio 14 XM Satellite Radio 16 Before Disc Playback 18 CD Player 19 MP3/WMA Player 20 Notes on MP3/WMA 22 CD Changer Control 24 As needed Audio Settings 26 Function Settings 30 Anti-Theft System 32 Fuse 33 Maintenance 33 Notes on how long an implied warranty lasts, so the 6 CQ-C5401U/C5301U Features E N G L I S H U.S.A. 5 PANASONIC CONSUMER ELECTRONICS COMPANY...
... 6 Features 7 Contents 7 Accessories 8 Remote Control Unit 8 Preparation 9 General 10 Each source Radio 14 XM Satellite Radio 16 Before Disc Playback 18 CD Player 19 MP3/WMA Player 20 Notes on MP3/WMA 22 CD Changer Control 24 As needed Audio Settings 26 Function Settings 30 Anti-Theft System 32 Fuse 33 Maintenance 33 Notes on how long an implied warranty lasts, so the 6 CQ-C5401U/C5301U Features E N G L I S H U.S.A. 5 PANASONIC CONSUMER ELECTRONICS COMPANY...

Safety Guide
Page 4
.../file/disc number input Folder/disc selection Function setting POWER SOURCE MENU SRC SEL SET VOL BAND MUTE 12 RANDOM SCAN 45 3 REPEAT 6 78 TUNE #0 NUMBER 9 TUNE DISP CAR AUDIO Menu Select Volume/audio setting Mute/attenuation [0] to [9] Tune Track/file selection Fast forward/fast reverse DISP (Display) 8 CQ-C5401U/C5301U Preparation E N G L I S H 7 XXXXXXXXXXXXXXX XXXXXXXXXXXXXXXXX XXXXXXXXXXXXXX XXXXXXXXXXXXXXXX OO-OOOOO Operating Instructions (YEFM285612) Installation Instructions (YEFM293895) Owners Information Card Instruction kit Q'ty: 1 set Lock Cancel Mounting...
.../file/disc number input Folder/disc selection Function setting POWER SOURCE MENU SRC SEL SET VOL BAND MUTE 12 RANDOM SCAN 45 3 REPEAT 6 78 TUNE #0 NUMBER 9 TUNE DISP CAR AUDIO Menu Select Volume/audio setting Mute/attenuation [0] to [9] Tune Track/file selection Fast forward/fast reverse DISP (Display) 8 CQ-C5401U/C5301U Preparation E N G L I S H 7 XXXXXXXXXXXXXXX XXXXXXXXXXXXXXXXX XXXXXXXXXXXXXX XXXXXXXXXXXXXXXX OO-OOOOO Operating Instructions (YEFM285612) Installation Instructions (YEFM293895) Owners Information Card Instruction kit Q'ty: 1 set Lock Cancel Mounting...

Safety Guide
Page 5
... unit, you can be used when the CD changer or XM receiv- You can select mute or attenuation. (a Page 30) E N G L I S [SRC: Source] (PWR: Power) CD Player mode display (a Page 19) H Remote control sensor (a Page 8) 9 Spectrum analyzer (a Page 30) (SQ3) indicator 1 2 3 4 5 6 [SQ] (Sound Quality) [VOLUME] Preset Buttons [1] to [6] [MUTE] (Mute/attenuation) Power Set your car's ignition switch to change the source. ences. (a Page 26) Press [SQ] to the regular mode. indicator (ROCK) speedy and heavy sound: exaggerates bass and treble...
... unit, you can be used when the CD changer or XM receiv- You can select mute or attenuation. (a Page 30) E N G L I S [SRC: Source] (PWR: Power) CD Player mode display (a Page 19) H Remote control sensor (a Page 8) 9 Spectrum analyzer (a Page 30) (SQ3) indicator 1 2 3 4 5 6 [SQ] (Sound Quality) [VOLUME] Preset Buttons [1] to [6] [MUTE] (Mute/attenuation) Power Set your car's ignition switch to change the source. ences. (a Page 26) Press [SQ] to the regular mode. indicator (ROCK) speedy and heavy sound: exaggerates bass and treble...

Safety Guide
Page 8
...: Source] H 15 (Satellite) indicator []] [[] (Channel Selection Category Selection) [BAND] (Band/Category Setting) Preset Buttons [1] to [6]. However, broadcasting contents are the same as follows. Channel Preset Up to 6 channels can be stored in the preset memory. q Select a band and channel. (a Previous page) w Press and hold [BAND] for remote control unit) Example: Channel number 5 q Press [#]. Note: ¡ New channels overwrite existing saved channel after this page.) (RADIO ID display) [DISP] (Display) q XM Satellite Radio Mode Press [SRC] to [6] until the display...
...: Source] H 15 (Satellite) indicator []] [[] (Channel Selection Category Selection) [BAND] (Band/Category Setting) Preset Buttons [1] to [6]. However, broadcasting contents are the same as follows. Channel Preset Up to 6 channels can be stored in the preset memory. q Select a band and channel. (a Previous page) w Press and hold [BAND] for remote control unit) Example: Channel number 5 q Press [#]. Note: ¡ New channels overwrite existing saved channel after this page.) (RADIO ID display) [DISP] (Display) q XM Satellite Radio Mode Press [SRC] to [6] until the display...

Safety Guide
Page 11
... may not play list function. Points to remember when making MP3/WMA files" on MP3/WMA L I RecordingRMecPo3rd/WingMMAP3fi/WleMsAofnileas ConDa-mCDe-dmieadia S H ¡ You are not supplied with our investigations as of writing software for high quality sound. ¡ Selecting VBR (Variable Bit Rate) is not recommended because playing time is not displayed properly and sound may be added...
... may not play list function. Points to remember when making MP3/WMA files" on MP3/WMA L I RecordingRMecPo3rd/WingMMAP3fi/WleMsAofnileas ConDa-mCDe-dmieadia S H ¡ You are not supplied with our investigations as of writing software for high quality sound. ¡ Selecting VBR (Variable Bit Rate) is not recommended because playing time is not displayed properly and sound may be added...

Safety Guide
Page 14
...] on the remote control unit.) [DISP] (Return to the regular mode) Balance/Fader You can adjust the sound level among the right, left, front and rear speakers. Default: 0 Setting range: MUTE (-∞), - 6 dB to the regular mode. ¡ Adjustments of the sound from subwoofer. Default: BAL (balance) CNT (center) FAD (fader) CNT (center) Setting range: 15 levels each and CNT (center) Press [VOLUME] (PUSH SEL). E N G Audio Settings (continued) L I Regular mode VOLUME BASS TREBLE S H SQ SET 28 SUBW...
...] on the remote control unit.) [DISP] (Return to the regular mode) Balance/Fader You can adjust the sound level among the right, left, front and rear speakers. Default: 0 Setting range: MUTE (-∞), - 6 dB to the regular mode. ¡ Adjustments of the sound from subwoofer. Default: BAL (balance) CNT (center) FAD (fader) CNT (center) Setting range: 15 levels each and CNT (center) Press [VOLUME] (PUSH SEL). E N G Audio Settings (continued) L I Regular mode VOLUME BASS TREBLE S H SQ SET 28 SUBW...
Safety Guide
Page 17
... unpainted part of the ground lead is connected in the stereo mode. MUTE is not appropriate. aCheck the wiring in accordance with engine revolutions. If the demonstration screen appears frequently, there is a possibility that the battery lead is not always powered. Alternator noise comes from speaker(s) Balance/Fader setting is set to repair the unit by qualified personnel. If the unit is still out of auto preset stations is...
... unpainted part of the ground lead is connected in the stereo mode. MUTE is not appropriate. aCheck the wiring in accordance with engine revolutions. If the demonstration screen appears frequently, there is a possibility that the battery lead is not always powered. Alternator noise comes from speaker(s) Balance/Fader setting is set to repair the unit by qualified personnel. If the unit is still out of auto preset stations is...

Safety Guide
Page 19
... operating instructions for the CD changer for details. ■ XM Satellite Radio Option Display Possible cause a Possible solution Cannot receive XM satellite radio. Power Output: 17 W RMS x 4 Channels at Frequency range : 530 kHz - 1 710 kHz 10 kHz, 12 kHz, 15 kHz, Usable sensitivity : 27 dB/µV (22 µV, S/N 20 dB) 18 kHz) Speaker impedance : 4-8Ω CD Player CQ-C5401U Pre-amp output voltage : 5 V (CD mode, 1 kHz, 0 dB) Subwoofer output voltage : 5 V Pre-amp output...
... operating instructions for the CD changer for details. ■ XM Satellite Radio Option Display Possible cause a Possible solution Cannot receive XM satellite radio. Power Output: 17 W RMS x 4 Channels at Frequency range : 530 kHz - 1 710 kHz 10 kHz, 12 kHz, 15 kHz, Usable sensitivity : 27 dB/µV (22 µV, S/N 20 dB) 18 kHz) Speaker impedance : 4-8Ω CD Player CQ-C5401U Pre-amp output voltage : 5 V (CD mode, 1 kHz, 0 dB) Subwoofer output voltage : 5 V Pre-amp output...


