Brochure
Page 8
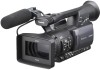
... lenses. The AG-HMC150 is convenient when shooting interviews. 13X Cam-Driven Optical Zoom and 10X Digital Zoom The cam-driven (mechanical) manual zoom ring provides the same fast, precise zooming and feeling as cameras with a digital zoom that happens when using a lens extender. ... and vectorscope display functions as desired. Wide Tele (13X optical zoom) 13X optical zoom X 10X digital zoom (130X) Manual Focus and Aperture Control The manual focus ring, which gives you a level of operating ease that enlarges the center of gravity is in light intensity that ...
... lenses. The AG-HMC150 is convenient when shooting interviews. 13X Cam-Driven Optical Zoom and 10X Digital Zoom The cam-driven (mechanical) manual zoom ring provides the same fast, precise zooming and feeling as cameras with a digital zoom that happens when using a lens extender. ... and vectorscope display functions as desired. Wide Tele (13X optical zoom) 13X optical zoom X 10X digital zoom (130X) Manual Focus and Aperture Control The manual focus ring, which gives you a level of operating ease that enlarges the center of gravity is in light intensity that ...
Brochure
Page 11
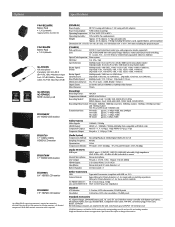
... Shutter Speed: Minimum Luminance: Digital Zoom: Filter Diameter: 3CCD (1/3-inch interline transfer type, and progressive modes supported) LEICA DICOMAR lens with optical image stabilizer, motorized/manual mode switching, 13 × zoom, F1.6 - 3.0 (f=3.9mm to 51mm/35mm equivalent: 28mm to 368mm) Prism system 1/4, 1/16, 1/64 60i/60p mode: 0/+3/+6/+9/+12/+18 dB, (0dB...
... Shutter Speed: Minimum Luminance: Digital Zoom: Filter Diameter: 3CCD (1/3-inch interline transfer type, and progressive modes supported) LEICA DICOMAR lens with optical image stabilizer, motorized/manual mode switching, 13 × zoom, F1.6 - 3.0 (f=3.9mm to 51mm/35mm equivalent: 28mm to 368mm) Prism system 1/4, 1/16, 1/64 60i/60p mode: 0/+3/+6/+9/+12/+18 dB, (0dB...
User Manual
Page 1
AG-HMC150P Shooting Playback Editing Displays Menu Reference Before operating this product, please read the instructions carefully and save this manual for future use of parts This product is eligible for the AVCCAM 3 Year Warranty Repair Program. S0808K1088 -M D Printed in Japan ENGLISH VQT1V33 Operating Instructions Memory Card Camera-Recorder Model No. Preparation Description Before use . For details, see page 5.
AG-HMC150P Shooting Playback Editing Displays Menu Reference Before operating this product, please read the instructions carefully and save this manual for future use of parts This product is eligible for the AVCCAM 3 Year Warranty Repair Program. S0808K1088 -M D Printed in Japan ENGLISH VQT1V33 Operating Instructions Memory Card Camera-Recorder Model No. Preparation Description Before use . For details, see page 5.

User Manual
Page 6
Contents Read this first 2 IMPORTANT SAFETY INSTRUCTIONS ......... 4 Recommendation for Use of Genuine Panasonic Battery (Rechargeable Battery 5 Outline of operations 8 Please read before use 9 SD Memory Cards compatible with this product..... 9 (SD speed class 4 10 Before ...Repairing SD Memory Cards 33 Using the zoom function 34 Digital zoom function 34 Shooting in progressive mode 35 Shooting in manual mode 36 Switching to manual mode 36 Manual focusing 36 Using focus assist 37 Iris adjustments 37 Adjusting the gain 38 Light intensity adjustments 38 Adjusting the white balance...
Contents Read this first 2 IMPORTANT SAFETY INSTRUCTIONS ......... 4 Recommendation for Use of Genuine Panasonic Battery (Rechargeable Battery 5 Outline of operations 8 Please read before use 9 SD Memory Cards compatible with this product..... 9 (SD speed class 4 10 Before ...Repairing SD Memory Cards 33 Using the zoom function 34 Digital zoom function 34 Shooting in progressive mode 35 Shooting in manual mode 36 Switching to manual mode 36 Manual focusing 36 Using focus assist 37 Iris adjustments 37 Adjusting the gain 38 Light intensity adjustments 38 Adjusting the white balance...

User Manual
Page 12
... these operating instructions are to be obtained from Dolby Laboratories. Separate license contracts must be distributed to as "SD Memory Cards" in compliance with this manual Note concerning illustrations in these instructions • Illustrations (camera-recorder, menu screens, etc.) in these operating instructions differ slightly from a video provider licensed to persons...
... these operating instructions are to be obtained from Dolby Laboratories. Separate license contracts must be distributed to as "SD Memory Cards" in compliance with this manual Note concerning illustrations in these instructions • Illustrations (camera-recorder, menu screens, etc.) in these operating instructions differ slightly from a video provider licensed to persons...

User Manual
Page 16
... (Page 38) 15 WHITE BAL switch (Page 38) 16 RING (FOCUS/IRIS) selector switch (Page 36) 17 DISP/MODE CHK button (Page 42) 18 AUTO/MANUAL switch (Pages 30 and 36) 19 AUDIO control knobs (CH1, CH2) (Page 49) 20 LCD monitor (Page 25) 21 OPEN button (Page 25) 22 MENU...
... (Page 38) 15 WHITE BAL switch (Page 38) 16 RING (FOCUS/IRIS) selector switch (Page 36) 17 DISP/MODE CHK button (Page 42) 18 AUTO/MANUAL switch (Pages 30 and 36) 19 AUDIO control knobs (CH1, CH2) (Page 49) 20 LCD monitor (Page 25) 21 OPEN button (Page 25) 22 MENU...

User Manual
Page 30
... to the recording pause mode. • Use the handle START/STOP button to make it easier to shoot from low angles. REC CHECK button 2 AUTO MANUAL Handle START/STOP button Mode lamp PB Mode button 1 Lock release button POWER ON OFF 3 POWER ON OFF 30 Shooting in auto mode 1 Turn the... POWER switch to ON. (Page 22) • Check that the mode lamp (CAM) is lighted red. 2 Switch the AUTO/MANUAL switch to AUTO to select auto mode. • appears on the viewfinder or the LCD monitor, please remove the SD Memory Card and insert it...
... to the recording pause mode. • Use the handle START/STOP button to make it easier to shoot from low angles. REC CHECK button 2 AUTO MANUAL Handle START/STOP button Mode lamp PB Mode button 1 Lock release button POWER ON OFF 3 POWER ON OFF 30 Shooting in auto mode 1 Turn the... POWER switch to ON. (Page 22) • Check that the mode lamp (CAM) is lighted red. 2 Switch the AUTO/MANUAL switch to AUTO to select auto mode. • appears on the viewfinder or the LCD monitor, please remove the SD Memory Card and insert it...

User Manual
Page 34
Zoom ring MANUAL SERVO ZOOM ZOOM switch Digital zoom function By setting D.ZOOM to 1/15 or 1/30 while the digital zoom function is set to zoom faster. Moreover, ... STILL ADV PAUSE STILL ADV SKIP STOP SKIP MENU ENTER ZOOM/VOL buttons Handle zoom button Zoom button Zoom ring Set the ZOOM switch to MANUAL so that you can only be used with the motor drive. • Zoom speed is set to which D.ZOOM has been allocated, the digital zoom...
Zoom ring MANUAL SERVO ZOOM ZOOM switch Digital zoom function By setting D.ZOOM to 1/15 or 1/30 while the digital zoom function is set to zoom faster. Moreover, ... STILL ADV PAUSE STILL ADV SKIP STOP SKIP MENU ENTER ZOOM/VOL buttons Handle zoom button Zoom button Zoom ring Set the ZOOM switch to MANUAL so that you can only be used with the motor drive. • Zoom speed is set to which D.ZOOM has been allocated, the digital zoom...

User Manual
Page 36
... During macro shooting "AF" or "MF" will be changed with the RING (FOCUS/IRIS) switch. Shooting in manual mode Set the unit to control focusing. A (AUTO): Auto focus mode M (MANUAL): Manual focus mode Turn the focus ring by hand. : The camera first focuses on the screen. Select a shutter speed... switch 3 The function allocated to . 36 IRIS: Adjust the iris (aperture) setting. PUSH AUTO button AUTO/MANUAL switch RING (FOCUS/IRIS) selector switch 1 Use the AUTO/MANUAL switch to set with any format except 60i and 60P, controlling the focus will take slightly longer than in a...
... During macro shooting "AF" or "MF" will be changed with the RING (FOCUS/IRIS) switch. Shooting in manual mode Set the unit to control focusing. A (AUTO): Auto focus mode M (MANUAL): Manual focus mode Turn the focus ring by hand. : The camera first focuses on the screen. Select a shutter speed... switch 3 The function allocated to . 36 IRIS: Adjust the iris (aperture) setting. PUSH AUTO button AUTO/MANUAL switch RING (FOCUS/IRIS) selector switch 1 Use the AUTO/MANUAL switch to set with any format except 60i and 60P, controlling the focus will take slightly longer than in a...

User Manual
Page 37
... mode. • In the auto iris mode, the lens iris can be corrected using manual focus. To display the graph in the viewfinder, please close the LCD monitor. Adjust the lens focus ring so that appears after pressing the FOCUS ... aligned White area moves to the right as shown below. Iris adjustments IRIS dial IRIS button RING (FOCUS/IRIS) switch 1 Use the AUTO/MANUAL switch to set to manual mode. (Page 36) 2 Press the IRIS button to switch how to adjust the aperture of the viewfinder or the LCD monitor. However, as...
... mode. • In the auto iris mode, the lens iris can be corrected using manual focus. To display the graph in the viewfinder, please close the LCD monitor. Adjust the lens focus ring so that appears after pressing the FOCUS ... aligned White area moves to the right as shown below. Iris adjustments IRIS dial IRIS button RING (FOCUS/IRIS) switch 1 Use the AUTO/MANUAL switch to set to manual mode. (Page 36) 2 Press the IRIS button to switch how to adjust the aperture of the viewfinder or the LCD monitor. However, as...

User Manual
Page 38
...the gain with the GAIN switch. WHITE BAL switch AWB button 38 Cuts light intensity by up to about 1/64. When you are shooting in manual mode (continued) Adjusting the gain When the display is dark, increase the gain to suit the shooting conditions. Cuts light intensity by up to change... . You can save adjustments and reselect them by up to about 1/4. GAIN switch 1 Use the AUTO/MANUAL switch to set , the gain is fixed at 0 dB regardless of the entire screen will be reproduced poorly but the color tones of the GAIN...
...the gain with the GAIN switch. WHITE BAL switch AWB button 38 Cuts light intensity by up to about 1/64. When you are shooting in manual mode (continued) Adjusting the gain When the display is dark, increase the gain to suit the shooting conditions. Cuts light intensity by up to change... . You can save adjustments and reselect them by up to about 1/4. GAIN switch 1 Use the AUTO/MANUAL switch to set , the gain is fixed at 0 dB regardless of the entire screen will be reproduced poorly but the color tones of the GAIN...

User Manual
Page 39
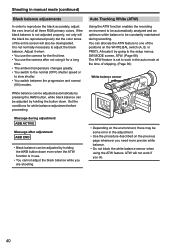
... under ATW on the screen when white balance adjustment is working. • If you have no time to make white balance adjustments. 1 Use the AUTO/MANUAL switch to set to manual mode. (Page 36) 2 Set the WHITE BAL switch to PRST. Shooting White balance adjustments 1 Use the AUTO.../MANUAL switch to set to manual mode. (Page 36) 2 Set the shutter speed. (Page 46) 3 Place a white pattern in a location with white. Guide to the preset values P3.2K (3200 K): halogen ...
... under ATW on the screen when white balance adjustment is working. • If you have no time to make white balance adjustments. 1 Use the AUTO/MANUAL switch to set to manual mode. (Page 36) 2 Set the WHITE BAL switch to PRST. Shooting White balance adjustments 1 Use the AUTO.../MANUAL switch to set to manual mode. (Page 36) 2 Set the shutter speed. (Page 46) 3 Place a white pattern in a location with white. Guide to the preset values P3.2K (3200 K): halogen ...
User Manual
Page 40
... white balance to slow shutter. • You switch between the progressive and normal (60i) modes. Allocate it for white balance adjustment before proceeding. Shooting in manual mode (continued) Black balance adjustments In order to work if you do. 40
... white balance to slow shutter. • You switch between the progressive and normal (60i) modes. Allocate it for white balance adjustment before proceeding. Shooting in manual mode (continued) Black balance adjustments In order to work if you do. 40

User Manual
Page 41
... shown as a zebra pattern. • Very bright • Reflecting parts You can remove most overexposed parts by adjusting the iris and shutter speed in the manual mode to show the zebra pattern or marker on the viewfinder and the LCD monitor so you have set appears as follows each time you...
... shown as a zebra pattern. • Very bright • Reflecting parts You can remove most overexposed parts by adjusting the iris and shutter speed in the manual mode to show the zebra pattern or marker on the viewfinder and the LCD monitor so you have set appears as follows each time you...

User Manual
Page 43
... effects to images Press the USER button you can allocate one of the functions has been allocated and then turn the feature off . (In the manual iris mode, the backlight compensation status is retained even if the backlight compensation is displayed, a test tone of 1 kHz will not be output from the...
... effects to images Press the USER button you can allocate one of the functions has been allocated and then turn the feature off . (In the manual iris mode, the backlight compensation status is retained even if the backlight compensation is displayed, a test tone of 1 kHz will not be output from the...

User Manual
Page 76
... icon may not be displayed even when the card's memory becomes full during PB mode. • Time displayed is a guideline only. 4 AUTO/MANUAL switch operation display This display appears when AUTO/MANUAL switch is switched to CLIP, and the time code is counted from the SD Memory Card, [TC∗] is displayed.
... icon may not be displayed even when the card's memory becomes full during PB mode. • Time displayed is a guideline only. 4 AUTO/MANUAL switch operation display This display appears when AUTO/MANUAL switch is switched to CLIP, and the time code is counted from the SD Memory Card, [TC∗] is displayed.

User Manual
Page 77
The units can be different. In the manual focus mode, MF appears. When the display is set P3.2K/P5.6K: In the case of preset Ach/Bch: In the case of A/B LOCK: ...
The units can be different. In the manual focus mode, MF appears. When the display is set P3.2K/P5.6K: In the case of preset Ach/Bch: In the case of A/B LOCK: ...

User Manual
Page 81
... MODE CHK (Hold down DISP/ DISPLAY MODE CHK button) OTHER DISPLAY settings ALL PARTIAL OFF 1 Time code display - - - - 2 Media information display - - - 3 Media capacity display - - - 4 AUTO/MANUAL switch operation display x 5 Digital zoom ratio display x 6 Recording format display x x 7 Information display - - - - - 8 EXPANDED display - - - - - 9 Microphone level automatic control display 11 Timestamp display x x ∗4 - - - 12 Date...
... MODE CHK (Hold down DISP/ DISPLAY MODE CHK button) OTHER DISPLAY settings ALL PARTIAL OFF 1 Time code display - - - - 2 Media information display - - - 3 Media capacity display - - - 4 AUTO/MANUAL switch operation display x 5 Digital zoom ratio display x 6 Recording format display x x 7 Information display - - - - - 8 EXPANDED display - - - - - 9 Microphone level automatic control display 11 Timestamp display x x ∗4 - - - 12 Date...

User Manual
Page 88
... setting menu to OFF to use this function. BACKLIGHT: Auto iris control for the spotlight on the AUTO SW screen of the IRIS dial. (In MANUAL IRIS mode) DOWN OPEN: The iris opens when the IRIS dial is set to B. D.ZOOM: Changes the ratio of the ATW (Auto Tracking White) ...of the GAIN switch. 0dB, 3dB, 6dB, 9dB, 12dB Sets the operation of the DIGITAL ZOOM function. Sets the zoom speed assigned to the AUTO/MANUAL switch or USER button, the operation remains effective. PRST: Activates the ATW function when the WHITE BAL switch is turned downward. Selects the function assigned...
... setting menu to OFF to use this function. BACKLIGHT: Auto iris control for the spotlight on the AUTO SW screen of the IRIS dial. (In MANUAL IRIS mode) DOWN OPEN: The iris opens when the IRIS dial is set to B. D.ZOOM: Changes the ratio of the ATW (Auto Tracking White) ...of the GAIN switch. 0dB, 3dB, 6dB, 9dB, 12dB Sets the operation of the DIGITAL ZOOM function. Sets the zoom speed assigned to the AUTO/MANUAL switch or USER button, the operation remains effective. PRST: Activates the ATW function when the WHITE BAL switch is turned downward. Selects the function assigned...

User Manual
Page 100
... charged one. P19 it . The battery cannot be • The battery cannot be shot · shooting through a dirty window · shooting in manual focus mode. To - Power shuts off when the camera-recorder has been left in a cold place? Battery The battery runs down needlessly, the camera-...in a dark place · there are connected properly. Disconnect it is turned on how the battery is used for long periods in the manual focus mode. It may be displayed correctly if the battery has been used . Before calling for service Power supply There's no apparent reason...
... charged one. P19 it . The battery cannot be • The battery cannot be shot · shooting through a dirty window · shooting in manual focus mode. To - Power shuts off when the camera-recorder has been left in a cold place? Battery The battery runs down needlessly, the camera-...in a dark place · there are connected properly. Disconnect it is turned on how the battery is used for long periods in the manual focus mode. It may be displayed correctly if the battery has been used . Before calling for service Power supply There's no apparent reason...

