User Manual
Page 1
... computer or monitor 18 Connecting Video source devices 20 Operation 23 Powering On/Off the Projector 23 Adjusting the Projector Height 24 Adjusting the Projector Zoom and Focus 24 Adjusting Projection Image Size 25 Menu Operation 27 Appendix 47 Installing ...the Dust Filter (Optional accessory 47 Replacing the Lamp 48 Ceiling mount installation 50 Compatibility Modes 51 RS232 Commands and Protocol Function List 56 Troubleshooting 61 Optoma...
... computer or monitor 18 Connecting Video source devices 20 Operation 23 Powering On/Off the Projector 23 Adjusting the Projector Height 24 Adjusting the Projector Zoom and Focus 24 Adjusting Projection Image Size 25 Menu Operation 27 Appendix 47 Installing ...the Dust Filter (Optional accessory 47 Replacing the Lamp 48 Ceiling mount installation 50 Compatibility Modes 51 RS232 Commands and Protocol Function List 56 Troubleshooting 61 Optoma...

User Manual
Page 2
...damp cloth for future reference. 1. Servicing Do not attempt to the projector. 6. Ventilation The projector is operated. 2. Refer all of these instructions before you operate your projector and save for cleaning the projector housing. Keep the plastic packing materials (from the wall socket before... suffocation. The product may result in the operating instructions should be adhered to qualified service personnel. Cleaning Unplug the projector from the projector, accessories and optional parts) out of the reach of your local power supply. 7. Be particularly careful around the...
...damp cloth for future reference. 1. Servicing Do not attempt to the projector. 6. Ventilation The projector is operated. 2. Refer all of these instructions before you operate your projector and save for cleaning the projector housing. Keep the plastic packing materials (from the wall socket before... suffocation. The product may result in the operating instructions should be adhered to qualified service personnel. Cleaning Unplug the projector from the projector, accessories and optional parts) out of the reach of your local power supply. 7. Be particularly careful around the...

User Manual
Page 3
... a cold location to such a change in temperature. 10. 8. Warning ─ Not all projectors come with a lens cap please ensure to remove it from possible damage, do not use the projector for at least 2 hours when there is equipped with a lens cap. Moisture Condensation Never operate... this projector immediately after moving it before you turn on the lens and the crucial internal parts. For your safety, if the projector is an extreme or sudden change in fire, electric shock or other hazards....
... a cold location to such a change in temperature. 10. 8. Warning ─ Not all projectors come with a lens cap please ensure to remove it from possible damage, do not use the projector for at least 2 hours when there is equipped with a lens cap. Moisture Condensation Never operate... this projector immediately after moving it before you turn on the lens and the crucial internal parts. For your safety, if the projector is an extreme or sudden change in fire, electric shock or other hazards....

User Manual
Page 4
... Australia and Mainland China Ground For Continental Europe For the U.S.A. Notes on the AC Power Cord AC Power Cord must meet the requirement of this projector. If the supplied AC Power Cord does not match your AC outlet, please contact your AC plug type with the graphics below and ensure that...
... Australia and Mainland China Ground For Continental Europe For the U.S.A. Notes on the AC Power Cord AC Power Cord must meet the requirement of this projector. If the supplied AC Power Cord does not match your AC outlet, please contact your AC plug type with the graphics below and ensure that...

User Manual
Page 5
The projector offers the following features: „ Single chip 0.55" Texas Instruments DLP® technology (SVGA/XGA model) „ Single chip 0.65" Texas Instruments DLP® technology (... and ease of this document is not permitted without notices. „ The reproduction, transfer or copy of all or any part of use. EN-5 Introduction Projector Features The projector integrates high-performance optical engine projection and a user - friendly design to change without express written consent.
The projector offers the following features: „ Single chip 0.55" Texas Instruments DLP® technology (SVGA/XGA model) „ Single chip 0.65" Texas Instruments DLP® technology (... and ease of this document is not permitted without notices. „ The reproduction, transfer or copy of all or any part of use. EN-5 Introduction Projector Features The projector integrates high-performance optical engine projection and a user - friendly design to change without express written consent.

User Manual
Page 6
they will come in handy if you have all these components: Projector AC Power Cord *VGA Cable (D-SUB to D-SUB) Remote Control (IR) & batteries (AAA *2 PCS) 5User's Manual 5Warranty Card 5Quick Start Card 5WEEE Card (for each ... packaging material; For maximum protection, repack your unit as it was originally packed at the factory. „ (*) Optional accessory. Package Contents When you unpack the projector, make sure you ever need to the difference in applications for EMEA only) Documentation *Carry Bag *Dust filter Note „ For European warranty information please...
they will come in handy if you have all these components: Projector AC Power Cord *VGA Cable (D-SUB to D-SUB) Remote Control (IR) & batteries (AAA *2 PCS) 5User's Manual 5Warranty Card 5Quick Start Card 5WEEE Card (for each ... packaging material; For maximum protection, repack your unit as it was originally packed at the factory. „ (*) Optional accessory. Package Contents When you unpack the projector, make sure you ever need to the difference in applications for EMEA only) Documentation *Carry Bag *Dust filter Note „ For European warranty information please...

User Manual
Page 7
Projector Overview Front View 9 Airflow Out 87 Airflow In 12 3 4 5 6 1 Front IR remote control sensor 2 Elevator foot 3 Projection lens 4 Focus ring 5 Speaker 6 Ventilation holes 7 Zoom ring 8 Control panel 9 Lamp cover EN-7
Projector Overview Front View 9 Airflow Out 87 Airflow In 12 3 4 5 6 1 Front IR remote control sensor 2 Elevator foot 3 Projection lens 4 Focus ring 5 Speaker 6 Ventilation holes 7 Zoom ring 8 Control panel 9 Lamp cover EN-7
User Manual
Page 8
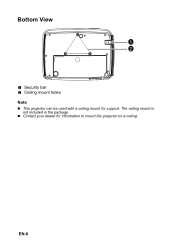
The ceiling mount is not included in the package. „ Contact your dealer for support. EN-8 Bottom View 1 2 1 Security bar 22 Ceiling mount holes Note „ This projector can be used with a ceiling mount for information to mount the projector on a ceiling.
The ceiling mount is not included in the package. „ Contact your dealer for support. EN-8 Bottom View 1 2 1 Security bar 22 Ceiling mount holes Note „ This projector can be used with a ceiling mount for information to mount the projector on a ceiling.

User Manual
Page 9
... on page 62. 3 SOURCE Switch between input signals. 4 POWER (Power LED indicator) Refer to "LED Indicator Messages" on page 62. 5 Power Turn the projector on or off. 6 HELP Display Help menu. 7 LAMP (Lamp LED indicator) Refer to "LED Indicator Messages" on page 62. 8 ENTER Confirm your item ...selection. 9 Re-SYNC Automatically synchronize the projector to the input source. 10 Four directional buttons Use four directional buttons to select items or make adjustments to your selection. 11 MENU Display or...
... on page 62. 3 SOURCE Switch between input signals. 4 POWER (Power LED indicator) Refer to "LED Indicator Messages" on page 62. 5 Power Turn the projector on or off. 6 HELP Display Help menu. 7 LAMP (Lamp LED indicator) Refer to "LED Indicator Messages" on page 62. 8 ENTER Confirm your item ...selection. 9 Re-SYNC Automatically synchronize the projector to the input source. 10 Four directional buttons Use four directional buttons to select items or make adjustments to your selection. 11 MENU Display or...
User Manual
Page 10
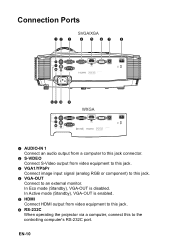
... 1 Connect an audio output from a computer to this jack connector. 2 S-VIDEO Connect S-Video output from video equipment to this jack. 6 RS-232C When operating the projector via a computer, connect this jack. 4 VGA-OUT Connect to the controlling computer's RS-232C port. In Active mode (Standby), VGA-OUT is disabled. EN-10
... 1 Connect an audio output from a computer to this jack connector. 2 S-VIDEO Connect S-Video output from video equipment to this jack. 6 RS-232C When operating the projector via a computer, connect this jack. 4 VGA-OUT Connect to the controlling computer's RS-232C port. In Active mode (Standby), VGA-OUT is disabled. EN-10
User Manual
Page 12
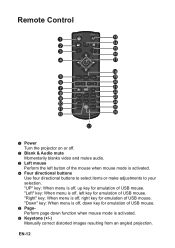
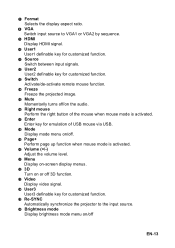
.... EN-12 Remote Control 1 13 14 2 15 3 16 4 17 18 5 19 6 20 7 21 8 22 9 23 10 24 11 25 12 26 27 1 Power Turn the projector on or off. 2 Blank & Audio mute Momentarily blanks video and mutes audio. 3 Left mouse Perform the left key for emulation of USB mouse. "Right" key...
.... EN-12 Remote Control 1 13 14 2 15 3 16 4 17 18 5 19 6 20 7 21 8 22 9 23 10 24 11 25 12 26 27 1 Power Turn the projector on or off. 2 Blank & Audio mute Momentarily blanks video and mutes audio. 3 Left mouse Perform the left key for emulation of USB mouse. "Right" key...
User Manual
Page 13
... Turn on or off 3D function. 23 Video Display video signal. 24 User3 User3 definable key for customized function. 25 Re-SYNC Automatically synchronize the projector to the input source. 26 Brightness mode Display brightness mode menu on/off EN-13
... Turn on or off 3D function. 23 Video Display video signal. 24 User3 User3 definable key for customized function. 25 Re-SYNC Automatically synchronize the projector to the input source. 26 Brightness mode Display brightness mode menu on/off EN-13
User Manual
Page 14
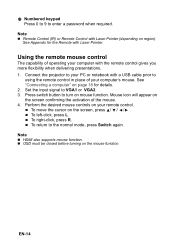
Connect the projector to your remote control. „ To move the cursor on page 18 for the Remote with the remote control gives you more flexibility when delivering ...
Connect the projector to your remote control. „ To move the cursor on page 18 for the Remote with the remote control gives you more flexibility when delivering ...

User Manual
Page 16
Remote Control Operation Point the remote control at the infrared remote sensor and press a button. „ Operating the projector from the front 15 15 5m 8m 7m Note „ The remote control may not operate when there is sunlight or other strong light such ...
Remote Control Operation Point the remote control at the infrared remote sensor and press a button. „ Operating the projector from the front 15 15 5m 8m 7m Note „ The remote control may not operate when there is sunlight or other strong light such ...
User Manual
Page 17
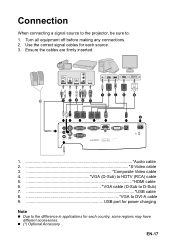
...-A cable 9 USB port for power charging Note „ Due to : 1. Use the correct signal cables for each source. 3. Connection When connecting a signal source to the projector, be sure to the difference in applications for each country, some regions may have different accessories. „ (*) Optional Accessory EN-17
...-A cable 9 USB port for power charging Note „ Due to : 1. Use the correct signal cables for each source. 3. Connection When connecting a signal source to the projector, be sure to the difference in applications for each country, some regions may have different accessories. „ (*) Optional Accessory EN-17

User Manual
Page 18
... one end to the VGA1/YPbPr or VGA2/ YPbPr signal input socket on their external video ports when connected to find your notebook's documentation to a projector. Connect the other end of the VGA cable to the D-Sub output socket of the computer. 2. Important „Many notebooks do not turn on ... a function key labeled CRT/LCD or a function key with a monitor symbol on /off. Refer to your notebook's key combination. To connect the projector to both IBM® compatible and Macintosh® computers. Usually a key combo like FN + F3 or CRT/LCD key turns the external display on the...
... one end to the VGA1/YPbPr or VGA2/ YPbPr signal input socket on their external video ports when connected to find your notebook's documentation to a projector. Connect the other end of the VGA cable to the D-Sub output socket of the computer. 2. Important „Many notebooks do not turn on ... a function key labeled CRT/LCD or a function key with a monitor symbol on /off. Refer to your notebook's key combination. To connect the projector to both IBM® compatible and Macintosh® computers. Usually a key combo like FN + F3 or CRT/LCD key turns the external display on the...

User Manual
Page 19
...is projecting out, VGA-OUT source will be VGA1. 2. If VGA1 is equipped with a VGA cable following the instructions below: To connect the projector to a monitor: 1. Connect the projector to a computer as on the screen, you want to view your monitor is projecting out, VGA-OUT source will keep the latest display...VGA source signal. If none of the video monitor. 3. EN-19 Connecting a monitor If you can connect the VGA-OUT signal output socket on the projector to an external monitor with a DVI input socket, take a VGA to DVI-A cable and connect the DVI end of the cable to the DVI ...
...is projecting out, VGA-OUT source will be VGA1. 2. If VGA1 is equipped with a VGA cable following the instructions below: To connect the projector to a monitor: 1. Connect the projector to a computer as on the screen, you want to view your monitor is projecting out, VGA-OUT source will keep the latest display...VGA source signal. If none of the video monitor. 3. EN-19 Connecting a monitor If you can connect the VGA-OUT signal output socket on the projector to an external monitor with a DVI input socket, take a VGA to DVI-A cable and connect the DVI end of the cable to the DVI ...
User Manual
Page 20
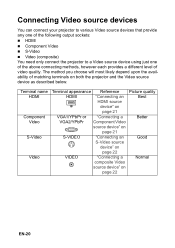
...of the following output sockets: „ HDMI „ Component Video „ S-Video „ Video (composite) You need only connect the projector to a Video source device using just one of the above connecting methods, however each provides a different level of matching terminals on both the... projector and the Video source device as described below: Terminal name HDMI Component Video S-Video Video Terminal appearance Reference Picture quality HDMI "...
...of the following output sockets: „ HDMI „ Component Video „ S-Video „ Video (composite) You need only connect the projector to a Video source device using just one of the above connecting methods, however each provides a different level of matching terminals on both the... projector and the Video source device as described below: Terminal name HDMI Component Video S-Video Video Terminal appearance Reference Picture quality HDMI "...
User Manual
Page 21
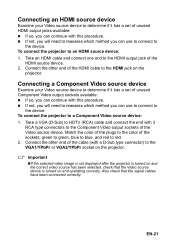
... a Component Video source device: 1. To connect the projector to an HDMI source device: 1. Take a VGA (D-Sub) to HDTV (RCA) cable and connect the...can use to connect to the device. Important „If the selected video image is not displayed after the projector is turned on and the correct video source has been selected, check that the signal cables have been connected ...Sub type connector) to the VGA1/YPbPr or VGA2/YPbPr socket on the projector. Connect the other end of the HDMI cable to the HDMI jack on the projector. Take an HDMI cable and connect one end to the HDMI output jack ...
... a Component Video source device: 1. To connect the projector to an HDMI source device: 1. Take a VGA (D-Sub) to HDTV (RCA) cable and connect the...can use to connect to the device. Important „If the selected video image is not displayed after the projector is turned on and the correct video source has been selected, check that the signal cables have been connected ...Sub type connector) to the VGA1/YPbPr or VGA2/YPbPr socket on the projector. Connect the other end of the HDMI cable to the HDMI jack on the projector. Take an HDMI cable and connect one end to the HDMI output jack ...
User Manual
Page 22
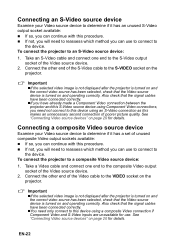
... Video output socket of the Video source device. 2. Important „If the selected video image is not displayed after the projector is turned on the projector. Connecting a composite Video source device Examine your Video source device to determine if it has a set of unused composite Video... on and the correct video source has been selected, check that the signal cables have already made a Component Video connection between the projector and this S-Video source device using Component Video connections, you need not connect to this device using a composite Video connection if Component...
... Video output socket of the Video source device. 2. Important „If the selected video image is not displayed after the projector is turned on the projector. Connecting a composite Video source device Examine your Video source device to determine if it has a set of unused composite Video... on and the correct video source has been selected, check that the signal cables have already made a Component Video connection between the projector and this S-Video source device using Component Video connections, you need not connect to this device using a composite Video connection if Component...


