

Manual
Page 1
DLP® Projector User manual
DLP® Projector User manual
Manual
Page 2
... Overview...10 Connections...11 Keypad...12 Remote control...13 SETUP AND INSTALLATION 14 Installing the projector...14 Connecting sources to the projector 16 Adjusting the projector image...17 Remote setup...19 USING THE PROJECTOR 21 Powering on / off the projector 21 Selecting an input source...22 Menu navigation and features 23 OSD Menu tree...24...
... Overview...10 Connections...11 Keypad...12 Remote control...13 SETUP AND INSTALLATION 14 Installing the projector...14 Connecting sources to the projector 16 Adjusting the projector image...17 Remote setup...19 USING THE PROJECTOR 21 Powering on / off the projector 21 Selecting an input source...22 Menu navigation and features 23 OSD Menu tree...24...

Manual
Page 3
... Setup network control settings menu 43 Control reset menu...50 Information menu...51 ADDITIONAL INFORMATION 52 Compatible resolutions...52 Image size and projection distance 55 Projector dimensions and ceiling mount installation 57 IR remote control codes...59 Troubleshooting...61 Warning indicators...63 Specifications...64...
... Setup network control settings menu 43 Control reset menu...50 Information menu...51 ADDITIONAL INFORMATION 52 Compatible resolutions...52 Image size and projection distance 55 Projector dimensions and ceiling mount installation 57 IR remote control codes...59 Troubleshooting...61 Warning indicators...63 Specifications...64...

Manual
Page 4
... of uninsulated "dangerous voltage" within the product's enclosure that may become damaged. ‡ Do not block the light coming out of the projector lens when in operation. Please call Optoma before you to dangerous voltages or other apparatus such as recommended in this may cause electric shock. ‡ Do not attempt to...
... of uninsulated "dangerous voltage" within the product's enclosure that may become damaged. ‡ Do not block the light coming out of the projector lens when in operation. Please call Optoma before you to dangerous voltages or other apparatus such as recommended in this may cause electric shock. ‡ Do not attempt to...

Manual
Page 5
...Information ‡ This product is extensive, therefore any kind of abnormal objects that can redirect light coming out of the projector performance. ‡ Please follow the correct projector orientation installation as defined in IEC 62471:5:Ed. 1.0. Do not use abrasive cleaners, waxes or solvents to clean the...135; Notice is class 1 laser product of IEC/EN 60825-1:2014 and risk group 2 with mild detergent to avoid the use of the projector. If the battery/batteries are left in places where smoke from remote control before storage. IEC 60825-1:2014 1 RG2 IEC 60825-1:2014 1 ...
...Information ‡ This product is extensive, therefore any kind of abnormal objects that can redirect light coming out of the projector performance. ‡ Please follow the correct projector orientation installation as defined in IEC 62471:5:Ed. 1.0. Do not use abrasive cleaners, waxes or solvents to clean the...135; Notice is class 1 laser product of IEC/EN 60825-1:2014 and risk group 2 with mild detergent to avoid the use of the projector. If the battery/batteries are left in places where smoke from remote control before storage. IEC 60825-1:2014 1 RG2 IEC 60825-1:2014 1 ...

Manual
Page 6
The product's intended use as this may cause damage by the exposure of laser radiation. Not following the control, adjustment or operation procedure may cause damage by the the exposure of laser radiation. ‡ Do not stare into beam when the projector is on. RISK GROUP 2. Laser Notice IEC 60825-1:2014: CLASS 1 LASER PRODUCT - ‡ Do not open or disassemble the projector as a consumer laser product and compliant with EN 50689:2021. CLASS 1 CONSUMER LASER PRODUCT EN 50689:2021 6 English The bright light may result in permanent eye damage.
The product's intended use as this may cause damage by the exposure of laser radiation. Not following the control, adjustment or operation procedure may cause damage by the the exposure of laser radiation. ‡ Do not stare into beam when the projector is on. RISK GROUP 2. Laser Notice IEC 60825-1:2014: CLASS 1 LASER PRODUCT - ‡ Do not open or disassemble the projector as a consumer laser product and compliant with EN 50689:2021. CLASS 1 CONSUMER LASER PRODUCT EN 50689:2021 6 English The bright light may result in permanent eye damage.

Manual
Page 7
... not expressly approved by the manufacturer could void the user's authority, which can radiate radio frequency energy and, if not installed and used in this projector. All other countries. Neither this manual, nor any of the material contained herein, may cause harmful interference to maintain compliance with FCC regulations. Copyright This...
... not expressly approved by the manufacturer could void the user's authority, which can radiate radio frequency energy and, if not installed and used in this projector. All other countries. Neither this manual, nor any of the material contained herein, may cause harmful interference to maintain compliance with FCC regulations. Copyright This...

Manual
Page 8
... harmful interference and 2. If the lens is not covered by the warranty. Warning: Do not clean the lens if the projector is subject to excessive heat inside the projector. This device must be sure to remove the dust. ‡ Use a special cloth for cleaning lens. To minimize pollution... including interference that may cause a fire due to the following two conditions: 1. This device may cause the lens' surface film to peel off the projector and unplug the power cord to allow it . Cleaning the Lens ‡ Before cleaning the lens, be properly grounded (earthed). 8 English Notice: ...
... harmful interference and 2. If the lens is not covered by the warranty. Warning: Do not clean the lens if the projector is subject to excessive heat inside the projector. This device must be sure to remove the dust. ‡ Use a special cloth for cleaning lens. To minimize pollution... including interference that may cause a fire due to the following two conditions: 1. This device may cause the lens' surface film to peel off the projector and unplug the power cord to allow it . Cleaning the Lens ‡ Before cleaning the lens, be properly grounded (earthed). 8 English Notice: ...
Manual
Page 9
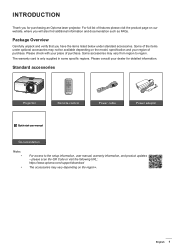
... not be available depending on the model, specification and your region of purchase. Please check with your dealer for purchasing an Optoma laser projector. The warranty card is only supplied in some specific regions. English 9 Package Overview Carefully unpack and verify that you will... items under optional accessories may vary depending on our website, where you have the items listed below under standard accessories. Standard accessories Projector Remote control Power cable Power adapter Quick start user manual Documentation Note: ‡ ‡ For access to region. ...
... not be available depending on the model, specification and your region of purchase. Please check with your dealer for purchasing an Optoma laser projector. The warranty card is only supplied in some specific regions. English 9 Package Overview Carefully unpack and verify that you will... items under optional accessories may vary depending on our website, where you have the items listed below under standard accessories. Standard accessories Projector Remote control Power cable Power adapter Quick start user manual Documentation Note: ‡ ‡ For access to region. ...

Manual
Page 10
Keypad 3. Zoom Lever 4. DC Jack No Item 7. Tilt-Adjustment Feet 9. When operating the projector in an enclosed space, allow at least 30 cm clearance around the intake and exhaust vents. Focus Ring 5. Ventilation (outlet) 6. Kensington™ Lock Port 10. ... 11. Ventilation (inlet) 8. INTRODUCTION Product Overview 4K 1.3x/4K 1.6x model 1 2 5 6 3 4 8 11 4K Short Throw model 1 2 8 10 9 7 8 7 5 6 4 8 11 8 10 9 7 8 7 Note: ‡ ‡ Do not block projector intake and exhaust vents. No Item 1. IR Receivers 2. Lens 10 English
Keypad 3. Zoom Lever 4. DC Jack No Item 7. Tilt-Adjustment Feet 9. When operating the projector in an enclosed space, allow at least 30 cm clearance around the intake and exhaust vents. Focus Ring 5. Ventilation (outlet) 6. Kensington™ Lock Port 10. ... 11. Ventilation (inlet) 8. INTRODUCTION Product Overview 4K 1.3x/4K 1.6x model 1 2 5 6 3 4 8 11 4K Short Throw model 1 2 8 10 9 7 8 7 5 6 4 8 11 8 10 9 7 8 7 Note: ‡ ‡ Do not block projector intake and exhaust vents. No Item 1. IR Receivers 2. Lens 10 English

Manual
Page 14
... well as the location and distance between the projector and the rest of four possible positions. Note: The further away the projector is designed to distance table on pages 55~56. SETUP AND INSTALLATION Installing the projector Your projector is placed from the screen the projected image .... 14 English Table mount front Ceiling mount front Table mount rear Ceiling mount rear Projector should be placed flat on a surface and 90 degrees / perpendicular to the screen. ‡ How to determine projector location for a given screen size, please refer to distance table on pages 55~56...
... well as the location and distance between the projector and the rest of four possible positions. Note: The further away the projector is designed to distance table on pages 55~56. SETUP AND INSTALLATION Installing the projector Your projector is placed from the screen the projected image .... 14 English Table mount front Ceiling mount front Table mount rear Ceiling mount rear Projector should be placed flat on a surface and 90 degrees / perpendicular to the screen. ‡ How to determine projector location for a given screen size, please refer to distance table on pages 55~56...

Manual
Page 15
... Minimum 100mm (3.94 inches) ‡ Ensure that the intake vents do not recycle hot air from the exhaust vent. ‡ When operating the projector in an enclosed space, ensure that the surrounding air temperature within the enclosure does not exceed operation temperature while the... projector is running, and the air intake and exhaust vents are unobstructed. ‡ All enclosures should pass a certified thermal evaluation to ensure that the projector does not recycle exhaust air, as this may cause the device to...
... Minimum 100mm (3.94 inches) ‡ Ensure that the intake vents do not recycle hot air from the exhaust vent. ‡ When operating the projector in an enclosed space, ensure that the surrounding air temperature within the enclosure does not exceed operation temperature while the... projector is running, and the air intake and exhaust vents are unobstructed. ‡ All enclosures should pass a certified thermal evaluation to ensure that the projector does not recycle exhaust air, as this may cause the device to...

Manual
Page 16
Audio Out Cable No Item 5. Power Cable 7. USB Power Cable 4. RJ-45 Cable To ensure the best image quality and avoid connection errors, we recommend the use of High Speed or Premium Certified HDMI cables up to the projector 3 4 1 2 7 8 5 6 Note: ‡ No Item 1. SETUP AND INSTALLATION Connecting sources to 5 meters. 16 English RS232 Cable 8. HDMI Cable 2. HDMI Dongle 3. Power Adapter 6.
Audio Out Cable No Item 5. Power Cable 7. USB Power Cable 4. RJ-45 Cable To ensure the best image quality and avoid connection errors, we recommend the use of High Speed or Premium Certified HDMI cables up to the projector 3 4 1 2 7 8 5 6 Note: ‡ No Item 1. SETUP AND INSTALLATION Connecting sources to 5 meters. 16 English RS232 Cable 8. HDMI Cable 2. HDMI Dongle 3. Power Adapter 6.

Manual
Page 17
Rotate the adjustable foot clockwise or counterclockwise to adjust on the underside of the projector. 2. SETUP AND INSTALLATION Adjusting the projector image Image height The projector is equipped with elevator feet for adjusting the image height. 1. Locate the adjustable foot you wish to raise or lower the projector. 4K 1.3x/4K 1.6x model: 4K Short Throw model: Tilt-Adjustment Feet Tilt-Adjustment Ring Tilt-Adjustment Feet Tilt-Adjustment Ring English 17
Rotate the adjustable foot clockwise or counterclockwise to adjust on the underside of the projector. 2. SETUP AND INSTALLATION Adjusting the projector image Image height The projector is equipped with elevator feet for adjusting the image height. 1. Locate the adjustable foot you wish to raise or lower the projector. 4K 1.3x/4K 1.6x model: 4K Short Throw model: Tilt-Adjustment Feet Tilt-Adjustment Ring Tilt-Adjustment Feet Tilt-Adjustment Ring English 17

Manual
Page 20
Approx. ± 15° Approx. ± 15° 20 English The distance between the remote control and the IR sensor on the projector that the remote control is located on the top and front sides of one another, the remote control might become ineffective. SETUP AND INSTALLATION Effective ... remote control and the sensor should not be longer than 6 meters (19.7 feet). ‡ Make sure that there are within a very short distance of the projector. Ensure that might obstruct the infra-red beam. ‡ Make sure the IR transmitter of the remote control is not being shined by sunlight or...
Approx. ± 15° Approx. ± 15° 20 English The distance between the remote control and the IR sensor on the projector that the remote control is located on the top and front sides of one another, the remote control might become ineffective. SETUP AND INSTALLATION Effective ... remote control and the sensor should not be longer than 6 meters (19.7 feet). ‡ Make sure that there are within a very short distance of the projector. Ensure that might obstruct the infra-red beam. ‡ Make sure the IR transmitter of the remote control is not being shined by sunlight or...

Manual
Page 21
... screen will display in standby mode, simply press the / button again to operate for about 10 seconds for the second time, the projector will be displayed: Power Off button on 1. When you will be prompted to select the preferred language, projection orientation, and other settings..., otherwise the message will be flashing green or blue. Press the / button again to turn red. 2. English 21 USING THE PROJECTOR Powering on / off the projector or Powering on the remote Press power key again. 3. The following message will disappear after a power off procedure. When the Power...
... screen will display in standby mode, simply press the / button again to operate for about 10 seconds for the second time, the projector will be displayed: Power Off button on 1. When you will be prompted to select the preferred language, projection orientation, and other settings..., otherwise the message will be flashing green or blue. Press the / button again to turn red. 2. English 21 USING THE PROJECTOR Powering on / off the projector or Powering on the remote Press power key again. 3. The following message will disappear after a power off procedure. When the Power...

Manual
Page 22
If multiple sources are connected, press the button on the screen, such as computer, notebook, video player, etc. or 22 English The projector will automatically detect the source. USING THE PROJECTOR Selecting an input source Turn on the connected source that you want to display on the projector keypad or remote control to select the desired input.
If multiple sources are connected, press the button on the screen, such as computer, notebook, video player, etc. or 22 English The projector will automatically detect the source. USING THE PROJECTOR Selecting an input source Turn on the connected source that you want to display on the projector keypad or remote control to select the desired input.

Manual
Page 23
... Picture Mode Dynamic Range Brightness Contrast Sharpness Gamma Color Settings Wall Color 3D Reset Bright Off English 23 USING THE PROJECTOR Menu navigation and features The projector has multilingual on the projector keypad or remote control to enter sub menu. 3. While making a selection on a particular page, press the button...again. Press the button to make image adjustments and change a variety of settings. To open the OSD menu, press the button on the projector keypad or remote control. 2. Use / keys to select the desired item in the sub menu and then press the button to be adjusted...
... Picture Mode Dynamic Range Brightness Contrast Sharpness Gamma Color Settings Wall Color 3D Reset Bright Off English 23 USING THE PROJECTOR Menu navigation and features The projector has multilingual on the projector keypad or remote control to enter sub menu. 3. While making a selection on a particular page, press the button...again. Press the button to make image adjustments and change a variety of settings. To open the OSD menu, press the button on the projector keypad or remote control. 2. Use / keys to select the desired item in the sub menu and then press the button to be adjusted...
Manual
Page 24
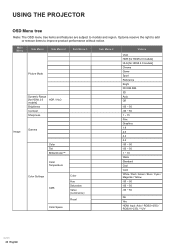
Optoma reserve the right to add or remove items to models and region. Main Menu Sub Menu Sub Menu 2 Sub Menu 3 Picture Mode Dynamic Range [for ... / Blue / Cyan / Magenta / Yellow -50 ~ 50 -50 ~ 50 -50 ~ 50 No Yes HDMI Input: Auto / RGB(0~255) / RGB(16~235) / YUV 24 English USING THE PROJECTOR OSD Menu tree Note: The OSD menu tree items and features are subject to improve product performance without notice.
Optoma reserve the right to add or remove items to models and region. Main Menu Sub Menu Sub Menu 2 Sub Menu 3 Picture Mode Dynamic Range [for ... / Blue / Cyan / Magenta / Yellow -50 ~ 50 -50 ~ 50 -50 ~ 50 No Yes HDMI Input: Auto / RGB(0~255) / RGB(16~235) / YUV 24 English USING THE PROJECTOR OSD Menu tree Note: The OSD menu tree items and features are subject to improve product performance without notice.

Manual
Page 25
... On Off On 4:3 16:9 16:10 4:3 [Screen Type: 4:3] 16:9 [Screen Type: 16:9] 16:10 [Screen Type: 16:10] 21:9 Native Auto English 25 USING THE PROJECTOR Main Menu Sub Menu Sub Menu 2 Sub Menu 3 Wall Color Image 3D 3D Mode 3D Sync Type 3D-2D Conversion 3D Format Reset Projection Orientation...
... On Off On 4:3 16:9 16:10 4:3 [Screen Type: 4:3] 16:9 [Screen Type: 16:9] 16:10 [Screen Type: 16:10] 21:9 Native Auto English 25 USING THE PROJECTOR Main Menu Sub Menu Sub Menu 2 Sub Menu 3 Wall Color Image 3D 3D Mode 3D Sync Type 3D-2D Conversion 3D Format Reset Projection Orientation...


