
User Manual
Page 1
... ...26 Setup...29 System ...32 Appendices 36 Troubleshooting 36 Image Problems 36 Intermission Problems 38 Projector Status Indication 39 Remote Control Problems 40 Replacing the Lamp 41 Compatibility Modes 42 RS232 Commands and Protocol Function List 43 Ceiling Mount Installation 46 Optoma Global Offices 47 Regulation & Safety notices 49 1
... ...26 Setup...29 System ...32 Appendices 36 Troubleshooting 36 Image Problems 36 Intermission Problems 38 Projector Status Indication 39 Remote Control Problems 40 Replacing the Lamp 41 Compatibility Modes 42 RS232 Commands and Protocol Function List 43 Ceiling Mount Installation 46 Optoma Global Offices 47 Regulation & Safety notices 49 1
User Manual
Page 3
...reduce the risk of its life, the projector will show on . See page 41. Reset the "Lamp Reset" function from the onscreen display "System|Lamp Setting" menu after replacing the lamp module (refer to rain or moisture. Do not use lens cap when projector is approaching to the end...contact your eyes. English Usage Notice Precautions Please follow all replacement instructions. When replacing the lamp, please allow unit to change the lamp when it shows warning messages. the end of the lamp itself. Please do not expose this projector to page 35). Allow 90 seconds for the ...
...reduce the risk of its life, the projector will show on . See page 41. Reset the "Lamp Reset" function from the onscreen display "System|Lamp Setting" menu after replacing the lamp module (refer to rain or moisture. Do not use lens cap when projector is approaching to the end...contact your eyes. English Usage Notice Precautions Please follow all replacement instructions. When replacing the lamp, please allow unit to change the lamp when it shows warning messages. the end of the lamp itself. Please do not expose this projector to page 35). Allow 90 seconds for the ...
User Manual
Page 5
.... The best way to achieve this ensures that projectors are asked to point out something on the screen. ▀■ In order to minimize the lamp power needed, use room blinds to stare at all times. ▀■ Minimize standing facing into the projector beam at the projector... lamp. Keep your back to the beam as much as possible. ▀■ A stick or laser pointer is used in a classroom, adequately supervise students when they ...
.... The best way to achieve this ensures that projectors are asked to point out something on the screen. ▀■ In order to minimize the lamp power needed, use room blinds to stare at all times. ▀■ Minimize standing facing into the projector beam at the projector... lamp. Keep your back to the beam as much as possible. ▀■ A stick or laser pointer is used in a classroom, adequately supervise students when they ...

User Manual
Page 9
Power and IR Receiver 2. Menu (On/Off) 6. Re-Sync 9. Lamp Indicator LED 4. Source Select 8. English Introduction Control Panel 1 2 3 4 5 6 1. Enter 7 8 9 9 Temp Indicator LED 5. Four Directional Select Keys 7. Power Indicator LED 3.
Power and IR Receiver 2. Menu (On/Off) 6. Re-Sync 9. Lamp Indicator LED 4. Source Select 8. English Introduction Control Panel 1 2 3 4 5 6 1. Enter 7 8 9 9 Temp Indicator LED 5. Four Directional Select Keys 7. Power Indicator LED 3.
User Manual
Page 13
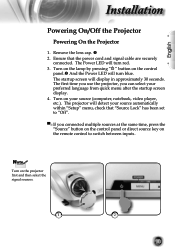
Ensure that "Source Lock" has been set to switch between inputs. Turn on the lamp by pressing " " button on your source (computer, notebook, video player, etc.). Turn on the control panel. And the Power LED will detect your preferred ...
Ensure that "Source Lock" has been set to switch between inputs. Turn on the lamp by pressing " " button on your source (computer, notebook, video player, etc.). Turn on the control panel. And the Power LED will detect your preferred ...
User Manual
Page 14
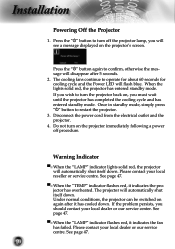
... back on again after 5 seconds. 2. Disconnect the power cord from the electrical outlet and the projector. 4. Do not turn off the projector lamp, you should contact your local dealer or our service center. Once in standby mode, simply press " " button to turn on the projector's screen...;■ When the "TEMP" indicator flashes red, it indicates the fan has failed. See page 47. ▀■ When the "LAMP" indicator flashes red, it indicates the projector has overheated. Press the " " button to restart the projector. 3. Warning Indicator ▀■ When the...
... back on again after 5 seconds. 2. Disconnect the power cord from the electrical outlet and the projector. 4. Do not turn off the projector lamp, you should contact your local dealer or our service center. Once in standby mode, simply press " " button to turn on the projector's screen...;■ When the "TEMP" indicator flashes red, it indicates the fan has failed. See page 47. ▀■ When the "LAMP" indicator flashes red, it indicates the projector has overheated. Press the " " button to restart the projector. 3. Warning Indicator ▀■ When the...
User Manual
Page 21
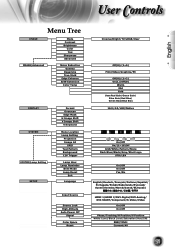
... OGvaemrsmcaan NoiEDsdeggReaemMdaumscaktion H TIm rGuaaemgVemivSaihdift EVCdDIogmeleogarEagnSmehpmSahncaeicfet B/VTWrKuREeeexyssVtetiotvnnisdieon EdCgoeloEr nTheamnpce BM/eW LnaunEgLxoutecanagtseiioonn LaCmolporSTeettminpg Projection Image AI InpuItRSIoSurce DISPLAY DISPLAY SYSTEM|Lamp Setting SETUP Test Pattern BaFcokrgmroautnd S1oO2uVvrecTrersicgLaogncekr HEigdFhgoeArmlMtiaattuskde AHuLtIOaomm vPeaporgsweHceoaSrunhrOifftf LVamEIdmpSgaiReggenMemaaSlisnhkdifetr HVBIrmKiteaeygMsetooSdnheeift VLIammapgReeSsheitft VLaKneEgyxusittaognee SETUP Color Space LaRnegsueatge SYSTEM SYSTEM...
... OGvaemrsmcaan NoiEDsdeggReaemMdaumscaktion H TIm rGuaaemgVemivSaihdift EVCdDIogmeleogarEagnSmehpmSahncaeicfet B/VTWrKuREeeexyssVtetiotvnnisdieon EdCgoeloEr nTheamnpce BM/eW LnaunEgLxoutecanagtseiioonn LaCmolporSTeettminpg Projection Image AI InpuItRSIoSurce DISPLAY DISPLAY SYSTEM|Lamp Setting SETUP Test Pattern BaFcokrgmroautnd S1oO2uVvrecTrersicgLaogncekr HEigdFhgoeArmlMtiaattuskde AHuLtIOaomm vPeaporgsweHceoaSrunhrOifftf LVamEIdmpSgaiReggenMemaaSlisnhkdifetr HVBIrmKiteaeygMsetooSdnheeift VLIammapgReeSsheitft VLaKneEgyxusittaognee SETUP Color Space LaRnegsueatge SYSTEM SYSTEM...
User Manual
Page 27
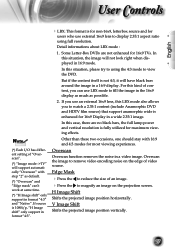
...". (*) "Image mode-->TV" will support automatically "Overscan" with 16:9 and 4:3 modes for maximum viewing effects. Some Letter-Box DVDs are no black bars, the full lamp power and vertical resolution is for non-16x9, letterbox source and for 16x9 TVs. V Image Shift Shifts the projected image position vertically. 27 Overscan the...
...". (*) "Image mode-->TV" will support automatically "Overscan" with 16:9 and 4:3 modes for maximum viewing effects. Some Letter-Box DVDs are no black bars, the full lamp power and vertical resolution is for non-16x9, letterbox source and for 16x9 TVs. V Image Shift Shifts the projected image position vertically. 27 Overscan the...
User Manual
Page 32
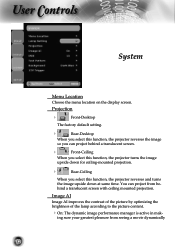
... and turns the image upside down at same time. Image AI Image AI improves the contrast of the picture by optimizing the brightness of the lamp according to the picture content. On: The dynamic image performance manager is active in mak- User Controls System Menu Location Choose the menu location...
... and turns the image upside down at same time. Image AI Image AI improves the contrast of the picture by optimizing the brightness of the lamp according to the picture content. On: The dynamic image performance manager is active in mak- User Controls System Menu Location Choose the menu location...
User Manual
Page 35
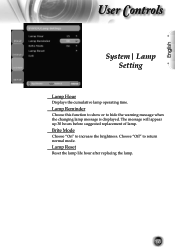
Lamp Reminder Choose this function to show or to increase the brightness. Lamp Reset Reset the lamp life hour after replacing the lamp. 35 English User Controls System| Lamp Setting Lamp Hour Displays the cumulative lamp operating time. The message will appear up 30 hours before suggested replacement of lamp. Brite Mode Choose "On" to hide the warning message when the changing lamp message is displayed. Choose "Off" to return normal mode.
Lamp Reminder Choose this function to show or to increase the brightness. Lamp Reset Reset the lamp life hour after replacing the lamp. 35 English User Controls System| Lamp Setting Lamp Hour Displays the cumulative lamp operating time. The message will appear up 30 hours before suggested replacement of lamp. Brite Mode Choose "On" to hide the warning message when the changing lamp message is displayed. Choose "Off" to return normal mode.
User Manual
Page 36
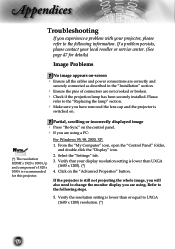
...resolution: HDMI's 1920 x 1080 i/p and component's 1920 x 1080 i is lower than UXGA (1600 x 1200). (*) 4. Please refer to the "Replacing the lamp" section. Make sure you experience a problem with your projector, please refer to change the monitor display you are using . Select the "Settings" tab. ... information. Click on the control panel. If you are not crooked or broken. Check if the projection lamp has been securely installed. Verify the resolution setting is recommended for details) Image Problems No image appears on-screen Ensure...
...resolution: HDMI's 1920 x 1080 i/p and component's 1920 x 1080 i is lower than UXGA (1600 x 1200). (*) 4. Please refer to the "Replacing the lamp" section. Make sure you experience a problem with your projector, please refer to change the monitor display you are using . Select the "Settings" tab. ... information. Click on the control panel. If you are not crooked or broken. Check if the projection lamp has been securely installed. Verify the resolution setting is recommended for details) Image Problems No image appears on-screen Ensure...
User Manual
Page 39
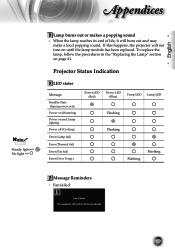
...) Error (Thermal fail) Error (Fan fail) Error (Over Temp.) Power LED (Red) Power LED (Blue) Temp-LED Lamp-LED Flashing Flashing Flashing Flashing Message Reminders Fan failed: 39 Projector Status Indication LED states Message Standby State (Input power cord) Power on (Warming) ...Power on page 41. If this happens, the projector will burn out and may make a loud popping sound. English Appendices Noottee Steady light => No light => Lamp burns out or makes a popping sound When the lamp reaches its end of life, it will not turn on until the...
...) Error (Thermal fail) Error (Fan fail) Error (Over Temp.) Power LED (Red) Power LED (Blue) Temp-LED Lamp-LED Flashing Flashing Flashing Flashing Message Reminders Fan failed: 39 Projector Status Indication LED states Message Standby State (Input power cord) Power on (Warming) ...Power on page 41. If this happens, the projector will burn out and may make a loud popping sound. English Appendices Noottee Steady light => No light => Lamp burns out or makes a popping sound When the lamp reaches its end of life, it will not turn on until the...
User Manual
Page 40
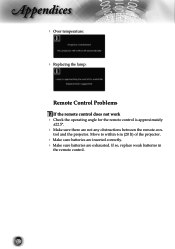
If so, replace weak batteries in the remote control. 40 trol and the projector. Move to within 6 m (20 ft) of the projector. Make sure batteries are inserted correctly. Make sure batteries are not any obstructions between the remote con- Appendices Over temperature: Replacing the lamp: Remote Control Problems If the remote control does not work Check the operating angle for the remote control is approximately ±22.5°. Make sure there are exhausted.
If so, replace weak batteries in the remote control. 40 trol and the projector. Move to within 6 m (20 ft) of the projector. Make sure batteries are inserted correctly. Make sure batteries are not any obstructions between the remote con- Appendices Over temperature: Replacing the lamp: Remote Control Problems If the remote control does not work Check the operating angle for the remote control is approximately ±22.5°. Make sure there are exhausted.
User Manual
Page 41
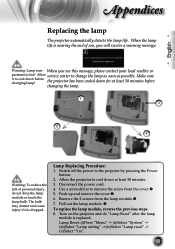
... local reseller or partment is nearing the end of personal injury, do "Lamp Reset" after the lamp module is dropped. Allow the projector to cool down at least 30 minutes before changing lamp! Remove the 2 screws from the cover. 5. Allow service center ...the screw from the lamp module. 7. Pull out the lamp module. To replace the lamp module, reverse the previous steps. 8. Warning: Lamp com- Make sure it is replaced. Lamp Replacing Procedure: 1. English Appendices Replacing the lamp The projector automatically detects the lamp life. Switch off the...
... local reseller or partment is nearing the end of personal injury, do "Lamp Reset" after the lamp module is dropped. Allow the projector to cool down at least 30 minutes before changing lamp! Remove the 2 screws from the cover. 5. Allow service center ...the screw from the lamp module. 7. Pull out the lamp module. To replace the lamp module, reverse the previous steps. 8. Warning: Lamp com- Make sure it is replaced. Lamp Replacing Procedure: 1. English Appendices Replacing the lamp The projector automatically detects the lamp life. Switch off the...
User Manual
Page 45
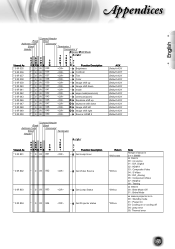
... 049 * 0 IR 049 O s Image shift right * 0 IR 050 * 0 IR 050 -- s Image shift up * 0 IR 047 * 0 IR 047 O s keystone shift down * 0 IR 041 * 0 IR 041 -- g Get Lamp Hour * 0 IR 802 * 0 IR 802 -- g Get Video Source * 0 IR 803 * 0 IR 803 -- g Get Projector status Return *002 xxxxx *003 xx *004 xx *005 xx Note... 00 : Brite Mode Off 01 : Brtire Mode xx means projector is in 00 : Standby mode 01 : Power On 03: Cooling on or cooling off 04: Lamp error 05: Thermal error 45 s Brightness * 0 IR 036 * 0 IR 036 -- g Get...
... 049 * 0 IR 049 O s Image shift right * 0 IR 050 * 0 IR 050 -- s Image shift up * 0 IR 047 * 0 IR 047 O s keystone shift down * 0 IR 041 * 0 IR 041 -- g Get Lamp Hour * 0 IR 802 * 0 IR 802 -- g Get Video Source * 0 IR 803 * 0 IR 803 -- g Get Projector status Return *002 xxxxx *003 xx *004 xx *005 xx Note... 00 : Brite Mode Off 01 : Brtire Mode xx means projector is in 00 : Standby mode 01 : Power On 03: Cooling on or cooling off 04: Lamp error 05: Thermal error 45 s Brightness * 0 IR 036 * 0 IR 036 -- g Get...


