
User Manual
Page 1
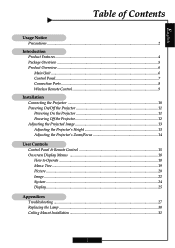
... 15 Onscreen Display Menus 18 How to Operate ...18 Menu Tree ...19 Picture ...20 Image ...22 System ...24 Display ...25 Appendices Troubleshooting ...27 Replacing the Lamp ...30 Ceiling Mount Installation 31 1
... 15 Onscreen Display Menus 18 How to Operate ...18 Menu Tree ...19 Picture ...20 Image ...22 System ...24 Display ...25 Appendices Troubleshooting ...27 Replacing the Lamp ...30 Ceiling Mount Installation 31 1

User Manual
Page 2
...popping" sound. carefully follow the cooling fan to run for several minutes. Before turning off the product, follow the lamp replacement instructions listed under "Replacing the Lamp." 2 Do not use lens cap when projector is about to rain or moisture. Warning- This product self-detects... signal sources. English Usage Notice Precautions Please follow the procedures listed under " Replacing the lamp." After installing a new lamp, reset the lamp life using the onscreen menu. When the lamp reaches the end of electric shock, do not expose this product to expire. Do not...
...popping" sound. carefully follow the cooling fan to run for several minutes. Before turning off the product, follow the lamp replacement instructions listed under "Replacing the Lamp." 2 Do not use lens cap when projector is about to rain or moisture. Warning- This product self-detects... signal sources. English Usage Notice Precautions Please follow the procedures listed under " Replacing the lamp." After installing a new lamp, reset the lamp life using the onscreen menu. When the lamp reaches the end of electric shock, do not expose this product to expire. Do not...
User Manual
Page 11
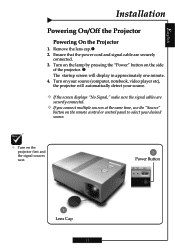
... connected. 3. o The startup screen will automatically detect your source (computer, notebook, video player etc), the projector will display in approximately one minute. 4. Turn on the lamp by pressing the "Power" button on the projector first and the signal sources next. 2 Power Button 1 Lens Cap 11 Remove the lens cap.n 2. English Installation...
... connected. 3. o The startup screen will automatically detect your source (computer, notebook, video player etc), the projector will display in approximately one minute. 4. Turn on the lamp by pressing the "Power" button on the projector first and the signal sources next. 2 Power Button 1 Lens Cap 11 Remove the lens cap.n 2. English Installation...
User Manual
Page 12
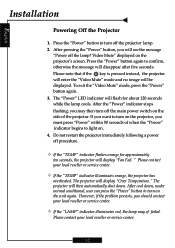
... the "Power" indicator stops flashing, you should contact your local reseller or service center. ™ If the "LAMP" indicator illuminates red, the lamp may then turn off the lamp? The projector will be displayed. Press the "Power" button to light on the projector's screen. Video Mute" displayed on ....when the "Power" indicator begins to turn off procedure. ™ If the "TEMP" indicator flashes orange for about 120 seconds while the lamp cools. Do not restart the projector immediately following a power off the main power switch on the unit again. Press the "Power" button again...
... the "Power" indicator stops flashing, you should contact your local reseller or service center. ™ If the "LAMP" indicator illuminates red, the lamp may then turn off the lamp? The projector will be displayed. Press the "Power" button to light on the projector's screen. Video Mute" displayed on ....when the "Power" indicator begins to turn off procedure. ™ If the "TEMP" indicator flashes orange for about 120 seconds while the lamp cools. Do not restart the projector immediately following a power off the main power switch on the unit again. Press the "Power" button again...
User Manual
Page 15
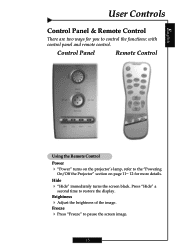
Control Panel Remote Control Using the Remote Control Power 4 "Power" turns on page 11~ 12 for you to pause the screen image. 15 Press "Hide" a second time to the "Powering On/Off the Projector" section on the projector's lamp, refer to restore the display. Freeze 4 Press "Freeze" to control the functions: with control panel and remote control. Brightness 4 Adjust the brightness of the image. English User Controls Control Panel & Remote Control There are two ways for more details. Hide 4 "Hide" immediately turns the screen black.
Control Panel Remote Control Using the Remote Control Power 4 "Power" turns on page 11~ 12 for you to pause the screen image. 15 Press "Hide" a second time to the "Powering On/Off the Projector" section on the projector's lamp, refer to restore the display. Freeze 4 Press "Freeze" to control the functions: with control panel and remote control. Brightness 4 Adjust the brightness of the image. English User Controls Control Panel & Remote Control There are two ways for more details. Hide 4 "Hide" immediately turns the screen black.

User Manual
Page 19
... R Contrast/G Contrast/B Contrast/R Brightness/G Brightness/ B Brightness Horizontal/Vertical/Frequency/ Phase Current/All English/French/Japanese/Spanish/ Chinese Simplified/Chinese Traditional/Italian/Portugese/ Germany/Korean Lamp Hour/Lamp Reminding/Lamp Hour Reset On/Off On/Off Blue/Black On/Off Auto/RGB/YUV Front Desktop/Front Ceiling/Rear Desktop/Rear Ceiling Native/Window/16...
... R Contrast/G Contrast/B Contrast/R Brightness/G Brightness/ B Brightness Horizontal/Vertical/Frequency/ Phase Current/All English/French/Japanese/Spanish/ Chinese Simplified/Chinese Traditional/Italian/Portugese/ Germany/Korean Lamp Hour/Lamp Reminding/Lamp Hour Reset On/Off On/Off Blue/Black On/Off Auto/RGB/YUV Front Desktop/Front Ceiling/Rear Desktop/Rear Ceiling Native/Window/16...
User Manual
Page 24
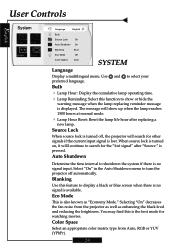
...signal input. Blanking Use this function to turn the projector off , the projector will show or hide the warning message when the lamp replacing reminder message is turned on, it willl continue to select your preferred language. Color Space Select an appropriate color matrix type ...search for the "lost . Source Lock When source lock is turned off automatically. When source lock is displayed. Bulb 4 Lamp Hour: Display the cumulative lamp operating time. 4 Lamp Reminding: Select this feature to shutdown the system if there is available. Select "On" in the Auto Shutdown menu to...
...signal input. Blanking Use this function to turn the projector off , the projector will show or hide the warning message when the lamp replacing reminder message is turned on, it willl continue to select your preferred language. Color Space Select an appropriate color matrix type ...search for the "lost . Source Lock When source lock is turned off automatically. When source lock is displayed. Bulb 4 Lamp Hour: Display the cumulative lamp operating time. 4 Lamp Reminding: Select this feature to shutdown the system if there is available. Select "On" in the Auto Shutdown menu to...

User Manual
Page 27
... the cables and power cord are correctly and securely connected as described in "Windows 3.x). Problem: No image appears on screen. 4 Ensure that the projection lamp has been securely installed. Please refer to adjust your monitor display setting. Verify that the "Hide" feature is not enabled. Open the "My Computer"..." button. For Windows 95, 98, 2000, XP: 1. If the projector is still not projecting the image, you may need to the "Replacing the lamp" section. 4 Ensure that you experience a problem with your display resolution setting is less than or equal to 1280 x 720.
... the cables and power cord are correctly and securely connected as described in "Windows 3.x). Problem: No image appears on screen. 4 Ensure that the projection lamp has been securely installed. Please refer to adjust your monitor display setting. Verify that the "Hide" feature is not enabled. Open the "My Computer"..." button. For Windows 95, 98, 2000, XP: 1. If the projector is still not projecting the image, you may need to the "Replacing the lamp" section. 4 Ensure that you experience a problem with your display resolution setting is less than or equal to 1280 x 720.
User Manual
Page 29
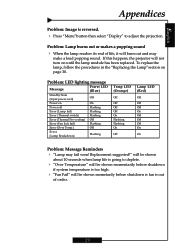
...LED lighting message Message Power LED (Blue) Standby State (Input power cord) Off Power on page 30. will be shown about 10 seconds when lamp life is going to deplete. 4 "Over Temperature" will be shown momentarily before shutdown if system temperature is too high. 4 "Fan Fail" ... is reversed. 4 Press "Menu"button then select "Display" to adjust the projection. To replace the lamp, follow the procedures in the "Replacing the Lamp"section on On Power off Flashing Error (Lamp fail) Flashing Error (Thermal switch) Flashing Error (Thermal Pre-cooling) Off Error (Fan lock fail) ...
...LED lighting message Message Power LED (Blue) Standby State (Input power cord) Off Power on page 30. will be shown about 10 seconds when lamp life is going to deplete. 4 "Over Temperature" will be shown momentarily before shutdown if system temperature is too high. 4 "Fan Fail" ... is reversed. 4 Press "Menu"button then select "Display" to adjust the projection. To replace the lamp, follow the procedures in the "Replacing the Lamp"section on On Power off Flashing Error (Lamp fail) Flashing Error (Thermal switch) Flashing Error (Thermal Pre-cooling) Off Error (Fan lock fail) ...
User Manual
Page 30
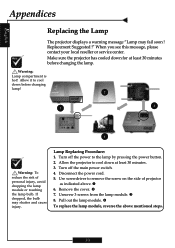
... the bulb may fail soon ! Use screwdriver to cool down before changing the lamp. Replacement Suggested !" n 6. Pull out the lamp module. Lamp Replacing Procedure: 1. Disconnect the power cord. 5. Unscrew 3 screws from the lamp module. When you see this message, please contact your local reseller or service center...projector to remove the screw on the side of personal injury, avoid dropping the lamp module or touching the lamp bulb. Turn off the power to cool down at least 30 minutes before changing lamp! 2 1 3 4 Warning: To reduce the risk of projector as indicated ...
... the bulb may fail soon ! Use screwdriver to cool down before changing the lamp. Replacement Suggested !" n 6. Pull out the lamp module. Lamp Replacing Procedure: 1. Disconnect the power cord. 5. Unscrew 3 screws from the lamp module. When you see this message, please contact your local reseller or service center...projector to remove the screw on the side of personal injury, avoid dropping the lamp module or touching the lamp bulb. Turn off the power to cool down at least 30 minutes before changing lamp! 2 1 3 4 Warning: To reduce the risk of projector as indicated ...


