
Optoma H77 Support Question
Optoma H77 Support Question
Find answers below for this question about Optoma H77.Need a Optoma H77 manual? We have 1 online manual for this item!
Question posted by johnbros01 on September 14th, 2012
How Do You Replace The Lamp On An Optoma H77?
The person who posted this question about this Optoma product did not include a detailed explanation. Please use the "Request More Information" button to the right if more details would help you to answer this question.
Current Answers
Related Optoma H77 Manual Pages
User Manual - Page 1
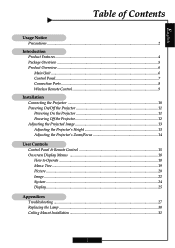
... Powering Off the Projector 12 Adjusting the Projected Image 13 Adjusting the Projector's Height 13 Adjusting the Projector's Zoom/Focus 14
User Controls Control Panel & Remote Control 15 Onscreen Display Menus 18 How to Operate ...18 Menu Tree ...19 Picture ...20 Image ...22 System ...24 Display ...25
Appendices Troubleshooting ...27 Replacing the Lamp ...30 Ceiling...
User Manual - Page 2

... back on the projector first and then select the signal sources. After installing a new lamp, reset the lamp life using the onscreen menu. Warning- Warning- When the lamp reaches the end of fire or electric shock, do not open or disassemble the product. To replace the lamp, follow the lamp replacement instructions listed under "Replacing the Lamp."
2
carefully follow the...
User Manual - Page 4

English
Introduction
Product Features
This product is a WXGA single chip 0.79-inch DLPTM projector featuring:
‹ True WXGA resolution 1280 x 720 addressable pixels ‹ Single chip DLPTM technology ‹ Power zoom and focus ‹ HDTV compatible (480i/p, 576i/p, 720p, ...
User Manual - Page 5
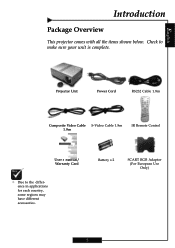
... shown below.
Battery x 2
SCART RGB Adaptor (For European Use Only)
5 Check to the difference in applications for each country, some regions may have different accessories. Projector Unit
Power Cord
RS232 Cable 1.8m
Composite Video Cable S-Video Cable 1.8m 1.8m
IR Remote Control
User's Manual/ Warranty Card
™ Due to make sure...
User Manual - Page 10
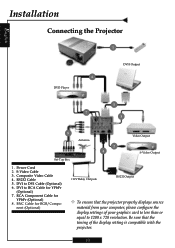
... properly displays source
material from your computer, please configure the display settings of the display setting is compatible with the projector.
10 English
Installation
Connecting the Projector
1
6 DVD Player
DVI-I Output
5 7
3
8 Antenna
2 4
Video Output S-Video Output
Set-Top Box
1. Composite Video Cable 4. BNC Cable for
YPbPr (Optional) 8. S-Video Cable 3. DVI to...
User Manual - Page 11
English
Installation
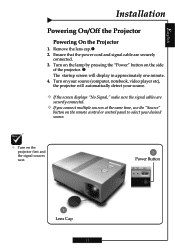
Powering On/Off the Projector
Powering On the Projector
1. Ensure that the power cord and signal cable are
securely ... side
of the projector. Remove the lens cap.n 2. Turn on your source (computer, notebook, video player etc), the projector will display in approximately one minute. 4. Turn on the lamp by pressing the "Power" button on the projector first and the ...
User Manual - Page 12
... your local reseller or service center.
12
Please contact your local reseller or service center.
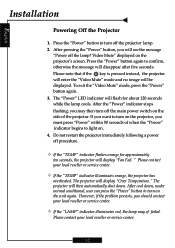
™ If the "TEMP" indicator illuminates orange, the projector has
overheated. Do not restart the projector immediately following a power off the projector lamp. 2. However, if the problem persists, you will disappear after five seconds. English
Installation
Powering Off the...
User Manual - Page 13
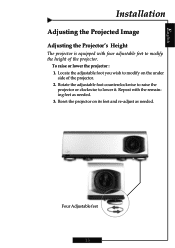
... with four adjustable feet to modify the height of the projector. 2.
Locate the adjustable foot you wish to lower it. Reset the projector on the under
side of the projector. To raise or lower the projector : 1. Rotate the adjustable foot counterclockwise to raise the
projector or clockwise to modify on its feet and re-adjust...
User Manual - Page 14
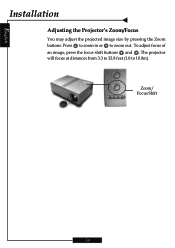
Zoom/ Focus Shift
14 Press to zoom in or to 10.0m). The projector will focus at distances from 3.3 to 32.8 feet (1.0 to zoom out. To adjust focus of an image, press the focus shift buttons and . English
Installation
Adjusting the Projector's Zoom/Focus
You may adjust the projected image size by pressing the Zoom buttons.
User Manual - Page 15
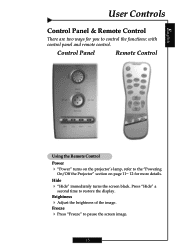
..." turns on page 11~ 12 for you to pause the screen image.
15 Press "Hide" a
second time to the "Powering
On/Off the Projector" section on the projector's lamp, refer to restore the display.
Freeze 4 Press "Freeze" to control the functions: with control panel and remote control. English
User Controls
Control Panel & Remote...
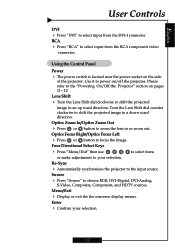
User Manual - Page 16

....
BNC
4 Press "BNC" to the input source. Re-Sync
4 Automatically synchronizes the projector to choose Analog RGB or YPbPr video
from red to select the desired aspect ratio. S-...choose S-Video source. H.Keystone & V.Keystone
4 Correct image distortion caused by rotating and tilting the
projector.
to display the zoom menu. Zoom
4 Press "Zoom" to select items
Enter
4 Confirm your ...
User Manual - Page 17
... Shift dial clockwise to the input source. Re-Sync
to select items
4 Automatically synchronizes the projector to shift the projected
image in a down ward direction. Using the Control Panel
Power
4 ...The power switch is located near the power socket on /off the projector. Optics Focus Right/Optics Focus Left
4 Press or button to your selection.
17 Menu/Exit...
User Manual - Page 18
...éma Normal Vivant
Item English
User Controls
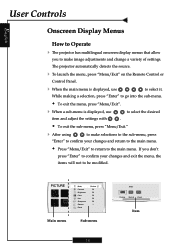
Onscreen Display Menus
How to Operate
4 The projector has multilingual onscreen display menus that allow
you don't
press "Enter" to confirm your changes... to the main menu.
Š Press "Menu/Exit" to return to the main menu.
The projector automatically detects the source.
4 To launch the menu, press "Menu/Exit" on the Remote Control or...
User Manual - Page 19

... R Contrast/G Contrast/B Contrast/R Brightness/G Brightness/ B Brightness Horizontal/Vertical/Frequency/ Phase Current/All English/French/Japanese/Spanish/ Chinese Simplified/Chinese Traditional/Italian/Portugese/ Germany/Korean Lamp Hour/Lamp Reminding/Lamp Hour Reset On/Off On/Off Blue/Black On/Off Auto/RGB/YUV
Front Desktop/Front Ceiling/Rear Desktop/Rear Ceiling Native/Window/16...
User Manual - Page 24
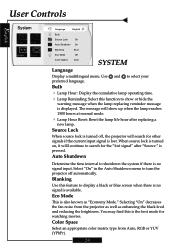
... the best mode for watching movies. Use and to shutdown the system if there is pressed. Blanking
Use this function to turn the projector off , the projector will show or hide the
warning message when the lamp replacing reminder message is turned off automatically. Color Space
Select an appropriate color matrix type from the...
User Manual - Page 25
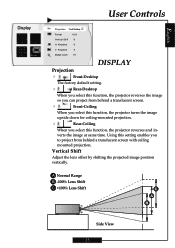
...The factory default setting.
4
Rear-Desktop
When you select this function, the projector reverses the image
so you can project from behind a translucent screen.
4
Front-Ceiling
When you select this ...function, the projector turns the image
upside down for ceiling-mounted projection.
4
Rear-Ceiling
When you select...
User Manual - Page 26

... onto the screen without
changing the projection distance.
Keystone
Correct image distortion caused by rotating the projector horizontally. Original Input
The letterbox
4Window: When a 4:3 image is bigger than a 16:9 ...4Native: Original image size. 416:9: The standard widescreen display format of the projector. 4Letterbox: Letterbox mode zooms a letterboxed image intended
for 4:3 display to ...
User Manual - Page 27

..." section.
4 Ensure that connector pins are not bent or broken. 4 Make sure that the projection lamp has been securely installed.
Next, open the "Control Panel"
folder, and double click the "Display" ...Appendices
Troubleshooting
If you experience a problem with your projector, please refer to the "Replacing the lamp" section.
4 Ensure that you may need to the following information.
User Manual - Page 29
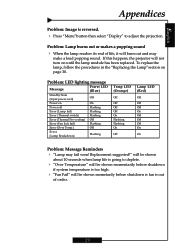
..., the projector will be shown mometarily before shutdown is fan is reversed. 4 Press "Menu"button then select "Display" to deplete.
4 "Over Temperature" will be shown momentarily before shutdown
if system temperature is too high.
4 "Fan Fail" will not turn on page 30.
To replace the lamp, follow the procedures in the "Replacing the Lamp"section...
User Manual - Page 30
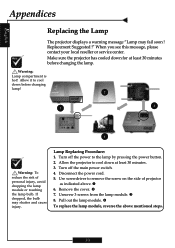
... screw on the side of personal injury, avoid dropping the lamp module or touching the lamp bulb. Warning: Lamp compartment is hot! Remove the cover. Unscrew 3 screws from the lamp module. q
To replace the lamp module, reverse the above . English
Appendices
Replacing the Lamp
The projector displays a warning message "Lamp may shatter and cause injury. n 6. Turn off the main power...
Similar Questions

How To Replace Lamp In Optoma Movietime Dv10 Projector
(Posted by igor62rAVINAS 10 years ago)


Light Flashing Menu
The projector is flashing the green pwr lite 5 times and the amber lamp lite once. what does this me...
The projector is flashing the green pwr lite 5 times and the amber lamp lite once. what does this me...
(Posted by Anonymous-121456 10 years ago)
Replacement Lamp Number For Optoma Pt100
what is the number of the lamp replacment
what is the number of the lamp replacment
(Posted by Thginkris 11 years ago)

The Projector Shuts Itself Off After Running For About 15 Minutes.
Reasons ?
(Posted by nnemani42 11 years ago)