

User Manual
Page 1
... ...6 Panel Control 7 Connection Ports 8 Full Function Wireless Remote Controller 9 Installation Connecting the Projector 10 Powering On/Off the Projector 11 Powering On the Projector 11 Powering Off the Projector 12 Adjusting the Projected Image 13 Adjusting the Projector Height 13 Adjusting the Projector Zoom/Focus 14 Adjusting Projection Image Size 14 User Controls Panel Control & Remote Control 15 On-Screen Display Menus 18 How to Operate 18 Menu Tree ...19 Picture ...20 Image ...22 System ...24 Display ...25 Appendices Troubleshooting 27 Changing the Lamp 30 Specifications...
... ...6 Panel Control 7 Connection Ports 8 Full Function Wireless Remote Controller 9 Installation Connecting the Projector 10 Powering On/Off the Projector 11 Powering On the Projector 11 Powering Off the Projector 12 Adjusting the Projected Image 13 Adjusting the Projector Height 13 Adjusting the Projector Zoom/Focus 14 Adjusting Projection Image Size 14 User Controls Panel Control & Remote Control 15 On-Screen Display Menus 18 How to Operate 18 Menu Tree ...19 Picture ...20 Image ...22 System ...24 Display ...25 Appendices Troubleshooting 27 Changing the Lamp 30 Specifications...
User Manual
Page 2
... into the lens. Before switching off the product, please keep the cooling fan running for a few minutes. Turn on until the lamp module has been replaced. Warning- To replace the lamp, follow all warnings, precautions and maintenance as this happens, the projector will detect the life of its life, it shows warning messages. The bright light may hurt your unit. Warning- After changing a new lamp, please reset the lamp life from OSD menu. English Usage...
... into the lens. Before switching off the product, please keep the cooling fan running for a few minutes. Turn on until the lamp module has been replaced. Warning- To replace the lamp, follow all warnings, precautions and maintenance as this happens, the projector will detect the life of its life, it shows warning messages. The bright light may hurt your unit. Warning- After changing a new lamp, please reset the lamp life from OSD menu. English Usage...
User Manual
Page 4
... product is an XGA single chip 0.7” DLPTM projector. The outstanding features of it are listed as follows: u True XGA, 1024 x 768 addressable pixels u 6.4 lbs (2.9 kgs) compact design u Single chip DLPTM technology u PureProgressiveTM processing technology for digital and analog video connectivity u Full function wireless remote controller u User friendly multilingual on-screen display menu u Advanced electronic keystone correction u User friendly control panel u SXGA compression and VGA, SVGA re-sizing u 200 Watts replaceable UHP u Mac compatible 4
... product is an XGA single chip 0.7” DLPTM projector. The outstanding features of it are listed as follows: u True XGA, 1024 x 768 addressable pixels u 6.4 lbs (2.9 kgs) compact design u Single chip DLPTM technology u PureProgressiveTM processing technology for digital and analog video connectivity u Full function wireless remote controller u User friendly multilingual on-screen display menu u Advanced electronic keystone correction u User friendly control panel u SXGA compression and VGA, SVGA re-sizing u 200 Watts replaceable UHP u Mac compatible 4
User Manual
Page 11
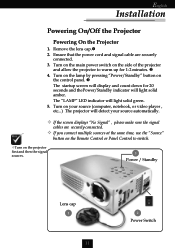
... same time, use the “Source” button on your source (computer, notebook, or video player , etc...) The projector will light solid amber. Turn on the main power switch on the projector first and then the signal sources. 3 Power / Standby Lens cap 1 11 2 Power Switch Ensure that the power cord and signal cable are securely connected. The “LAMP” LED indicator will light solid green. 5. v If the screen displays “No Signal” , please make sure the signal cables are securely connected. 3. Remove the lens cap...
... same time, use the “Source” button on your source (computer, notebook, or video player , etc...) The projector will light solid amber. Turn on the main power switch on the projector first and then the signal sources. 3 Power / Standby Lens cap 1 11 2 Power Switch Ensure that the power cord and signal cable are securely connected. The “LAMP” LED indicator will light solid green. 5. v If the screen displays “No Signal” , please make sure the signal cables are securely connected. 3. Remove the lens cap...
User Manual
Page 12
... service center. If the problem persists, you must press the “Power/Standby”button within 90 seconds of the start of the projector. Press the “Power/Standby” button again to turn off the projector lamp. 2. v When the “LAMP” indicator flashes green for about 30 seconds. English Installation Powering Off the Projector 1. v When the “TEMP” indicator lights solid orange, it indicates the projector has been overheated. If you will see a message “Fan...
... service center. If the problem persists, you must press the “Power/Standby”button within 90 seconds of the start of the projector. Press the “Power/Standby” button again to turn off the projector lamp. 2. v When the “LAMP” indicator flashes green for about 30 seconds. English Installation Powering Off the Projector 1. v When the “TEMP” indicator lights solid orange, it indicates the projector has been overheated. If you will see a message “Fan...
User Manual
Page 14
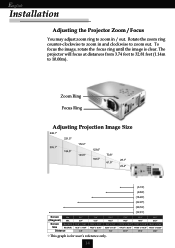
Zoom Ring Focus Ring Adjusting Projection Image Size Screen Max. (Diagonal) Min. The projector will focus at distances from 3.74 feet to 32.81 feet (1.14m to zoom in and clockwise to zoom out. Screen Max.(WxH) Size Min.(WxH) Distance 28.1" 23.4" 22.48" x 16.86" 18.72" x 14.04" ... 22.97' 29.53' 32.81' vThis graph is clear. English Installation Adjusting the Projector Zoom / Focus You may adjust zoom ring to 10.00m). Rotate the zoom ring counter-clockwise to zoom in / out. To focus the image, rotate the focus ring until the image is for user’s reference only. 14
Zoom Ring Focus Ring Adjusting Projection Image Size Screen Max. (Diagonal) Min. The projector will focus at distances from 3.74 feet to 32.81 feet (1.14m to zoom in and clockwise to zoom out. Screen Max.(WxH) Size Min.(WxH) Distance 28.1" 23.4" 22.48" x 16.86" 18.72" x 14.04" ... 22.97' 29.53' 32.81' vThis graph is clear. English Installation Adjusting the Projector Zoom / Focus You may adjust zoom ring to 10.00m). Rotate the zoom ring counter-clockwise to zoom in / out. To focus the image, rotate the focus ring until the image is for user’s reference only. 14
User Manual
Page 16
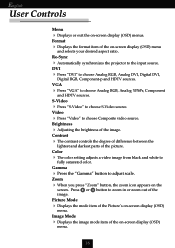
... item of the Picture’s on -screen display (OSD) menu and selects your desired aspect ratio. Re-Sync 4 Automatically synchronizes the projector to choose S-Video source. S-Video 4 Press “S-Video” to the input source. Video 4 Press “Video” to fully saturated color. Color 4 The color setting adjusts a video image from black and white to choose Composite video source. Press or button to choose Analog RGB, Analog YPbPr, Component and HDTV sources. Brightness 4 Adjusting the brightness...
... item of the Picture’s on -screen display (OSD) menu and selects your desired aspect ratio. Re-Sync 4 Automatically synchronizes the projector to choose S-Video source. S-Video 4 Press “S-Video” to the input source. Video 4 Press “Video” to fully saturated color. Color 4 The color setting adjusts a video image from black and white to choose Composite video source. Press or button to choose Analog RGB, Analog YPbPr, Component and HDTV sources. Brightness 4 Adjusting the brightness...
User Manual
Page 17
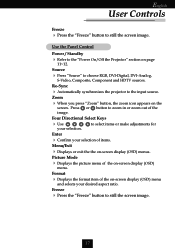
.... Use the Panel Control Power / Standby 4 Refer to choose RGB, DVI-Digital, DVI-Analog, S-Video, Composite, Component and HDTV sources. Zoom 4 When you press “Zoom” button, the zoom icon appears on -screen display (OSD) menu. Freeze 4 Press the “Freeze” button to the input source. Picture Mode 4 Displays the picture menu of the on the screen. Re-Sync 4 Automatically synchronizes the projector to still the screen image. 17 Press or button to still the screen image. English User Controls Freeze...
.... Use the Panel Control Power / Standby 4 Refer to choose RGB, DVI-Digital, DVI-Analog, S-Video, Composite, Component and HDTV sources. Zoom 4 When you press “Zoom” button, the zoom icon appears on -screen display (OSD) menu. Freeze 4 Press the “Freeze” button to the input source. Picture Mode 4 Displays the picture menu of the on the screen. Re-Sync 4 Automatically synchronizes the projector to still the screen image. 17 Press or button to still the screen image. English User Controls Freeze...
User Manual
Page 18
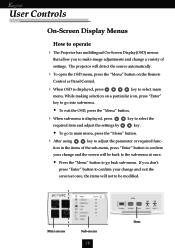
..., the items will detect the source automatically. 4 To open the OSD menu, press the “Menu” button on a particular icon, press “Enter” key to go to main menu, press the “Menu” button. 4 After using key to adjust the parameter or required func- English User Controls On-Screen Display Menus How to operate 4 The Projector has multilingual On-Screen Display(OSD) menus that allow...
..., the items will detect the source automatically. 4 To open the OSD menu, press the “Menu” button on a particular icon, press “Enter” key to go to main menu, press the “Menu” button. 4 After using key to adjust the parameter or required func- English User Controls On-Screen Display Menus How to operate 4 The Projector has multilingual On-Screen Display(OSD) menus that allow...
User Manual
Page 19
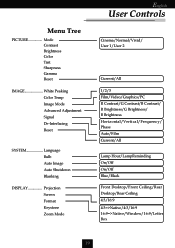
Menu Tree PICTURE Mode Contrast Brightness Color Tint Sharpness Gamma Reset IMAGE White Peaking Color Temp Image Mode Advanced Adjustment Signal De-Interlacing Reset SYSTEM Language Bulb Auto Image Auto Shutdown Blanking DISPLAY Projection Screen Format Keystone Zoom Mode English User Controls Cinema/Normal/Vivid/ User 1/User 2 Current/All 1/2/3 Film/Video/Graphics/PC R Contrast/G Contrast/B Contrast/ R Brightness/G Brightness/ B Brightness Horizontal/Vertical/Frequency/ Phase Auto/Film Current/All Lamp Hour/LampReminding On/Off On/Off Blue/Black Front Desktop/Front Ceiling/Rear Desktop/...
Menu Tree PICTURE Mode Contrast Brightness Color Tint Sharpness Gamma Reset IMAGE White Peaking Color Temp Image Mode Advanced Adjustment Signal De-Interlacing Reset SYSTEM Language Bulb Auto Image Auto Shutdown Blanking DISPLAY Projection Screen Format Keystone Zoom Mode English User Controls Cinema/Normal/Vivid/ User 1/User 2 Current/All 1/2/3 Film/Video/Graphics/PC R Contrast/G Contrast/B Contrast/ R Brightness/G Brightness/ B Brightness Horizontal/Vertical/Frequency/ Phase Auto/Film Current/All Lamp Hour/LampReminding On/Off On/Off Blue/Black Front Desktop/Front Ceiling/Rear Desktop/...
User Manual
Page 20
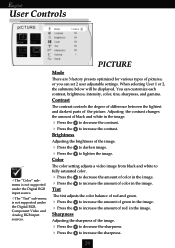
.... PICTURE Mode There are 3 factory presets optimized for various types of green in the image. Contrast The contrast controls the degree of difference between the lightest and darkest parts of color in the image. vThe “Tint” sub-menu is not supported under the Digital RGB, Component Video and Analog RGB input sources. When selecting User 1 or 2, the submenu below will be displayed. The tint adjusts the color...
.... PICTURE Mode There are 3 factory presets optimized for various types of green in the image. Contrast The contrast controls the degree of difference between the lightest and darkest parts of color in the image. vThe “Tint” sub-menu is not supported under the Digital RGB, Component Video and Analog RGB input sources. When selecting User 1 or 2, the submenu below will be displayed. The tint adjusts the color...
User Manual
Page 22
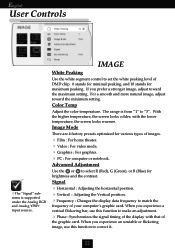
... the signal timing of the display with the lower temperature, the screen looks warmer. For a smooth and more natural image, adjust toward the maximum setting. Advanced Adjustment Use the or to select R (Red), G (Green), or B (Blue) for maximum peaking. IMAGE White Peaking Use the white segment control to set the white peaking level of the graphic card. The range is supported under the Analog RGB and Analog YPbPr input sources. Image Mode There are 4 factory presets...
... the signal timing of the display with the lower temperature, the screen looks warmer. For a smooth and more natural image, adjust toward the maximum setting. Advanced Adjustment Use the or to select R (Red), G (Green), or B (Blue) for maximum peaking. IMAGE White Peaking Use the white segment control to set the white peaking level of the graphic card. The range is supported under the Analog RGB and Analog YPbPr input sources. Image Mode There are 4 factory presets...

User Manual
Page 23
Reset Changes the adjustments and settings to the factory default value. 4Current : Reset the adjustments for the current settings to the factory default value. 4All : Reset the adjustments and setting for all menu to the factory default value. 23 English User Controls vThe “De-interlacing” sub-menu is supported under the S-video, Composite video and Component video input sources. IMAGE De-Interlacing Reduces interlacing the image from video source. 4 Film : For home theater. 4 Auto : automation.
Reset Changes the adjustments and settings to the factory default value. 4Current : Reset the adjustments for the current settings to the factory default value. 4All : Reset the adjustments and setting for all menu to the factory default value. 23 English User Controls vThe “De-interlacing” sub-menu is supported under the S-video, Composite video and Component video input sources. IMAGE De-Interlacing Reduces interlacing the image from video source. 4 Film : For home theater. 4 Auto : automation.
User Manual
Page 24
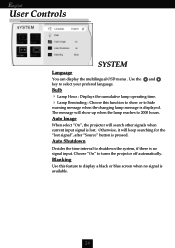
Use the and key to hide warning message when the changing lamp message is displayed. Auto Shutdown Decides the time interval to 2000 hours. Auto Image When select “On”, the projector will show or to select your prefered language. The message will search other signals when current input signal is lost signal”, after “Source” button is available. 24 Bulb 4 Lamp Hour : Displays the cumulative lamp operating time. 4 Lamp Reminding : Choose this feature to turns the...
Use the and key to hide warning message when the changing lamp message is displayed. Auto Shutdown Decides the time interval to 2000 hours. Auto Image When select “On”, the projector will show or to select your prefered language. The message will search other signals when current input signal is lost signal”, after “Source” button is available. 24 Bulb 4 Lamp Hour : Displays the cumulative lamp operating time. 4 Lamp Reminding : Choose this feature to turns the...
User Manual
Page 25
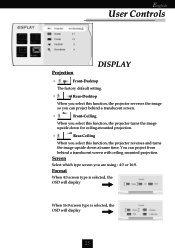
You can project behind a translucent screen with ceiling mounted projection. Screen Select which type screen you select this function, the projector reverses and turns the image upside down at same time. English User Controls Projection DISPLAY 4 Front-Desktop The factory default setting. 4 Rear-Desktop When you select this function, the projector reverses the image so you can project from behind a translucent screen. 4 Front-Ceiling When you select this function, the projector turns the image upside down for ceiling-mounted projection. 4 Rear-Ceiling When...
You can project behind a translucent screen with ceiling mounted projection. Screen Select which type screen you select this function, the projector reverses and turns the image upside down at same time. English User Controls Projection DISPLAY 4 Front-Desktop The factory default setting. 4 Rear-Desktop When you select this function, the projector reverses the image so you can project from behind a translucent screen. 4 Front-Ceiling When you select this function, the projector turns the image upside down for ceiling-mounted projection. 4 Rear-Ceiling When...
User Manual
Page 27
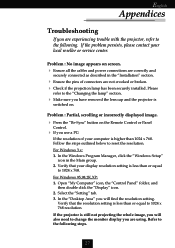
...,XP: 1. Problem : Partial, scrolling or incorrectly displayed image. 4 Press the “Re-Sync” button on the Remote Control or Panel Control. 4 If you use a PC: If the resolution of connectors are using. In the Windows Program Manager, click the “Windows Setup” icon in the “Installation” section. 4 Ensure the pins of your computer is less than or equal to reset the resolution. Verify that...
...,XP: 1. Problem : Partial, scrolling or incorrectly displayed image. 4 Press the “Re-Sync” button on the Remote Control or Panel Control. 4 If you use a PC: If the resolution of connectors are using. In the Windows Program Manager, click the “Windows Setup” icon in the “Installation” section. 4 Ensure the pins of your computer is less than or equal to reset the resolution. Verify that...
User Manual
Page 28
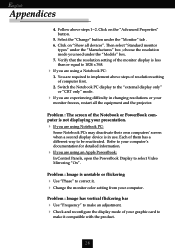
... an adjustment. 4 Check and reconfigure the display mode of the Notebook or PowerBook computer is not displaying your presentation. 4 If you are using Notebook PC: Some Notebook PCs may deactivate their own computers’ screen when a second display device is in changing resolutions or your computer’s documentation for detailed information. 4 If you are using an Apple PowerBook: In Control Panels, open the PowerBook Display...
... an adjustment. 4 Check and reconfigure the display mode of the Notebook or PowerBook computer is not displaying your presentation. 4 If you are using Notebook PC: Some Notebook PCs may deactivate their own computers’ screen when a second display device is in changing resolutions or your computer’s documentation for detailed information. 4 If you are using an Apple PowerBook: In Control Panels, open the PowerBook Display...
User Manual
Page 29
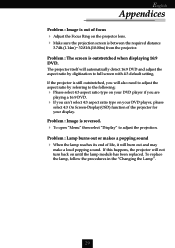
... a popping sound 4 When the lamp reaches its end of life, it will not turn back on until the lamp module has been replaced. If the projector is reversed. 4 To open “Menu” then select “Display” to adjust the projection. Problem : Image is still outstretched, you will automatically detect 16:9 DVD and adjust the aspect ratio by referring to full screen with 4:3 default setting. If this...
... a popping sound 4 When the lamp reaches its end of life, it will not turn back on until the lamp module has been replaced. If the projector is reversed. 4 To open “Menu” then select “Display” to adjust the projection. Problem : Image is still outstretched, you will automatically detect 16:9 DVD and adjust the aspect ratio by referring to full screen with 4:3 default setting. If this...

User Manual
Page 30
... is hot! Lamp Changing Procedure: 1. Remove the cover. 7. Warning : Lamp compartment is dropped. Turn off the power to remove the screw from the lamp module.Ž 8. Use screwdriver to the projector by pressing the Power/ Standby button. 2. Disconnect the power cord. 5. Pull out the lamp module. To replace the lamp module, reverse the previous steps. 30 Remove the 3 screws from the cover.Œ 6. It will detect the lamp life itself. Allow the projector to cool...
... is hot! Lamp Changing Procedure: 1. Remove the cover. 7. Warning : Lamp compartment is dropped. Turn off the power to remove the screw from the lamp module.Ž 8. Use screwdriver to the projector by pressing the Power/ Standby button. 2. Disconnect the power cord. 5. Pull out the lamp module. To replace the lamp module, reverse the previous steps. 30 Remove the 3 screws from the cover.Œ 6. It will detect the lamp life itself. Allow the projector to cool...

User Manual
Page 31
...) - Input Frequency 50-60Hz - 320 watts at normal operation - NTSC/NTSC 4.43/PAL/PAL-M/PAL-N/SECAM and HDTV compatible - 15kHz~100kHz horizontal scan - 43Hz~120Hz vertical refresh - Operating Temperature: 32oF~104oF (0oC~ 40oC) Humidity: 80% maximum - Storage Temperature: 14oF~140oF (-10oC~60oC) Humidity: 80% maximum - Frequency V. English Appendices Specifications Light Valve Lamp Number of Pixels Displayable Color Projection Lens Projection Screen Size Projection Distance Video Compatibility H. S-Video Terminal - Power: AC power input socket...
...) - Input Frequency 50-60Hz - 320 watts at normal operation - NTSC/NTSC 4.43/PAL/PAL-M/PAL-N/SECAM and HDTV compatible - 15kHz~100kHz horizontal scan - 43Hz~120Hz vertical refresh - Operating Temperature: 32oF~104oF (0oC~ 40oC) Humidity: 80% maximum - Storage Temperature: 14oF~140oF (-10oC~60oC) Humidity: 80% maximum - Frequency V. English Appendices Specifications Light Valve Lamp Number of Pixels Displayable Color Projection Lens Projection Screen Size Projection Distance Video Compatibility H. S-Video Terminal - Power: AC power input socket...


