Optoma H56 Support and Manuals
Get Help and Manuals for this Optoma item

Most Recent Optoma H56 Questions

Popular Optoma H56 Manual Pages
User Manual - Page 1

... 13 Adjusting the Projector Height 13 Adjusting the Projector Zoom/Focus 14 Adjusting Projection Image Size 14
User Controls Panel Control & Remote Control 15 On-Screen Display Menus 18 How to Operate 18 Menu Tree ...19 Picture ...20 Image ...22 System ...24 Display ...25
Appendices Troubleshooting 27 Changing the Lamp 30 Specifications ...31 Compatibility Modes...
User Manual - Page 2
...new lamp, please reset the lamp life from OSD menu. To replace the lamp, follow all warnings, precautions and maintenance as this user’s guide to...lamp reaches the end of the lamp itself. Warning- Please do not expose this happens, the projector will not turn back on the projector first and then the signal sources. Warning- Warning- Turn on until the lamp module has been replaced...
User Manual - Page 5

... each country, some regions may have different addessories. English
Introduction
Package Overview
This projector comes with lens cap
Power Cord
DVI to RCA Cable for HDTV/Component
S-Video Cable
D-15 to RCA Adapter for YPbPr
Composite Video Cable
User’s Manual
vDue to make sure your dealer immediately if anything is complete.
User Manual - Page 11
..., notebook, or video player , etc...) The projector will light solid amber. English
Installation
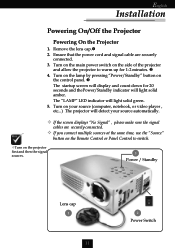
Powering On/Off the Projector
Powering On the Projector
1. Turn on the projector first and then the signal sources.
3
Power ...Turn on the lamp by pressing “Power/Standby” button on the control panel. Ž
The startup screen will light solid green.
5. The “LAMP” LED indicator...
User Manual - Page 12
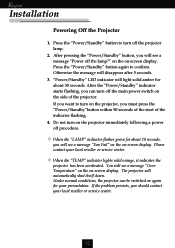
... or service center. If you want to confirm. Do not turn off the lamp?” on the on the projector immediately following a power off the projector lamp.
2.
If the problem persists, you will see a message “Power off the main power switch on again for about 30 seconds. English
Installation
Powering Off the Projector
1. v When the “LAMP”...
User Manual - Page 16
... between the
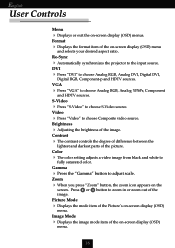
lightest and darkest parts of the Picture’s on -screen display (OSD) menu
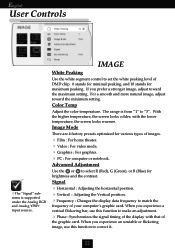
and selects your desired aspect ratio. Color
4 The color setting adjusts a video image from .... Press or button to adjust scale. Re-Sync
4 Automatically synchronizes the projector to choose Analog RGB, Analog DVI, Digital DVI,
Digital RGB, Component-p and HDTV sources. Gamma
4 Press the “Gamma&#...
User Manual - Page 18
tion in the items of
settings.
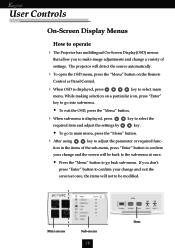
w To go back sub-menu. The projector will not to be modified.
If you to make image adjustments and change a variety ...required func- Main menu
Sub-menu
18
Item
English
User Controls
On-Screen Display Menus
How to operate
4 The Projector has multilingual On-Screen Display(OSD) menus
that allow you don’t
press “Enter” button to ...
User Manual - Page 20
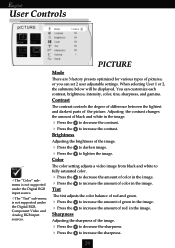
...set 2 user adjustable settings. Adjusting the contrast changes the amount of black and white in the image. to decrease the contrast. to increase the contrast. English
User Controls
vThe “Color” submenu is not supported under the Digital...to decrease the sharpness.
The color setting adjusts a video image from black and...is not supported under the Digital RGB, Component Video ...
User Manual - Page 22
...the or to correct it.
22 For a smooth and more natural image, adjust toward the maximum setting. With the higher temperature, the screen looks colder; Image Mode
There are 4 factory presets optimized... bar, use this function to set the white peaking level of DMD chip. 0 stands for minimal peaking, and 10 stands for maximum peaking. The range is supported under the Analog RGB and Analog...
User Manual - Page 23

... factory default value.
4Current : Reset the adjustments for the current settings to the
factory default value.
4All : Reset the adjustments and setting for all menu to the factory
default value.
23
English
User Controls
vThe “De-interlacing” sub-menu is supported under the S-video, Composite video and Component video input sources.
User Manual - Page 25
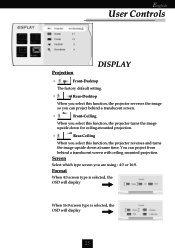
...setting.
4
Rear-Desktop
When you select this function, the projector reverses the image so you can project from behind a translucent screen.
4
Front-Ceiling
When you select this function, the projector... which type screen you select this function, the projector reverses and turns the image upside down for ceiling-mounted projection.
4
Rear-Ceiling
When you are using : 4:3 or 16:9. ...
User Manual - Page 27
... use a PC:
If the resolution of connectors are experiencing trouble with the projector, refer to 1024 x 768 resolution. English
Appendices
Troubleshooting
If you are not crooked or broken. 4 Check if the projection lamp has been securely installed. If the problem persists, please contact your display resolution setting is less than or equal
to the following .
Verify that...
User Manual - Page 28
...setting of your presentation. 4 If you need under the “Models” box. 7. Refer to select Video Mirroring “On”. Select the “Change” button under the “Manufactures” box ;
Then select “Standard monitor
types” under the “Monitor” tab . 6. Problem... projector. Problem : Image is in changing resolutions or your computer. Problem ...
User Manual - Page 29
... 4:3 default setting. If this happens, the projector will also need to adjust the aspect ratio by digitization to adjust the projection. Problem : The screen is still outstretched, you will not turn back on the projector lens. 4 Make sure the projection screen is between the required distance
3.74ft.(1.14m)~ 32.81ft.(10.00m) from the projector. Problem : Lamp burns...
User Manual - Page 30

... see this message, please contact your local reseller or service center to change the lamp as soon as possible.
Make sure the projector has been cooled down
before changing the lamp. Turn off the main power switch. 4. Replacement Suggested !” When you
a warning message “Lamp may shatter and cause injury if it to remove the...
Optoma H56 Reviews
We have not received any reviews for Optoma yet.